.png "Powered by vBulletin")
Originally posted by philosopheriam
View Post
-
Im the same way hahahaI build Pipers
-
.Originally posted by growler View Post
.
.
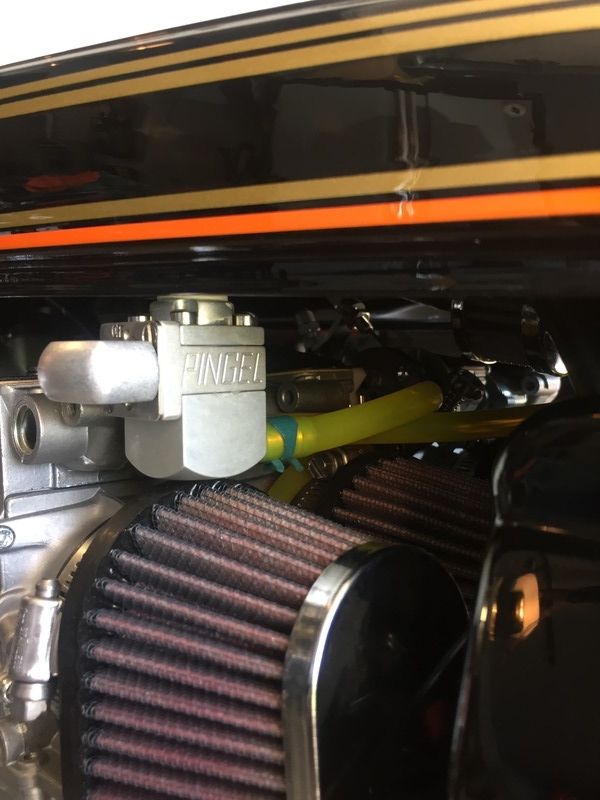
I had the silver piece custom machined, whereas the other pieces were purchased from Dime City Cycles. I found it necessary to spread the headlight brackets apart in order to make sufficient clearance between the brackets and the tank at full steering lock. Also, this created a solution to another problem - I was now able to use the brackets to hold down the lower decorative triple cover. I simply created some spacers out of black ABS pipe and sandwiched the spacers between the brackets and the triple cover.
 Cogito ergo sum - "I think, therefore I am"
René DescartesComment
-
Personally speaking wrenching = means to an end, though I enjoy the process of more then I once did.Originally posted by philosopheriam View Postsigpic
When consulting the magic 8 ball for advice, one must first ask it "will your answers be accurate?"
Glen
-85 1150 es - Plus size supermodel.
-Rusty old scooter.
Other things I like to photograph.....instagram.com/gs_junkie
https://www.instagram.com/glen_brenner/
https://www.flickr.com/photos/152267...7713345317771/Comment
-
I have a couple of questions going back a ways from where you are now....Originally posted by philosopheriam View Post
How did you get down in the fins on top of the head. I've soda blasted and scrubbed, but I still have black spots from the vibration dampers, etc.
Also, how did you cut those circles for masking the bolt holes and spark plug holes, etc. How did you remove the tiny spots of masking tape without messing up the paint around it?Comment
-
With respect to the stains on the head, as long as you have done a thorough job of soda blasting, degreasing, and washing the head, don't worry about it. The aluminum is slightly porus, making some stains very difficult to remove. If you are genuinely worried, wash the head, and then put it in an oven around 200F for an hour - this will help to bring out any oil that is just below the surface. After that, let it cool, soda blast it again, and then put it in the dishwasher on the hi-temp cycle. Squeaky clean head :-) Now, this is assuming your head is totally disassembled - if not, then go back to what I originally said, which is don't worry about it - soda blast, wash, and then wipe with acetone.Originally posted by Sam 78 GS750 View Post
The masking tape circles are pre-punched masking discs from McMaster Carr in various sizes: https://www.mcmaster.com/#masking-tape-discs/=17air1i
They can withstand temperatures up to 325F, so, once all of my parts were primed and painted, I put the parts in the oven to cure with the masking discs still applied - once the parts had cured and cooled down, I then removed all of the discs with a tweezers and x-acto knife. No damage to the paint!Cogito ergo sum - "I think, therefore I am"
René DescartesComment
-
Ladies, Gentlemen, Boys and Girls!
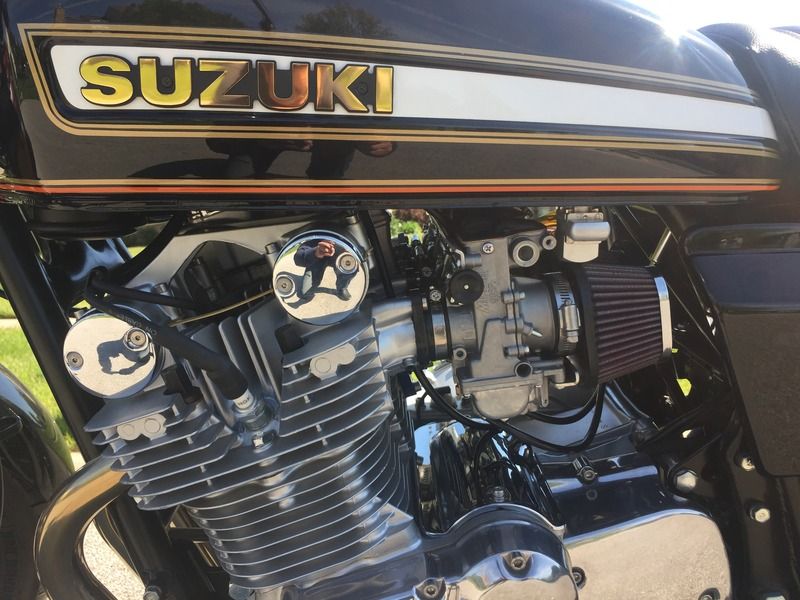
Over the past few weeks, I've had a lot going on at work. Lately, my company has been sending me on a lot of field welding jobs, so I've been going to my union's training center on Saturdays to get some long overdue practice (SMAW, overhead and verticals, challenging if you don't do them all the time). That, combined with home repairs/cleaning, and I haven't had a lot of time to work on the bike and it was driving me nuts. So, yesterday, I made some desperately needed progress and completed the following:
1. Connected the fuel lines to the new petcock and filled the tank with gas, checked for leaks - none found, yay! I love the guzzler petcock - small, clean, and the knob operation works great.
2. Glued on the emblems (didn't use the decals, couldn't get the air bubbles out of them and they looked like crap)
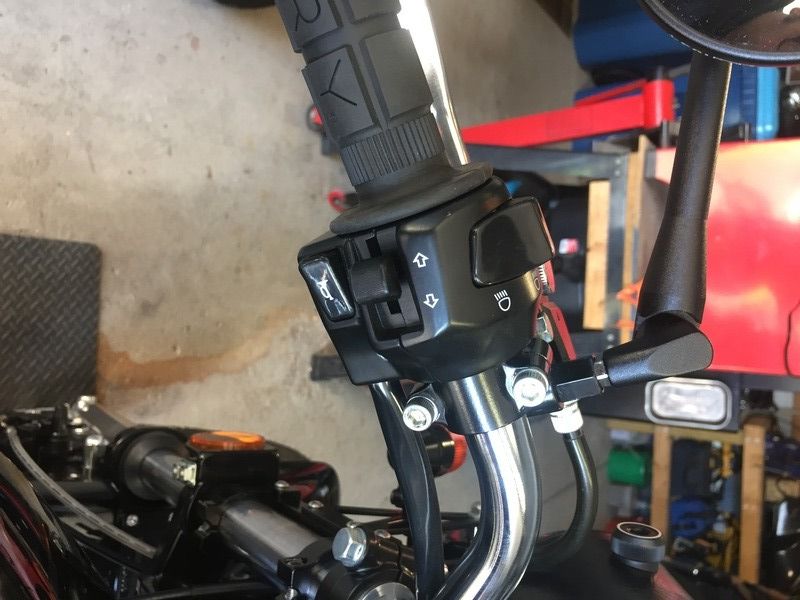
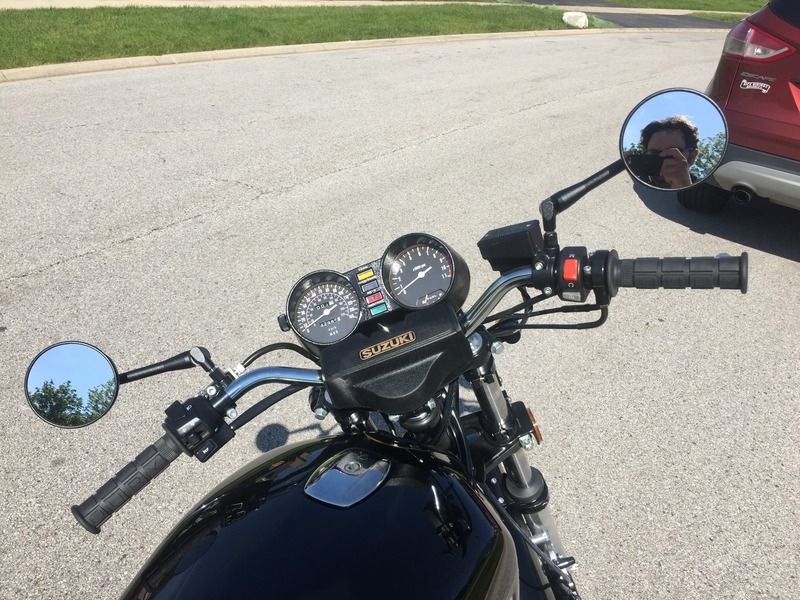
3. Positioned the controls where I wanted them and drilled the indexing holes in the handlebar - I have a jig for this, which worked beautifully
4. Went over the suspension bolts, etc, for tightness
5. Aired-up the tires
6. Started the engine (hasn't run since last summer) - turned on thefuel, let the carb bowls fill, hit the start button and she fired up first crank over (OMG OMG happy happy)
7. Lubed the chain
In essence, the day has arrived - at 9:15AM CST, I took Francine out for the first time on a quick ride around my neighborhood. I had to give myself a pep talk because I was so incredibly nervous (hence taking the bike out early on a Sunday, as my neighborhood is very quiet at this time). This is the first time that I have EVER rode the bike since I bought her in October of 2013. Words simply cannot describe my elation right now - aside from the expected issues associated with the carbs not being dialed-in, the bike performed beautifully. No leaks, no strange noises, no pieces falling off, nada! It is now safe to say that my restoration is 99.9% done!!!
Initial impressions:
1. I was concerned about the Gast fibers and the x3 stock/x3 EBC clutch springs - once I was out on the road, the clutch felt great (no grabbiness, etc) and the trans shifted like butter. All gears are OK with no weird noises.
2. Engine and exhaust sound like pure sex
3. Brakes need to bed themselves in but work well
4. The suspension is firm but comfortable - the seat is friendly to my butt
5. Even though the carbs aren't tuned, the bike pulls like an ffing mule in 1st gear
Things I will need to address:
1. Carb tuning - accelerator pumps are disabled and I have the pilot screws only 2-turns out. At very light throttle, I can hear the carbs sneezing, indicating a lean condition. I'll set the pilot screws at 2.5 to three turns out and see what happens. Once I get this sorted, I will play with the accelerator pump to fix the dead spot when mashing the throttle.
2. Fuel tank and carb bowl vent hoses - I wasn't thinking when I used black PVC hose, which isn't working well with the amount of heat generated near the carbs (getting a bit soft). I ordered some Tygon tubing from McMaster Carr and will install it next week.
3. Slight weep from one of my carbs bowl vent hoses - I may have got some crud in one of the needle/seat assemblies. I'm not worried about it right now, but if it persists, I will check the offending carb's float height (again) and possible replace the needle and clean the seat.
4. Going to install some Motion Pro quick disconnects in the fuel lines to make removing the tank easier.
5. Valve clearance check/adjustment (duh)
Overall, I want to once again thank everyone who provided insight, help, and support during this build. Without the GSresources, this build would not have been possible. As I venture forth in the carb tuning process, I welcome any suggestions or input that you may have. I am in a state of euphoria right now
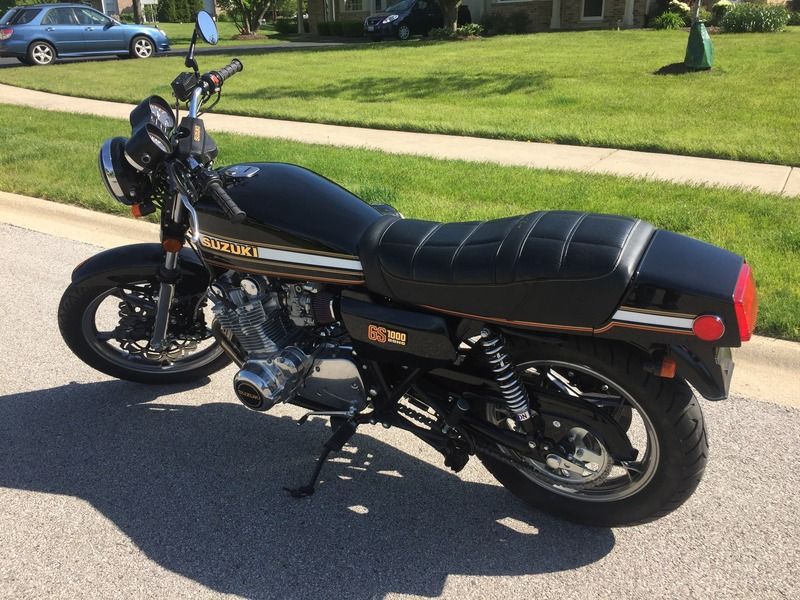
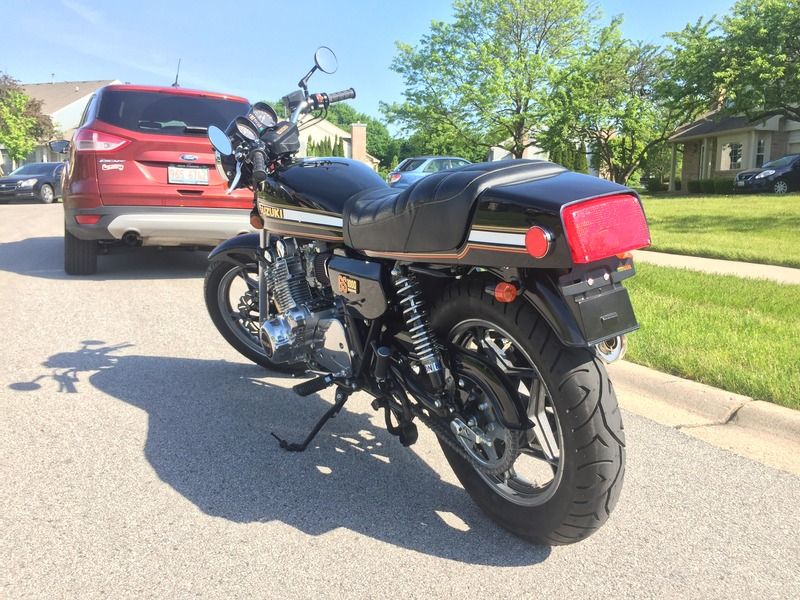
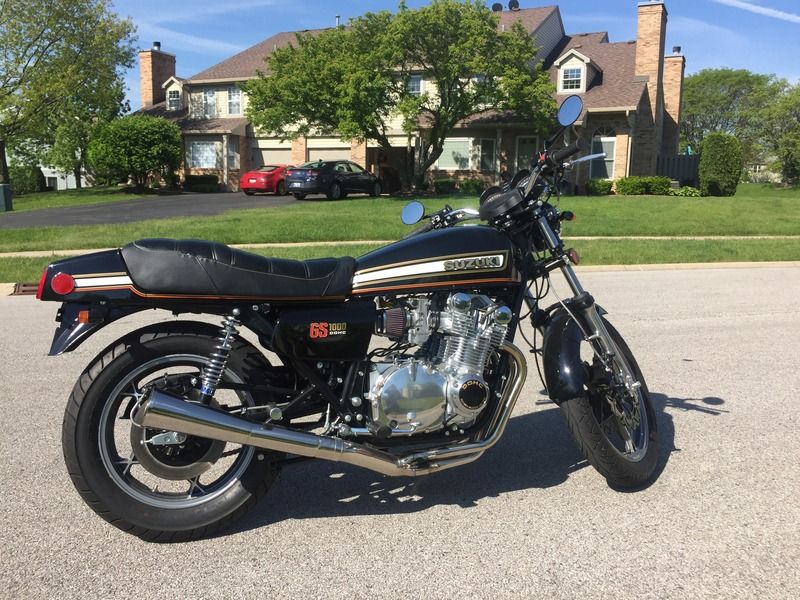
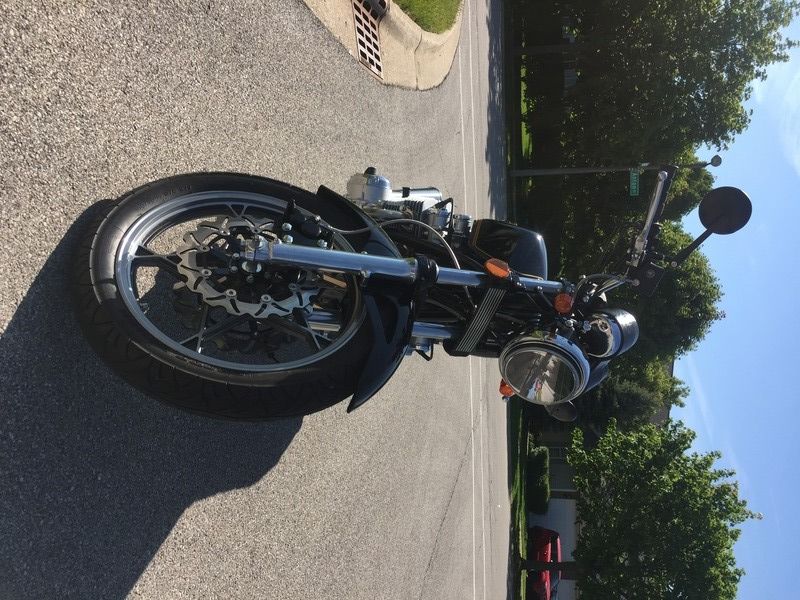
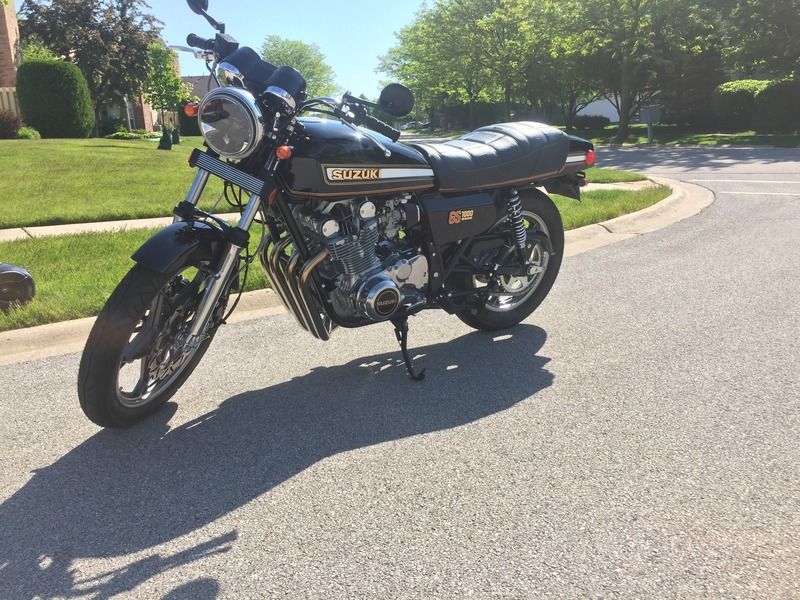
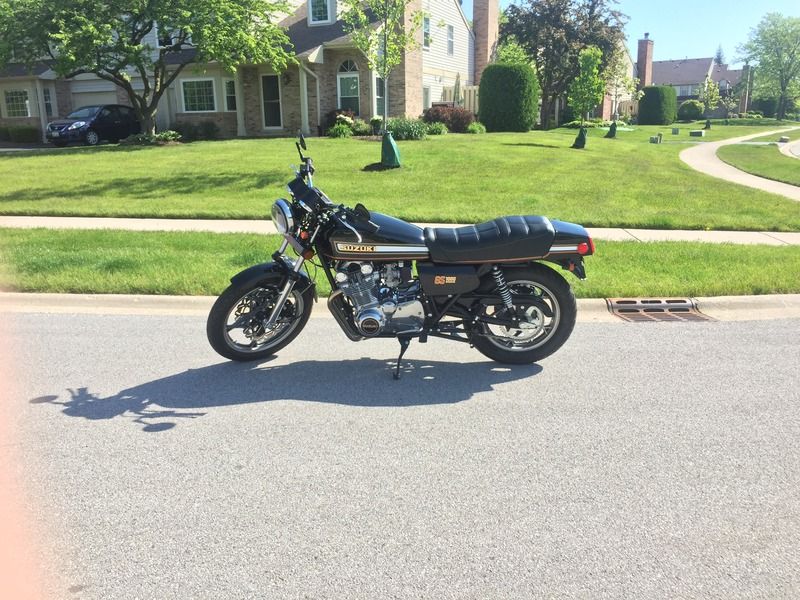
Some photos for your enjoyment:

Last edited by philosopheriam; 05-14-2017, 11:51 AM.Cogito ergo sum - "I think, therefore I am"
René DescartesComment
-
In all of her glory

 Cogito ergo sum - "I think, therefore I am"
René DescartesComment
-
Wow, what a incredible motorcycle! The attention to detail is amazing! Do you plan on showing it? Mid-Ohio Motorcycle Days in July perhaps? I know it would take first place! Plus I'd love to see it in person. Very nice motorcycle indeed 👍My Motorcycles:
22 Kawasaki Z900 RS (Candy Tone Blue)
22 BMW K1600GT (Probably been to a town near you)
82 1100e Drag Bike (needs race engine)
81 1100e Street Bike (with race engine)
79 1000e (all original)
82 850g (all original)
80 KZ 650F (needs restored)Comment
-
Philo, all your effort, time and money have been worth it. She is a beauty.
Is the new suspension keeping up the new power?2@ \'78 GS1000Comment
-
Feels good finishing a long project, doesn't it? Nicely done. That baby looks great!1979 GS1000S,
1982 Honda CX500 Turbo, 1982 Honda MB5 w/CR80 motor, 1977 Honda "nekid" Goldwing, 1976 Honda CB550F cafe', 1972 Honda XL250 cafe'Comment
-
Not sure yet - didn't really ride the bike long/hard enough to find out. I purposely re-sprung the front forks (also added 10w oil) and rear shock a bit firmer to keep the bike from being mushy under power. I need to get it out on the road and thrash it a bit.Originally posted by steve murdoch View PostCogito ergo sum - "I think, therefore I am"
René DescartesComment
-
Thanks storm - I don't know about showing it quite yet, however, it's something to think about :-)Originally posted by storm 64 View PostCogito ergo sum - "I think, therefore I am"
René DescartesComment
-
It looks even better in the daylight. Beautiful job.sigpic
When consulting the magic 8 ball for advice, one must first ask it "will your answers be accurate?"
Glen
-85 1150 es - Plus size supermodel.
-Rusty old scooter.
Other things I like to photograph.....instagram.com/gs_junkie
https://www.instagram.com/glen_brenner/
https://www.flickr.com/photos/152267...7713345317771/Comment
-
Looks good, I know it's a relief when you make it back home on the first ride.
Thanks again for the input on how to replate all my bolts/nuts/spacers....Comment
-
Absolutely luv it, amazing work. Your attention to detail really brings out the true lines and look of the bike. Outstanding job.Comment


Comment