Announcement

Collapse
No announcement yet.

Rebuilding my 1982 GS850 GL

Collapse
X
 
  • Filter
  • Time
  • Show
Clear All
new posts

    Rebuilding my 1982 GS850 GL

    It's been sitting neglected in the garage. It's crankcase was at one time filled with gasoline and oil, all the way to the brim. It was a horrible sight, leaking and oozing a tarry substance from the gaskets. After a winter of sitting like this and continuously cleaning the oozings I decided to check out what was going on. The last I knew it ran, but not well. It seemed to be missing on one cylinder.

    This was still the case when I tried her again, probably in 2013, missing on cylinder 2. I could completely cover the intake on the carb and have no change in the way it ran. At this point I checked the compression and found that it had none on cylinder 2. I decided it was an issue with the cylinder or the rings so I poured Marvel Mystery oil in the intake and let it sit for a day or two. This gave me an increase of pressure by about 20 psi and to my mind seemed to confirm the cylinder or ring theory. I was never able to get the compression over 20 psi on cylinder 2.

    I then bought a replacement engine with the intention of replacing the engine and riding away. Great idea, but life got in the way. When I posted about an exhaust question Steve mentioned that I may have a valve clearance issue. I am going to pursue this theory as it makes more sense than mine.

    I am now ready to put her back together and resume the love/hate relationship that we once had. I have some pictures of when she last ran and her horrible current state.

    I have listed a few things I will need to do, please let me know if I missed anything or should skip anything.

    Find a headlight bucket and ears
    Find an exhaust
    recover seat
    replace brake lines
    replace fuel lines
    remove dent from tank
    degrease and paint tank, frame, engine
    find windshield

    research weak spline issue
    check charging system
    change oil in transmission
    need to find valve cover gasket
    replace carb pods
    replace petcock
    carb job
    valve job
    oil change x2

    Previous state:


    Current State:


    #2
    I would move "replace petcock" to number 1 on your list, because a failed petcock is the most likely reason a lot of gas was dumped via the vacuum line into cylinder #2 over time, resulting in all the oil being washed from the cylinder, leading to accelerated ring/cylinder wear, and hence no compression. That was also the cause of your crankcase being full of gas.

    Another possible cause of no compression is no valve clearance on that cylinder's valves.

    You are on the right path with your list. I suggest that you add a complete overhaul of front and rear brake master cylinders and calipers using OEM seals and piston kits to your list, as well as replacing the tyres which are probably old, in order to have a safe, reliable motorcycle.

    Good luck!
    1981 GS850G "Blue Magic" (Bike Of The Month April 2009)

    1981 GS1000G "Leo" (Bike Of The Month August 2023)

    Comment


      #3
      What do you think about using the engine that was flooded with fuel or using the replacement?

      Comment


        #4
        If the engine was not run with the diluted oil, no worries.

        .
        sigpic
        mine: 2000 Honda GoldWing GL1500SE and 1980 GS850G'K' "Junior"
        hers: 1982 GS850GL - "Angel" and 1969 Suzuki T250 Scrambler
        #1 son: 1986 Yamaha Venture Royale 1300 and 1982 GS650GL "Rat Bagger"
        #2 son: 1980 GS1000G
        Family Portrait
        Siblings and Spouses
        Mom's first ride
        Want a copy of my valve adjust spreadsheet for your 2-valve per cylinder engine? Send me an e-mail request (not a PM)
        (Click on my username in the upper-left corner for e-mail info.)

        Comment


          #5
          I've finally started the clean up and rebuild of my bike. I have been down for a little while with a broken ankle.

          I'm back with a question - does anyone know what the hole is under the starter on a 1982 GS850GL? I pulled the starter as there was some debris next to where the wire goes under the cover for the starter and found that there was a small 7/16" or so hole on the engine case. The same hole is on the spare engine. It seemed there was a small 1/8" vent tube going into the hole, and also seemed like debris could get in there.

          Comment


            #6
            Originally posted by jdion81 View Post
            I've finally started the clean up and rebuild of my bike. I have been down for a little while with a broken ankle.

            I'm back with a question - does anyone know what the hole is under the starter on a 1982 GS850GL? I pulled the starter as there was some debris next to where the wire goes under the cover for the starter and found that there was a small 7/16" or so hole on the engine case. The same hole is on the spare engine. It seemed there was a small 1/8" vent tube going into the hole, and also seemed like debris could get in there.

            This is the hole that I mentioned:image (1).jpg

            Comment


              #7
              While I currently don't have photos to post, but will add some later. I have made some progress on this as well as some modifications to the plan. I have some questions though...

              First the plan:
              I have two GS850 engines which means some extra parts.
              I will be swapping the engines - reason: original engine had fuel in the crank, and I am not sure if it was ran like this.
              I will be swapping the heads as the new engine has 6 of the 8 exhaust bolts seized in it.
              Since I will be swapping the heads, I will be replacing the gaskets and o rings from the crank up.
              Lap the valves
              replace the valve oil seals

              The question: should I replace the valve guides at the same time? I understand I am not going to get what I am putting in the machine back out of it monetarily, but I also don't want to spend more than I need to.

              Comment


                #8
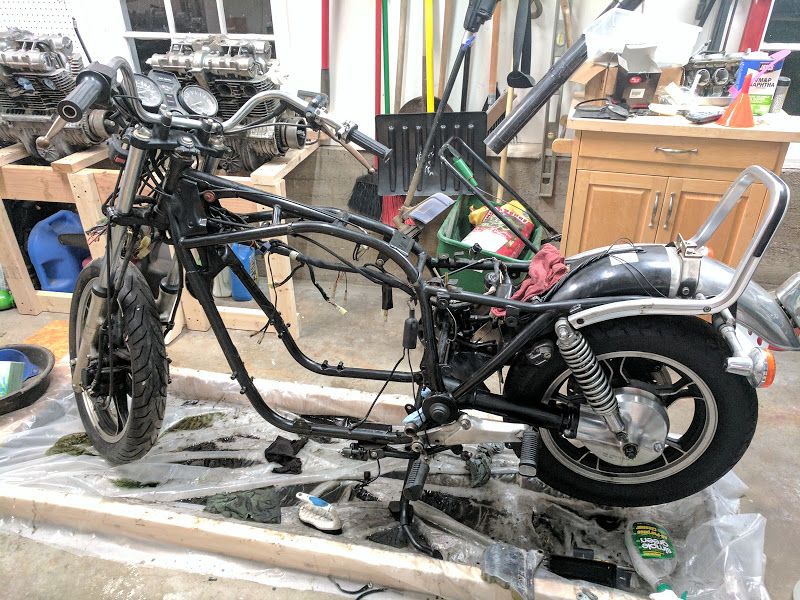
                Current state.

                This is the current state of the bike. You can see in the background I built a dual motor workstation to do the parts swaps and rebuild.


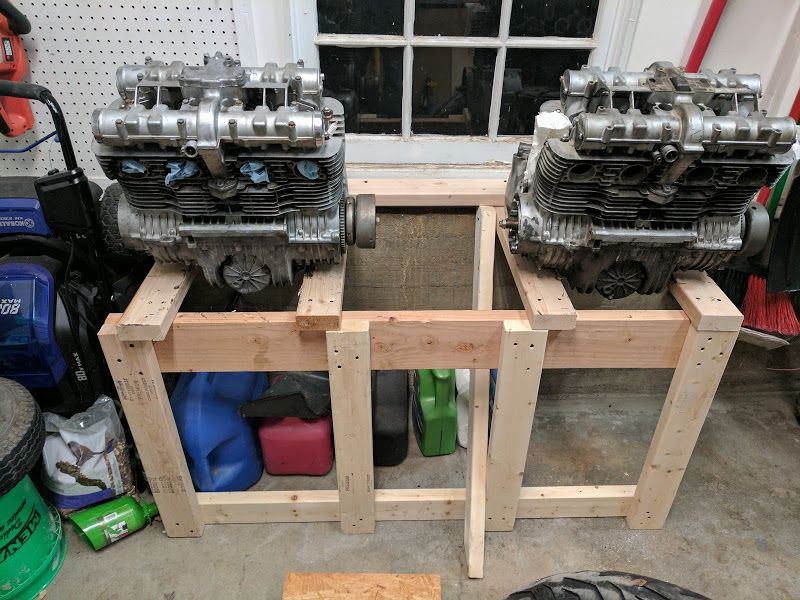
                Here's a better view of the engines and stand.


                As you can see and expect, they are both pretty dirty. I'm trying to figure out what/how I can clean the head/jugs while I have the engine tore down. I was originally thinking of soaking in purple power or simple green, but I am afraid to after a short period of time the shifter cover was in the purple power and how it looks now.

                Also, I am working on scanning some of the gaskets and getting them into a format that can be used to cut them with a Cricut or a Silhouette CNC cutter. I don't know if anyone is interested, but it could save a few $.
                Last edited by Guest; 03-23-2017, 08:17 PM.

                Comment


                  #9
                  Originally posted by jdion81 View Post
                  I'm back with a question - does anyone know what the hole is under the starter on a 1982 GS850GL?
                  Would you believe me if I told you that we call it "The Mystery Hole"?

                  No, I'm not kidding. It is there to drain the starter cavity in the event it gets wet. The 1/8" vent tube you saw is the vent for the secondary drive area.

                  .
                  sigpic
                  mine: 2000 Honda GoldWing GL1500SE and 1980 GS850G'K' "Junior"
                  hers: 1982 GS850GL - "Angel" and 1969 Suzuki T250 Scrambler
                  #1 son: 1986 Yamaha Venture Royale 1300 and 1982 GS650GL "Rat Bagger"
                  #2 son: 1980 GS1000G
                  Family Portrait
                  Siblings and Spouses
                  Mom's first ride
                  Want a copy of my valve adjust spreadsheet for your 2-valve per cylinder engine? Send me an e-mail request (not a PM)
                  (Click on my username in the upper-left corner for e-mail info.)

                  Comment


                    #10
                    Originally posted by jdion81 View Post
                    I'm trying to figure out what/how I can clean the head/jugs while I have the engine tore down. I was originally thinking of soaking in purple power or simple green, but I am afraid to after a short period of time the shifter cover was in the purple power and how it looks now.
                    Simple Green will etch aluminum slightly, and eat into some paints a bit. Your cover was probably a bit hazy, right? If you plan on painting, simple green will be ok. If not, WD40 or PB Blaster, a stiff brush, and some elbow grease will do the job. Personally, I'd just soak the heck out of it in Simple Green, scrub it, then spray it with VHT Universal Aluminum....
                    sigpic

                    Check out my rebuild thread here: https://www.thegsresources.com/_foru...GS-750-Rebuild

                    Comment


                      #11
                      I am strongly considering the VHT on the head and jugs, but what would you do to protect the gasket surfaces while using the simple green and during painting?

                      Comment


                        #12
                        I wouldn't worry about protecting the gasket surfaces from simple green. To protect during painting, get a good quality masking tape like 3m and tape up all the gasket surfaces and bolt holes,etc. You can also buy plug and cap kits for bolt holes and nuts/bolts that aren't being removed. They can make the masking go a bit faster.

                        Overlap the strips of tape, and overhang the edges. When you have the whole surface covered, use an exacto knife to cut the tape to the shape of the area you're masking. Be careful not to knick the aluminum when you're cutting... peel the tape off when the paint's dry, but before it cures.
                        sigpic

                        Check out my rebuild thread here: https://www.thegsresources.com/_foru...GS-750-Rebuild

                        Comment


                          #13
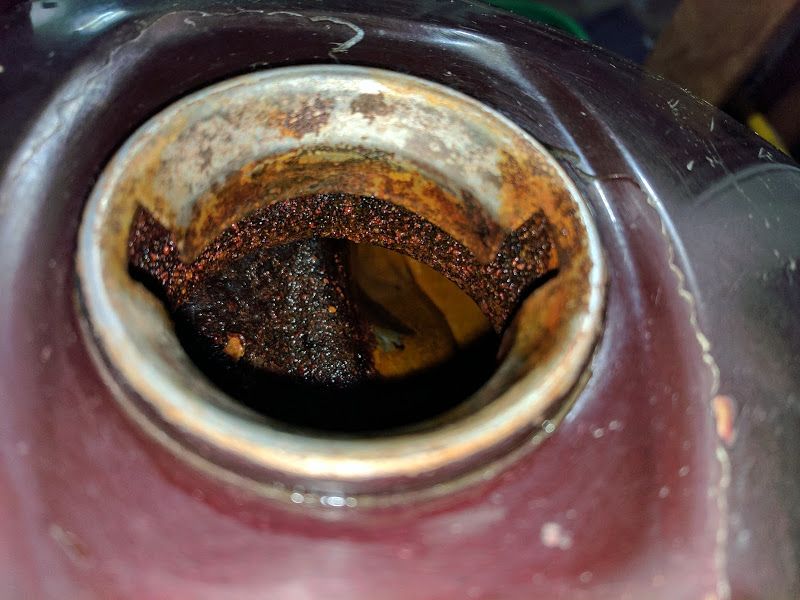
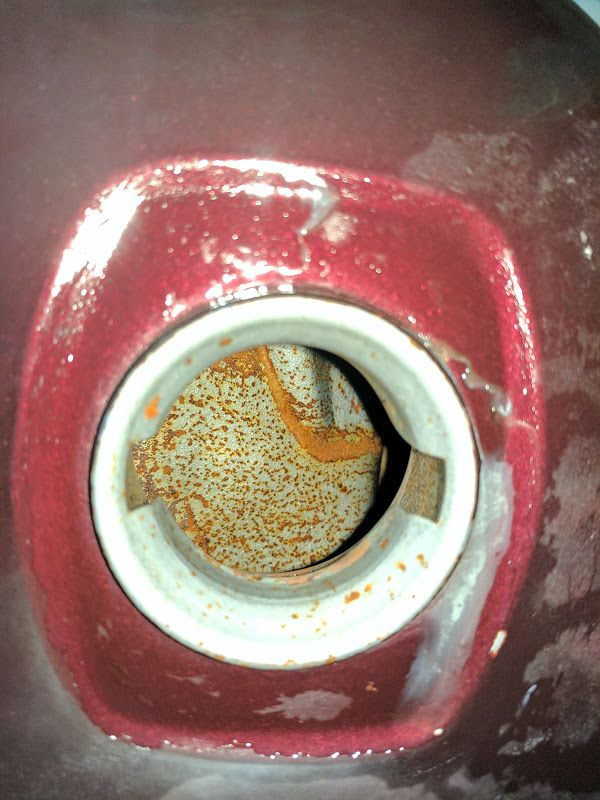
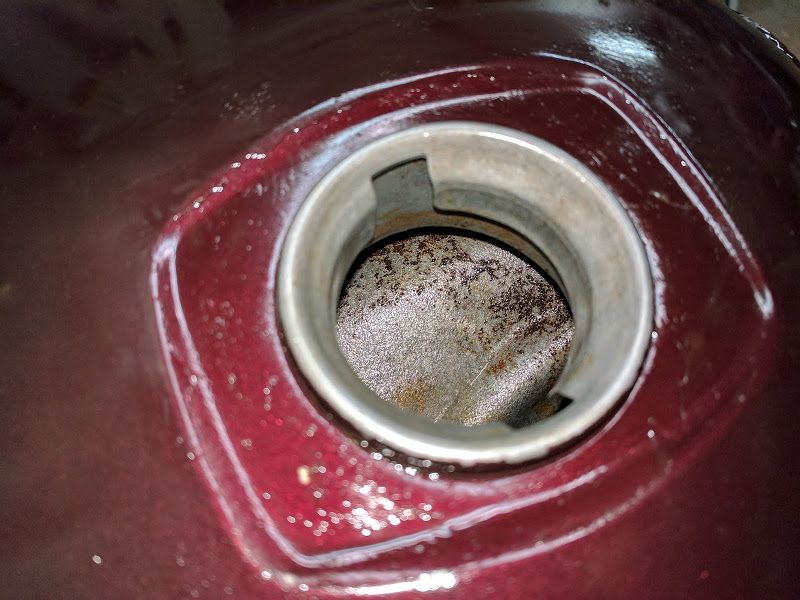
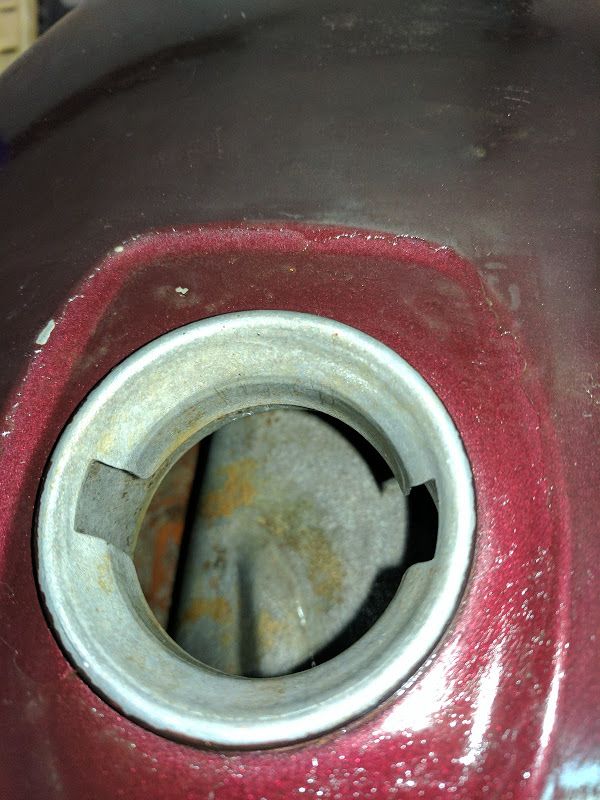
                          I finally got to cleaning the tank, it was pretty bad off. I tried vinegar, but it took too long and I forgot to swish it often enough. I think I could have been better off leaving it alone, if I remember right it wasn't too bad before I poured the vinegar in. I think it was flash rusting continuously or something. This is what it looked like after the vinegar:


                          I then tried the hydrochloric acid instead of vinegar, this was fun. I had all of the ppe required, and it came out nice, and only took a couple of hours (being very meticulous and cautious). I decided I would drain it the best I could after neutralizing the acid. Then rinse the tank, then put some oil in the tank and swish it around to displace what was left of the water. I would have rather dumped some acetone or alcohol in the tank then the oil, but I found out too late that I didn't have any.

                          The next day it had flash rusted in spots.


                          This was frustrating. I decided since it was pretty light that I would purple power the oil out of the tank then CLR the tank and then WD-40 it. This worked well and I was about to spray the wd40 and then the tank wobbled off of the table and into the pan with the oil/water/denatured in it. Splashed everywhere.

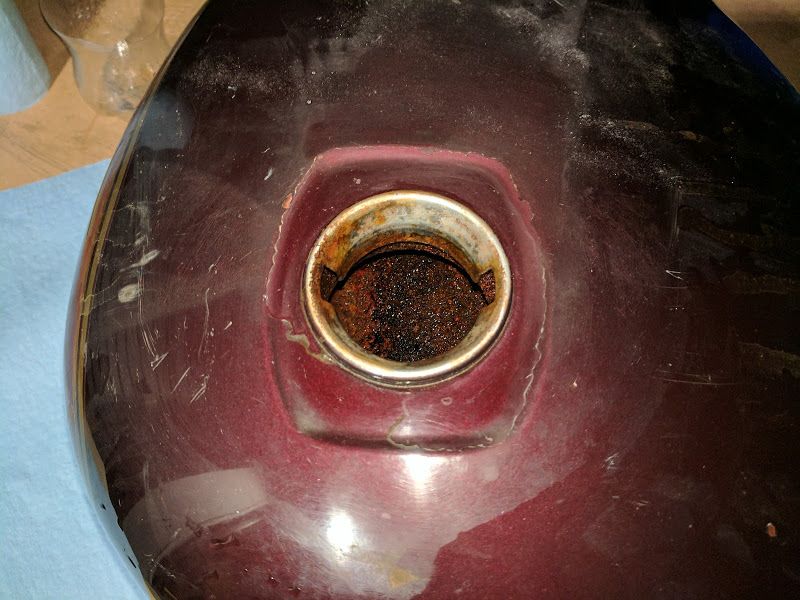
                          I finally got the tank grippable and sprayed the wd, but it had started to flash rust a little. This is what it looks like now, I may try again closer to reassembly, I dunno.


                          It looks a lot better, but we will see in 24 hours. I'm skeptical.
                          Last edited by Guest; 03-23-2017, 08:16 PM.

                          Comment


                            #14
                            Originally posted by Sam 78 GS750 View Post
                            I wouldn't worry about protecting the gasket surfaces from simple green. To protect during painting, get a good quality masking tape like 3m and tape up all the gasket surfaces and bolt holes,etc. You can also buy plug and cap kits for bolt holes and nuts/bolts that aren't being removed. They can make the masking go a bit faster.

                            Overlap the strips of tape, and overhang the edges. When you have the whole surface covered, use an exacto knife to cut the tape to the shape of the area you're masking. Be careful not to knick the aluminum when you're cutting... peel the tape off when the paint's dry, but before it cures.
                            Ok, I was just worried about any etching preventing a good gasket seal. What do you think, is there a way to freshen the paint on the engine block without completely dismantling it. I plan to disassemble the head and jug, obviously, but don't know if I am ready to tackle the crankcase.

                            Comment


                              #15
                              Originally posted by jdion81 View Post
                              is there a way to freshen the paint on the engine block without completely dismantling it. I plan to disassemble the head and jug, obviously, but don't know if I am ready to tackle the crankcase.
                              No need to dismantle, just mask where you don't want paint to go. Bigger areas can be cover with paper that's taped around the edges....

                              sigpic

                              Check out my rebuild thread here: https://www.thegsresources.com/_foru...GS-750-Rebuild

                              Comment

                              Working...
                              X