Announcement

Collapse
No announcement yet.

Making It Easier to Install Carbs on GS550 Motors

Collapse
X
 
  • Filter
  • Time
  • Show
Clear All
new posts

    Making It Easier to Install Carbs on GS550 Motors

    I have read on the forum many times how difficult it is to install the carbs on a GS550, to squeeze them in between the motor boots and the airbox boots. As there is less room in there than on the larger bikes with larger frames which allow a bit more space.

    My solution is to move the airbox back a bit further than it would normally move by moving the rear mudguard back a bit. Very easy to do, it takes about 30 seconds.

    See following pictures and description:


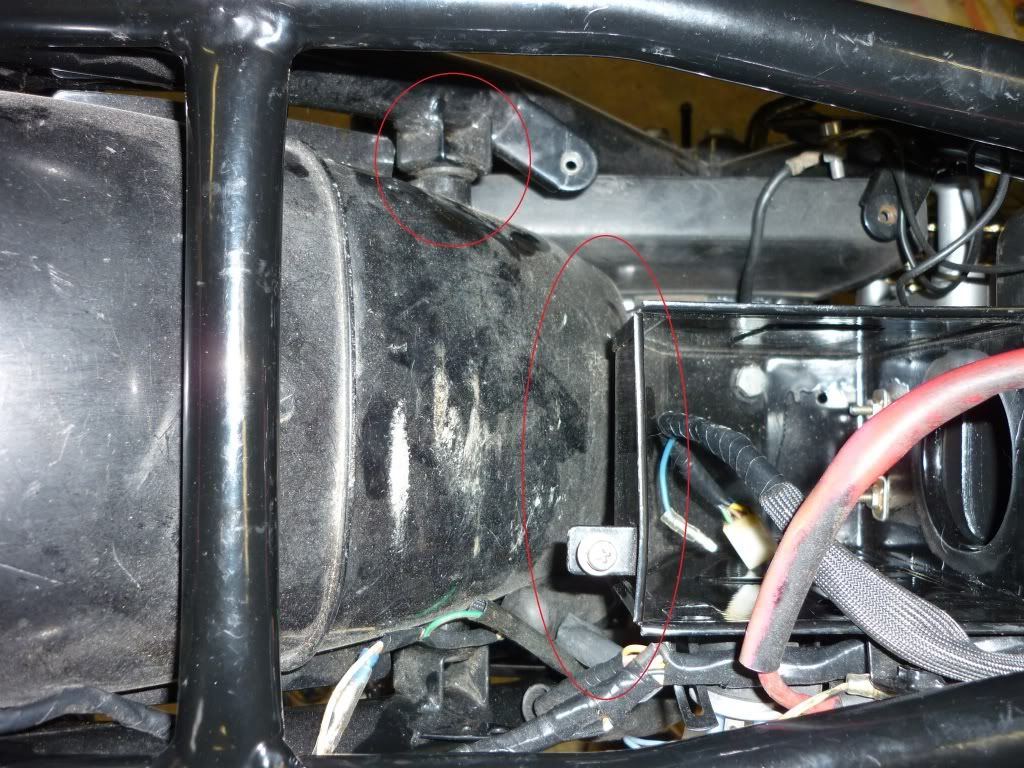
    Above: This is what the standard GS550 setup looks like and shows the airbox hard up against the rear mudguard. And shows the mudguard nodule in place in the frame gromet.


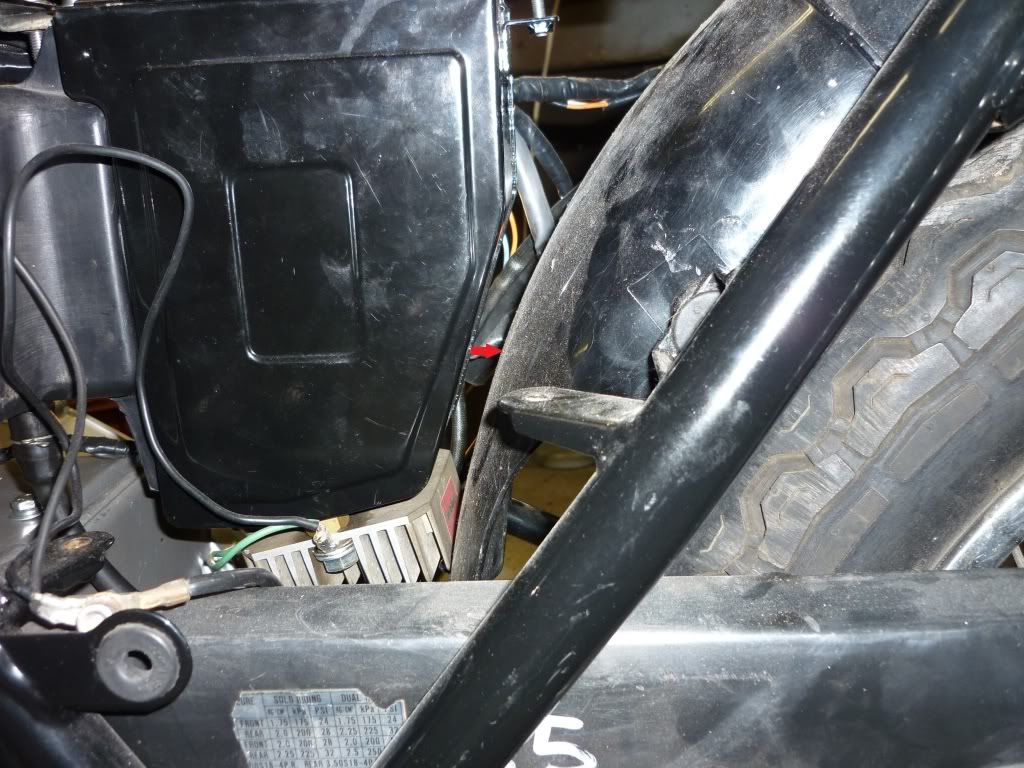
    Above: This picture also shows the close proximity of the airbox to the guard. See RED arrow.


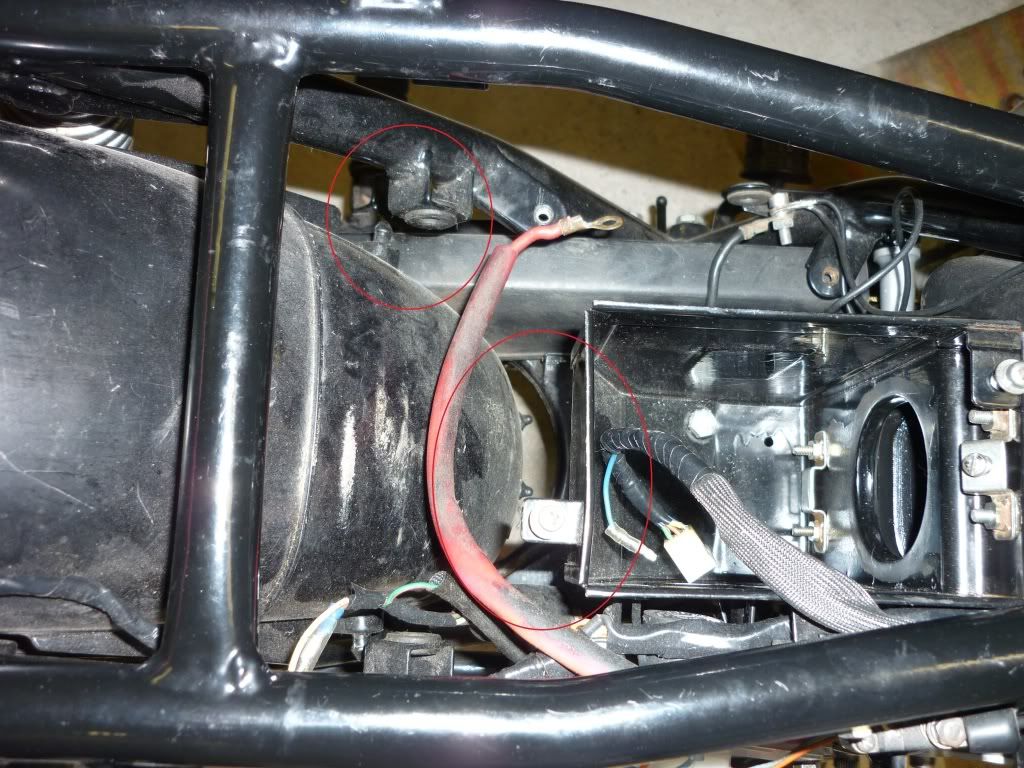
    Above: The mudguard nodule removed from the frame gromet and the guard moved rearward to create more clearance.


    Above: you can see the extra clearance provided looking down from above. This creates space for the airbox to be moved further to the rear.


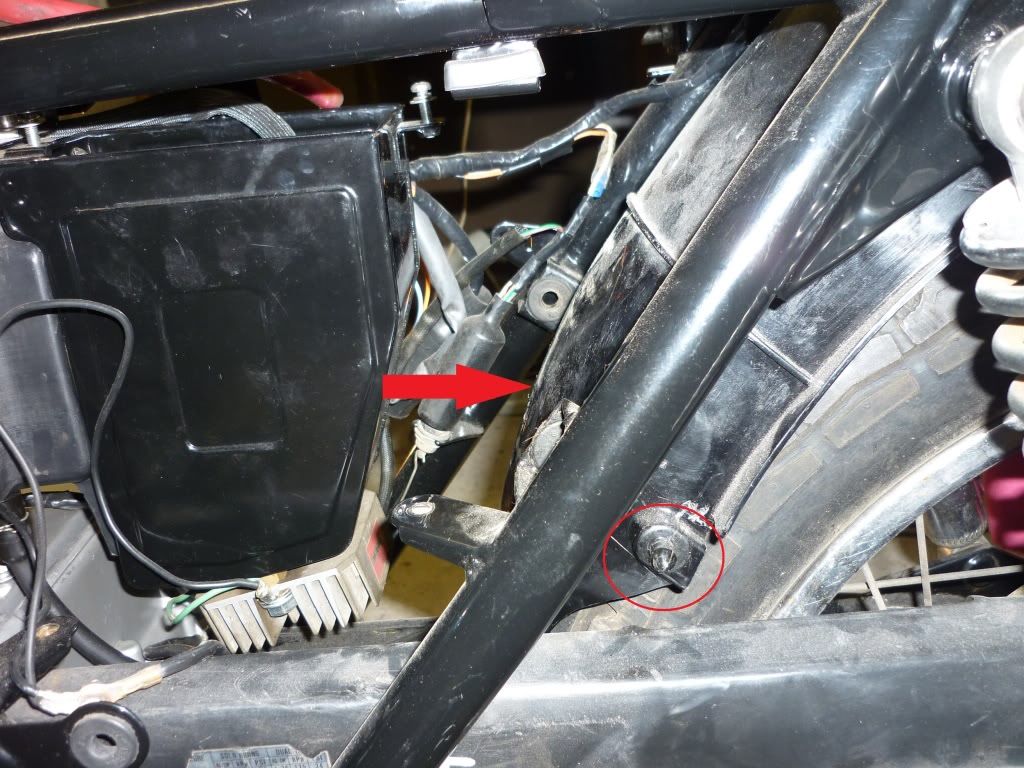
    Above: This pic shows the extra clearance provided for the airbox to be moved rearward. Compare this RED arrow with the previous picture with the other RED arrow to see the difference.

    Some forum members may be familiar with this tip, but for those that are not it can make the job easier, although it could take a little longer as a few bits may have to be removed to allow the airbox to slide back.

    Once I have done this it literally takes less than 10 mins to get the carbs on the motor.
    Last edited by Guest; 10-22-2010, 07:55 AM.

    #2
    Thanks Don for reminding me of something I did once but haven't the other times I did the carbs. DOH!
    Cowboy Up or Quit. - Run Free Lou and Rest in Peace

    1981 GS550T - My First
    1981 GS550L - My Eldest Daughter's - Now Sold
    2007 GSF1250SA Bandit - My touring bike

    Sit tall in the saddle Hold your head up high
    Keep your eyes fixed where the trail meets the sky and live like you ain't afraid to die
    and don't be scared, just enjoy your ride - Chris Ledoux, "The Ride"

    Comment


      #3
      Nice one Don, the 450's have this same problem and when I was dismantling mine I did exactly the same thing but I never took pic's of it.
      1982 GS450E - The Wee Beastie
      1984 GSX750S Katana 7/11 - Kit Kat - BOTM May 2020

      sigpic

      450 Refresh thread: https://www.thegsresources.com/_foru...-GS450-Refresh

      Katana 7/11 thread: http://www.thegsresources.com/_forum...84-Katana-7-11

      Comment


        #4
        Originally posted by pete View Post
        Nice one Don, the 450's have this same problem and when I was dismantling mine I did exactly the same thing but I never took pic's of it.
        Yes pete, it is fairly obvious and an easy thing to do, but can be overlooked easily when in the middle of doing an urgent job and wanting to get a daily rider back on the road and then you get frustrated and break something trying to jam them in there. Particularly if the rubber boots are rigid and stiff. An extra 1/2 inch makes all the difference.

        It also alows extra tilt of the airbox so you can slide the carbs mouths into the boots on that side. It might help out some newbies who have not done this task before.

        Comment


          #5
          Yeah I've fed it back on a couple of threads, but there's nothing quite so helpful as some good pic's like what you've posted here
          1982 GS450E - The Wee Beastie
          1984 GSX750S Katana 7/11 - Kit Kat - BOTM May 2020

          sigpic

          450 Refresh thread: https://www.thegsresources.com/_foru...-GS450-Refresh

          Katana 7/11 thread: http://www.thegsresources.com/_forum...84-Katana-7-11

          Comment


            #6
            Originally posted by pete View Post
            Yeah I've fed it back on a couple of threads, but there's nothing quite so helpful as some good pic's like what you've posted here
            a picture is worth a thousand words ,


            or maybe in a motorcycle thread


            a thousand words are worthless

            Comment


              #7
              Originally posted by posplayr View Post
              a picture is worth a thousand words ,


              or maybe in a motorcycle thread


              a thousand words are worthless
              Well, in OT, anyhow.
              Dogma
              --
              O LORD, be gracious to me; heal me, for I have sinned against you! - David

              Skeptical scrutiny is the means, in both science and religion, by which deep insights can be winnowed from deep nonsense. - Carl Sagan

              --
              '80 GS850 GLT
              '80 GS1000 GT
              '01 ZRX1200R

              How to get a "What's New" feed without the Vortex, and without permanently quitting the Vortex

              Comment


                #8
                Don bless you .

                I tried you trick Tuesday and it made the #^))^$# removal job MUCH easier.
                THANK YOU
                Geo

                Comment


                  #9
                  Glad it worked for you Geo.

                  Thank you and good luck.

                  Comment


                    #10
                    Thanks for that Don. When working on motorbike engines I HATE fitting the carbs back on 'cos the airbox rubbers are such a pain to clear and refit. On my ZR550 it is a world-class pain. I can remove, strip and clean the carbs in about 1hour .. then takes me about 1hour to refit them. I did the carbs on the GS750 and my GPz750 and they weren't too bad at all; probably 20min mucking about. Luckily I haven't had to do the carbs on the GS550 yet but when I do I'll be remembering this!!

                    Comment


                      #11
                      Hey OZ it's payback time. Glad it can be of use to you.

                      Comment


                        #12
                        Thanks for the tip. We struggled with this job just a day or two ago.

                        Comment


                          #13
                          Originally posted by jasper View Post
                          Thanks for the tip. We struggled with this job just a day or two ago.
                          Did you move the guard rearward as suggested or find this thread too late?

                          Comment


                            #14
                            Originally posted by Suzuki_Don View Post
                            Did you move the guard rearward as suggested or find this thread too late?
                            Found the thread too late...but the way this build is going the carbs will be off and on again more than a few times over the summer.

                            This tip will come in very handy.

                            Comment


                              #15
                              Awesome, but I read this a little too late. I ended up taking my airbox & "airbox filter box" apart to give me enough room to get the carbs out.

                              Comment

                              Working...
                              X