.png "Powered by vBulletin")
can somebody tell me what's the trick to replacing original coils? I bought a set of ACCEL coils, comes complete w/ spark plug wires (8mm.) I did swap them and everything connected right outta the box without a hitch, long story short. would only run for aprox. 5-7 mins. tops and then would shut itself off, would wait for CDI box to cool down and then would start again. I did the restarting 3 times until the CDI gave up (smoked). bought a newer CDI and went back to original coils everything is ok. Why ACCEL coils you ask?...I have replaced w/ACCEL in other bikes succesfully before and the results are amazing, better gas mileage, cleaner burning plugs, smoother iddle, and of course the main culprit easier/faster starts, saving battery life. thanks for your help. (Re. 1980 GS 850 GL)
-
-
Check the primary resistance on those ACCEL coils, I'd bet they are 0.7-ohm and should be more like 2.5 to 5 ohms.Last edited by fbody_mike; 09-05-2018, 06:57 PM.1981 Suzuki GS250T
1982 Yamaha Seca Turbo
1985 Suzuki GS550E
2004 Suzuki GSF1200S -
First of all, you do NOT have a "CDI" on your bike. Much has been written about that, let's just say "you don't have one".
Next, measure the resistance of the primary side of the coils. My wife's bike came to us (14 years ago) with Accel coils, which I thought was a great upgrade. Over the years, I have replaced several ignitors (the proper term, not "CDI"). I don't know what finally made me think of checking the coils, but this is what I found:
I went to the auto parts store, got a couple of 2 ohm ballast resistors, installed them and we are now using them on a 2000-mile trip.
I started a thread on the topic:
.png)
.sigpic
mine: 2000 Honda GoldWing GL1500SE and 1980 GS850G'K' "Junior"
hers: 1982 GS850GL - "Angel" and 1969 Suzuki T250 Scrambler
#1 son: 1986 Yamaha Venture Royale 1300 and 1982 GS650GL "Rat Bagger"
#2 son: 1980 GS1000G
Family Portrait
Siblings and Spouses
Mom's first ride
Want a copy of my valve adjust spreadsheet for your 2-valve per cylinder engine? Send me an e-mail request (not a PM)
(Click on my username in the upper-left corner for e-mail info.)Comment
-
Need to have 3 ohm coils. Before buying my Accel coil set, I asked Steve 184 questions, and drove him nuts. I had to be sure in MY mind I was buying the RIGHT part, before I bought it, lol. If the resistance is off, you WILL cook the igniter in these bikes. These systems are just too fragile to handle any deviation in resistance...'83 GS 1100T
The Jet
sigpic
'95 GSXR 750w
The Rocket
I'm sick of all these Irish stereotypes! When I finish my beer, I'm punching someone in the face ! ! !Comment
-
Check your factory service manual. Most GS bikes come with 4 ohm coils.Ed
To measure is to know.
Mikuni O-ring Kits For Sale...https://www.thegsresources.com/_foru...ts#post1703182
Top Newbie Mistakes thread...http://www.thegsresources.com/_forum...d.php?t=171846
Carb rebuild tutorial...https://gsarchive.bwringer.com/mtsac...d_Tutorial.pdf
KZ750E Rebuild Thread...http://www.thegsresources.com/_forum...0-ResurrectionComment
-
The factory manual for the '79 850 does specify 4 ohm coils, but the addendum for the '80 850 (which the original poster has) calls for 3-5 ohms of primary resistance.Originally posted by Nessism View Post
.sigpic
mine: 2000 Honda GoldWing GL1500SE and 1980 GS850G'K' "Junior"
hers: 1982 GS850GL - "Angel" and 1969 Suzuki T250 Scrambler
#1 son: 1986 Yamaha Venture Royale 1300 and 1982 GS650GL "Rat Bagger"
#2 son: 1980 GS1000G
Family Portrait
Siblings and Spouses
Mom's first ride
Want a copy of my valve adjust spreadsheet for your 2-valve per cylinder engine? Send me an e-mail request (not a PM)
(Click on my username in the upper-left corner for e-mail info.)Comment
-
There are two different part numbers for 4 cylinder Accel coil kits. The 140403 is the 3 ohm coils. The 140404 is the .7 ohm coils. I have seen people use the .7 ohm coils and fry the igniter on the Suzuki GS.Comment
-
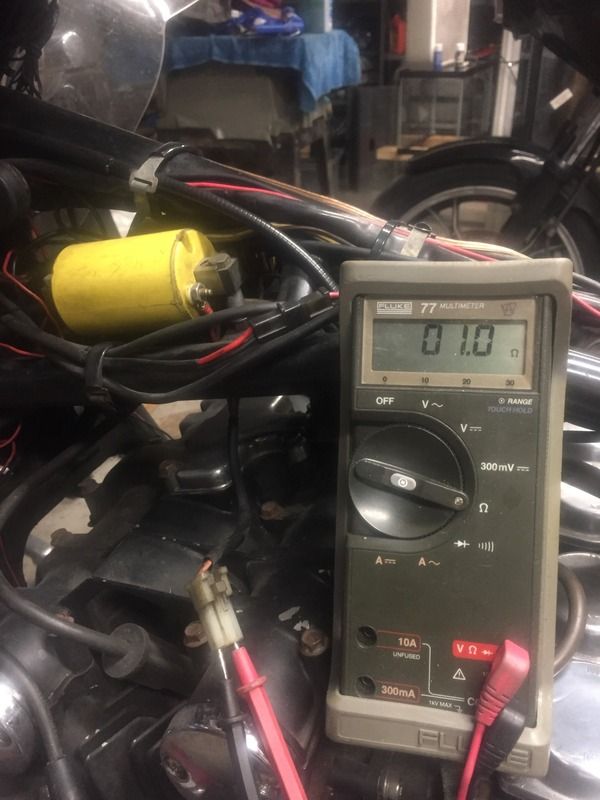
The reading shown on the meter in post #3 is 1.0 ohms, but the typical reading when the leads are shorted together is 0.2 or 0.3 ohms, so those might be .7 ohm coils. "Fry the igniter"? How about FIVE of them in the last 13 years? I finally got the urge to do something more than just throw another igniter in and found out WHY we have been frying igniters.
.sigpic
mine: 2000 Honda GoldWing GL1500SE and 1980 GS850G'K' "Junior"
hers: 1982 GS850GL - "Angel" and 1969 Suzuki T250 Scrambler
#1 son: 1986 Yamaha Venture Royale 1300 and 1982 GS650GL "Rat Bagger"
#2 son: 1980 GS1000G
Family Portrait
Siblings and Spouses
Mom's first ride
Want a copy of my valve adjust spreadsheet for your 2-valve per cylinder engine? Send me an e-mail request (not a PM)
(Click on my username in the upper-left corner for e-mail info.)Comment
-
GS whisperer...I'm sold on the 1.8 ohm resistors (NAPA) in your thread. Being unfamiliar with this procedure, would you have a picture of resistors being connected to each coil as you mention?
Have you had a chance to test them on a longer ride yet?
ThanksComment
-
You probably had me addressed properly the first time around.Originally posted by Bearr045 View Post
My username is "Steve", just like yours is "Bearr045".
The "GS Whisperer" is just my forum status, just like yours is "Forum Newbie".
By the way, my real name is "Steve", too.
I did not document the process, but can probably tell you well enough without pictures.Originally posted by Bearr045 View Post
1. Remove the coils from the bike, just for easier access to the wires.
2. Remove one wire from the coil. I removed the one that was closer to the center of the bike. No particular reason, and it does not really matter which one is removed.
3. Cut the terminal off the wire.
4. Prepare wires for the resistor. The resistor has 1/4" spade connectors. I used right-angle "flag" female spade connectors on two pieces of wire about 6" long.
5. On the other end of one of those 6" wires, put a ring terminal that will fit on the coil on one wire, a butt connector on the other. You can solder that connection instead, if you wish.
6. You will find that when you route the wires toward the back of the bike, one will be about 3" longer than the other. Your wires are now in position to attach to the resistor.
7. Re-install the coils.
8. Lay the resistors between the frame rails over the carbs. Existing wiring keeps them from falling through, the insulation on the spade connectors keeps them electrically safe from the frame.
9. Re-connect the coil primary wire connectors.
10. Re-connect the plug wires to the coils.
11. Install whatever else you took off.
12. Go for a ride.
Tested on a longer ride?
We just got back from a week-long ride that covered about 1700 miles. Close enough?
That in itself is no proof, as we have gone several thousand between ignitor replacements before. There is just no telling how long it might last, so 1700 miles is hardly any proof.
.sigpic
mine: 2000 Honda GoldWing GL1500SE and 1980 GS850G'K' "Junior"
hers: 1982 GS850GL - "Angel" and 1969 Suzuki T250 Scrambler
#1 son: 1986 Yamaha Venture Royale 1300 and 1982 GS650GL "Rat Bagger"
#2 son: 1980 GS1000G
Family Portrait
Siblings and Spouses
Mom's first ride
Want a copy of my valve adjust spreadsheet for your 2-valve per cylinder engine? Send me an e-mail request (not a PM)
(Click on my username in the upper-left corner for e-mail info.)Comment
Comment