Announcement

Collapse
No announcement yet.

Hillbilly Valve Spring Compressor

Collapse
X
 
  • Filter
  • Time
  • Show
Clear All
new posts

  • bwringer
    replied
    Originally posted by eil View Post
    What size C-clamp do you need for this, anyway?
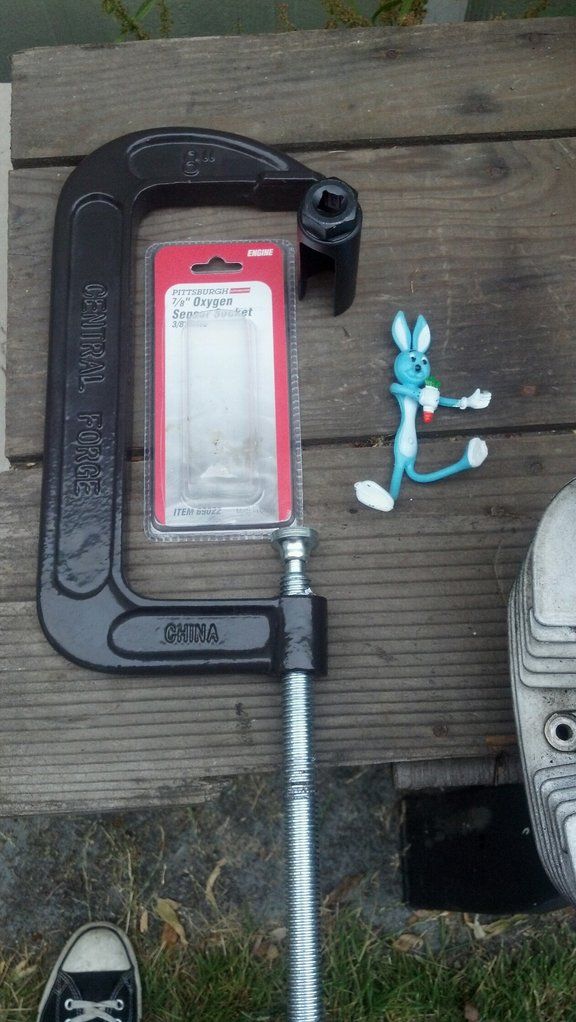
    If you check the photos, mine says 8" on it. That's 200mm if you're a metric type.

    oldgsfan's is also an 8" c-clamp.


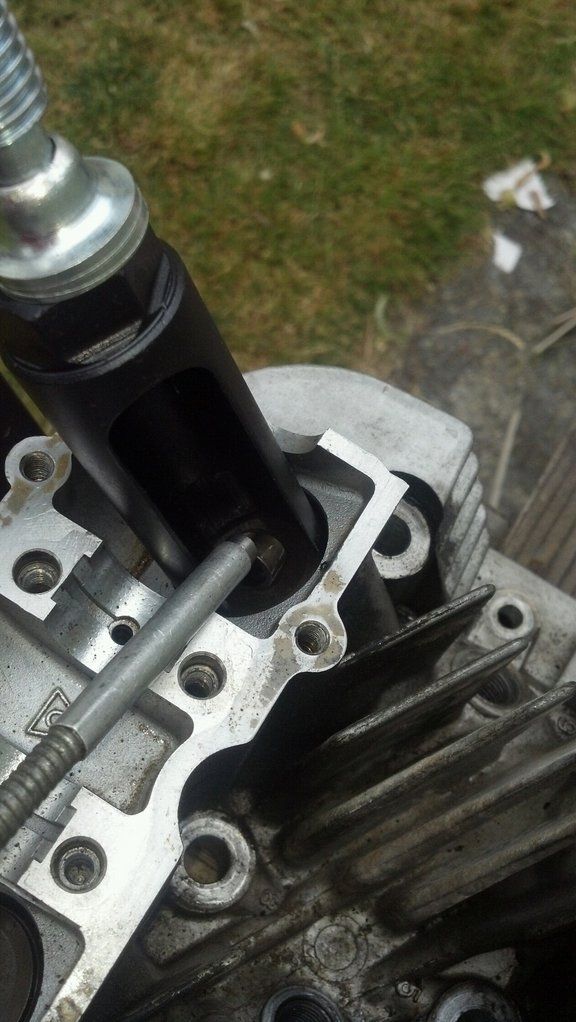
    One detail that's different is that on mine, the socket is bolted to the "static" end of the clamp (it's left a little loose so I can easily turn the socket so the window is in the right spot). This is a LOT easier than trying to juggle the socket separately.

    This also avoids damaging the cylinder head with the static end of the clamp -- you can place the nose of the clamp screw directly against the valve. The "static" end of the clamp can gouge the aluminum cylinder head, and may not reach the valve on some cylinder heads.
    Last edited by bwringer; 07-21-2013, 12:26 PM.

    Leave a comment:


  • cowboyup3371
    replied
    Get the largest one you can. I'll get the exact size for you tomorrow though it you want as it's in my tool box in the other garage.

    Leave a comment:


  • eil
    replied
    I've never changed an oxygen sensor, but for some reason it gets a special socket with a panel missing. So it's pretty much the same idea, except the cutting is already done for you.
    Hey, nice find. $5 is a bit steep for a socket missing 1/5 of its material, but I guess it's better than the price of a valve spring compressor.

    BTW, the "some reason" is because oxygen sensors have a wire sticking out of them.

    What size C-clamp do you need for this, anyway?

    Leave a comment:


  • bwringer
    replied
    Originally posted by chuck hahn View Post
    I have heard of a rope in the cylinder to remove the springs for refreshing stem seals before with the head on the bike.

    So how do you get the rope in so you can jam it with the piston? Thru the intake port or something?

    I admittedly haven't done a search for such tricks...sorry.

    The rope goes in through the spark plug hole. Just stuff as much rope as you can in there when the piston is at BDC, leave the rest hanging out, then turn the engine a bit to squish the rope against the valves. Secure the engine so it doesn't rotate, and you're ready to go.

    I'd use a new-ish, clean rope -- something flexible that won't flake apart or get grit in the cylinder.

    Leave a comment:


  • Sandy
    replied
    Originally posted by Steve View Post
    Yeah, I started with PVC, even made a video that is posted on BassCliff's site, but found that the PVC deforms too much.
    It's also a bit "fiddly" trying to glue a washer to the end of the PVC to give the clamp something to push on.

    After searching around for various bits of metal that would be stronger, I decided on a deep-well socket. Plenty strong sides, and the (mostly) closed end where the ratchet is attached just keeps the c-clamp from falling into the middle. That is the hole that Brian evidently uses to bolt it to the clamp.

    .
    Yeah I tried the PVC when I did the head but it flexed too much and split. I took a piece of 1/8" x 3/4" steel bar, bent it into a "U" shape and used that. Now that was a real PITA to keep square and prevent parts from flying across the shop. Stubborn, boneheaded tenacity got the job done. Next time I'll breakdown and buy a socket to cut up.

    Leave a comment:


  • oldgsfan
    Guest replied
    Well, yes, I suppose that is easier to see..

    Leave a comment:


  • Nessism
    replied


    Leave a comment:


  • chuck hahn
    replied
    I have heard of a rope in the cylinder to remove the springs for refreshing stem seals before with the head on the bike.

    So how do you get the rope in so you can jam it with the piston? Thru the intake port or something?

    I admittedly haven't done a search for such tricks...sorry.

    Leave a comment:


  • oldgsfan
    Guest replied
    I don't have the equipment to cut up a socket, so I went to Harbor Freight and wandered around until I spotted a $5 oxygen sensor socket.

    I've never changed an oxygen sensor, but for some reason it gets a special socket with a panel missing. So it's pretty much the same idea, except the cutting is already done for you.


    This gave me the access I needed to get those little keys out.


    Worked great, especially for someone like me who doesn't plan on doing this job again!

    Leave a comment:


  • Steve
    replied
    Originally posted by Call Me Ahab View Post
    Heh, I used that hammer method =] worked perfectly fine
    Let us know how the hammer does to put them back in.

    .

    Leave a comment:


  • mrbill5491
    replied
    Originally posted by GelandeStrasse View Post
    I've read that it can be done by pressuring up the cylinder with an airline. Guess you'd need a fairly high pressure. Sounds feasible, I'll try it next time I need new seals.
    Yeah you can do that, though still need the piston at the top just in case the air pressure is some how released. It can happen and I've seen it happen, doesn't take much either.

    Leave a comment:


  • Call Me Ahab
    Guest replied
    Heh, I used that hammer method =] worked perfectly fine

    Leave a comment:


  • derwood
    replied
    This is a Hillbilly method that works...
    You don't need a window in the socket to remove the keepers.(collet)
    If you hold the unmodified socket on the valve spring a diplomatic smack with a hammer on the socket will bump the keepers out.
    Pre-compress the springs and zip tie them for installation.
    Last edited by derwood; 03-02-2013, 10:50 PM.

    Leave a comment:


  • GelandeStrasse
    Guest replied
    Originally posted by bwringer View Post
    I removed and replaced the valve stem seals on my KLR650 (same shim-over-bucket setup as a GS) with an air hold and this home made compressor device.

    I used 40 psi to hold the valve up once I had the keepers off, and increased it to 60 psi while I was actually working on the valve. No scientific reason -- this just felt right. YMMV -- GS valves are a bit smaller, so you may want to use a bit more pressure.

    I also put the piston at TDC so the valve wouldn't drop all the way out if I lost air pressure. I made sure to secure the crank VERY well so the engine couldn't rotate with the air pressure. You'd want to do the same with a GS; set it to TDC, do those cylinders (1 and 4), then rotate 180 degrees and do the others. Fortunately, a GS is easy to re-time when you rotate the engine with the camshafts out.

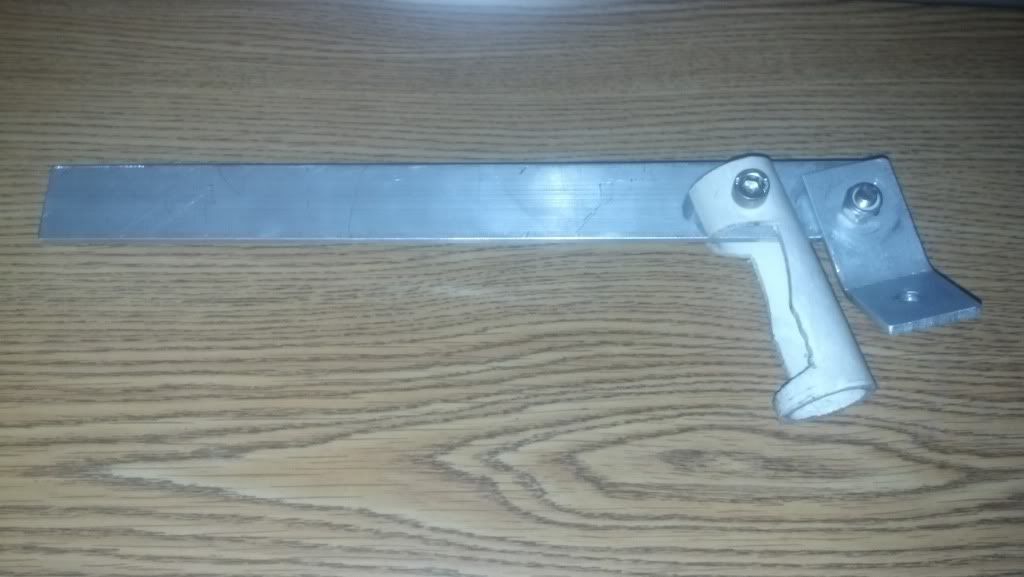
    The angled bit with the hole bolts to one of the cam cap holes. To move from the intakes to the exhausts, I reversed the fittings on the lever.

    I thought I would just use the PVC to get the shape right then re-create it with metal tubing, but as it turned out the PVC held up just fine.

    I'm pretty sure something similar would work with a GS. It was a tight fit on the KLR, but it worked. Pulling the old valve stem seals was the hard part, since there was so little vertical clearance to get my puller (a modified pair of large needlenose pliers) in there.

    Thanks for sharing, super useful info! I will definitely try that

    Leave a comment:


  • bwringer
    replied
    I removed and replaced the valve stem seals on my KLR650 (same shim-over-bucket setup as a GS) with an air hold and this home made compressor device.

    I used 40 psi to hold the valve up once I had the keepers off, and increased it to 60 psi while I was actually working on the valve. No scientific reason -- this just felt right. YMMV -- GS valves are a bit smaller, so you may want to use a bit more pressure.

    I also put the piston at TDC so the valve wouldn't drop all the way out if I lost air pressure. I made sure to secure the crank VERY well so the engine couldn't rotate with the air pressure. You'd want to do the same with a GS; set it to TDC, do those cylinders (1 and 4), then rotate 180 degrees and do the others. Fortunately, a GS is easy to re-time when you rotate the engine with the camshafts out.

    The angled bit with the hole bolts to one of the cam cap holes. To move from the intakes to the exhausts, I reversed the fittings on the lever.

    I thought I would just use the PVC to get the shape right then re-create it with metal tubing, but as it turned out the PVC held up just fine.

    I'm pretty sure something similar would work with a GS. It was a tight fit on the KLR, but it worked. Pulling the old valve stem seals was the hard part, since there was so little vertical clearance to get my puller (a modified pair of large needlenose pliers) in there.

    Leave a comment:

Working...
X