Announcement

Collapse
No announcement yet.

Cam Timing Clarification on GS550

Collapse
X
 
  • Filter
  • Time
  • Show
Clear All
new posts

    Cam Timing Clarification on GS550

    After tearing my '79 GS550 (DOHC) down to the rings to replace them I'm in the rebuild stage, but I'm not exactly sure how to interpret the Clymer manual and repair manual on BikeCliff's site (thanks by the way, it's an incredible resource!).

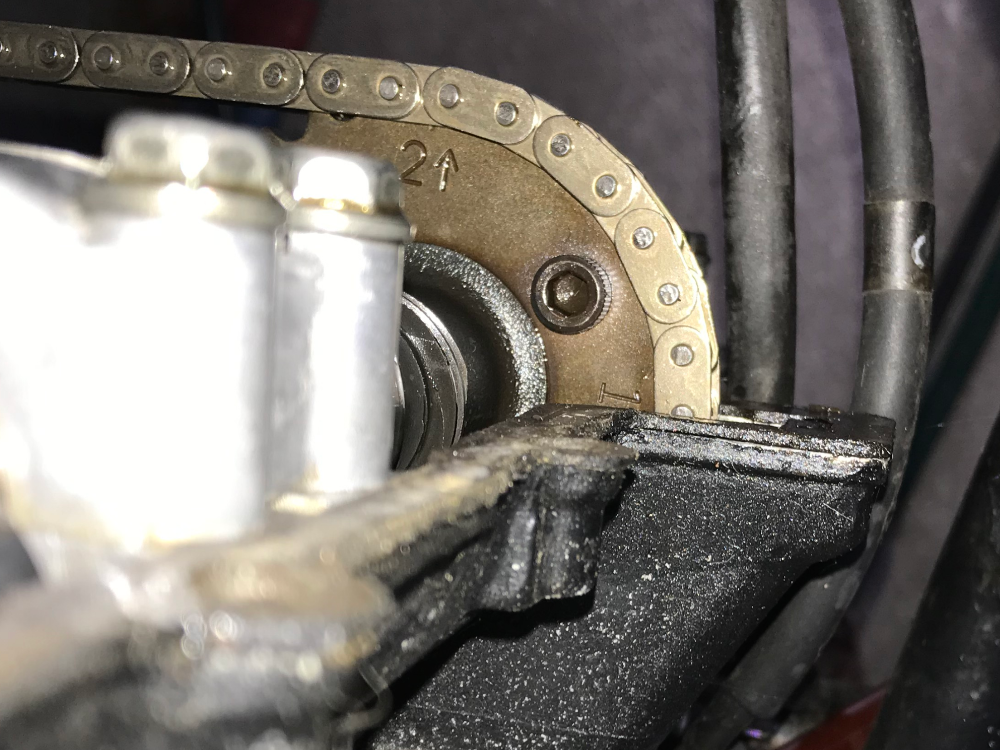
    The official repair manual states to place the crank at TDC and pull the cam chain tight, insert the exhaust cam and:

    "exhaust cam has an arrow mark as indicated (in a photo I can't copy but which adds little for me). Turn over exhaust camshaft to point this arrow flush with the joint surface of the cylinder head. Engage the timing chain with this sprocket."

    It seems straight-forward. Here's my question: does "flush" indicate that the arrow lays above the joint surface but points parallel with it, or that, when looking horizontally at the bike the arrow crosses the plane of the joint's surface but isn't pointing parallel with it. I know it's a bit convoluted, but this timing is critical.


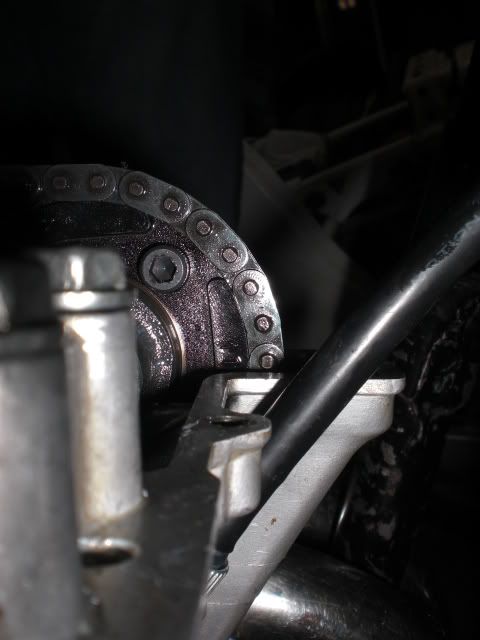
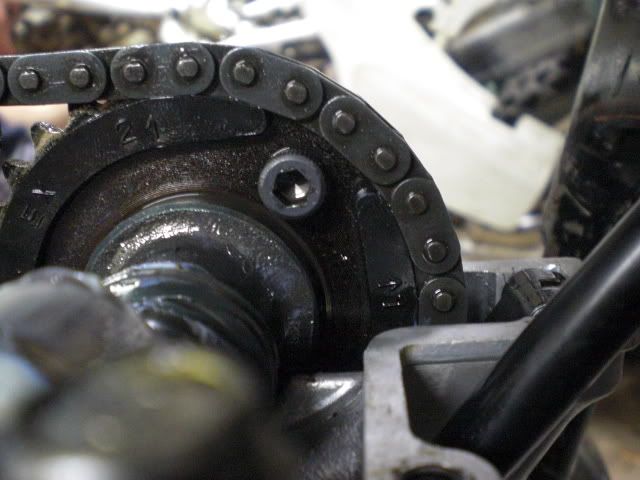
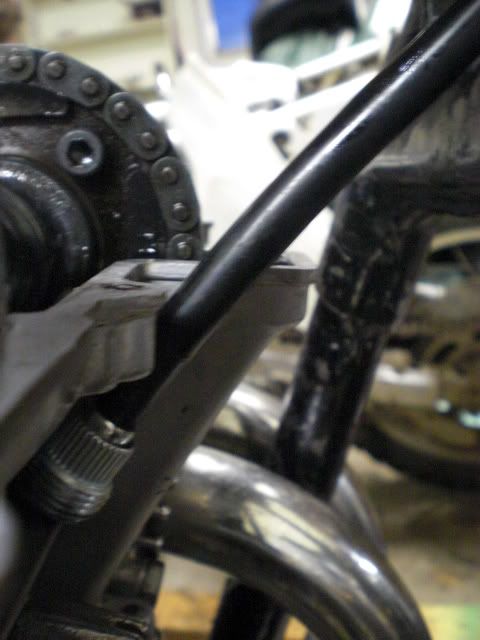
    These are a few photos of my best interpretation. The debate is whether this is correct, or whether the exhaust cam should be moved a link one way or another. Any thoughts GS community?

    [IMG]file:///F:/GS%20Photos/CIMG1362.JPG[/IMG][IMG]file:///F:/GS%20Photos/CIMG1362.JPG[/IMG][IMG]file:///F:/GS%20Photos/CIMG1362.JPG[/IMG]

    #2
    Derick the No. 1 arrow is flush with the head surface with camchain in place then count 20 pins from the No.2 arrow (including the pin the No. 2 arrow points at) then install the intake camshaft and the 20th pin should line up with the No. 3 arrow on the intake camshaft sprocket. When this is done rotate the crank by hand a couple of times and then recheck with the motor at TDC on No. 1 cyl.

    Comment


      #3
      Don is correct, but one thing to check is that you have the crank at TDC.
      I just finished putting my gs550 together and after turning it over by hand(forcing it) for 3-4 revolutions, I took another look why it was so hard to turn over. The timing chain was set perfectly 20 links apart etc. But then I found out there are 2 T's that you could possibly line the crank up to. One is for TDC 1,4, and the other is for TDC 2,3,. I had lined up the first 'T' that came along and unfortunately, it was for cylinders 2,3. I then forced the engine over a few times. After re-setting the crank to the correct 'T' (1,4) I took a chance everything would be ok and started it up. It ran pretty well but there was very little vacuum to set the carbs and I only had 70lbs compression. I had bent the valves. So it's apart again replacing some valves. I wish the manuals made more of a point about the fact there are 2 'T's for us first time engine rebuilders.
      Bill

      Comment


        #4
        Exactly as Don and Bill have said, the arrow must point to the mating surface and be parallel with the head.

        Comment


          #5
          Your #1 position is perfect, assuming the 1-4 T mark is aligned on the crank.
          Ed

          To measure is to know.

          Mikuni O-ring Kits For Sale...https://www.thegsresources.com/_foru...ts#post1703182

          Top Newbie Mistakes thread...http://www.thegsresources.com/_forum...d.php?t=171846

          Carb rebuild tutorial...https://gsarchive.bwringer.com/mtsac...d_Tutorial.pdf

          KZ750E Rebuild Thread...http://www.thegsresources.com/_forum...0-Resurrection

          Comment


            #6
            Originally posted by Suzuki_Don View Post
            When this is done rotate the crank by hand a couple of times and then recheck with the motor at TDC on No. 1 cyl.
            As I said in my previous post TDC on #1 cyl. and then line the arrows up as explained above.

            Comment


              #7
              Yeah, the difference between the 1-4 and 2-3 TDC marks is apparent, so no worries there. I simply had a doubt because "flush" could either mean parallel with the surface, or level with it, but not both and I would truly love to not bend a valve! Thanks for the help local experts, this site is an unparalleled resource for GS info. I'll finish the reassembly and hope the snow here quits! Thanks again.

              Comment


                #8
                For anyone who may stumble across this thread looking for an answer for Cam Timing Clarification, I did indeed find the exact information needed - in another thread. It's called "Another Cam timing thread" by "TheBigRed" and is complete with photos and detailed explanations of how the arrow should perfectly line up level with the surface. I have read through too many cliffhanger threads so this one will resolve the issue for anyone with timing problems. Best of luck gents!

                Comment


                  #9
                  Originally posted by derickson104 View Post
                  For anyone who may stumble across this thread looking for an answer for Cam Timing Clarification, I did indeed find the exact information needed - in another thread. It's called "Another Cam timing thread" by "TheBigRed" and is complete with photos and detailed explanations of how the arrow should perfectly line up level with the surface. I have read through too many cliffhanger threads so this one will resolve the issue for anyone with timing problems. Best of luck gents!


                  http://www.thegsresources.com/_forum...g+chain&page=2
                  I've edited this post to remove some wrong information, thanks Hannibal, as you say, I mistook the 1 for the arrow and the arrow for the 1.

                  I'm still stumped, I've got 2x low mileage GS550 engines, both of them half a link out, I can rotate the cam sprockets forward one link which puts the arrow just below the head, or leave as is with it just above the head. I'm struggling to believe that both camchains have stretched the same amount (especially as some other guys are reporting the same situation). I'll measure the camchain wear and post results for posterity. I thought it was a hyvo, but I guess I didn't look properly - I'm seeing a few posts about a DID 219H split link chain (I'd probably just put the bike in the bin if I had to replace an endless chain).

                  Last edited by Guest; 06-19-2019, 07:56 PM.

                  Comment


                    #10
                    In both of your examples, the arrow points to a sprocket tooth. If the arrow in pic B was pointing at the gap between teeth, it'd be pointing at a chain pin.

                    The only difference in pic B is that the "1" is above the arrow. In pic A, the "1" is below the arrow.
                    Jordan

                    1977 Suzuki GS750 (My first bike)
                    2000 Kawasaki ZRX1100
                    1973 BMW R75/5

                    Comment


                      #11
                      £50 and a couple of hours effort down the drain, I've replaced the camchain with a 116 link DID 219H, it was pretty straight forward. But sadly, I'm still half a link out! I'm going to look closer at the timing plate position, I assumed it was keyed but I don't know how else to account for this.


                      Comment


                        #12
                        Did you ever get this resolved?

                        Comment


                          #13
                          Some of the original photos are missing from this thread but I just want to mention that it's normal for the 1- line on the exhaust cam to point above the gasket surface when the engine is timed properly. This is because the chain will elongate a little with wear. If the 1- line is pointing down, below the gasket surface (like that last photo shows,) then the timing is off a tooth on the cam.
                          Ed

                          To measure is to know.

                          Mikuni O-ring Kits For Sale...https://www.thegsresources.com/_foru...ts#post1703182

                          Top Newbie Mistakes thread...http://www.thegsresources.com/_forum...d.php?t=171846

                          Carb rebuild tutorial...https://gsarchive.bwringer.com/mtsac...d_Tutorial.pdf

                          KZ750E Rebuild Thread...http://www.thegsresources.com/_forum...0-Resurrection

                          Comment


                            #14
                            I can clarify that it will normally look like it's slightly higher. To prove a point, set it one lower and it will be quite a long way below the surface — I've done it myself to make sure. Worn chains and guides, skimmed heads, aftermarket head gaskets could all contribute. When you're pretty sure everything is right, turn it over slowly by hand. Never force it, if something goes tight, there is an issue.
                            1996 GSF1200 — Pretty Much Standard.
                            1983 GSX750ES — Cafe Racer Project
                            1980 GS550E — 673 Conversion.
                            1980 GS400 — Cafe Racer???

                            http://biketech7.blogspot.com.au

                            Comment

                            Working...
                            X