.png "Powered by vBulletin")
Originally posted by Suzuki_Don
View Post
-
Awesome tip. The pictures are priceless. Will do this for sure. -
Good luck. Although good preparation and management beats good luck every time. And you seem to be doing that quite well.Originally posted by Lucero View PostComment
-
If gas/fuel to remain in tank,treat gas w/Sta-bil fuel stabilizer as per;container directive,stuff works well.Don't want gas turn funky and cause any problems and w/eventually rebuilt carb.set and engine performance down the line.Secure garage w/tank placed out of harm's way w/protective padded breathable material off of floor w/good air circulation around/about it should do it,till time comes to wake things up . Tank petcock,as it sets low on bottom is vunerable esp.if tank were to somehow be bumped off its perch,and we know we don't want that to happen,best wishes on project.
Comment
-
Let's break it down for doing it yourself:Originally posted by Lucero View Post
- Let's be generous and say it's going to take you an hour to take them out. That includes removing the tank, seat, etc.
- If you are slow and careful, it will take another hour to totally disassemble the carbs.
- You will need a gallon-size can of Berryman's Carb Cleaner Dip, about $22 at Auto Zone.
- You will need an o-ring kit from cycleorings.com, about $15.
- While you are there, go ahead and get the intake boot o-rings and stainless hardware, less than $10.
- Yes, you will need to spurge eventually, so go ahead and get your Carbtune synchronizer, that will be 68 Pounds ($102.32).
- You will spend about half an hour with each carb as it comes out of the dip, cleaning it and putting it back together (total of two hours).
- After the last carb is out of the dip (on the fourth day), plan on about an hour to put the rack together and do a bench sync.
- It shouldn't take more than an hour to put the carbs back on, sync them and put the tank and seat back on.
TOTAL:
About 6 hours of your time (spread out over 4 or 5 days).*
About $150 for parts and tools.
You will gain a great-running bike and more toys in the toolbox that you won't have to buy again.
* This is a rather generous estimate. It really shouldn't take nearly that long, I am just allowing for it being your first time doing this.
.sigpic
mine: 2000 Honda GoldWing GL1500SE and 1980 GS850G'K' "Junior"
hers: 1982 GS850GL - "Angel" and 1969 Suzuki T250 Scrambler
#1 son: 1986 Yamaha Venture Royale 1300 and 1982 GS650GL "Rat Bagger"
#2 son: 1980 GS1000G
Family Portrait
Siblings and Spouses
Mom's first ride
Want a copy of my valve adjust spreadsheet for your 2-valve per cylinder engine? Send me an e-mail request (not a PM)
(Click on my username in the upper-left corner for e-mail info.)Comment
-
If leaving fuel in tank for storage not appealing,is not too hard to empty tank of fuel,will make tank lighter and easy to manage etc. Could even do visual inspection in and out-side w/no fuel in it.Comment
-
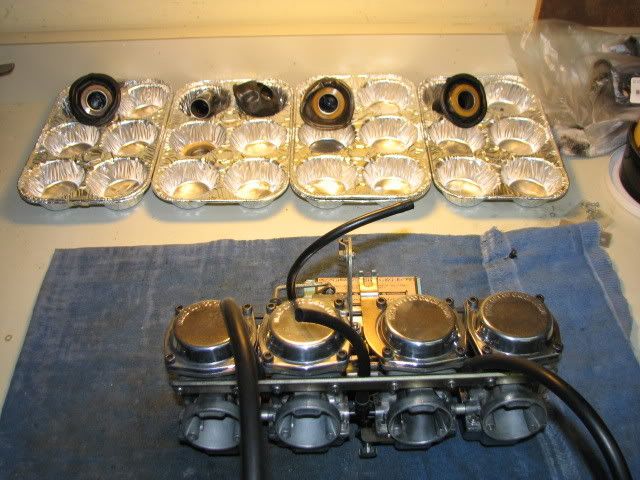
Oh, and don't forget that it helps to have a good work space.
Clean, well-lit and organized. Some disposable muffin tins make GREAT parts holders.
.sigpic
mine: 2000 Honda GoldWing GL1500SE and 1980 GS850G'K' "Junior"
hers: 1982 GS850GL - "Angel" and 1969 Suzuki T250 Scrambler
#1 son: 1986 Yamaha Venture Royale 1300 and 1982 GS650GL "Rat Bagger"
#2 son: 1980 GS1000G
Family Portrait
Siblings and Spouses
Mom's first ride
Want a copy of my valve adjust spreadsheet for your 2-valve per cylinder engine? Send me an e-mail request (not a PM)
(Click on my username in the upper-left corner for e-mail info.)Comment
-
Steve has 'soshiki":"organization", SuzukiDon has got it going on , all the great willing to share /contribute members of GSR an endless list..we all fortunate to they are so good to us in times needing info/answers/directives and those pictures;speaking volumes...wow..what a site/source GSR is.Comment
-
This makes me think my basement is probably the best place to do the work. My garage is a wreck, I've been cleaning it out (it was full, and i mean FULL of junk when i bought the place a lil under two years ago. Just had it boarded up for the first year, but opened it up in the spring. I live in the hood, had to be boarded or I got street urchins lurking around and I didn't really need the space at the time. That's changed lately,Originally posted by Steve View Post.
And yes, elrico, these guys have been invaluable to me so far.Comment
-
Si,si..all of us,in this... vintage GS 'ness.They all very wonderfull allies.Comment
-
Got'em out yet??
Its tight, but you will get it. CafeKid said it right ... thats how I did it, just inch them out and after a certain point they will fall into your hands.
Clean work table ... important I got four large plastic bins, marked 1,2,3, and 4 .. as I took the carbs apart, each part goes in the right bin, then lid back on. Like an assembly line. Once all is apart .. then look closely and see what needs attention/replacement.
I have to tell you .. I rebuilt my 550 carbs .. before I found this site. Still ran like crap. Due to the "mystery" of the CV carbs (to me anyhoo) I took it in to a shop with a mechanic who claimed to be an "old factory suzuki mechanic" in the early 80's. After 3 .. THREE complete carb rebuilds, and a price tag of 500 bucks, he didnt get it to run any better than I had. Yea, I didnt pay 500 bucks ......
I printed out the carb tutorial here, got the right parts, and carefully rebuilt the carbs completely. And now it runs AWESOME
This is why these guys say NO shop .. you can do it, and do it correctly.
JasonComment
-
Diggin the muffin trays... Was trying to figure out something to use when I do my carbs next week.Comment
-
Warning, they are VERY expensive.Originally posted by keman View Post
I got them at Big Lots. The 6-place tins come in a package of two for 99 cents. I got two packages, so it was about $2.12 with tax.
(Yeah, there are more than four tins in the picture. I liked the idea, so I went back and got more.)
.sigpic
mine: 2000 Honda GoldWing GL1500SE and 1980 GS850G'K' "Junior"
hers: 1982 GS850GL - "Angel" and 1969 Suzuki T250 Scrambler
#1 son: 1986 Yamaha Venture Royale 1300 and 1982 GS650GL "Rat Bagger"
#2 son: 1980 GS1000G
Family Portrait
Siblings and Spouses
Mom's first ride
Want a copy of my valve adjust spreadsheet for your 2-valve per cylinder engine? Send me an e-mail request (not a PM)
(Click on my username in the upper-left corner for e-mail info.)Comment
-
Guys, it's been a busy holiday season for me and I haven't even touched the bike since October!!! (I do a lot of traveling in Oct/Nov) This unseasonably warm weather has me regretting that I have put the carb rebuild off so long. I am planning to run around this weekend and buy most of the stuff on Steve's list, as well as order the o-ring/intake kits.
That, and buy a new (used) refridgerator and some other crap for household projects. Just wanted to stop by and say hello after an extended hiatus. I'll be bummed if I get this done in a few weeks and we get four feet of snow, but damn, I'd be out on it right now if I hadn't put it off this long. Gotta get it done.Comment
-
cycleorings.com
I have access to a car mechanic's full shop; is there something they are likely to have in-shop that I could substitute for the carbtune synchronizer to avoid this cost?Originally posted by Steve View Post
I've got a paypal cart full of o-ring kits and intake o-rings, but I'm not sure what size screws I need. My bike isn't listed on his page, and I tried looking at the flatout website he links to, but I don't know which part I'm looking for on the carb blowout diagram.Originally posted by Steve View Post
Does anyone know what I need for an '82 GS 550L?
Thanks as always for your help, everyone.
LuceroComment
-
Plenty of good advice so far, but my own secret that's helped me out is some rubber safe lube or grease on the engine and air box side boots.Comment
")
Comment