Announcement

Collapse
No announcement yet.

My simplified polishing test

Collapse
X
 
  • Filter
  • Time
  • Show
Clear All
new posts

    My simplified polishing test

    While waiting for my carbs, I started experimenting with some of the techniques I've found here at GSR.
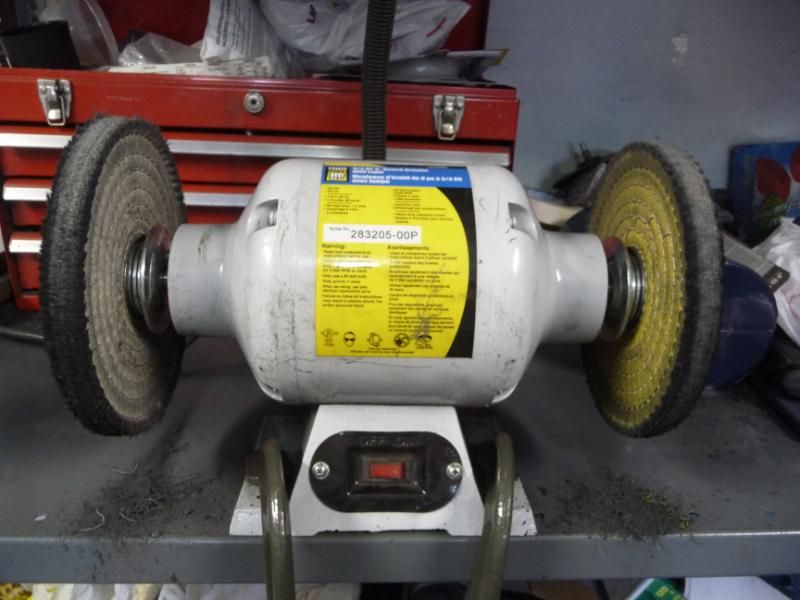
    I went down to my local hardware store and found a very limited selection of polishing equipment.
    I left with a 6" spiral sewn buffing wheel, a stick of tripoli and a few sheets of sand paper.

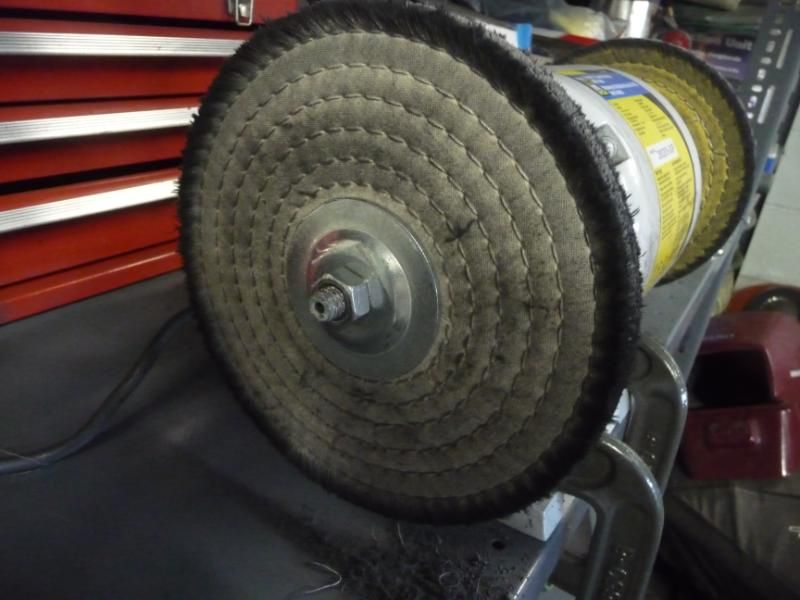
    I took the top covers from my old set of carbs and beat the nasty off of them with the wire wheel on my bench grinder.
    Then I tried sand paper, which was a waste of time and a lot of work. Just leave this step out.
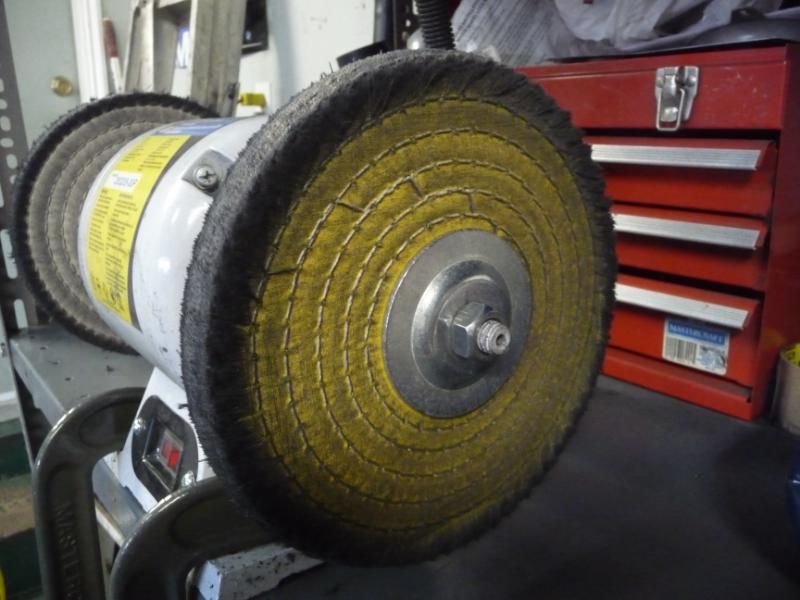
    Next I put the buffing wheel on my grinder, opposite the wire wheel.
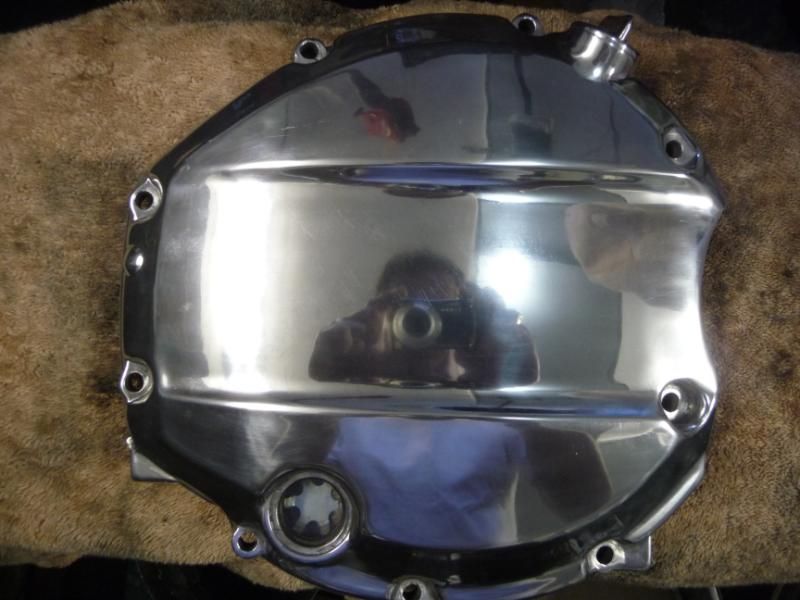
    I peeled back the paper on the tripoli and lightly run the buffing wheel over it.
    As soon as I put one of the tops to the wheel and applied pressure, it began to shine.
    Now it's not showroom quality and probably never will be, but it looks very good.
    And I'm not quite finished with it. I'll run it on the wheel a few more strokes.
    Then clean it and see what a little hand polishing with Mothers will do.

    Here are some bad pictures from my bad camera that really doesn't show the finish very well.


    Last edited by Guest; 04-04-2012, 02:27 PM.

    #2
    Well if you're gonna do em, then I won't!
    Actually it's part of the service, caps and bowls polished...

    Comment


      #3
      Cool. I'm just using these tops to experiment with.
      I'm sure I'll get future use of them, on this bike or another.
      I'm a little tempted to grab one of my old carb bodies and make it shine.
      But first, I'd like to pull all the covers from the engine and works them a bit.

      Comment


        #4
        I use a sisal wheel and gray cutting compound. This combination is noticeably more aggressive than tripoli and a stitched wheel, which does a nice job of bringing up the shine, but won't go down and remove corrosion pitting and such.
        Ed

        To measure is to know.

        Mikuni O-ring Kits For Sale...https://www.thegsresources.com/_foru...ts#post1703182

        Top Newbie Mistakes thread...http://www.thegsresources.com/_forum...d.php?t=171846

        Carb rebuild tutorial...https://gsarchive.bwringer.com/mtsac...d_Tutorial.pdf

        KZ750E Rebuild Thread...http://www.thegsresources.com/_forum...0-Resurrection

        Comment


          #5
          I'll have to pick those up on my next trip to the big city. Or online.
          What I got was all that was available here.
          And I know what you are referring to about the pitting.
          I have some slight pitting that my wheel won't remove.

          What is the grey compound called, by the way? My store may actually have it.
          And would my wheel work using the more aggressive grey stuff on the pitting?

          Comment


            #6
            Using the sandpaper first, is to get rid of any pits, gouges, deep scratches, corrosion, it's quicker than trying to do it with the buffing wheel.

            using a coarse paper first get's the job done quick, then as you use finer and finer paper, it will leave the part almost perfect but without a shine, then you use the buffer.....

            and at the end, get some polishing cream and do the part by hand, and final step, a nice soft cloth, cotton T shirt, or the new micro fiber cloths to buff to a brilliant shine
            Last edited by Guest; 04-04-2012, 03:22 PM.

            Comment


              #7
              Originally posted by GateKeeper View Post
              Using the sandpaper first, is to get rid of any pits, gouges, deep scratches, corrosion, it's quicker than trying to do it with the buffing wheel.

              The way Nes mentions you wont need any sand paper.
              sigpic

              82 GS850
              78 GS1000
              04 HD Fatboy

              ...............................____
              .................________-|___\____
              ..;.;;.:;:;.,;.|__(O)___|____/_(O)|

              Comment


                #8
                Originally posted by Octain View Post
                The way Nes mentions you wont need any sand paper.
                perhaps he has better luck than I do, I find any deep scratch, one that can be felt by your finger nail, would not be removed by buffing alone.

                Comment


                  #9
                  Originally posted by GateKeeper View Post
                  perhaps he has better luck than I do, I find any deep scratch, one that can be felt by your finger nail, would not be removed by buffing alone.

                  Ever tried a Sisal wheel?
                  sigpic

                  82 GS850
                  78 GS1000
                  04 HD Fatboy

                  ...............................____
                  .................________-|___\____
                  ..;.;;.:;:;.,;.|__(O)___|____/_(O)|

                  Comment


                    #10
                    There's more to removing a scratch than just the scratch itself. It's easy to tell if there was ever one or any other kind of damage in a spot that wasn't removed properly. I've seen a lot of it. Depending on the location, a large area has to be refinished to make the repair blend in. There's no other way.

                    Comment


                      #11
                      Originally posted by GS ace View Post
                      There's more to removing a scratch than just the scratch itself. It's easy to tell if there was ever one or any other kind of damage in a spot that wasn't removed properly. I've seen a lot of it. Depending on the location, a large area has to be refinished to make the repair blend in. There's no other way.
                      Scratches aren't the biggest problem with this 30 year old aluminum, pits are. Usually if it's that's bad and the owner wants "perfect" then the part may need to be replaced with a better one. One with no scratches or pits. If the owner is ok with some imperfections then most scratches and pits can be removed to look pretty good, although not perfect.

                      I have buffed noticeable low spots in large flat areas without sand paper.

                      When I first saw Nessism recommend Sisal wheels I immediately found some on the net. In conjunction with a really good buffing motor(and the correct saftey equipment) they work amazingly well. You'll cut your buffing time in half or better.
                      sigpic

                      82 GS850
                      78 GS1000
                      04 HD Fatboy

                      ...............................____
                      .................________-|___\____
                      ..;.;;.:;:;.,;.|__(O)___|____/_(O)|

                      Comment


                        #12
                        This is part of my items I use for polishing/buffing


                        And this was done last night, I had to do it over as it got messed up sitting around in the garage, during the bike build

                        prior to hitting it with the buffer, I sanded it with 1000 grit wet/dry paper

                        still not 100%, but close enough


                        .

                        Comment


                          #13
                          I'm about to find out how well a jitterbug sander will speed up the pitting removal.
                          I have three different grits. 120, 320 and 600. That's as fine as they had.
                          I could have gotten better paper at the parts store, but it was in the opposite direction from home.
                          Another 20 miles round trip. If what I have doesn't do it, I'll go that way in the morning.

                          I noticed a few minutes ago, that if I apply enough pressure the wheel and tripoli will smooth the pits.
                          Not completely, but almost. So a more aggressive compound might do it. And then no sanding will be required.
                          The sisal wheel should definitely eliminate the need for sanding.

                          OK, I run the jitterbug on one of the tops using only the 320 grit.
                          Then I buffed it out with my wheel and wiped it down with a rag.
                          I can put a penny up beside it and almost read the date.
                          I think after the 600 grit, I'll be able to see "In God We Trust", "Liberty" and "2007". lol
                          My pictures are really blurry if taken indoors, so I won't bother with the camera until I get back outside.

                          Comment


                            #14
                            Just did that to top and bowls on 79 850, used the sisal wheel and "hard metal " compound first then polishing pad and polishing compound and they look really good! Even the bowls came out nice and shiny! terrylee

                            Comment


                              #15
                              Think I'll try this on my swing arm. The simpler the better, I'm not looking for a mirror finish.
                              sigpicMrBill Been a GSR member on and off since April 2002
                              1980 GS 750E Bought new in Feb of 1980
                              2015 CAN AM RTS


                              Stuff I've done to my bike 1100E front end with new Sonic springs, 1100E swing arm conversion with new Progressive shocks installed, 530 sprockets/chain conversion, new SS brake lines, new brake pads. New SS fasteners through out. Rebuilt carbs, new EBC clutch springs and horn installed. New paint. Motor runs strong.

                              Comment

                              Working...
                              X