Announcement

Collapse
No announcement yet.

Spoke Wheel Lacing Tutorial

Collapse
X
 
  • Filter
  • Time
  • Show
Clear All
new posts

    Spoke Wheel Lacing Tutorial

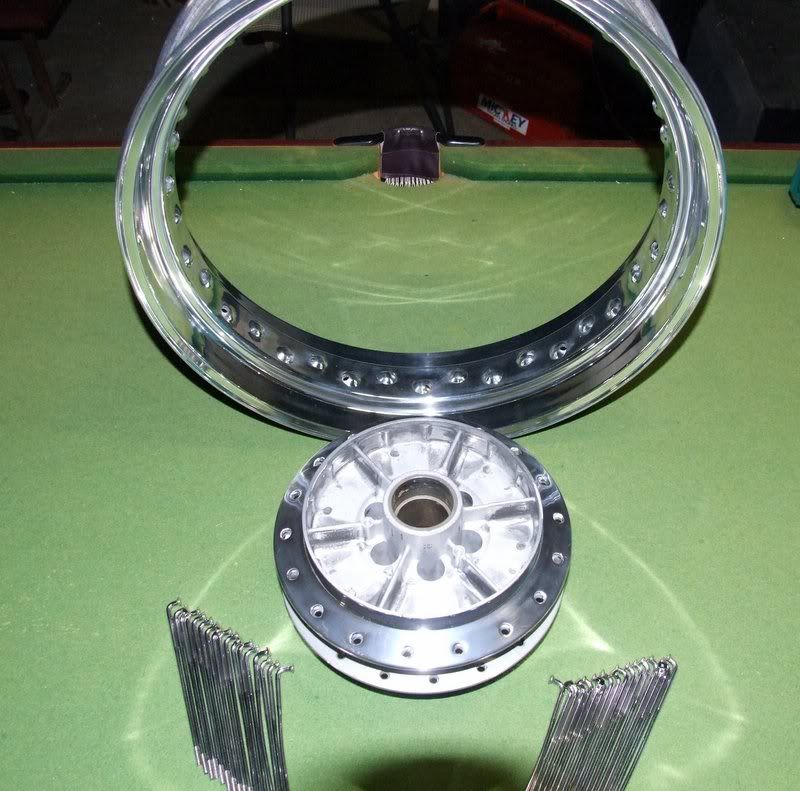
    After disassembling and re-lacing several GS wheels I finally figured out an efficient way to accomplish the task. It isn't hard but is like a puzzle that has to be assembled in a certain order. If you don't do it in this order you will need to remove already installed spokes to install other spokes, which is very frustrating. Also, if done differently the spokes do not install easily and it is easy to scratch the rim. So, see below for the tutorial I wrote with what I think is the best way to lace spoke wheels. Using this method the spokes all install without removing any others and they install easily so there isn't as much chance of scratching the rim.

    Spoke Wheel Lacing - the DOH! I Finally Figured it out Method

    First, there are three important basic things to note:

    • It is very important to know the offset of the hub to the rim so the wheel can be re-laced with the correct offset. The rims are not always centered in relation to the hub. Be sure to take and write down measurements! I use a long straight edge and measure the offset from the edge of the rim to a flat surface on either side of the hub.

    • The spokes have two different bends. The spokes with the tighter bend at the hub end are inserted into every other hole in the hub from the inside, i.e. the bend will be visible from the outside. The spokes with the lesser bend are inserted into the every other hole from the outside, i.e. the spoke button will be visible from the outside. The tighter bend spokes will work inserted either way but the lesser bend spokes will only work when inserted outside in so be careful and sure you’re using the right spokes as it sucks to have to disassemble the wheel when you’re almost finished because you used one incorrect spoke!

    • The spoke nipple holes on the rim are offset left and right. As would make sense, the left nipples are for the spokes from the left side of the rim and vice-versa. The holes in the rim nipples also point in different directions depending on where the appropriate spoke is coming from.


    Now to start lacing the rim:
    1. Separate the spokes into two groups, one group for the tighter bend, one group for the lesser bend. Put the tighter bend aside for now.
    2. Place the hub and rim on a work bench. It helps to have the hub and rim extending past the edge of the bench as the spokes need to drop well below the bottom of the hub and rim. Roughly center the hub inside the rim.
    3. Insert one of the lesser bend spokes in any hub hole from the outside in, i.e the button will be visible. Orient the threaded end of the spoke in a clockwise direction moving outward from the hub to the rim. Place the threaded end of the spoke in a rim hole that is positioned on the upper edge of the rim drop center and pointing the proper direction to align with the spoke. With the hub roughly centered inside the hub the spoke will point in approximately an 8 o’clock position. Loosely screw the spoke nipple onto the threaded end of the spoke.
    4. Using another lesser bend spokes, insert it into the hub hole from the outside in, two places clockwise from the first spoke. Insert the threaded end of the spoke into the rim hole four spaces clockwise from the first spoke. Loosely screw the spoke nipple onto the threaded end of the spoke.

    5. Repeat steps 3 and 4 above, spacing the spokes two holes apart on the hub and four spaces apart on the rim. For a thirty-six spoke rim you will end up with nine spokes installed.
    6. Flip the wheel over and spin the rim counter-clockwise until the spokes are relatively evenly spaced and the hub is centered inside the rim. Notice that the spokes are now pointing in a counter-clockwise direction moving outward from the hub to the rim.


    Also note that, looking straight down, the holes in the hub are offset between the top and bottom edges.
    7. Looking straight down, insert a lesser bend spoke into any hub hole just counter-clockwise (right) in relation to any lower rim edge hole that has a spoke inserted. When inserting the spoke (from the outside in with the spoke button visible) be sure to position the threaded end to the counter-clockwise (right) side of the existing spoke below. If you don’t do this you will not be able to move the threaded end of the spoke into its designated rim hole.
    8. Insert the threaded end of the spoke into the rim hole just counter-clockwise (right)of the rim hole occupied by the existing spoke below.
    9. Repeat steps 3 and 4 above, moving in either direction around the hub and rim, inserting a lesser bend spoke into every other hub hole and every fourth rim hole.
    At this point you should have eighteen spokes in the wheel, all lesser bend spokes. Every other hole in the hub should have a spoke inserted from the outside in with the spoke button visible from the outside. The rim should have nine pairs of adjacent spokes with two holes between each pair. The spokes should have a symmetrical pattern.
    10. Now grab the eighteen spokes with a tighter bend. Pick any open rim hole and insert the tighter bend spoke from the inside out, i.e. the bend should be visible from the outside. Position the threaded end of the spoke clockwise at approximately an 8 o’clock position. It should clearly line up with a rim hole located on the top side of the drop center and pointing in line with the spoke. Insert the threaded end of the spoke into this rim hole and loosely screw the spoke nipple onto the spoke.
    11. Repeat step 10 above, moving in either direction until all rim holes on the top side have spokes installed. Again, you will be moving two holes on the hub and four holes on the rim, regardless of direction.

    12. Flip the wheel over and repeat steps 10 and 11 above. This time the spokes will be pointing counter-clockwise from the hub to the rim. It should be readily apparent which hub and rim holes to use.

    CONGRATULATIONS! You have successfully laced a spoke wheel!


    I hope this is helpful. Of the instructions are followed you should be able to lace a wheel in under an hour! I also have this writeup in PDF format so please let me know if you would like me to send that to you.

    Thanks,
    Joe
    Last edited by Joe Nardy; 04-16-2014, 02:38 PM.
    IBA# 24077
    '15 BMW R1200GS Adventure
    '07 Triumph Tiger 1050 ABS
    '08 Yamaha WR250R

    "Krusty's inner circle is a completely unorganized group of grumpy individuals uninterested in niceties like factual information. Our main purpose, in an unorganized fashion, is to do little more than engage in anecdotal stories and idle chit-chat while providing little or no actual useful information. And, of course, ride a lot and have tons of fun.....in a Krusty manner."


    #2
    That sure brings back memories. I haven't laced a wheel since the early 80's when I worked at a Suzuki dealership. I assume you have a stand with a dial indicator. heh
    All the robots copy robots.

    Komorebi-The light filtering through the trees.

    You are free to choose, but you are not free from the consequences of your choices.

    Comment


      #3
      Do not have any spokes myself.
      That being said thank you for sharing this.
      Copied and saved this to word in case the need ever arrives.
      Such sharing is so appreciated!

      Comment


        #4
        Thanks for that. Where did you get the spokes?

        1978 GS1000C
        1979 GS1000E
        1980 GS1000E
        2004 Roadstar

        Comment


          #5
          Originally posted by earlfor View Post
          That sure brings back memories. I haven't laced a wheel since the early 80's when I worked at a Suzuki dealership. I assume you have a stand with a dial indicator. heh
          Earl,

          Of course I have a dial indicator, along with a balance stand. I hope to write a follow up tutorial on setting offset and truing.

          Thanks,
          Joe
          IBA# 24077
          '15 BMW R1200GS Adventure
          '07 Triumph Tiger 1050 ABS
          '08 Yamaha WR250R

          "Krusty's inner circle is a completely unorganized group of grumpy individuals uninterested in niceties like factual information. Our main purpose, in an unorganized fashion, is to do little more than engage in anecdotal stories and idle chit-chat while providing little or no actual useful information. And, of course, ride a lot and have tons of fun.....in a Krusty manner."

          Comment


            #6
            Originally posted by Joe Nardy View Post
            Earl,

            Of course I have a dial indicator, along with a balance stand. I hope to write a follow up tutorial on setting offset and truing.

            Thanks,
            Joe
            That's the one I want to see. My method is trial and error, mostly error.


            Life is too short to ride an L.

            Comment


              #7
              Originally posted by Rover View Post
              Thanks for that. Where did you get the spokes?
              The spokes are from a '78 GS750. The hub and rim are from a '78 GS1000. The GS1000 had alloy rims while all other GS spoke models had steel wheels. The spokes for the alloy wheels are no longer available but the spokes for the GS750 are. The spoke nipples are slightly different but the spoke length and wire size are identical. The GS750 spokes can be purchased at any Suzuki parts dealer. Also, Buchanan's and Mike's XS have stainless spokes available (the OEM spokes are plated steel) but Buchanan's is pretty pricey and Mike's XS spokes are for Yamaha XS models. I contacted Mike's XS and they had some spokes that would probably have worked but I chose the OEM spokes after some other forum members provided measurements from steel wheel bikes and found they were identical.

              Thanks,
              Joe
              IBA# 24077
              '15 BMW R1200GS Adventure
              '07 Triumph Tiger 1050 ABS
              '08 Yamaha WR250R

              "Krusty's inner circle is a completely unorganized group of grumpy individuals uninterested in niceties like factual information. Our main purpose, in an unorganized fashion, is to do little more than engage in anecdotal stories and idle chit-chat while providing little or no actual useful information. And, of course, ride a lot and have tons of fun.....in a Krusty manner."

              Comment


                #8
                Thanks Joe, planning on doing this 'one day'
                Rob
                1983 1100ES, 98' ST1100, 02' DR-Z400E and a few other 'bits and pieces'
                Are you on the GSR Google Earth Map yet? http://www.thegsresources.com/_forum...d.php?t=170533

                Comment


                  #9
                  So any reason you laced the wheel one hole out. You can clearly see the marks on the hub where a outer spoke was laced but you have a inner spoke installed facing in the other direction. Thus leaving marks on the hub showing for no reason at all.. And did you know those alloy rear hubs (2.5 x 18) can be laced onto the front hub and then if they wanted too buy a (4.25 x 18) rear akront that almost matches the same style and lace that to the rear. Just a suggestion if not wanting standard sizes. But good job on the tutorial.

                  Comment


                    #10
                    Originally posted by sharpy View Post
                    So any reason you laced the wheel one hole out. You can clearly see the marks on the hub where a outer spoke was laced but you have a inner spoke installed facing in the other direction. Thus leaving marks on the hub showing for no reason at all.. And did you know those alloy rear hubs (2.5 x 18) can be laced onto the front hub and then if they wanted too buy a (4.25 x 18) rear akront that almost matches the same style and lace that to the rear. Just a suggestion if not wanting standard sizes. But good job on the tutorial.
                    Sharpy,

                    You obviously have a better eye than me, I didn't even notice the marks. Regardless, I'm selling this wheel and it was disassembled. I told the buyer I would put it together so he would have a reference as to how to build it. He plans to disassemble again to clean and polish. While I was assembling I decided to do the tutorial, mostly to help the buyer who has never built wheels before, but also to help anyone else who could use it.

                    I did a set of spokes for my Kat and while I used the OEM 19 inch front I did use a 3.00 D.I.D rear to allow a wider rear tire. One thing to be aware of when sourcing aftermarket rims is that the drop center of the rim may be deeper than the OEM rims, requiring either slightly shorter spokes or shortening the OEM spokes so they don't stick past the nipples and puncture the tube.

                    Thanks for the compliment on the tutorial. I'm working on part 2 which will explain setting offset and runouts.

                    Joe
                    Last edited by Joe Nardy; 04-17-2014, 04:18 PM.
                    IBA# 24077
                    '15 BMW R1200GS Adventure
                    '07 Triumph Tiger 1050 ABS
                    '08 Yamaha WR250R

                    "Krusty's inner circle is a completely unorganized group of grumpy individuals uninterested in niceties like factual information. Our main purpose, in an unorganized fashion, is to do little more than engage in anecdotal stories and idle chit-chat while providing little or no actual useful information. And, of course, ride a lot and have tons of fun.....in a Krusty manner."

                    Comment


                      #11
                      Originally posted by sharpy View Post
                      So any reason you laced the wheel one hole out. You can clearly see the marks on the hub where a outer spoke was laced but you have a inner spoke installed facing in the other direction. Thus leaving marks on the hub showing for no reason at all.. And did you know those alloy rear hubs (2.5 x 18) can be laced onto the front hub and then if they wanted too buy a (4.25 x 18) rear akront that almost matches the same style and lace that to the rear. Just a suggestion if not wanting standard sizes. But good job on the tutorial.

                      Hi Sharpy,

                      So the rear 2.5 x 18 rim can be laced to the front hub? Are there any clearance issues? In my case it would be for a GSX1100EZ. And the 4.25 x 18 Akront on the rear, I'm liking the sound of that.

                      Comment


                        #12
                        Originally posted by Joe Nardy View Post
                        Sharpy,

                        You obviously have a better eye than me, I didn't even notice the marks. Regardless, I'm selling this wheel and it was disassembled. I told the buyer I would put it together so he would have a reference as to how to build it. He plans to disassemble again to clean and polish. While I was assembling I decided to do the tutorial, mostly to help the buyer who has never built wheels before, but also to help anyone else who could use it.

                        I did a set of spokes for my Kat and while I used the OEM 19 inch front I did use a 3.00 D.I.D rear to allow a wider rear tire. One thing to be aware of when sourcing aftermarket rims is that the drop center of the rim may be deeper than the OEM rims, requiring either slightly shorter spokes or shortening the OEM spokes so they don't stick past the nipples and puncture the tube.

                        Thanks for the compliment on the tutorial. I'm working on part 2 which will explain setting offset and runouts.

                        Joe

                        Looking forward to "part 2" Joe.
                        Rob
                        1983 1100ES, 98' ST1100, 02' DR-Z400E and a few other 'bits and pieces'
                        Are you on the GSR Google Earth Map yet? http://www.thegsresources.com/_forum...d.php?t=170533

                        Comment


                          #13
                          Originally posted by therefinery View Post
                          Hi Sharpy,

                          So the rear 2.5 x 18 rim can be laced to the front hub? Are there any clearance issues? In my case it would be for a GSX1100EZ. And the 4.25 x 18 Akront on the rear, I'm liking the sound of that.
                          Exactly what im running on my GS. The back of the brake arm needs to be flattened but thats all if ure running a 140. and a GSX550ESD front guard fits and is 18inch and just needed slight slots for the brake hose brackets. (well did on my bike)Look in here if u havent seen my bike yet.

                          Store your photos and videos online with secure storage from Photobucket. Available on iOS, Android and desktop. Securely backup your memories and sign up today!

                          Comment


                            #14
                            Also i ask one of my old bosses that is the original owner of my bike and been doing wheels professionally since 1975 (Tyres 4 Bikes, Keith Novak wheel repairs and now freelancing somewhere i cant mention) the spokes running with each other or opposite way dont seem to make any difference to strength. And if ure using stainless spokes go up one size at least (8 guage and maybe next size, have to check) as there a fraction more brittle and me personally i break 1 or 2 a year.

                            Comment


                              #15
                              Originally posted by Joe Nardy View Post
                              I'm working on part 2 which will explain setting offset and runouts.

                              Joe
                              Originally posted by azr View Post
                              Looking forward to "part 2" Joe.
                              Part 2 of the tutorial has been completed. A friend of mine, sometime GSR contributor Groove Daddy, has created a website and asked if he could post it there first and then link to it here. I'm not clear on the reasons but it has something to do with search engine rankings so I'm going to help him out. I will post a link as soon as he has posted the tutorial.

                              Thanks,
                              Joe
                              IBA# 24077
                              '15 BMW R1200GS Adventure
                              '07 Triumph Tiger 1050 ABS
                              '08 Yamaha WR250R

                              "Krusty's inner circle is a completely unorganized group of grumpy individuals uninterested in niceties like factual information. Our main purpose, in an unorganized fashion, is to do little more than engage in anecdotal stories and idle chit-chat while providing little or no actual useful information. And, of course, ride a lot and have tons of fun.....in a Krusty manner."

                              Comment

                              Working...
                              X