-
 Guest repliedSpray adhesive on the back and then cover the entire label with clear packaging tape.
 -
Here is the label which was affixed to the steering stem. I removed the label when the frame was painted & baked.
Does anyone have any experience with reapplying this little label. I know 3M makes spray adhesive but that might not be the best solution. . . . Suggestions?

Leave a comment:
-
Got the fork legs back from the powder coater on Friday, went with satin black. Old bushing & fork seal.

Found nicks in both stanchion tubes at the bottom of the travel. Could have got damaged during disassembly because you have to slide hammer the stanchion tube out of the fork leg which pulls out the upper bushing, washer & fork seal. I sanded the high spots with 1000 grit.

Now that I have researched I found these are not the original fork springs. The OEM's are progressive wound with one end tighter than the other. Also has a 1" spacer for more preload.

The GPz forks are different and have two bushings vs. the GS's with one. The second bushing requires a special tool to install but I used an exhaust pipe with duct tape on the lip so it would not damage the bushing & washer/fork seal when driving it in. You have to install the fork stanchions first, then install the bushing, washer & fork seal.

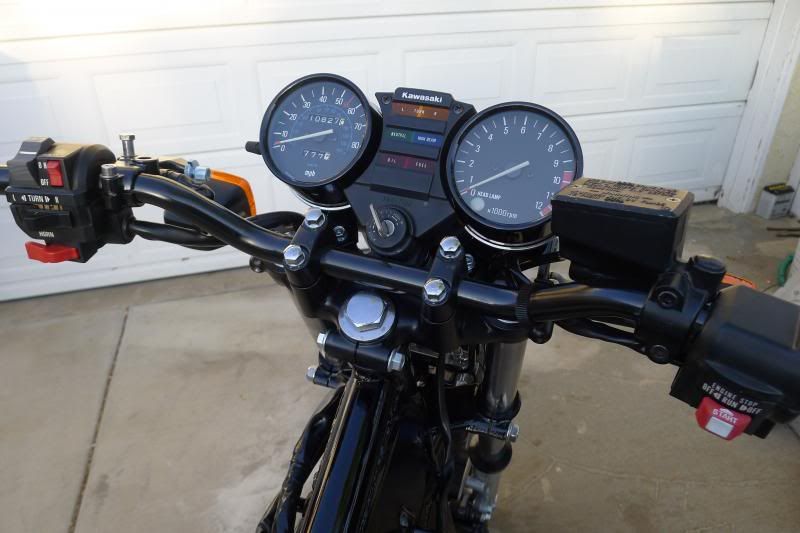
Here is the set up I used. I then added 245 ml of 10 wt fork oil and buttoned it up with the available new parts. Fork tubes ready to get installed. I also redid all the clocks, switch gear heat shrink which was torn and replaced it with Thermofit PVC 105C heat shrink . . . . thick & shiney like OEM
 Last edited by srsupertrap; 07-27-2014, 07:26 PM.
Leave a comment:
-
I took Ed up on his offer & bought his extra set of All Balls Steering Bearing & Seal kit for $15. Following his instruction I dremeled then chiseled the lower bearing race to remove it. The sledge on the right didn't have enough Ommph to seat the lower steering stem bearing.

Unfortunately the lower ID of the dust seal was to small to fit the OD of the lower tapered roller bearing making it useless.

I found a concave rubber drain valve that was the correct the OD @ The Home Depot. I then cut out the ID I needed.

Not perfect but it will keep the dirt out of the lower steering stem bearing

Here is the steering stem hanging by a thread, once tightened that seal will get pulled up of sight. The races went in 1-2-3 but the lower tapered roller bearing required the 8 Lb sledge to install it.

Top view of the All Balls dust cover over the top tapered roller bearing. I will install the beauty cover later
 Last edited by srsupertrap; 07-20-2014, 06:48 PM.
Leave a comment:
-
After Honing my original Master with ATF for a couple of minutes . . . Hope it does not leak

OEM replacement parts . . . Kawaskai parts are expensive
 Last edited by srsupertrap; 07-19-2014, 08:36 PM.
Leave a comment:
-
Guest repliedGood stuff!
Leave a comment:
-
I stripped both Masters down last Sunday & followed 7981GS's advice & picked up a can of VHT SP739 semi-gloss caliper paint.

Gotta love the smell of baking VHT in the oven

Bought this On EBay to hone the cylinders. The two blade works on 1/2" & up which is what I need. It cost $27.50 shipped

One of the rare tools still Made In USA & Lifetime Warranty

I now think my original Master is the best bet because the two stone hone will probably remove most of the surface pitting. 7981GS told me how to repair the pits in the Master. One of the two should work & give the authentic look.
 Last edited by srsupertrap; 07-18-2014, 05:09 AM.
Leave a comment:
-
-
-
The original was gloss black
Semi gloss caliper paint would be good, as it's a bit more fluid resistantLeave a comment:
-
Powdercoat it. I dunked a powdercoated part I had just taken out of the oven in brake fluid for a few days, then in gasoline for a few days, it still looked shiny and new.Leave a comment:
-
The EX650 master is good solution. . . unfortunately the EX650 brake hose is mounted 90 clockwise vs. the GPz master. The brake hose between the master & brake junction is braided stainless and it does not rotate a bit.
I do have a 1980 GS1000 square master that I squirreled away a decade ago just in case
Here is a pic of the master(s) after cleaning. Any recommendation on paint? Looks like no primer was applied, just semi gloss enamel & baked

Leave a comment:
-
Not sure what happens with a pitted master.
EX650 master shown on my 750. You can find them in good condition for cheap on ebay. Reservoir angles down more than I'd like but I can live with that.
Leave a comment:
-
I will show my ignorance . . . What's the symptom of using either brake master which has a pitted master cylinder bore? I am taking educated guess it would not sustain brake lever pressure for extended period of time due to seal leakage?Leave a comment:
-
Leave a comment:


Leave a comment: