.png "Powered by vBulletin")
I'm trying to find a tool to hold the rotor. So far I've only been able to get it up to 65-lbs. Using a strap wrench.
-
Stephen.
1981 GSX540L "Frankintwin"
1989 GS500E Resto-mod .
400 mod thread
Photo's 1
Photos 2
Gs500 build thread
GS twin wiki -
I put mine in 2nd gear and held the rear brake.Just go slow and sneak up on that 90lbs.Be sure the crank snout and inside of the rotor are completely clean and free of oil residue.Originally posted by Mekanix View PostComment
-
Yeah That means I have to pull it off again to see if there is any oil left on the crank.Originally posted by ben2go View Post
I didn't think the crank could handle 90' lbs. That's why I didn't use it in gear.
Have to pick up some red locktite as well. I use blue on almost everything normally without problems.Stephen.
1981 GSX540L "Frankintwin"
1989 GS500E Resto-mod .
400 mod thread
Photo's 1
Photos 2
Gs500 build thread
GS twin wikiComment
-
Here's some of the pics of the engine build.
Clearance engine case.


Bored and sleeved cylinder block.

Comment
-
What are those piston and sleeves from ?Stephen.
1981 GSX540L "Frankintwin"
1989 GS500E Resto-mod .
400 mod thread
Photo's 1
Photos 2
Gs500 build thread
GS twin wikiComment
-
We don't know.They measured out to the GS dimensions except for the outer diameter of the sleeves but they GS sleeves can be pressed out.Then the cylinder block was rebored for the new sleeves to be pressed in.
Here is a discussion started by the guy that I am working with to build my engine.The discussion starts off about building a 541cc and turns into my 569cc build.He started the motor and things have changed for him.So we are finishing it together and installing it in my 89 that is heavily modified.
Comment
-
Looks good.
How do you degree your valves on this head?
I'm having a hard time getting my dial needle down to the bucket without hitting the cam.
Where can you get the cam's and what kind of numbers are you using ?
I've noticed that my timing chain is stretched a bit and the timing is out. I think its sitting at around 110 + right now.
I just finished a set of cam sprockets and a new degree wheel for it so now I have something more accurate to play with.Stephen.
1981 GSX540L "Frankintwin"
1989 GS500E Resto-mod .
400 mod thread
Photo's 1
Photos 2
Gs500 build thread
GS twin wikiComment
-
Those videos are very intriguing... but they do definitely confirm what I feel...Originally posted by Mekanix View Post
Reducing the springs *and* enlarging the vacuum hole = awesome
Ben, looks like she's gonna be a beast!1982 GS450E - The Wee Beastie
1984 GSX750S Katana 7/11 - Kit Kat - BOTM May 2020
sigpic
450 Refresh thread: https://www.thegsresources.com/_foru...-GS450-Refresh
Katana 7/11 thread: http://www.thegsresources.com/_forum...84-Katana-7-11Comment
-
I hope this answers some questions.This is a bit of a hodge podge of parts but they were cheap when dgyver picked them up.I won't have a whole lot of money into this project,so if it doesn't work,no big loss and I still have my original engine to fall back on.Originally posted by Mekanix View Post
Vids are cool.Originally posted by pete View Post
Thanks.Pete.Comment
-
Turns out that my timing is fineand the chain is only 0.009" stretched. It was my tdc reference that was off. The ignitor rotor pin hole on the crank was drilled. That allows for a 10 degree advance . Once I set it to stock and confirmed with a dial indicator, everything lined up perfectly.
But I still have not been able to check the numbers yet because I can't get my dial needle in a good spot to measure.
I've done it plenty of times on my other head.Stephen.
1981 GSX540L "Frankintwin"
1989 GS500E Resto-mod .
400 mod thread
Photo's 1
Photos 2
Gs500 build thread
GS twin wikiComment
-
I've never seen an advance done like that.I have a Bob B. 5* advanced rotor.He has a jig that allows him to weld up the factory hole and redrill it with a 5* advance.Works a treat on my bike.Originally posted by Mekanix View Post
I am not sure where a good place would be to set up a dial indicator.I had a base and holder that I made for AMC Jeep engines that bolted down to the valve cover bolt hole.Of course it worked on other engines as well.Comment
-
Originally posted by ben2go View Post
Advancing the ignition can be done many ways. Although knowing how much you advanced it is hard with this setup.
At least with the mechanical advance you always had a TDC reference that didn't change. As a matter of fact I used my old one to set TDC on mine just to be sure where it was.
The new type of rotor doesn't tell you where TDC really is if you adjust it.
I found a way to check my cams.
Ziptied a needle to the tip of my dial and bent it around the cam so I still get proper deflection in the right direction without hitting the cam.
I actually won't be changing them right now. They are at 105 IN , 106 EX right now.
I did find something else out. My feeler gages are squished :P
So I need a new set and some shims.
I have a 2.45 ,2.60, 2.65 and 2.70 The exhaust are on the tight side and the intake are ok with a 0.56mm feeler gage.
Still going to start collecting shims though. I could probably use a 2.55.
I have 2.45, 2.40, 2.35 already Stephen.
1981 GSX540L "Frankintwin"
1989 GS500E Resto-mod .
400 mod thread
Photo's 1
Photos 2
Gs500 build thread
GS twin wikiComment
-
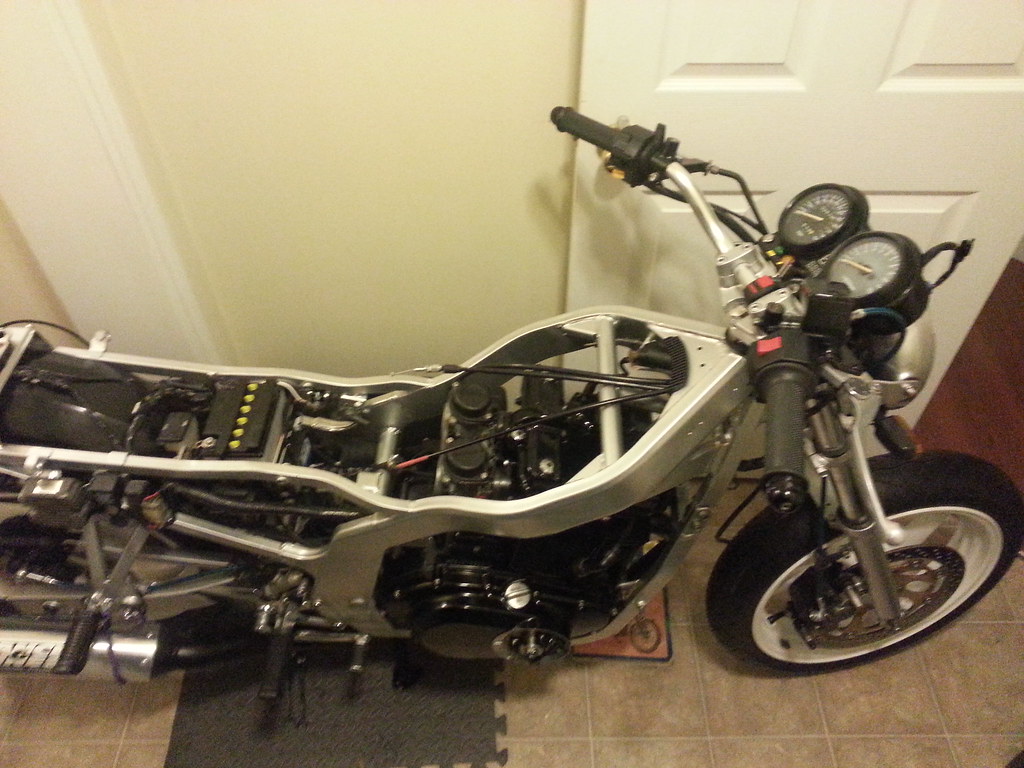
Some pics
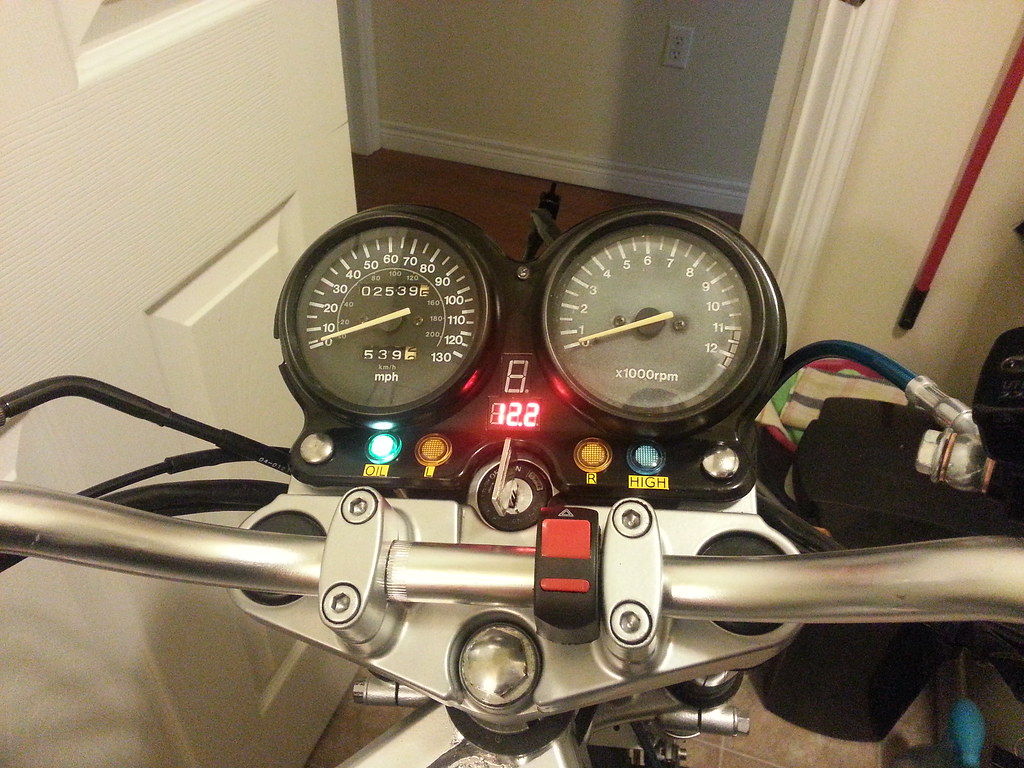


Cluster is done, Just have to run a few wires to run for the gear position and shift light. Still have to make a box for the arduino and mount it in front of the rev limiter.
Dipped and rebuilt the carbs and petcock. Removed all the restrictors, and ran the lines.
Installed exhaust and intake. Made a few replacement brackets for the exhaust out of aluminum and saved 5 lbs
Installed PVC calve, Still have to make a catch tank although I was thinking of just running the line to the chain case to dump on the chain.
I'm in the middle of stripping the inside of the tank.
Lots of screws and lots of shaking is really getting rid of the rust. Just have to keep at it.
Bought a Kreem kit to seal the tank after that.Stephen.
1981 GSX540L "Frankintwin"
1989 GS500E Resto-mod .
400 mod thread
Photo's 1
Photos 2
Gs500 build thread
GS twin wikiComment
-
Anyone into programing arduino's ? I'm still learning but can't seem to decide what I want to do with it .
<made this one from scratch>
Here's my code for the Mega 2650
I've decided to keep this one for my prototyping board and instead install a UNO board. So all the pins in the sketch is for the Mega.
The UNO has less pins but I don't need that many pins. I could even use a Nano and get away with that.
This is writen to run each of the led's in a seven segment display and for each input it turns on a separate set of led's .
There is much easyer ways to do this but I wrote it like this so I could make the led's do what ever I wanted. Like make the n symbol or have the lite's chase eatchother just for fun.
I'm thinking of adding a button to allow for temperature display.
Its easy to do. I add a button and when its pressed it will read the value from a sensor and then change the gear position display to show the first number, pause , second number and so on. Then just resume the gear position. I'd have to add a bit of code to ignore repeated presses until it got back to gear position.
I could even add a second button to show the current time or temperature.
//set the names for the gears for to the pins they will be using
int first = 52;
int second = 50;
int third = 48;
int forth = 46;
int fifth = 44;
int sixth = 42;
int neutral = 40;
// just a delay for the animation during startup.
int Delay =200;
//declare what will start up first and set if pins are inputs or outputs and what will be.
void setup() {
pinMode(2, OUTPUT);//segment A
pinMode(3, OUTPUT);//segment B
pinMode(4, OUTPUT);//Segment C
pinMode(5, OUTPUT);//Segment D
pinMode(6, OUTPUT);//Segment E
pinMode(7, OUTPUT);//Segment F
pinMode(8, OUTPUT);//Segment G
pinMode(9, OUTPUT);//Decimal point
pinMode(first, INPUT);//1 refers to the name First as stated in the int above.
pinMode(second, INPUT);//2
pinMode(third, INPUT);//3
pinMode(forth, INPUT);//4
pinMode(fifth, INPUT);//5
pinMode(sixth, INPUT);//6
pinMode(neutral,INPUT);//neutral
digitalWrite(first, HIGH); // setting all the pins to pullup resistors so that you don't need external resistors.
digitalWrite(second,HIGH);
digitalWrite(third, HIGH);
digitalWrite(forth, HIGH);
digitalWrite(fifth, HIGH);
digitalWrite(sixth, HIGH);
digitalWrite(neutral,HIGH);
//animation starts here counting down from 6 to n
// write '6'
digitalWrite(2, 0);
digitalWrite(3, 1);
digitalWrite(4, 0);
digitalWrite(5, 0);
digitalWrite(6, 0);
digitalWrite(7, 0);
digitalWrite(8, 0);
delay(Delay);
// write '5'
digitalWrite(6, 1);// not much change for 5
delay(Delay);
// write '4'
digitalWrite(2, 1);
digitalWrite(3, 0);
digitalWrite(5, 1);
delay(Delay);
// write '3'
digitalWrite(2, 0);
digitalWrite(5, 0);
digitalWrite(7, 1);
delay(Delay);
// write '2'
digitalWrite(2, 0);
digitalWrite(3, 0);
digitalWrite(4, 1);
digitalWrite(6, 0);
delay(Delay);
// write '1'
digitalWrite(2, 1);
digitalWrite(4, 0);
digitalWrite(5, 1);
digitalWrite(6, 1);
digitalWrite(8, 1);
delay(Delay);
// write 'n'
digitalWrite(2, 0);
digitalWrite(3, 0);
digitalWrite(4, 0);
digitalWrite(5, 1);
digitalWrite(6, 0);
digitalWrite(7, 0);
digitalWrite(8, 1);
digitalWrite(9, 0);
delay(Delay);
// write 'blank display'
digitalWrite(2, 1);
digitalWrite(3, 1);
digitalWrite(4, 1);
digitalWrite(5, 1);
digitalWrite(6, 1);
digitalWrite(7, 1);
digitalWrite(8, 1);
digitalWrite(9, 1);
//around the ring we go :P
digitalWrite(2, 0);
delay(100);
digitalWrite(3, 0);
delay(100);
digitalWrite(4, 0);
delay(100);
digitalWrite(5, 0);
delay(100);
digitalWrite(6, 0);
delay(100);
digitalWrite(7, 0);
delay(100);
digitalWrite(8, 1);
delay(100);
digitalWrite(9, 1);
digitalWrite(2, 1);
delay(100);
digitalWrite(3, 1);
delay(100);
digitalWrite(4, 1);
delay(100);
digitalWrite(5, 1);
delay(100);
digitalWrite(6, 1);
delay(100);
digitalWrite(7, 1);
delay(100);
digitalWrite(8, 1);
delay(100);
digitalWrite(9, 1);
delay(500);
digitalWrite(2, 1); //reset to all off and clean up animation
digitalWrite(3, 1);
digitalWrite(4, 1);
digitalWrite(5, 1);
digitalWrite(6, 1);
digitalWrite(7, 1);
digitalWrite(8, 1);
digitalWrite(9, 1);
}
void loop() {
//assign names to the pins and tell them to read what. Either its digitalread or analog read
first = digitalRead(52);
second = digitalRead(50);
third = digitalRead(48);
forth = digitalRead(46);
fifth = digitalRead(44);
sixth = digitalRead(42);
neutral= digitalRead(40);
if (first == LOW) { //check for gear grounded
digitalWrite(2, 1);
digitalWrite(3, 0);
digitalWrite(4, 0);
digitalWrite(5, 1);
digitalWrite(6, 1);
digitalWrite(7, 1);
digitalWrite(8, 1);
delay (100);
}
if (second == LOW){//check for gear grounded
digitalWrite(2, 0);
digitalWrite(3, 0);
digitalWrite(4, 1);
digitalWrite(5, 0);
digitalWrite(6, 0);
digitalWrite(7, 1);
digitalWrite(8, 0);
delay (100);
}
if (third == LOW){//check for gear grounded
digitalWrite(2, 0);
digitalWrite(3, 0);
digitalWrite(4, 0);
digitalWrite(5, 0);
digitalWrite(6, 1);
digitalWrite(7, 1);
digitalWrite(8, 0);
delay (100);
}
if (forth == LOW){//check for gear grounded
digitalWrite(2, 1);
digitalWrite(3, 0);
digitalWrite(4, 0);
digitalWrite(5, 1);
digitalWrite(6, 1);
digitalWrite(7, 0);
digitalWrite(8, 0);
delay (100);
}
if (fifth == LOW){//check for gear grounded
digitalWrite(2, 0);
digitalWrite(3, 1);
digitalWrite(4, 0);
digitalWrite(5, 0);
digitalWrite(6, 1);
digitalWrite(7, 0);
digitalWrite(8, 0);
delay (100);
}
if (sixth == LOW){//check for gear grounded
digitalWrite(2, 0);
digitalWrite(3, 1);
digitalWrite(4, 0);
digitalWrite(5, 0);
digitalWrite(6, 0);
digitalWrite(7, 0);
digitalWrite(8, 0);
delay (100);
}
if (neutral == LOW){//check for gear grounded
digitalWrite(2, 0);
digitalWrite(3, 0);
digitalWrite(4, 0);
digitalWrite(5, 1);
digitalWrite(6, 0);
digitalWrite(7, 0);
digitalWrite(8, 1);
delay (100);
}
else(neutral == HIGH);{ //cleane's up the display if at the end of the loop if this is high. If the others are low and the low is released, this line will reset the displays to off.
digitalWrite(2, 1);
digitalWrite(3, 1);
digitalWrite(4, 1);
digitalWrite(5, 1);
digitalWrite(6, 1);
digitalWrite(7, 1);
digitalWrite(8, 1);
}// closes the bracket for the else argument
}//closes the loop altogether
Stephen.
1981 GSX540L "Frankintwin"
1989 GS500E Resto-mod .
400 mod thread
Photo's 1
Photos 2
Gs500 build thread
GS twin wikiComment
-
On the crankcase vent line I have a small filter.I have never had issues with oil blowing out as long as the steel wool is left in the breather block that the hose is connected to.I used a double barb.I think a PCV valve will cause a restriction that may cause oil leaks around gaskets.If there's a restriction in the vent,pressure will build up in the crank case robbing power and blowing gaskets and seals.

Comment

Comment