T
trexbob
Guest
So this goes back a few months, when my friend JMS picked up a 1980 GS850G. This bike had not been ridden regularly in 20+ years, but after getting it, it was riding decently enough with the normal old Suzuki issues (carb boots, intake boots, 30 year old brake fluid, valve clearance and shim replacement, voltage regulator was shot, fluids needed changing, wiring harness connectors were all a mess) and then!!! An issue with the front brakes - the return valve in the master cylinder got clogged, causing the front brake to hang = engine overheating if you keep riding on a hanging front brake (DOH!). This in turn resulted in failure of the seals between the crankcase and the secondary gears. When these go bad, engine oil moves from the engine case through the seals into the secondary gear drive, overflowing the secondary compartment and seeping out the top overflow and draining into the "mystery hole". As others have said there's also an O-ring holding oil in at the starter, and we checked that first - it was fine, but was replaced anyways. The real tell-tale was the oil level building up in the secondary while draining out of the engine! After much research, mainly on this forum, we decided we could pull the engine, crack the case halves with the engine upside down, replace necessary seals, and throw it all back together in a weekend - that was the plan anyways! JMS was new to mechanics before purchasing this Suzi, but I've been tinkering with motorcycles and dirtbikes since I was a teen, so I felt pretty confident we could bust this out. We went through all the parts fiche's trying to identify the necessary seals, o-rings, and gaskets. After the parts got here, and after dealing with this situation for what seemed like forever (which was something like 6 weeks), JMS finally bit the bullet and we decided to fix it over a weekend. -- Luckily, it was a long weekend!
Friday night the engine got removed. It weighed a ton! Not a one man job... First, oil was drained, footpegs, brake, shift levers removed, tank and carbs taken off, exhaust off, no problems... We were a bit concerned about unhooking the driveshaft - being a long time dirt-bike guy, I've done plenty of engines, but I've never worked on a bike with a driveshaft. It was no big deal - it unhooked, wires were moved out of the way, and the engine pulled out, we were good to go! Miller time...
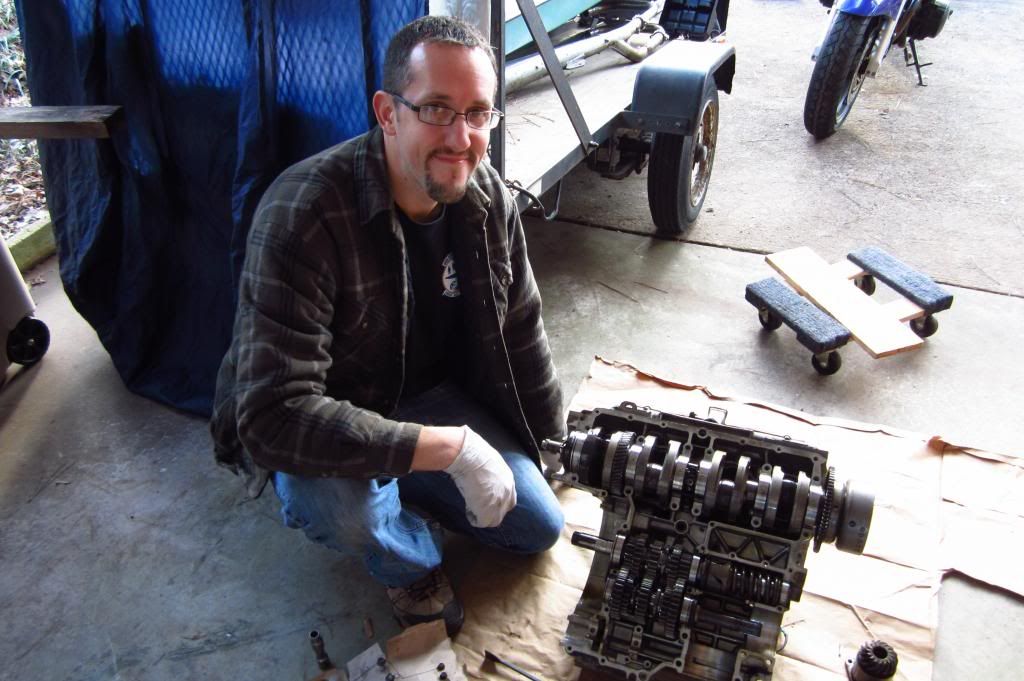
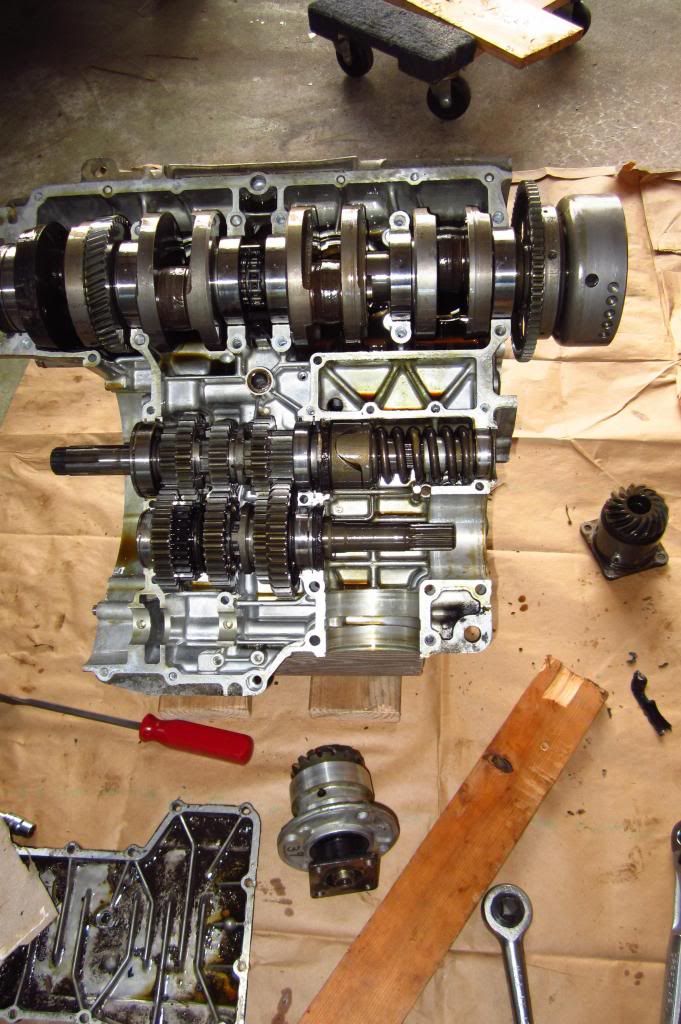
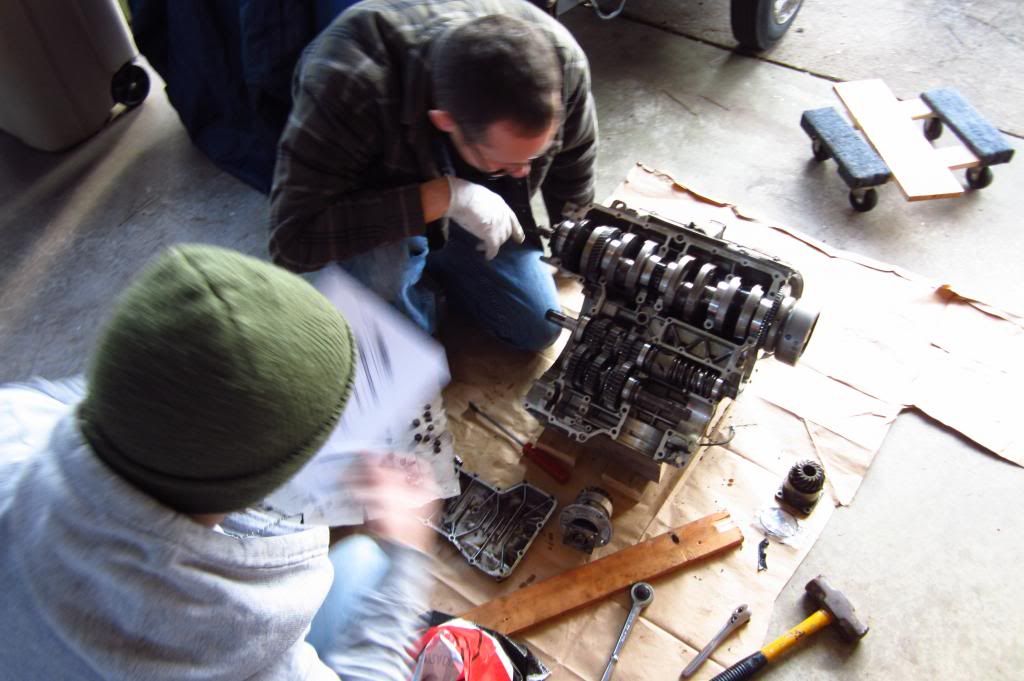
Saturday started out trying to pull the engine apart... First JMS constructed a wooden cradle for the engine. The clutch cover had to come off, and the clutch basket had to come out. Screws holding plates under the clutch were tough. Definitely needed the impact driver here. Ignition cover had to come off also. The stator cover had to come off, but we did not take the stator itself off. Starter was taken off also. Oil pan had to be removed, then somewhere - oh around 300 bolts (!!!) had to be loosened to get the case halves apart. Finally after beating the case for 10 minutes with a 2x4 and a 3-lb sledge, it started to come apart. We didn't take the secondary gears out beforehand as we thought it would be easier once the case halves were apart. We were right. After the halves came apart, the secondary gears popped right out.
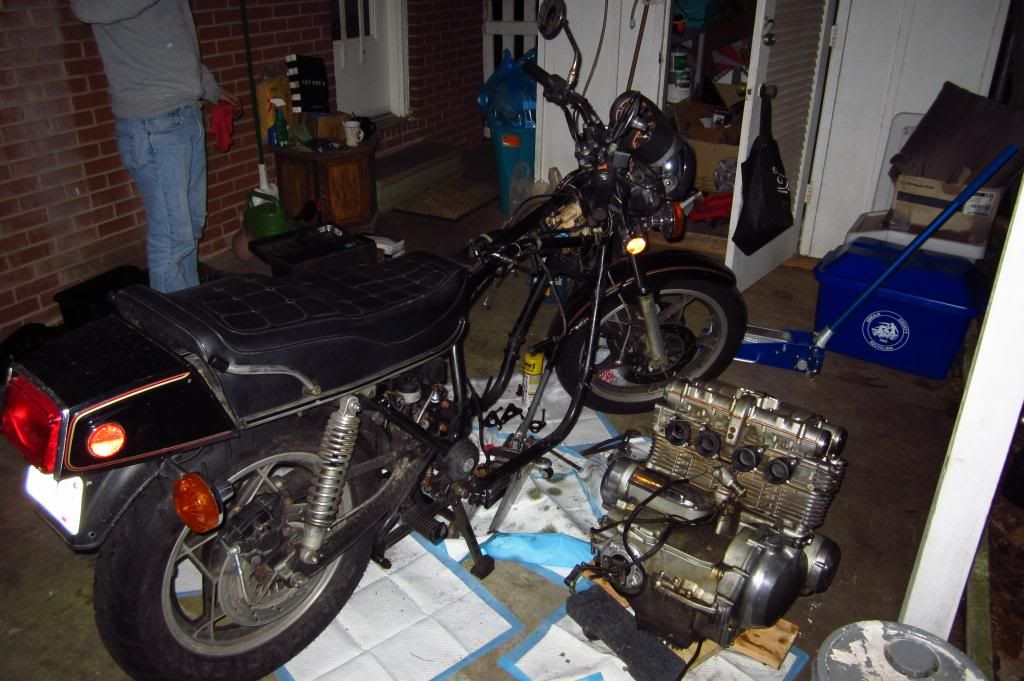
Here's my carport halfway through Saturday. Oh the horror!
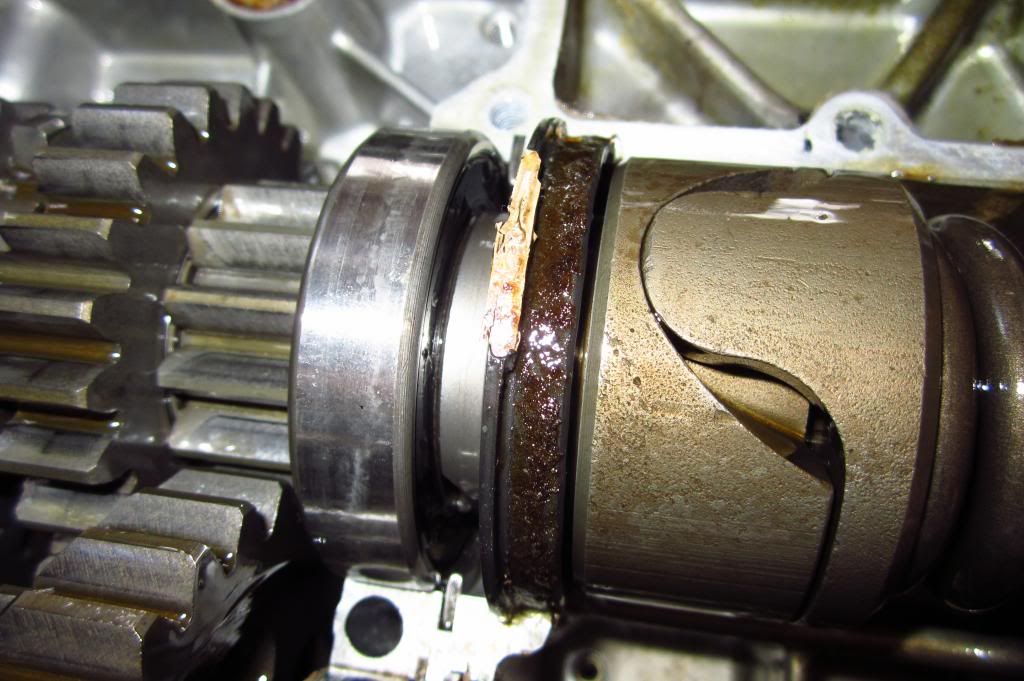
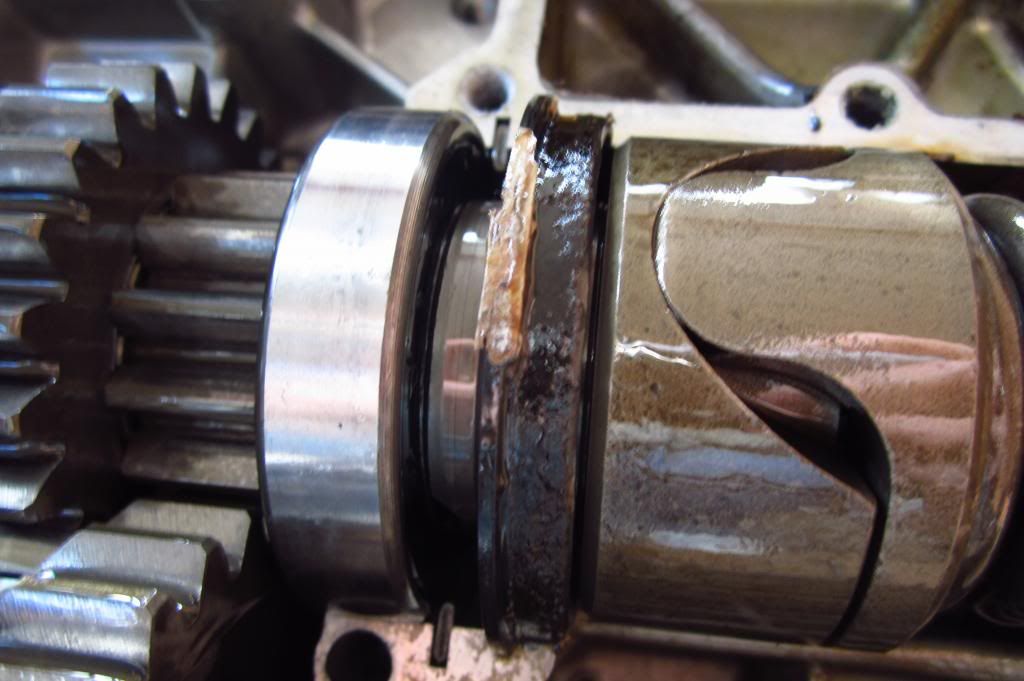
It was immediately apparent which seals were shot!
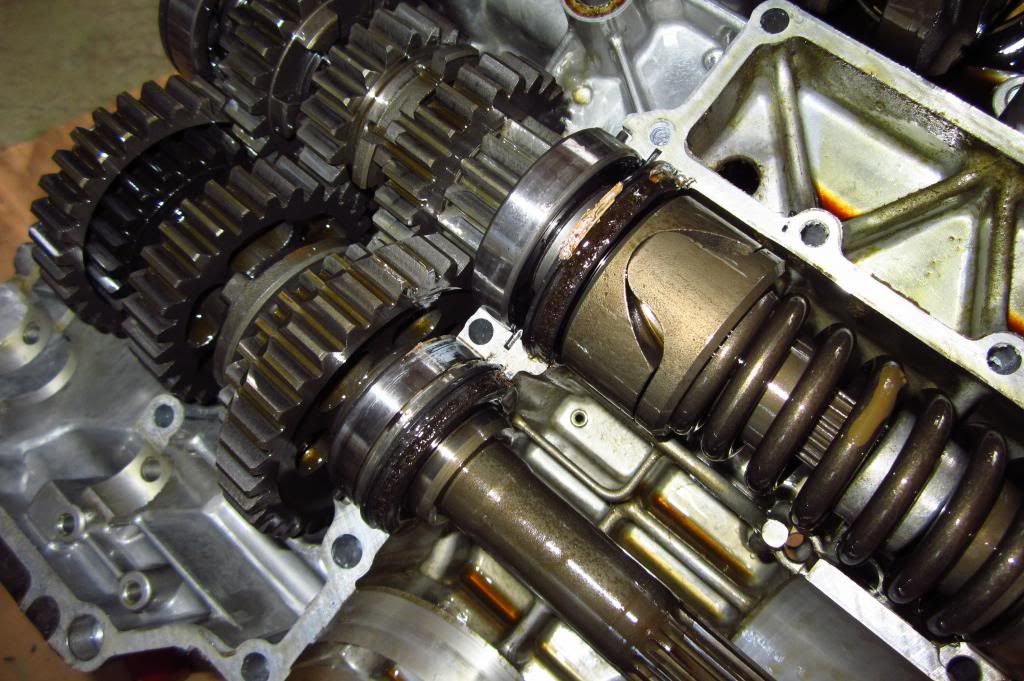
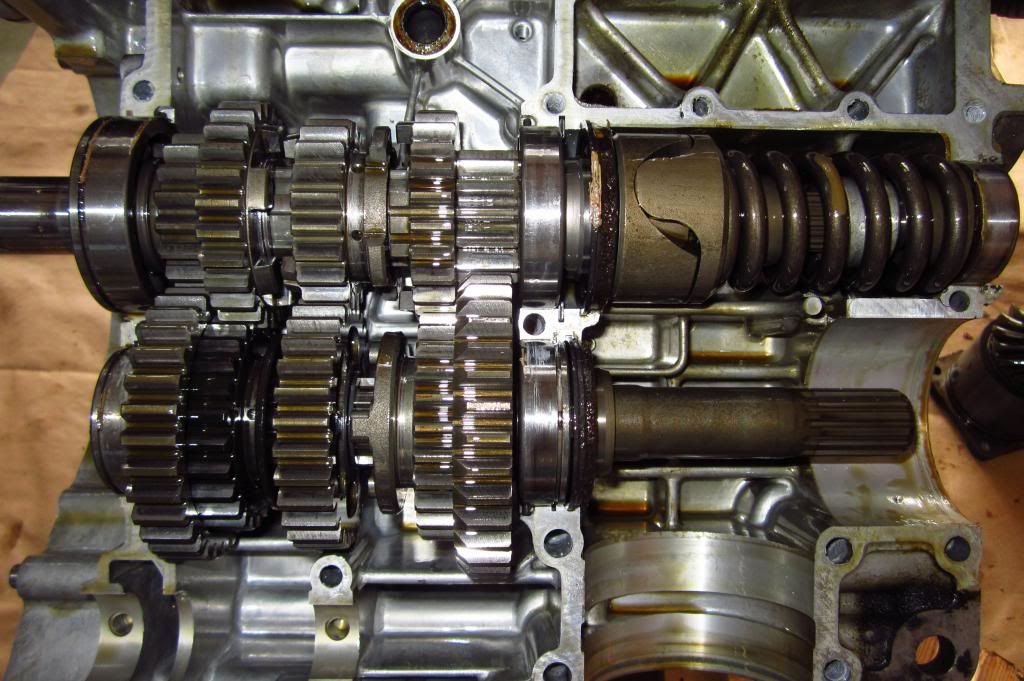
Here are closeups of the seals. You can see the oil seemed to cook onto the seal and well.... ugh. Just made a mess of the seal.

What I did not get a good picture of was the one shaft/gear that had to come apart because there's another oil seal in the middle of it... it's the shaft with the big spring on it. The unseen seal resides in the middle of the "dogs".
There is a special tool for getting to the seal in the dogs - the "Dog Cam Stopper Set Tool", Suzuki part # 09924-44511 The large spring is held on by a couple stoppers that won't come out unless you compress the spring ....we did not have that tool, and hindsight being what it is, if we had it, we would have saved several hours of head-scratching and wandering around autozone. We ended up using a valve-spring compressor piece attached to a gear puller instead. It was able to compress that spring just enough to get the thing apart. With new seals in place, we put the engine back together using Threebond 1215. The only tricky part was getting the shifter forks lined up. If you do this, test the gear shifting before torquing all your bolts back down! You will have to move the driven gear in the transmission to get it to shift through all the gears just FYI... do not try to turn the engine crank with the cases split - you're asking for trouble if you do that. The secondary gears were put back in after the case halves were back together, as the o-rings would not have seated properly otherwise. New o-rings were used on the secondary gears, and new gaskets and o-rings were used for the cam chain tensioner, the oil sender, and exhaust flanges. The engine dissassembly, fix, and reassembly took most of Saturday including the evening. We quit around 11:00PM and had the engine in the same condition as it was Friday night, ready to go back in the bike.
Sunday was a bit of a lazy day. We didn't get started until after 11, and finished sometime around 7... with a break in the middle. We cleaned a lot. The threebond had somewhere right around 24 hours to set. We figured that was enough even though some folks recommend 48 hours. After a brief moment of "oh my!" monkeying around with the choke, she started up... smoked for a while, and has been running great ever since! Beers were well-deserved that night.
I posted this because I didn't know if JMS was ever going to get around to it... and I thought this would be a great resource to all who may have a "mystery hole" leak. I know this worked because JMS' bike is now running better than ever and no leaks for over three weeks now! Sometimes you got to get down and dirty and bust the engine open. Because of how the seals sit in the case, you really cannot change these oil seals out without cracking the case halves. The other thing that would have been REALLY GOOD to do is change the oil seal on the crankshaft. Oh well... at least THAT can be changed later without taking the engine out! If we had to do this all again, it would take less time for sure but would still be a solid weekend of wrenching. There's just a lot of things that need to be removed/replaced, etc. Overall not too difficult though for two motivated guys. Whew! It was educational for sure, for both me and JMS. Hopefully others can benefit from our adventure.
Next up: Fork seals and front springs! Stay tuned...
Friday night the engine got removed. It weighed a ton! Not a one man job... First, oil was drained, footpegs, brake, shift levers removed, tank and carbs taken off, exhaust off, no problems... We were a bit concerned about unhooking the driveshaft - being a long time dirt-bike guy, I've done plenty of engines, but I've never worked on a bike with a driveshaft. It was no big deal - it unhooked, wires were moved out of the way, and the engine pulled out, we were good to go! Miller time...
Saturday started out trying to pull the engine apart... First JMS constructed a wooden cradle for the engine. The clutch cover had to come off, and the clutch basket had to come out. Screws holding plates under the clutch were tough. Definitely needed the impact driver here. Ignition cover had to come off also. The stator cover had to come off, but we did not take the stator itself off. Starter was taken off also. Oil pan had to be removed, then somewhere - oh around 300 bolts (!!!) had to be loosened to get the case halves apart. Finally after beating the case for 10 minutes with a 2x4 and a 3-lb sledge, it started to come apart. We didn't take the secondary gears out beforehand as we thought it would be easier once the case halves were apart. We were right. After the halves came apart, the secondary gears popped right out.
Here's my carport halfway through Saturday. Oh the horror!
It was immediately apparent which seals were shot!
Here are closeups of the seals. You can see the oil seemed to cook onto the seal and well.... ugh. Just made a mess of the seal.
What I did not get a good picture of was the one shaft/gear that had to come apart because there's another oil seal in the middle of it... it's the shaft with the big spring on it. The unseen seal resides in the middle of the "dogs".
There is a special tool for getting to the seal in the dogs - the "Dog Cam Stopper Set Tool", Suzuki part # 09924-44511 The large spring is held on by a couple stoppers that won't come out unless you compress the spring ....we did not have that tool, and hindsight being what it is, if we had it, we would have saved several hours of head-scratching and wandering around autozone. We ended up using a valve-spring compressor piece attached to a gear puller instead. It was able to compress that spring just enough to get the thing apart. With new seals in place, we put the engine back together using Threebond 1215. The only tricky part was getting the shifter forks lined up. If you do this, test the gear shifting before torquing all your bolts back down! You will have to move the driven gear in the transmission to get it to shift through all the gears just FYI... do not try to turn the engine crank with the cases split - you're asking for trouble if you do that. The secondary gears were put back in after the case halves were back together, as the o-rings would not have seated properly otherwise. New o-rings were used on the secondary gears, and new gaskets and o-rings were used for the cam chain tensioner, the oil sender, and exhaust flanges. The engine dissassembly, fix, and reassembly took most of Saturday including the evening. We quit around 11:00PM and had the engine in the same condition as it was Friday night, ready to go back in the bike.
Sunday was a bit of a lazy day. We didn't get started until after 11, and finished sometime around 7... with a break in the middle. We cleaned a lot. The threebond had somewhere right around 24 hours to set. We figured that was enough even though some folks recommend 48 hours. After a brief moment of "oh my!" monkeying around with the choke, she started up... smoked for a while, and has been running great ever since! Beers were well-deserved that night.
I posted this because I didn't know if JMS was ever going to get around to it... and I thought this would be a great resource to all who may have a "mystery hole" leak. I know this worked because JMS' bike is now running better than ever and no leaks for over three weeks now! Sometimes you got to get down and dirty and bust the engine open. Because of how the seals sit in the case, you really cannot change these oil seals out without cracking the case halves. The other thing that would have been REALLY GOOD to do is change the oil seal on the crankshaft. Oh well... at least THAT can be changed later without taking the engine out! If we had to do this all again, it would take less time for sure but would still be a solid weekend of wrenching. There's just a lot of things that need to be removed/replaced, etc. Overall not too difficult though for two motivated guys. Whew! It was educational for sure, for both me and JMS. Hopefully others can benefit from our adventure.
Next up: Fork seals and front springs! Stay tuned...
Last edited:
")