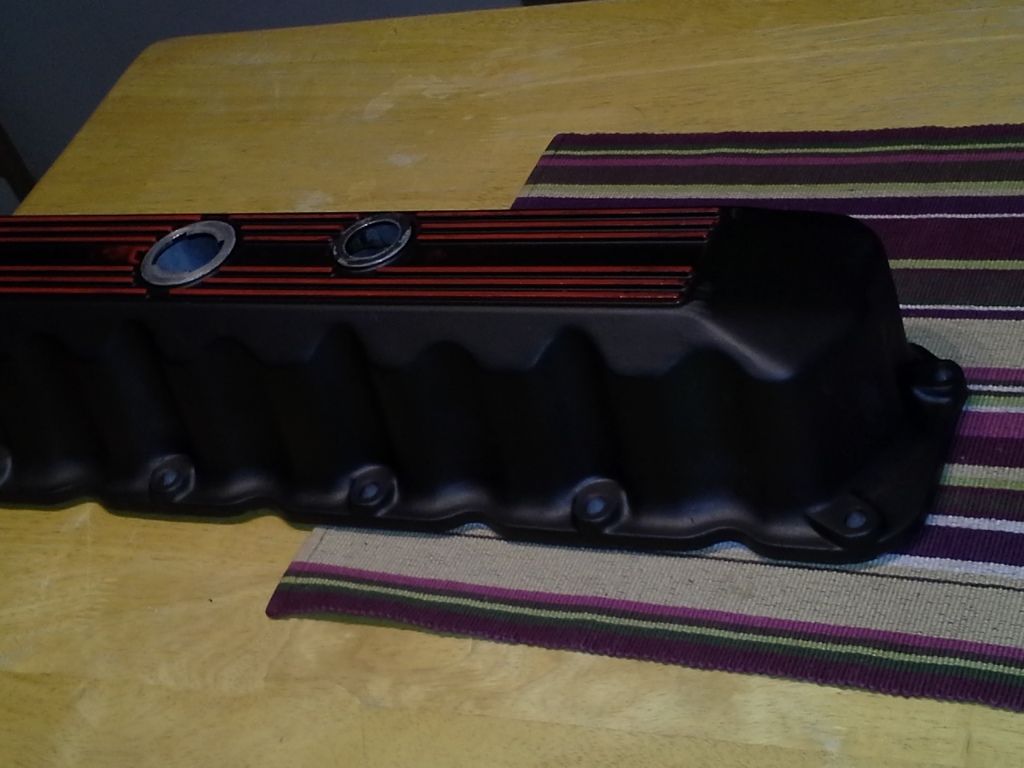
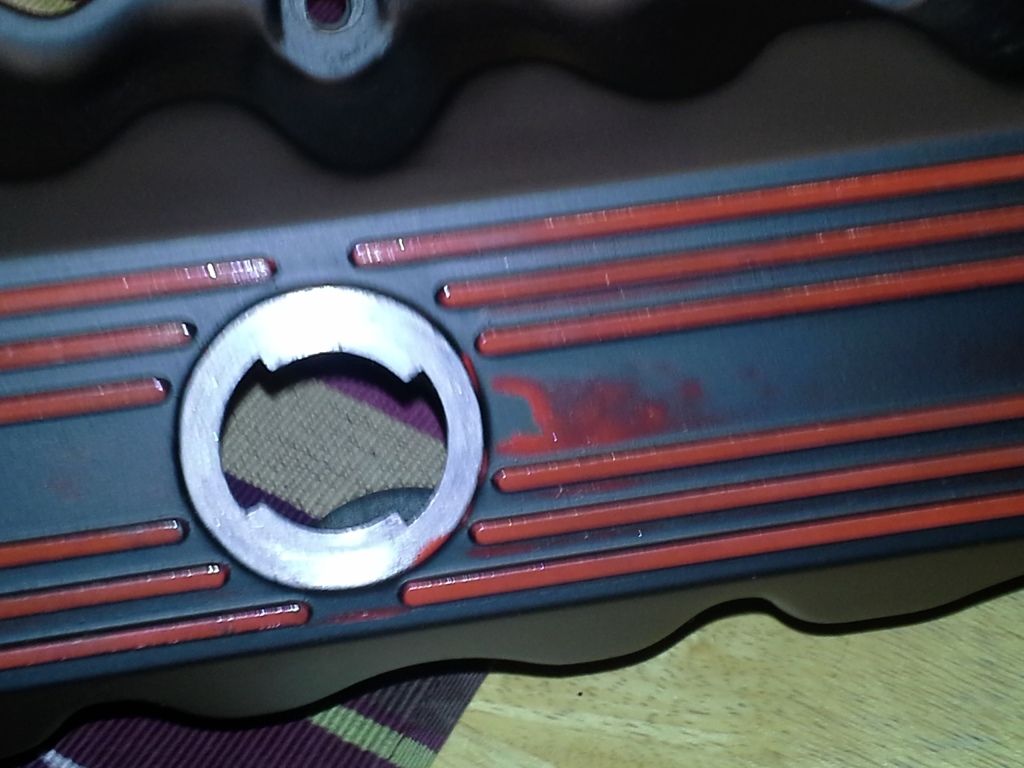
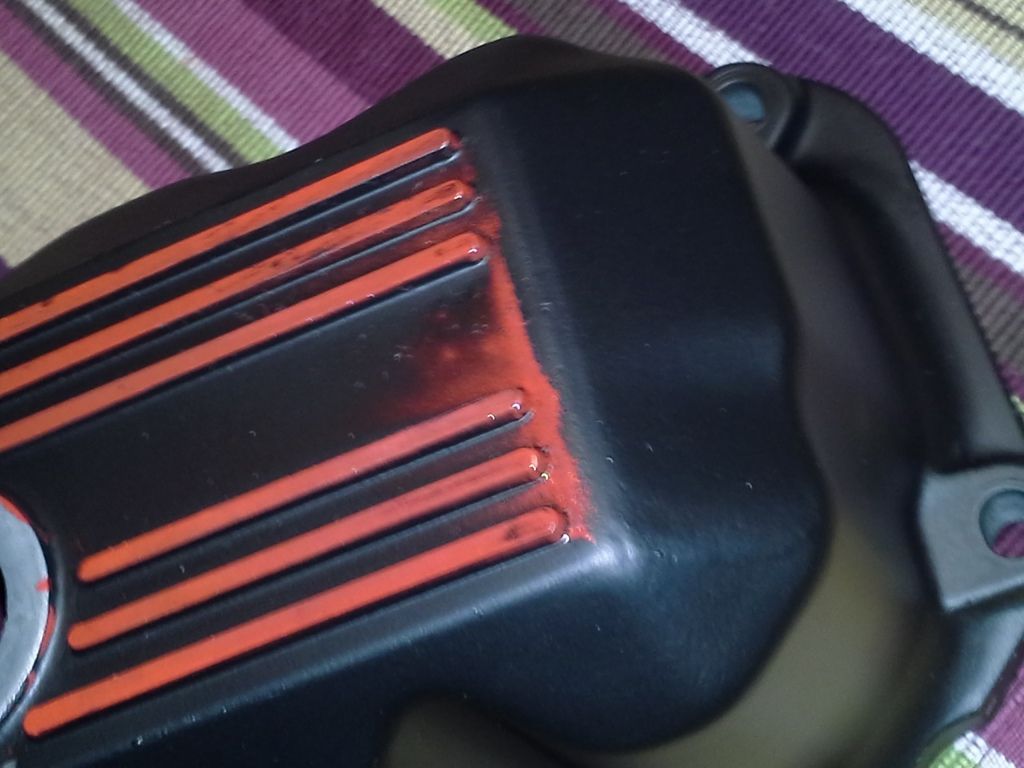
What would happen if I did the black again now after the full cure? Would curing it twice mess it up? I have heard overcuring is a bad thing?
Announcement
Collapse
No announcement yet.
Those of you who do your own powder coating….
Collapse
X
-
I may have cured the first coat too long. I waited for it to get shiny, then get dull again, but it's a shinier powder so it didn't get dull again like the matte black I have been using, maybe waited too long. Also I turned the oven off and opened the door but left it in the oven to cool. I think the end of the valve cover that was in the deep end of the oven might have stayed too hot too long. It worked fine on the other end. Also I was in a hurry, it was getting dark and windy, so didn't think of blowing it off and trying agin.Originally posted by Mayhem63 View Post
What would happen if I did the black again now after the full cure? Would curing it twice mess it up? I have heard overcuring is a bad thing?Last edited by tkent02; 02-17-2014, 11:04 AM.
-
 Guest replied^^^^
Well one gets to learn something everyday....
.
Leave a comment:
-
 Guest repliedYes you can.
Depending on what type of equipment you are using its really simple.
The first coat should only be flashed (once the first coat glosses only leave it in for half the cure cycle) a fully cured coat acts as a resister and can cause cratering or rejection of the second coat.
Also by the first coat not being fully cured it allows the two coats to bond during the second coat cure.
The trick is to lower the KV setting on the gun and not to get to close to the part. Also move or wiggle the gun back and fourth as you are coating the part(this helps to break the Faraday effect caused by first coat and any angles that are present.
And make sure your part is grounded well... It may take a couple of tries.
If it doesn't work simply blow off the powder of the second coat (make sure there is no residual on it) even can wipe (lightly) with a tac rag.
put it in a hot oven for just a few minutes...this releases the static electricity that has built up. let it cool and try it again.
They make two coat candy's that have a base coat/ tinted clear top coat that are outstanding.
It is all in technique and with a little practice I know you could do it! Last edited by Guest; 02-17-2014, 05:13 AM.
Leave a comment:
-
Hmmm, I read about people doing this two color thing, and also doing multiple coats of the same color. Never heard you can't do it.
Anybody know?
Leave a comment:
-
 Guest repliedI thought you couldn't powdercoat over powdercoat ?
.
Leave a comment:
-
Fail, what happened?

Did the red first, cooked it a little, then the black. Planning on taking the black powder off of the red strips with a damp finger, that part worked fine.
But the black wouldn't cover the red. Just in a couple places, it just wouldn't stick to the red. In the middle here:

And here:

Tried the higher Voltage setting, no good. The black just wouldn't be attracted to the red. Any ideas?
Leave a comment:
-
 Guest repliedre
I preferred to blast the custom parts in house, we used something called star blast.
It looked almost like a combo of fine sand and glass bead.
But it left a really clean and smoother surface.
You don't want a perfectly smooth surface, the powder has to have something to bite into.
If you ever want to powder over chrome, the surface must be abraded in someway.
One of those green scuff pads works good.
I found this company back in the day http://www.prismaticpowders.com/
The have 1000's of colors and have the best quality powder IMHO
Not the cheapest but well worth the money if anyone is really into a total resto project.
Leave a comment:
-
 Guest repliedThe way my blast cabinet is set up, I have two suction hoses. One that rests at the bottom of the cabinet for the glass beads. As you blast with it, a lot of it falls to the bottom of the cabinet to be reused. But soda explodes on impact, which is why it works so well, so there is little to no recovery of the soda. If you left it fall to the bottom of the cabinet to re-use, you'll find that it doesn't cut as well as when it was fresh.. you end up with an even finer powder once it's used.
As mentioned, I ran an additional hose down through the drain plug at the bottom of the cabinet that feeds soda out of a bucket. Because soda is dense, it doesn't easily collapse on itself and tends to make an air hole from the bottom of the cabinet up to the surface and you're soon sucking air all the time.. you have to bang the cabinet to make it fall onto itself again, and that gets annoying real quick. But now that I have it in the bucket, all I have to do is occassionally tap the bucket with my foot (I use it as a foot rest when doing long jobs) and I avoid that air hole issue all together..
What ever soda residue you end up with inside the cabinet mixes with the glass, this isn't too much of an issue.. its the glass mixing with the soda that is the huge concern. Because I had to blast a lot of parts, I resorted to this quick mod to make the work flow process go easier. Keep in mind also that you have to use a good vacuum cleaner with good filters (think drywall dust but finer) to suck the debris out of the cabinet, especially with soda, it's such a dust storm in there you'd never be able to see what you're doing. The glass beads are heavy enough that the large majority of what you're blasting falls to the bottom again and the dust it creates gets sucked out. Its that fine glass dust you have to be cautious off, bad health hazard.
For cutting through the rust, it depends on the type of surface and the type of rust.. you'll learn quick which works best.. For seriously rusted steel parts, you'll be using glass as soda won't cut through it unless you have a monster compressor that can put out 14-ish CFM at 90 PSI.. I haven't yet encountered anything yet that soda won't cut through on the soft metals.. it will remove rust stains off metal easily enough but for the deep rust, glass works great.
if you decide on getting the HF blast cabinet, be sure to look around for a better pair of gloves.. mine tore through at the arm holes, and they're not 'man' sized gloves.. The cabinet itself is decent, but not perfect, just a little work to make it better...
Leave a comment:
-
Don't have the cabinet here yet to look at, but don't they both mix together once you shoot it into the cabinet? Next time you will get a mix?Originally posted by Seaking View PostI have one of those HF cabinets and with a few mods, it works quite well. I use it with soda and glass all the time.. Glass beads in the cabinet with one suction hose, the soda is outside in a bucket with another suction hose going out the drain plug hole. A lot easier that way.
and does the soda really cut rust and old paint or does it just sit there while you blast and blast?
Leave a comment:
-
 Guest repliedSoda is best for soft metals.. Sand will leave a very rough surface. Glass beads on steel parts leaves a slightly less rougher surface than sand will. Walnut shells tend to absorb water and clog up the system..
I have one of those HF cabinets and with a few mods, it works quite well. I use it with soda and glass all the time.. Glass beads in the cabinet with one suction hose, the soda is outside in a bucket with another suction hose going out the drain plug hole. A lot easier that way.
Leave a comment:
-
Planning on getting one of those little table top blast cabinets, for a one type does all blast media, what would you recommend? Walnut shells? Sand? Soda?
Leave a comment:
-
 Guest repliedre
Thanks Gatekeeper,
I had the pleasure of visiting the Powder Coating institutes test facility on campus in Raleigh NC (don't know if it's still located there) and play with a lot of what was new toys at the time.
That's where I learned more about cross hatch testing and impact resistance testing,and chemical resistance along with automated lines and infrared ovens (the new thing)
I know they have done a lot to improve quality of powder and even put in over bake protection.Last edited by Guest; 01-13-2014, 04:37 PM.
Leave a comment:
-
 Guest repliedMayhem63-----lots of great info in your above post.....I am sure this will help out many...
Leave a comment:
-
 Guest repliedre
You can over cure a part....if you plan on doing doing it quite a bit I would invest in a lazer temp gun...like what they use to show you track temp at a NASCAR race.
The phosphate wash is the step right before precook and I don't think for home use would be necessary, Just have to make sure part is real clean,grease free and dry.
Yes 400 is more than enough to alter the metal if left in to long...we had to stop doing frames for the local super truck series because the heat effects the chrome moly tubing. If you stick to the temp range and time of cure it wont effect 99.9% of what you are curing.
I know all to well it is a pain to remove seals...but you have to because trapped oils will continuously cook out, and by the time all the oil is out the seals are ruined.
Its best to disassemble everything and don't put anything in the oven you are not actually coating ie: valve spring...seals and the like.
Seaking I think for the smaller parts or thinner gauges of metal setting the temp lets say recommended is 400 degrees at 15 min
When the powder flows or looks glossy then setting the timer to recommended...works.
They have put better flow factor in powder now and actually made curing a lot less trial and error.
There was a small writeup in a powder magazine about me and the shop and how we used a computerized system to monitor temp and cure cycle.
We were doing Hospital equipment using a Epoxy/Polyester hybrid.
The last thing a hospital or surgeon needs is powder flaking off into a patient.
We attached leads to dummy parts and ran them with the coated stuff and watched the temp of the metal and set the timer when it hit the mark.
I think they have tried to make it as easy and trouble free as possible with the at home versions.
The last point I think is that what ever you are using to cure the powder it has to remain a consistent temp from top to bottom and front to back to ensure even cure across the part.
Seen many a frame come in from another coater to be fixed because the front of the frame was peeling and the back was cured. They had hung the frame with neck facing down and the oven had a cool spot near the floor.
Leave a comment:
-
Good info, I can't tell exactly when the part gets to 400 degrees. What I have been doing is watch it until it looks wet all over, then start the clock. The directions on the powder say 400 for 15 - 20 mins, I go 20 from when it looks wet. It seems to work so far, but I know bigger pieces will take longer to heat up. Is there a problem with leaving it in longer to make sure, say 30 minutes or so?.Originally posted by Mayhem63 View PostI was a professional coater for many years...started off in industrial applications and then found my passion doing custom motorcycles and auto parts.
There are a lot of different powders for many different applications. Each one has different characteristics.The best overall is polyester...it has good flexibility,uv protection,and chemical resistance. Urethane is a little more brittle I guess you could say but is a lot nicer finish,smoother but does seem to scratch easier. Epoxy has the highest chemical protection but the lowest uv rating it chalks in the sun.
The cleaning is important.we use to have 50 percent of the parts sand blasted and the rest we use to hand scuff then use a Phosphate wash or bath. It's not an etch it actually puts a fine layer of phosphate on the part to help adhesion. Used all types of blast media including glass bead.
Precooking the part is not a science it all depends on the material. Cast is the worst as far as gassing out also the age of the piece, the older the metal the more problems we seem to have with pin holing and gas out
The one thing I don't see in a lot of DIY applications is the explanation that the part has to get to cure temp. and remain for the recommended time period.
For example :The powders recommended temp is 400 degrees for 20 mins. If you have a 1/4" piece of steel and put it in for only 20 mins it will not cure properly. The likelihood of failure is higher.
Powder is great and they have made a lot of improvements in the manufacture of it.
Less orange peel than in the past.
But Thicker is not better. It will lose the flexibility the thicker it is. Recommended mil thickness for most powders is 1.5 to 3.5 mils thick.
Well I've rambled on long enough I hope this helps some out there.
Also the phosphate bath, is this the last step before applying the powder? Is this something I can do at home?
Is the 400 degrees enough to alter the metal, like make the aluminum soft or brittle, or maybe change the temper of valve springs or other steel parts?
How hot before rubber oil seals start to get damaged? It would be nice to do without removing new seals and ruining them.
Leave a comment:
.png)
Leave a comment: