.png "Powered by vBulletin")
Say, not to bring up a sore subject, but were it me, I'd lose the inline filter you had going on there (i just looked over your carb pics in the thread again).. Gravity fed systems dont like turning restricted corners... There is a great filter in your petcock too..so unless you have some serious flaking rust going on in your tank, the inline filter is just an added restriction to the fuel system..
-
-
On the AIR screw (the one on the side of the carb) IN will richen the pilot circuit.. OUT will lean it out (lets more air in) the opposite of this is true for the FUEL screw on the bottom of your carbs. BUT you SHOULDNT have to mess with the fuel screw.. Make the air screws do the work...Originally posted by chuck hahn View PostComment
-
Yup, going back in that 1/8th turn this morning before I start it. Also going to pull the plugs after yesterdays riding and see what they look like now. I may as well throw in the 4 new ones too before I fire it up.
I was thinking about that filter not realizing theres one on the petcock. If thats the case, I'll lose it. Its a pain in the a** trying to get the hose (that filters attached to) onto the petcock. I have to raise the bloody tank again anyway since I forgot to connect the fuel gauge wires.Comment
-
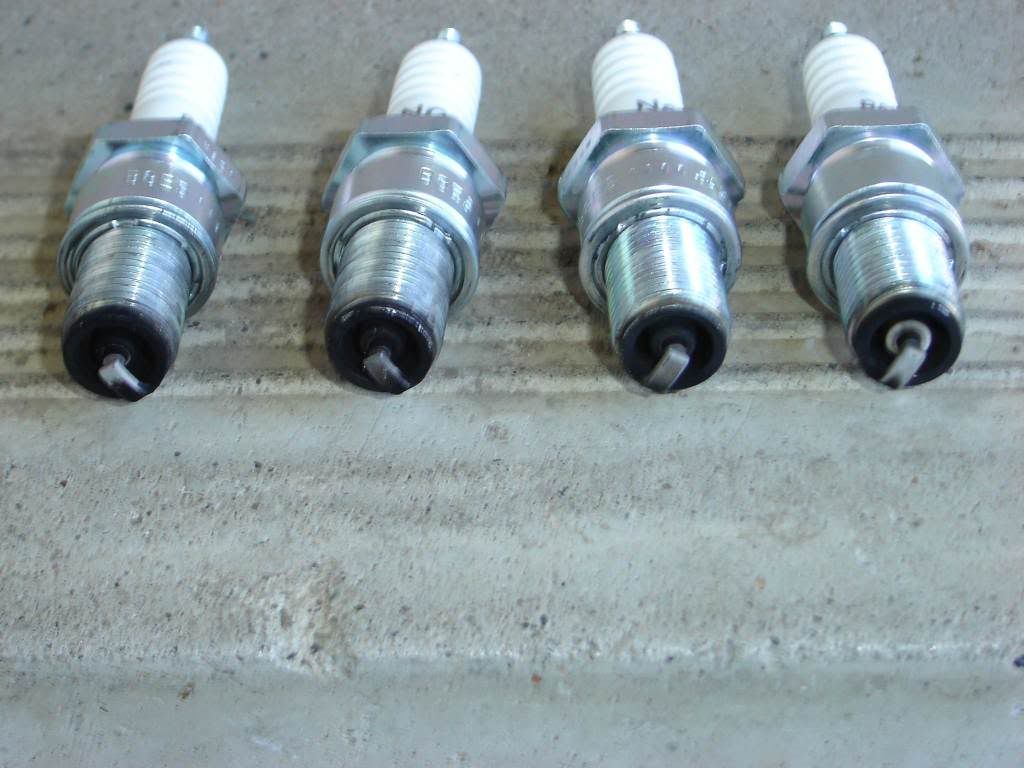
Heres the 4 plugs from yesterday. As you see them is how they would be in the bike if you were sitting on it looking down. Right plug from right side cyl and etc.
Only on the extreme right cyl. is the center insulator visible. The other 3 are sooty.
On the 2 center plugs the *curved* electrode isn't as white. To me that means the 2 middle pilots aren't as lean?
I guess I shouldn't have moved the needles the 1 notch richer either.
Sorry to keep on with one subject over and over.
Comment
-
Not an absolute but when running a 4/1 your plugs will not necessarily be 100% identical. No big deal. Yes it was a mistake to move the needle clip one full position. Restore to the way it was yesterday, those plug chops from yesterday very pretty damn close considering they had some color after 20 minutes of riding. How many turns out are you currently on 1) pilot fuel screw 2) pilot air screw. You want to find that pilot fuel screw sweet spot were the air screw does affect how it idles.
We should stickey this one just because.
Pilot Mixture air screw rule of thumb: "If the air screw is located between the carburetor slide and the engine (BS Carbs), turning the screw out richens the mixture. If the screw is between the carburetor slide (VM Carbs) and the air cleaner turning it in richens it." Joe Minton1979 GS1000E (44 Yrs), 1981 GPz550
Departed: 1970 Yamaha R5A, 1971 R5B, 1975 Honda XL250, 1983 Suzuki PE175, 1983 CB1100F, 1983 BMW R100RS, 1992 ST1100Comment
-
Taken from Paul Musser's VM carb rebuild sheet.....(some cutting here also to get across what I want to question)Originally posted by TheCafeKid View Post
***
Pilot air screws–also known as side air screws, or pilot screws, control air flow into the idle circuit.
2. See if there is a nick next to the screw head lined up with one end of the screw slot. That is put there by the factory to help reposition the screw if it’s removed. Turn each one in until it bottoms, counting the turn(s). Write down the number of turns then unscrew and remove.
***
***Turn each side pilot air screw slowly (both ways) up to one full turn until you hear the engine speed max out. When the engine speed stops rising, stop turning. You may want to go back about ⅛ turn to allow for listening error. These screws usually end up about 1Ľ to 2 turns out. ***
Ok...I have those little "nicks" next to the screw herads. My question is...which end of the screw slot do you use????
Right now I'm 1 1/4 turns out. I could twist the screw head and either end of the slot would line up with the "nick" before I get to 2 turns out.
Comment
-
When you set the air screw to lightly seated..which side of the slot was facing the nick? Thats your starting point. When that side of the slot comes back around to the nick, thats one full turn. The opposite side of the slot at the nick would be a half turn.. it helps to count as the slot lines up. starting at zero...one half, one, one half, two, etc..its also possible that the 'sweet spot' ISNT at the nick..you could find that it idles best (when you get to setting the highest idle with the screws, just get it running now) at 1 3/4 turns out, or 2 1/4 turns out..Its not an exacting science.. *listen* to the bike, it will tell you..Originally posted by Rick65Cat View PostLast edited by Guest; 04-04-2010, 04:10 PM.Comment
-
I've given up for the night....sadly by the time I get off work during the week its to late to work on it since I don't have a garage. Its gonna have to wait til next weekend.
This afternoon I started the bike with the needles back on the 3rd notch as per stock, the side screws out 1 3/4 turns and the pilot screws 3/4 turn out.
Bike ran but not the best. I thought it was just still not up to temp. When I got out on the road it was obvious it was too lean. I came back and turned the side screws back into 1 1/4 turns out and the bike ran wayyy better.....THEN....
A half mile from home it started stuttering like it was starving. By the time I managed to get home it was running on only the 2 center cylinders.
Pulling the outter plugs shows no real deposits on them and no smell of gas. The bowls have fuel, its just not getting through.
Oh, and when I was struggling to get it home..I'd reef on the throttle and then it would run on all 4. I'm thinking theres a blockage somehow somewhere.
Say....is there a spec length/number of coils on the spring for the pilot screw? Its a crazy thought but, if theres too many coils on this carb kit pilot spring it wouldn't allow you to screw the pilot all the way in to its full depth right? That would end up giving you a false reading when you attempt to turn the screw out X number of turns from seated.Comment
-
I have never used but others have stated those K&L / Aftermarket carb kits are a crap shoot. If you have the original pilot screw springs I would suggest installing them instead. It's a problem if you cannot lightly seat the screws because the new springs are too long Last edited by srsupertrap; 04-04-2010, 10:02 PM.1979 GS1000E (44 Yrs), 1981 GPz550
Departed: 1970 Yamaha R5A, 1971 R5B, 1975 Honda XL250, 1983 Suzuki PE175, 1983 CB1100F, 1983 BMW R100RS, 1992 ST1100Comment
-
When trying to use the "nick" to line up the mixture screws, remember that the factory put that nick there when the carb was brand new and about as perfect as it would ever be.
There is a very good chance that the "nick" won't be the sweet spot any more.
.sigpic
mine: 2000 Honda GoldWing GL1500SE and 1980 GS850G'K' "Junior"
hers: 1982 GS850GL - "Angel" and 1969 Suzuki T250 Scrambler
#1 son: 1986 Yamaha Venture Royale 1300 and 1982 GS650GL "Rat Bagger"
#2 son: 1980 GS1000G
Family Portrait
Siblings and Spouses
Mom's first ride
Want a copy of my valve adjust spreadsheet for your 2-valve per cylinder engine? Send me an e-mail request (not a PM)
(Click on my username in the upper-left corner for e-mail info.)Comment
-
Move away from Edmonton!!!!!!!Following this thread has been very entertaining!!
Originally posted by Rick65Cat View PostComment
-
I thought I'd go back to the settings that the carb was set up with when I first had the jetting done. 1 1/4 turns out on the pilot fuel screws, and 1 1/2 turns out on the side air screws. If it worked then, it should re-work.
Bike started right up. Jumped on and got 200 yrds down the road and it quit. Had to push it home.
After I got it in its parking spot, I stood there looking at it a few minutes and decided to try it without the gas cap....took it off and hit the button..fired right up.
So I took the gascap to my workbench and tore it down. There didn't seem to be any grunge coming out of it but I had the knowledge it was clean.
Jumped on the bike and got 400 yrds away before it quit. A long push at 52 yrs old. So its not the cap. Next I'm gonna take the petcock off and check the filter.
Its getting gas, just not enough. If the filter is clean, then the carbs are coming back off for another cleaning. This time i'll use a pressurized can of carb cleaner on the orifices as well as dipping.Last edited by Guest; 04-06-2010, 12:24 AM.Comment
-
Sounds like the right course of action. The vacuum petcock are also suspect at the 30 year mark. Might want to use prime instead and see if that makes a difference? It's probably gas flow related rather than carb related.1979 GS1000E (44 Yrs), 1981 GPz550
Departed: 1970 Yamaha R5A, 1971 R5B, 1975 Honda XL250, 1983 Suzuki PE175, 1983 CB1100F, 1983 BMW R100RS, 1992 ST1100Comment
-
Yep, I was kinda thinking the same. My next move is to drain my gas and filter it through a cheescloth into a gas can. Then pull the petcock out and check it. Hopefuly the O-rings and gasket are reusable.
Do all the easy stuff before ripping the carbs apart again.Comment
-
K....Got the "quitting after a few hundred yards" thing fixed.
Gonna start getting serious on the fuel screw tuningComment
Comment