Announcement

Collapse
No announcement yet.

1/4 throttle stumble

Collapse
X
 
  • Filter
  • Time
  • Show
Clear All
new posts

    #16
    Originally posted by chef1366 View Post
    I'd call around and check if you can find some 117.5 Mikuni large round main jets.
    THEN jet the needle with the washers.
    I'll put in some calls tomorrow before work and see if i can pick some up from one of the local shops over here.

    Originally posted by tkent02 View Post
    The accepted procedure for jetting CV carbs is to get the main jet right first, then work your way down.

    Have you done any plug chops?
    Once again as a total carburetor novice These are things that are go a long way! Thanks.
    As for plug chops: A. I don't know what that is/does exactly, B. Other than clean them and jet the needle I haven't done anything
    Edit: so I looked up plug chops.. yeah should have done that before reposting. Anyways Nope haven't run the engine at a specific speed/rpm,
    then kill it, and check the plugs. Would you suggest doing this before getting the larger main jets or after? I'd assume after to better assess
    the upgrade however it might be interesting to see how it is performing before the step-up and then after.
    Last edited by Guest; 08-11-2010, 12:52 AM. Reason: Ignorance... haha

    Comment


      #17
      With the airbox/K&N and stock pipe you will be good to go with the 117.5s. You probably will lose the stumble with two washers.
      1983 GS 1100E w/ 1230 kit, .340 lift Web Cams, Ape heavy duty valve springs, 83 1100 head with 1.5mm oversized SS intake valves, 1150 crank, Vance and Hines 1150 SuperHub, Star Racing high volume oil pump gears, 36mm carebs Dynojet stage 3 jet kit, Posplayr's SSPB, Progressive rear shocks and fork springs, Dyna 2000, Dynatek green coils and Vance & Hines 4-1 exhaust.
      1985 GS1150ES stock with 85 Red E bodywork.

      Comment


        #18
        Originally posted by Kapoor View Post
        ... Nope haven't run the engine at a specific speed/rpm, then kill it, and check the plugs. ...
        It is not speed/rpm that determines when to chop the throttle to read the plugs, it is THROTTLE OPENING.

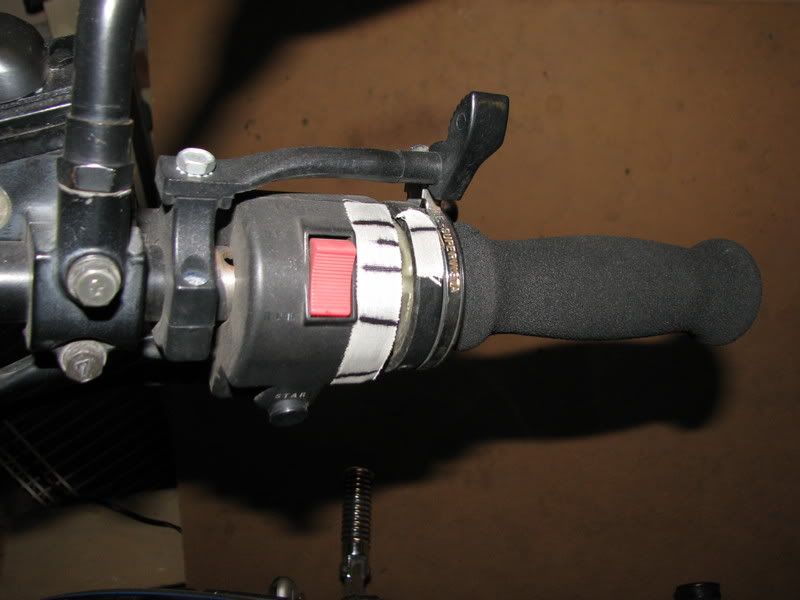
        Use some white tape (masking tape will work, too), place a strip on the throttle grip and a strip on the housing. Place a mark across both of them, near the top. Hold the throttle all the way open, make a mark across from its mark, on the housing's strip. Measure between the two marks (idle and full throttle), make marks for 1/2 and 1/4 throttle. When you are done, it might look like this:


        Now you are ready to hold the throttle at specific THROTTLE OPENINGS to do your "plug chops".

        .
        sigpic
        mine: 2000 Honda GoldWing GL1500SE and 1980 GS850G'K' "Junior"
        hers: 1982 GS850GL - "Angel" and 1969 Suzuki T250 Scrambler
        #1 son: 1986 Yamaha Venture Royale 1300 and 1982 GS650GL "Rat Bagger"
        #2 son: 1980 GS1000G
        Family Portrait
        Siblings and Spouses
        Mom's first ride
        Want a copy of my valve adjust spreadsheet for your 2-valve per cylinder engine? Send me an e-mail request (not a PM)
        (Click on my username in the upper-left corner for e-mail info.)

        Comment


          #19
          Originally posted by Steve View Post
          It is not speed/rpm that determines when to chop the throttle to read the plugs, it is THROTTLE OPENING.
          Haha Thanks for the correction, essentially that's what I was trying to say. Also quick question do we have a pdf on proper procedure when doing plug chops on?

          Comment


            #20
            Originally posted by Kapoor View Post
            Also quick question do we have a pdf on proper procedure when doing plug chops on?

            Not a PDF, per-say, but I think you'll find the following links rather useful:


            That's a pretty good primer in carb theory and tuning. Also, when you rebuilt them, you rebuilt them using this guide, right?

            http://www.mtsac.edu/~cliff/storage/gs/mc_maint/GS_CV_Carb_Cleaning_Series.pdf

            I know it's a no brainer, but I'd also wager that you replaced all those thirty year old o-rings with pieces from Mr. Robert Barr, correct?


            Buy a bunch of spark plugs for your chops. Use a new set for each circuit, if you can swing it. That's a lot of plugs to buy, but you should be able to reuse the plugs after you get the tuning dialed, thus lowering your maintenance cost. Nice new plugs make it real easy to read the A/F ratio. A Colortune is also an option. Also, make sure you sync the carbs before trying to tune them.

            Comment


              #21
              Originally posted by Turtleface View Post
              Not a PDF, per-say, but I think you'll find the following links rather useful:


              That's a pretty good primer in carb theory and tuning. Also, when you rebuilt them, you rebuilt them using this guide, right?

              http://www.mtsac.edu/~cliff/storage/gs/mc_maint/GS_CV_Carb_Cleaning_Series.pdf

              I know it's a no brainer, but I'd also wager that you replaced all those thirty year old o-rings with pieces from Mr. Robert Barr, correct?


              Buy a bunch of spark plugs for your chops. Use a new set for each circuit, if you can swing it. That's a lot of plugs to buy, but you should be able to reuse the plugs after you get the tuning dialed, thus lowering your maintenance cost. Nice new plugs make it real easy to read the A/F ratio. A Colortune is also an option. Also, make sure you sync the carbs before trying to tune them.
              Thanks again! As for using the guide I did not, however after flipping through it I seems I had preformed many if not all of the same steps just in a different order. Also about the O-Rings the kit came with all of the rings but the fuel line T-adapter o-rings, but a quick trip to lowes and I was good to go! I guess the only ones i didn't get to was the choke o-rings!

              On to the next topic plugs! So $5-6 each sound about right or really expensive? picked up my last set at a local shop which usually means more expensive, but the shipping online (and the wait! ) didn't make it seem worth it. Also after reading BassCliffs plug chop method it appears i need 3 NEW sets of plugs then? So we talking about $60 in plugs?! lol

              As for the guides I seemed to have figured out how to sync the carbs fairly efficiently using a homebrew rig made from nylon tubing, some motionpro carb sync adabtors, a meter stick, and some ATF. I also had stumbled upon the carb theory 101 guide about 4 days ago and have read it multiple times, and will probably have to read it a few more! Haha, only thing I haven't done is the plug choping which is something I've begun to look into as my next mini project. Thanks again for the great resources!
              Last edited by Guest; 08-11-2010, 02:51 AM.

              Comment


                #22
                Originally posted by Kapoor View Post
                On to the next topic plugs! So $5-6 each sound about right or really expensive? picked up my last set at a local shop which usually means more expensive, but the shipping online (and the wait! ) didn't make it seem worth it. Also after reading BassCliffs plug chop method it appears i need 3 NEW sets of plugs then? So we talking about $60 in plugs?! lol
                Sounds a bit high on the price there, but I am not home to check my receipts.

                No, you only need ONE new set of plugs. You don't actually CHOP the plugs, as in cutting them up.

                You simply install new plugs so there is no color on them at all. I start with the pilot circuit/low-speed operation first. Actually, you will want to warm up the engine on the old plugs, then install the new ones for the tests.

                Idle around the neighborhood, keeping the throttle as closed as you can. You might need to to this for a full minute or two. Use higher gears. Yes, ou will be doing 20 mph in fifth gear, but that's what keeps the throttle opening very small. Hit the kill switch and pull the clutch, coast to a stop, hopefully in a safe area. Pull the plugs, read and record their colors. Repeat this at 1/4 throttle. You won't have to go quite as long, maybe just one minute. Helps if you have a small hill to climb to keep your speed down at 1/4 throttle. Again, CHOP THE THROTTLE, hit the kill switch, pull the clutch, coast to a stop, read the plugs. Repeat at 1/2 throttle, then full throttle. Fortunately, the full-throttle run will color the plugs quickly, you will only need one good run to about 70 or 80 mph, then kill the engine and coast to a stop. Keep in mind that if you let the engine idle as you coast to a stop, that test is WORTHLESS.

                Now you can either keep the new plugs in the bike or go home, put the old plugs back in and keep the new ones for spares.
                No sparkplugs are destroyed in the process.

                .
                sigpic
                mine: 2000 Honda GoldWing GL1500SE and 1980 GS850G'K' "Junior"
                hers: 1982 GS850GL - "Angel" and 1969 Suzuki T250 Scrambler
                #1 son: 1986 Yamaha Venture Royale 1300 and 1982 GS650GL "Rat Bagger"
                #2 son: 1980 GS1000G
                Family Portrait
                Siblings and Spouses
                Mom's first ride
                Want a copy of my valve adjust spreadsheet for your 2-valve per cylinder engine? Send me an e-mail request (not a PM)
                (Click on my username in the upper-left corner for e-mail info.)

                Comment


                  #23
                  Must picked up two sets of plugs at Autozone, each plug was just under $3 bucks. NGK D8EAs.

                  Comment


                    #24
                    Hey thanks about the autozone tip, and letting me know I didn't need a set of plugs for each chop. Lol and I figured I wasn't actually 'chopping' them, just didn't know if it was best for each curcuit to have it's own set.

                    So currently I have the new 117.5 main jets in there, and I went back to the 2 washers. Before I went for a ride the air fuel mixture was way off and it took a bit to get her to start. So I referedto Mr. Basscliffs page for the best method of adjusting the mixture screws, ended up using the highest-idle method. Got that squared away and took her for a quick spin.

                    Even though it's a small change I like the new tiny bit of power the jets added, or if they didn't add any tangable amount of power I like a better running bike that's for sure! Everything felt great, there's still however a tiny tiny blip in the acceleration, so I think I'm going to find a washer that is just slightly smaller than the ones in my stack and try splitting the difference between 2 and 1 washers. I think I got some somewhere. Oh and another quick question. I recently have been getting a backfire from the engine while I ride is this an adjustment that needs to be done to the intake and exhaust cams? And when I do adjust them where in the range of factory spec should I adjust them to? Like the tightest, or middle of the range?

                    Comment


                      #25
                      Can someone go into detail please the procedure on shimming the needle.
                      This can be done with the carbs on the bike?

                      Comment


                        #26
                        Originally posted by KDS111 View Post
                        Can someone go into detail please the procedure on shimming the needle.
                        This can be done with the carbs on the bike?
                        Take the needle out of the slide, remove the plastic spacer and replace it with a lesser heigth of washers. This raises the needle and richens the needle circuit.
                        Look for the small assorted washers at Radio Shack.
                        1983 GS 1100E w/ 1230 kit, .340 lift Web Cams, Ape heavy duty valve springs, 83 1100 head with 1.5mm oversized SS intake valves, 1150 crank, Vance and Hines 1150 SuperHub, Star Racing high volume oil pump gears, 36mm carebs Dynojet stage 3 jet kit, Posplayr's SSPB, Progressive rear shocks and fork springs, Dyna 2000, Dynatek green coils and Vance & Hines 4-1 exhaust.
                        1985 GS1150ES stock with 85 Red E bodywork.

                        Comment


                          #27
                          When does the back fire occur?
                          Try Radio Shack for the correct washers.
                          1983 GS 1100E w/ 1230 kit, .340 lift Web Cams, Ape heavy duty valve springs, 83 1100 head with 1.5mm oversized SS intake valves, 1150 crank, Vance and Hines 1150 SuperHub, Star Racing high volume oil pump gears, 36mm carebs Dynojet stage 3 jet kit, Posplayr's SSPB, Progressive rear shocks and fork springs, Dyna 2000, Dynatek green coils and Vance & Hines 4-1 exhaust.
                          1985 GS1150ES stock with 85 Red E bodywork.

                          Comment


                            #28
                            Well RadioShack out by me doesn't carry very many washers at all , so i went to Lowe's and home-depot but they didn't have anything small enough either. I'll try a few more RadioShack's in the area and maybe I'll get lucky.

                            The backfire occurs after rolling off of the throttle and letting the engine slow you down. I've known this to happen on a few trucks, but never really a bike (then again I really don't have the experience to speak for either). So is this something to do with the lifters on the exhaust cam getting stuck or are out of tune?

                            Also currently there's another problem. After installing the 117.5 mains the bike had been running rough, and after adjusting the mixture screws is was still running really rough. So I tried to remove one of the washers, and it runs horrible. I'd say as bad as it did just before I started to shim the needles. But honestly it sort of reminds me of when the carbs were first out of sync, so I'll have to do that tomorrow when I get off work. I guess my question is: After jetting your carbs should you have to resync them?

                            Comment


                              #29
                              I don't really favor shimming the needles as an only adjustment. I found that bone stock GS's respond very nicely by bumping the pilot jets one size richer. Pilots primarily help from idle to 1/4 throttle, but what most people don't know is pilots continue to feed fuel througout the entire carb range. If you are truly at 1/4 throttle you might be just at or beyond a pilot jet change, but still something to think about.

                              Here's a trick to tell exactly what throttle position you are at without "guessing". Wrap a piece of masking tape around your Throttle switch housing. Stick a sewing pin with a red knob in your grip flange up high where you can see this. Mark the tape with a line corresponding to the pin. This is "idle". Now twist the throttle WO, and mark the tape again "WO" . Now divide the remaining incraments to 1/4, 1/2 and 3/4 between your baseline established throttle positions. Now as you are road testing your jetting you can look at the throttle position and precisely tell what carb circut is not performing correctly
                              Last edited by Guest; 08-13-2010, 12:00 PM.

                              Comment


                                #30
                                Alright so I see a problem in my descriptions now. First off I left out that I did indeed do the thing with the tape before posting this thread (and I swear it's at exactly 1/4 throttle) and so my last description of how it was running was poor. It's running really rough as in stumbles at 1/4 throttle again, the idle is not as smooth as it once was, and just just sounds off. I'll look around for the next step in pilot jet size, and maybe pick them up before I get off of work. I don't see this being a problem because I believe once I get a new exhaust I'll be jetting the carbs again anyways. However I think I'll attempt to sync the carbs again (or at least check them) before I install the new pilot jets.

                                Comment

                                Working...
                                X