Announcement

Collapse
No announcement yet.

Carb noob isn't so noob now

Collapse
X
 
  • Filter
  • Time
  • Show
Clear All
new posts

    Carb noob isn't so noob now

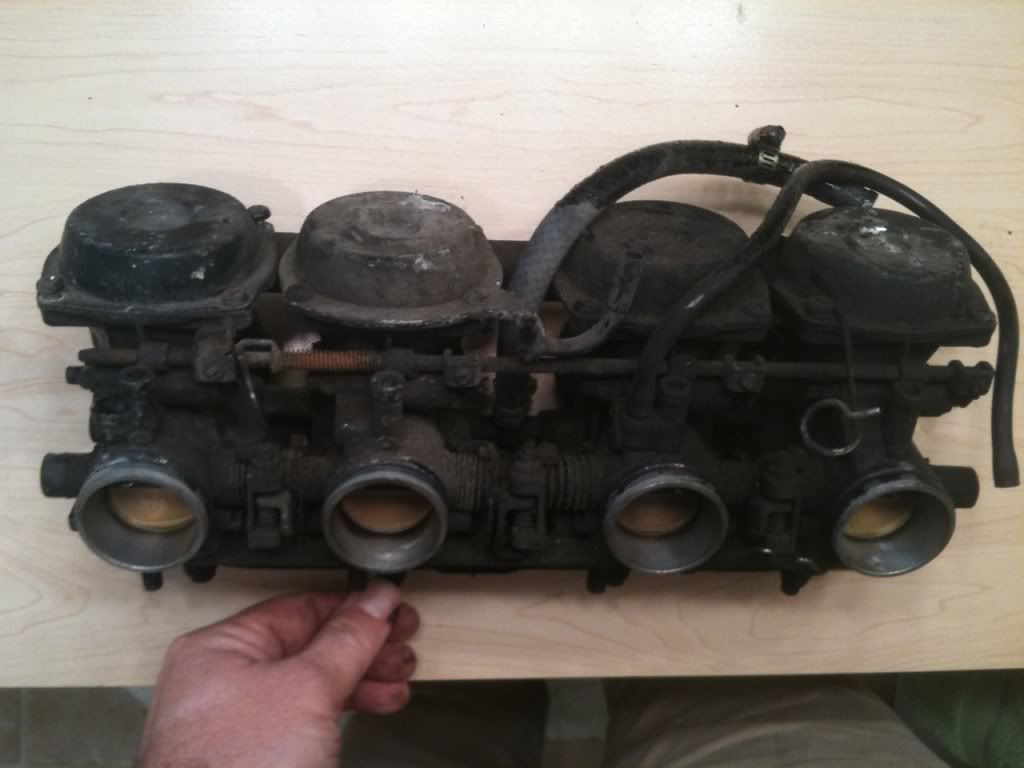
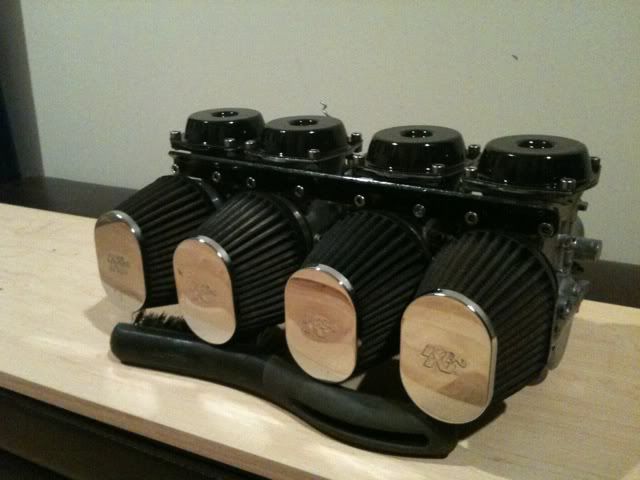
    I finished rehabbing these carbs I got from Ebay, came with pods, 100 shipped. Such a good price I thought, and even if they need parts or whatever, there was plenty of budget left over for stuff. Turns out there was a stage 1 kit installed, judging by the numbers stamped on the jets, but I think I will need a Stage 3 kit if I want to maximize performance (I also have a 4-1 pipe). The O ring kit from cycleorings.com worked great, and I also got a set of stainless fasteners. The hardest part was actually getting all the black plasticky paint stuff of the carb bodies. Hours of brushing and light scraping, all those nools and crannies, still couldn't get all of it off, didn't want to wait days for the solvent to maybe work. Whatever, they're clean. They were so filthy before i started I sprayed lots and lots of degreaser on them and brought them to a self-serve carwash to blast as much loose dirt and grime as I could. That actually made it a lot less messy, and who cares if I get water in them, they were coming apart anyway.

    Big props to this awesome site! I wouldn't have been as comfortable tackling this without the knowledge that is available here.

    Enough yammering, here are the before and after shots. The pics were taken with my phone, sorry they aren't sharp and purdy...


    #2
    Way to go Cableguy those look awesome, I hope I can doi half as good a job when i pull mine.

    Tom

    Comment


      #3
      self-serve carwash... lol. good job on cleaning them though...

      Comment


        #4
        Hi

        What a difference a dip makes!


        Thank you for your indulgence,

        BassCliff

        Comment


          #5
          Originally posted by BassCliff View Post
          What a difference a dip makes!
          Hey, some of us "dips" do quite well, thank you very much.

          .
          sigpic
          mine: 2000 Honda GoldWing GL1500SE and 1980 GS850G'K' "Junior"
          hers: 1982 GS850GL - "Angel" and 1969 Suzuki T250 Scrambler
          #1 son: 1986 Yamaha Venture Royale 1300 and 1982 GS650GL "Rat Bagger"
          #2 son: 1980 GS1000G
          Family Portrait
          Siblings and Spouses
          Mom's first ride
          Want a copy of my valve adjust spreadsheet for your 2-valve per cylinder engine? Send me an e-mail request (not a PM)
          (Click on my username in the upper-left corner for e-mail info.)

          Comment


            #6
            Wow! Those are some of the best "before and after" pics I have seen yet.
            Looks like they came from the bottom of the ocean.
            1983 GS 1100E w/ 1230 kit, .340 lift Web Cams, Ape heavy duty valve springs, 83 1100 head with 1.5mm oversized SS intake valves, 1150 crank, Vance and Hines 1150 SuperHub, Star Racing high volume oil pump gears, 36mm carebs Dynojet stage 3 jet kit, Posplayr's SSPB, Progressive rear shocks and fork springs, Dyna 2000, Dynatek green coils and Vance & Hines 4-1 exhaust.
            1985 GS1150ES stock with 85 Red E bodywork.

            Comment


              #7
              Originally posted by Steve View Post
              Hey, some of us "dips" do quite well, thank you very much.

              .
              And you, kind sir, are one of the dippiest!


              Thank you for your indulgence,

              BassCliff

              Comment


                #8
                Originally posted by BassCliff View Post
                And you, kind sir, are one of the dippiest!


                I think I thank you, thir.

                .
                sigpic
                mine: 2000 Honda GoldWing GL1500SE and 1980 GS850G'K' "Junior"
                hers: 1982 GS850GL - "Angel" and 1969 Suzuki T250 Scrambler
                #1 son: 1986 Yamaha Venture Royale 1300 and 1982 GS650GL "Rat Bagger"
                #2 son: 1980 GS1000G
                Family Portrait
                Siblings and Spouses
                Mom's first ride
                Want a copy of my valve adjust spreadsheet for your 2-valve per cylinder engine? Send me an e-mail request (not a PM)
                (Click on my username in the upper-left corner for e-mail info.)

                Comment


                  #9
                  Real nice job there Cableguy, I must agree, those are some serious before and after pics.

                  Comment


                    #10
                    Great Job and picts.

                    cg
                    sigpic
                    83 GS1100g
                    2006 Triumph Sprint ST 1050

                    Ohhhh!........Torque sweet Temptress.........always whispering.... a murmuring Siren

                    Comment


                      #11
                      That was a very impressive cleanup you did there.

                      Comment


                        #12
                        I think the only difference in the Stage 3 kit is the size of the main and where you set the clip on the needle. Give them a try the way they are first. If it pulls clean through the rpm range and you don't get any popping off the throttle you're probably go to go. Nice job and a good score. The pods are worth your $100.

                        Comment


                          #13
                          Thanks! I think the key was the initial degreaser/pressure blast at the car wash, and letting the bodies soak long enough to get all the paint off. I sanded the tops and rails, then primed/painted with engine paint for durability. All I need is a set of bowl gaskets and stage 3 mains and I'm good to go. Can't wait for spring! Or at least march!

                          Comment


                            #14
                            ...once again, the "Car Wash"..... lol

                            Comment

                            Working...
                            X