.png "Powered by vBulletin")
I will have to really sit down tomorrow to absorb all of this. What tremendous info. I will answer all the question I can for you and fill you in on some other things. Wow! I am impressed.
-
-
Haha yeah Chuck! What a crazy amount of info.
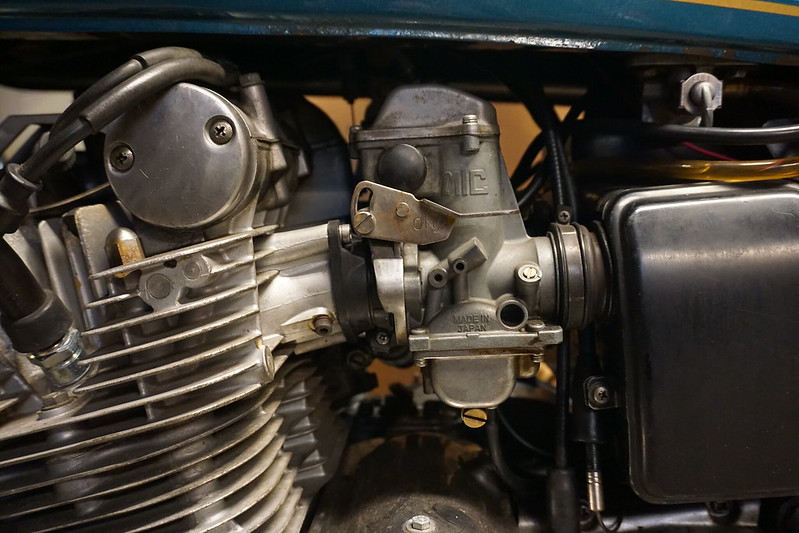
For a comparison, here is a similar picture that I happened to have on my flickr of the stock vm26's on my '77 GS750:
 1980/1981 GS450 - GS500 Cylinder + Piston Swap - "De-L'ed", custom seat, CB350 bits, 18" rear, etc.
1977 GS550
1977 GS750 - Cross country trip threadComment
-
Hey I just thought of something else obvious/necessary... are you certain you are getting plenty of fuel flow???? And not too much on cylinder #3???
Your vacuum petcock may not be operating properly. Are you sure the vacuum line that goes to the petcock from carb #3 is not dripping fuel out of it? And that the petcock is opening fully upon applying vacuum to it???
Your symptoms are pretty drastic, so I wanted to check more obvious issues.
You can disconnect and plug off the vacuum hose from the petcock (dove a pin or nice round nail or fine thread screw into hose), then turn the petcock to "Prime," & then try to ride the bike, see if anything different happens.
the float needles are critical to check and replace if you haven't already. They need to seal well. Or else you will be rich everywhere.
Thank you for the kind words, allojohn.. I'm just a huge 2 wheeled mechanical geek, really. I'm still learning... lots more to learn. Guys like GregT, rapidray, 49er, wera90ex, etc are the true technical wizards of these bikes...'77 GS750 920cc heavily modded
'97 Kawasaki KDX220R rugged terrain ripper!
'99 Kawasaki KDX220R rebuild in progress
'79 GS425 stock
PROJECTS:
'77 Suzuki PE250 woods racer
'77 GS550 740cc major mods
'77 GS400 489cc racer build
'76 Rickman CR1000 GS1000/1100
'78 GS1000C/1100Comment
-
i've rebuilt the petcock and tested it to the best of my ability. I installed all clear fuel lines so that I can see whats happening and its moving through. I have tried to ride it on prime with the vacuum line plugged and its still the same issue. I've replaced all the float needles as well. I'm beginning to wonder if it may be something more drastic like a bent valve or lost compression. I don't get much smoke from it but there is some, not enough to alarm me based on the dirtbikes I've worked on. It does throttle well when it isn't under load its only dying when engaged with the transmission.Comment
-
Yes, another thing I was going to say, do you have access to a compression testing gauge? You have to have compression, fuel, spark, and proper timing of ignition and camshafts to make everything work.
Do a compression test after adjusting the valves properly. Put the compression test gauge in one cylinder at a time with the other spark plugs all out, and crank engine over with electric start if possible, while you hold throttle open all the way. Record results. Then squirt a little bit of engine oil into each cylinder through the spark plug hole, this helps if you have an old school oil squirter canister. You can just drizzle some in from the cap of a 1 quart oil jug if needed. Then kick the engine over many times with the KICKSTARTER (avoid Hugh speeds and electric to try and not get any oil on the valve seats/faces) to get the oil spread around as best as possible on the cylinder walls and around the full circumference of the rings. Then repeat, put the compression test gauge in one cylinder at a time with the other spark plugs all out, and over with electric start if possible, and hold throttle open all the way, record results.
If your numbers are low on the first test, below 120 or below 110, and they are high on the second test, say 180 everywhere, you know you have some bad rings somewhere, or damaged pistons or cylinder walls. If you didn't use too much oil on the west test, and your numbers are still low, you know the Rings are ceiling, but you have burnt valves or lots of carbon buildup on the valve seats and faces. If the valves were hanging open, Carbon can get built up on them and cause them not to seal. I have rejuvenated engines from dumping a very liberal amount of oil into the cylinders and running them, which helps break loose the carbon without dismantling the head. Perhaps automatic transmission fluid might help loosen the carbon more, just as it does help loosen rusted/stuck rings? That's another thing, you could also have some sticking piston rings if the bike has not been ridden much. Carbon buildup on the valves or a burnt valve is more likely.
Doing a top end rebuild on these isn't really that difficult, but some steps are a bit tedious (taking great care not to bang up pistons, damage gasket surfaces, etc. Ring gaps, bore clearances if just re-ringing yourself, ring clocking, & most of all, cam timimg, are pretty particular. Taking the head to a machine shop for a proper valve job and possible resurfacing is the highly skilled part that most of us will source out. And boring/decking the cylinders.
If you find that you have to pull the head and cylinders, you may want to look into boring a Wiseco K844 kit into the cylinders, and decking the block about .010"/0.25mm. The kit can be had for as cheap as about $418, and I believe that is with head gasket.
Several years ago, MTC Engineering still had a few sets of discontinued +2mm (67mm) overbore high compression 798cc piston sets available for $250. No head gasket. These would be pretty nice in there. Or cruizin_image_co in Japan (ebay) remakes OEM style cast pistons for GS's, I have an 870cc gs850 +1mm set that I was going to install. It was less than $200 shipped! TheY may make 66mm overbore pistons for the 750 as well. If not, a standard bore set of 850 pistons from them will also bore right into the 750 cylinders. That is the ABSOLUTE MAX you can bore them out however.
Or get an 850 cylinder off ebay if you want to put more effort into it, bore it +1mm to 870cc, resurface the deck ( pretty much always needed on 850 cylinders because of the original OEM head gaskets deteriorating). You will have to spend some time clearancing the crankcase, which means is best to dismantle the entire bottom end to do this, and then install new seals everywhere down there while it is a part, and then clean the case halves and RTV silicone and back together with special case sealer RTV. It is possible to clearance the cases to fit the bigger 850 cylinder without dismantling the bottom end, but not recommended. You have to be very tedious to not get metal shavings down there. It only rubs in a few spots per cylinder. The Wiseco kit bored into your stock cylinders will be much easier but cost more up front. Because your cylinders already fit the current case.
vroom vroom!
I love modifying bikes (GS, KZ, 2 stroke dirtbikes) for better performance. Engine, chassis, brake, wheel, suspension, you name it... is it obvious?'77 GS750 920cc heavily modded
'97 Kawasaki KDX220R rugged terrain ripper!
'99 Kawasaki KDX220R rebuild in progress
'79 GS425 stock
PROJECTS:
'77 Suzuki PE250 woods racer
'77 GS550 740cc major mods
'77 GS400 489cc racer build
'76 Rickman CR1000 GS1000/1100
'78 GS1000C/1100Comment
-
A while back, you were showing the settings that you had, then mentioned VM29 carbs, which got another flurry of activity. Now that the hubbub has settled down a bit, let's re-visit those settings, just to establish a baseline.
- Set the float level to the stock 24mm. I think you mentioned some other number.
- Set the pilot fuel screw (the one on the bottom) to 1 full turn out from lightly seated. Stock is 3/4 to 7/8, the extra bit is for the pods.
- Set the pilot air screw (the one on the side) to 1 1/2 turns out from lightly seated. After fine-tuning, it might end up about double the fuel screw setting, but starting at 1 1/2 will give a slightly richer mixture for easier starting.
- Treat your bike to some new NGK B8ES spark plugs.
- Make sure the valves are properly adjusted.
With those basic items addressed, you can do some fine-tuning, but it will be from a known, established baseline.
.sigpic
mine: 2000 Honda GoldWing GL1500SE and 1980 GS850G'K' "Junior"
hers: 1982 GS850GL - "Angel" and 1969 Suzuki T250 Scrambler
#1 son: 1986 Yamaha Venture Royale 1300 and 1982 GS650GL "Rat Bagger"
#2 son: 1980 GS1000G
Family Portrait
Siblings and Spouses
Mom's first ride
Want a copy of my valve adjust spreadsheet for your 2-valve per cylinder engine? Send me an e-mail request (not a PM)
(Click on my username in the upper-left corner for e-mail info.)Comment
-
Test compression first before going any further with carb adjustments.
Then proceed with carb adjustments, with float height check, and bench synchronization first and second.'77 GS750 920cc heavily modded
'97 Kawasaki KDX220R rugged terrain ripper!
'99 Kawasaki KDX220R rebuild in progress
'79 GS425 stock
PROJECTS:
'77 Suzuki PE250 woods racer
'77 GS550 740cc major mods
'77 GS400 489cc racer build
'76 Rickman CR1000 GS1000/1100
'78 GS1000C/1100Comment
-
just a thought but perhaps the mechanical advance should be checked for proper operationComment
-
I'm not sure I know what that is or how to do it?Comment
-
It's time for you to walk away from your bike, find a comfy chair and spend a day or two reading through the workshop manual. Everything you need to know about your bike is in there.Originally posted by BurtyMcSquirt View Post-Mal
"The only reason for time is so that everything doesn't happen at once." - B. Banzai
___________
78 GS750EComment
-
mechanical advance is the thing the behind the timing plate that spins. mark your timing plate so it can be put back in at the same spot and remove it by taking out the 3 big bolts. Twist the mechanical advance to see that the weights open AND it snaps back when released. also a good time to give it a smear of a LIGHT grease on the shaft.MY BIKES..1977 GS 750 B, 1978 GS 1000 C (X2)
1978 GS 1000 E, 1979 GS 1000 S, 1973 Yamaha TX 750, 1977 Kawasaki KZ 650B1, 1975 Honda GL1000 Goldwing, 1983 CB 650SC Nighthawk, 1972 Honda CB 350K4, 74 Honda CB550
NEVER SNEAK UP ON A SLEEPING DOG..NOT EVEN YOUR OWN.
I would rather trust my bike to a "QUACK" that KNOWS how to fix it rather than a book worm that THINKS HE KNOWS how to fix it.Comment
-
Happy Thanksgiving everyone. Today I'm thankful for all the help and great people I've experienced in this community. Enjoy your friends and family today and I'll update you when I've had time to tinker. God Bless.Comment
-
I suggest you start by reading this,
.png)
If you haven't already1978 GS 1000 (since new)
1979 GS 1000 (The Fridge, superbike replica project)
1978 GS 1000 (parts)
1981 GS 850 (anyone want a project?)
1981 GPZ 550 (backroad screamer)
1970 450 Mk IIID (THUMP!)
2007 DRz 400S
1999 ATK 490ES
1994 DR 350SESComment
-
Well fellas I just road my bike all over town and through all gears with no loss of power and it feels GREAT!!!!Comment
Comment