I had an issue with the wiring harness on my bike, a 77 gs750b. since I've started to fix it, i have bought 3 different harnesses. Have Found out there have been problems with these also. Is there anywhere that sales an aftermarket or oem harness short of just making my own. Have searched and haven't had any luck.
-
-
Hi,
There are very few new wiring harnesses available OEM any more. Check with your favorite online vendors and see. There are a few members who have built their own wiring harnesses using the wiring diagrams from the manual. It's do-able.
Thank you for your indulgence,
BassCliff -
It would appear that the B model harness is NLA but, the C model harness is!
Perhaps you could compare the twe fiches and see if the differences are minimal enough to use the C harness.
http://www.boulevardsuzuki.com/fiche...1977&fveh=2133
EricComment
-
I suggest you simply repair it.
They are really not that difficult.
1-Carefully remove the main wrapping , leaving the branch parts intact until you have to work with them.
2- Inspect EVERY inner connection and complete the repair of each one individually. This step is important
3- use solder connections and re-wrap all connections as needed, OR use liquid electrical tape and a lighter tape over-wrap.
It is important to avoid getting too much tape bulk because if it gets too thick you may have trouble getting it back in where it belongs.
4-There are a few 'branches" to deal with and each should be kept in that same condition, so lightly wrap the inner parts of them as you go along
5-When repairs are all done wrap the branches from the ends towards the inner connections/ main harness section.
That includes the tail sections.
6-Wrap the main harness from the front to the back, overlapping the branch connections.
Keep the tape tight as you wrap to avoid water intrusion. Don't be concerned about getting it too tight or too stiff: it HAS to be tightly wrapped and even if you make it stiffer than the original, it will just take a bit longer to feed through. Remember, you are only doing this once, so it should be good the first time, and spending a few extra minutes now could save hours of work later.Comment
-
Thanks for the help, think I've figured out the problem with it. I think though this winter when i tear the bike all down i will be making my own.Comment
-
+1 on the advice argonsagas gave you based on my experience with this.
now is also a great opportunity to make your harness better than new
add an Eastern Beaver H4 headlight relay kit. i also used their horn relay kit and r/r connector kit for the FH012 MOSFET-type r/r
what i also did was to "part out" a couple of ratty harnesses for sufficient lengths of correct color-coded wire.
consider using a 10 gage wire for the main trunk of the grounding circuit that goes thru the harness. all the tributaries that branch off at the front and back can remain the same gage as stock
i also removed the redundant stator charge loop that goes to the front of the bike in order to wire the stator directly to the r/r. if you don't know about this, please read the Stator Papers in Cliff's link then do a search. you will find that many members here recommend this.
also get your brass terminals and the necessary hard-shell plastic connectors from Eastern Beaver and Z1 Enterprises. get a good open barrel crimping tool (mine cost about $65 and has five sets of jaws).
you will also need terminal picks for removing the terminals from their hard-shells
tin your wires before crimping, it makes soldering a snap.
the Eastern Beaver site is chock-full of good tutorials. look up Jim's step-by-step on how to do open-barrel crimps
solder each terminal after crimping and before inserting into the connector. use the resin flux and use the flux very sparingly on female spades; if the flux flows into the receiver part of the female terminal, the solder will follow it in and not allow a male to be inserted
use marine-grade heat-shrink tubing. it is the type that is glue-lined so when it is heated the glue will flow and seal the connection water tight. i used it on ring terminal ends, splices and at the bullet connectors (the clear vinyl boots will slip over with a bit of dielectric grease, making a nice tight seal). i get mine cheap from Harbor Freight.
if i had to do this over again, i would have everything in the headlight bucket or otherwise exposed to weather in sealed Metri-Pak type Furakawa connectors. one of my donor harnesses is from a late GS500E and its full of them. i am using a couple in other areas. an Jim at Eastern Beaver has the terminals and cavity plugs.
i paid $9.99 on ebay for the GS500E harness
good luckLast edited by Guest; 07-25-2012, 02:37 AM.Comment
-
I think it would be best so you know what condition you're wiring is in. I know I found a badly soldered patch job after I removed all of the tape from one connection last year. I was shocked that section even workedCowboy Up or Quit. - Run Free Lou and Rest in Peace
1981 GS550T - My First
1981 GS550L - My Eldest Daughter's - Now Sold
2007 GSF1250SA Bandit - My touring bike
Sit tall in the saddle Hold your head up high
Keep your eyes fixed where the trail meets the sky and live like you ain't afraid to die
and don't be scared, just enjoy your ride - Chris Ledoux, "The Ride"Comment
-
How about tips/tricks for getting the brass terminals out of the plastic connectors and rubber boots without destroying them?Comment
-
Use a set of jewelers screwdrivers to push in and depress the tab. Or some use a paper clip - I never could get that to work for me though very well.Cowboy Up or Quit. - Run Free Lou and Rest in Peace
1981 GS550T - My First
1981 GS550L - My Eldest Daughter's - Now Sold
2007 GSF1250SA Bandit - My touring bike
Sit tall in the saddle Hold your head up high
Keep your eyes fixed where the trail meets the sky and live like you ain't afraid to die
and don't be scared, just enjoy your ride - Chris Ledoux, "The Ride"Comment
-
I have always preferred a METAL clip, as the paper ones folded too easily.
It also helps to know exactly what it is that you are trying to accomplish.
Take a look at these two pictures and notice the little tabs that are sticking up.
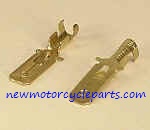
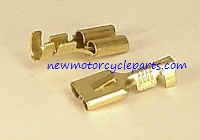
It is easiest to see in the right picture. Notice the tab just below the "cy" in cycleparts?
THAT is what you are trying to flatten, so you can pull the terminal out of the housing.
.
.sigpic
mine: 2000 Honda GoldWing GL1500SE and 1980 GS850G'K' "Junior"
hers: 1982 GS850GL - "Angel" and 1969 Suzuki T250 Scrambler
#1 son: 1986 Yamaha Venture Royale 1300 and 1982 GS650GL "Rat Bagger"
#2 son: 1980 GS1000G
Family Portrait
Siblings and Spouses
Mom's first ride
Want a copy of my valve adjust spreadsheet for your 2-valve per cylinder engine? Send me an e-mail request (not a PM)
(Click on my username in the upper-left corner for e-mail info.)Comment
-
Very cool, and thank you!
My plan is to take the harness and stick it to a piece of cardboard and slowly go through with the manual to try and figure out what goes where, label everything, take pictures and then take stuff apart.
A little nervous, but I'm sure it'll turn out Cope-Ah-Set-Ick.Comment
Comment