-
Ed
To measure is to know.
Mikuni O-ring Kits For Sale...https://www.thegsresources.com/_foru...ts#post1703182
Top Newbie Mistakes thread...http://www.thegsresources.com/_forum...d.php?t=171846
Carb rebuild tutorial...https://gsarchive.bwringer.com/mtsac...d_Tutorial.pdf
KZ750E Rebuild Thread...http://www.thegsresources.com/_forum...0-Resurrection -
Well, it's <sort of> in the manual.
They DO tell you how to position the cam lobes, they just don't detail why to position them that way.
The important thing to remember there is that you might see a clearance of 0.04mm and think "great, almost the middle of the range", when you are reading that 'extra' clearance and you really have NONE.
There is also no way to tell if you need to add the 0.02 or 0.04, so why not just position them correctly and trust the numbers you read?
There is another advantage of positioning them according to the manual.
You only need to move the crank FOUR times. Once to set the position for the first two, then three more times for the next three pairs. Putting the lobe "up" for each valve will require you to move the crank EIGHT times.
Since I am basically lazy, I'll continue to do it the correct way.
.sigpic
mine: 2000 Honda GoldWing GL1500SE and 1980 GS850G'K' "Junior"
hers: 1982 GS850GL - "Angel" and 1969 Suzuki T250 Scrambler
#1 son: 1986 Yamaha Venture Royale 1300 and 1982 GS650GL "Rat Bagger"
#2 son: 1980 GS1000G
Family Portrait
Siblings and Spouses
Mom's first ride
Want a copy of my valve adjust spreadsheet for your 2-valve per cylinder engine? Send me an e-mail request (not a PM)
(Click on my username in the upper-left corner for e-mail info.)Comment
-
Just my recent experience
I just did mine about 3 weeks ago -
Below you can see the results of the adjustments I made -
With the tolerances all near the 'bigger' end I have noticed NO change in running or performance
I have heard it sounds just a little different -- a bit more noise -- like a loud sewing machine (once you can hear beyond the exhaust note)
I AM chasing an exhaust leak right now and expect that to help quite a bit in quelling the noises -
Comment
-
All valve clearances around 0.075mm. So well within spec. Sounds great. Next main job is the clutch slip.Comment
-
If you have assured yourself that the cable is properly adjusted, fixing the slip is easy and cheap.
Order up six new OEM Suzuki springs. Do NOT bother with aftermarket "heavy duty" springs. Order up a clutch cover gasket. When you have the gaskets, leave the bike on the side stand. Remove the cable from its bottom mount, remove the clutch cover. Remove the six bolts that hold the pressure plate against the disk pack.
While you have the clutch open, check a couple of things. Be sure to keep all the disks in the same orientation. Keep the side that was facing out, facing out, do not turn it around. Measure the thickness of the fiber disks, compare that to the minimum thickness published in the manual. Inspect the inside of the clutch basket for notches. If any exist, use a file to remove them to ensure smooth operation of the clutch.
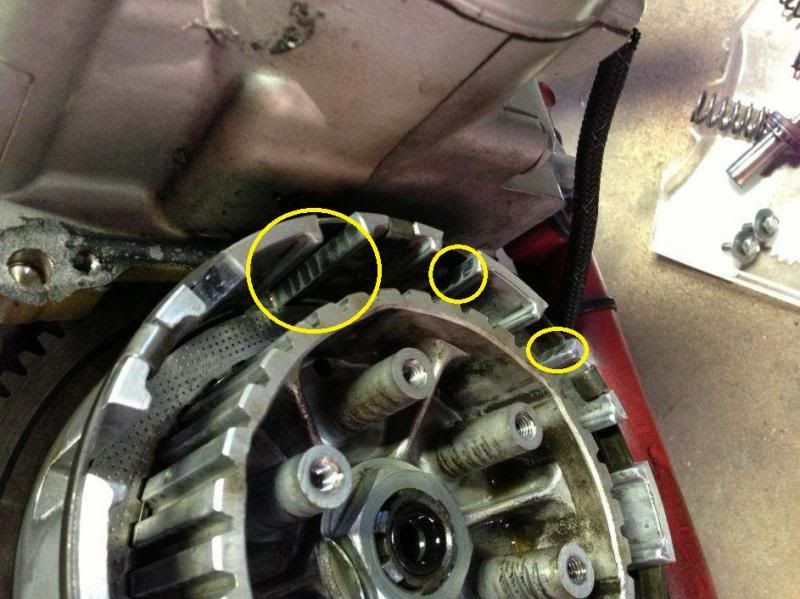
Here is what you DON'T want to see:
When you are assured that the disks and the basket are in good condition, put it all back together with the new springs and gasket, then put the back in place and adjust it.
.sigpic
mine: 2000 Honda GoldWing GL1500SE and 1980 GS850G'K' "Junior"
hers: 1982 GS850GL - "Angel" and 1969 Suzuki T250 Scrambler
#1 son: 1986 Yamaha Venture Royale 1300 and 1982 GS650GL "Rat Bagger"
#2 son: 1980 GS1000G
Family Portrait
Siblings and Spouses
Mom's first ride
Want a copy of my valve adjust spreadsheet for your 2-valve per cylinder engine? Send me an e-mail request (not a PM)
(Click on my username in the upper-left corner for e-mail info.)Comment
-
sigpic
mine: 2000 Honda GoldWing GL1500SE and 1980 GS850G'K' "Junior"
hers: 1982 GS850GL - "Angel" and 1969 Suzuki T250 Scrambler
#1 son: 1986 Yamaha Venture Royale 1300 and 1982 GS650GL "Rat Bagger"
#2 son: 1980 GS1000G
Family Portrait
Siblings and Spouses
Mom's first ride
Want a copy of my valve adjust spreadsheet for your 2-valve per cylinder engine? Send me an e-mail request (not a PM)
(Click on my username in the upper-left corner for e-mail info.)Comment

Comment