Tool for Disassembling Forks - Question about the Nut

Collapse
X
 
  • Time
  • Show
Clear All
new posts
  • Mith

    #1

    Tool for Disassembling Forks - Question about the Nut

    I've partly disassembled one of the forks on my 1981 GS550L. I need to make the T-handled tool with the 19mm nut. Is the nut 19mm across the flats (as measured with a digital caliper)? I have the two springs and oil out of the fork but am trying to get the inner tube and piston out. I assume now is when I need the tool to remove the screw in the bottom of the fork.
  • Mith

    #2
    ok, I was able to remove the screw without a tool. After getting the piston out, I see that there is no internal hex in the top of it for the T-handled tool to have held it anyway. This worries me because I'm wondering what prevents it from turning when I try to put it back together! Any thoughts? I need to take the inner tube out of the outer tube now so I can get the seal out.

    Pete

    Comment

    • Guest

      #3
      If you have an impact wrench put the fork caps back on and hit the bottom allen with that. Heat it a little first to loosen the old loctite.
      If you don't have one do a search. I know basscliff's site has a picture tutorial.

      Comment

      • Sandy
        Forum Guru
        Past Site Supporter
        • Feb 2004
        • 7504
        • Cranbrook, BC Canada

        #4
        Before you put it back together just make sure the threads are clean and free to turn and you shouldn't have any trouble.
        '84 GS750EF (Oct 2015 BOM) '79 GS1000N (June 2007 BOM)

        Comment

        • Mith

          #5
          I have the fork all apart now. After getting the screw out I just slid the inner tube forward a few times and it knocked the seal right out and the tubes seperated. I'm reading through BassCliff's instructions for reassembly. I still think I may wind up with a problem when I reassemble since I don't have any way of holding the damper (piston) when I need to tighten the allen bolt.

          Comment

          • Wallowgreen
            Forum Mentor
            Past Site Supporter
            • Sep 2007
            • 953
            • Navarre, Florida

            #6
            Just finished my fork rebuild yesterday. Yes the 19mm is across the flats of the nut but if your "piston" doesn't have a hex recess in the top that won't help you anyway.

            Another method I've seen people use on here is to buy a sacrificial broom stick and reassemble the inner and outer far enough to be able to extend the tubes as far as possible, then insert the broomstick into the inner tube all the way to the bottom then cut it so that you can screw in the top cap to put pressure on the "piston" at the bottom while you screw in the allen bolt from the bottom. If trying that I'd make sure a broom handle will fit inside the tube, maybe a large diameter dowel rod might be needed, not sure. Mine had the hex recess for the 19mm nut.
            It's smoke that make electronic components work.
            Every time I've let the smoke out by mistake, they never work again.
            '80 GS250T... long gone... And back!
            '86 Honda Bol D'Or... very sadly long gone
            '82 GS1000SZ
            '82 GS1100GL
            '01 Honda CBR1100XX BlackBird

            Comment

            • Mith

              #7
              After reading through BassCliff's instructions and comparing my forks to the GS1000G that the instructions are for, I'm thinking that my reassembly will have to deviate. Specifically, I'm thinking that installing the new seal will come AFTER the inner-tube and piston are installed in the outer tube. I'm saying this because the inner tube can't very well be inserted through the new seal since it has the brass collar and steel collar on the end of it.

              I think that I can drive the new seal in after the inner tube is installed using a piece of PVC with a cap on it. That way I won't scratch the inner tube.

              Comment

              • tkent02
                Forum LongTimer
                Past Site Supporter
                • Jan 2006
                • 35571
                • Near South Park

                #8
                Are your upper tubes clean and smooth enough that they won't ruin the new seals as they go through?
                http://img.photobucket.com/albums/v5...tatesMap-1.jpg

                Life is too short to ride an L.

                Comment

                • Mith

                  #9
                  Reassembling Forks - 1981 GS550L

                  The tubes are clean and rust-free. I don't see how the inner tube can be installed if the seal is installed before the tube goes in. The inner tube has a collar on it that is larger in outer diameter than the tube itself. The 550L forks are not like the forks on the 1000.

                  Pete

                  Comment

                  • Suzuki_Don

                    #10
                    Originally posted by Mith
                    The tubes are clean and rust-free. I don't see how the inner tube can be installed if the seal is installed before the tube goes in. The inner tube has a collar on it that is larger in outer diameter than the tube itself. The 550L forks are not like the forks on the 1000.

                    Pete
                    You are correct Pete. The 550 forks are completely different from the 1000 forks. Follow the instructions above to use a broom handle to lock the bottom portion of the fork while tightening up the allen screw from the bottom. The only part of the instructions that is incorrect is that you use a rake handle, not a broom handle. lol. Cut the wooden handle so when the forks are fully extended with no springs in the fork the top of the handle show two or three exposed threads, then insert the top nut and screw it down as far as required to put enough pressure on the bottom part of the fork so it will not turn as the allen bolt is screwed in.
                    Photo attached.
                    Last edited by Guest; 04-26-2009, 04:42 AM.

                    Comment

                    • Guest

                      #11
                      bump

                      Originally posted by Suzuki_Don
                      use a broom handle to lock the bottom portion of the fork while tightening up the allen screw from the bottom.
                      Cut the wooden handle so when the forks are fully extended with no springs in the fork the top of the handle show two or three exposed threads, then insert the top nut and screw it down as far as required to put enough pressure on the bottom part of the fork so it will not turn as the allen bolt is screwed in.
                      Photo attached.
                      i've encountered what is supposed to be forks of a 1985 gk model and there's no internal hex socket either.

                      i'll try the above method unless there are other suggestions?

                      anyone know what's the factory procedure / tool for disasembling these forks?

                      Comment

                      • Shin-Ken 1074
                        Forum Sage
                        Past Site Supporter
                        Super Site Supporter
                        • Feb 2008
                        • 1904
                        • Brisbane Queensland Australia

                        #12
                        Originally posted by Suzuki_Don
                        You are correct Pete. The 550 forks are completely different from the 1000 forks. Follow the instructions above to use a broom handle to lock the bottom portion of the fork while tightening up the allen screw from the bottom. The only part of the instructions that is incorrect is that you use a rake handle, not a broom handle. lol. Cut the wooden handle so when the forks are fully extended with no springs in the fork the top of the handle show two or three exposed threads, then insert the top nut and screw it down as far as required to put enough pressure on the bottom part of the fork so it will not turn as the allen bolt is screwed in.
                        Photo attached.
                        Also ensure you use a metric rake handle!
                        Badgezz, we don need noh stinkin' badgezz!
                        Shin-Ken 1074
                        1982 GSX1100SXZ Wire Wheel Katana - BOM Nov 2011
                        1981 GSX1135 Katana Build completed Mar 2024, Curb Weight, all fluids and 21 lt fuel = 206 kg.

                        Comment

                        • Suzuki_Don

                          #13
                          Originally posted by Shin-Ken 1074
                          Also ensure you use a metric rake handle!
                          Only a BANANA-BENDER would make a comment like that.

                          Comment

                          • Suzuki_Don

                            #14
                            Originally posted by psyguy
                            bump

                            i've encountered what is supposed to be forks of a 1985 gk model and there's no internal hex socket either.

                            i'll try the above method unless there are other suggestions?

                            anyone know what's the factory procedure / tool for disasembling these forks?
                            PSYGUY just use the broom stick method, it will work fine. Remove the spring and oil then fit broomstick cut to length so 3 or 4 threads are showing so the top nut can be started and then just wind the top nut down to hold the gear (damper, etc.) firmly while undoing the hex screw. There is a factory tool, but I defy anyone to make one. Picture in the GS550 manual.

                            Comment

                            • Steve
                              GS Whisperer
                              • Jun 2005
                              • 35925
                              • southwest oHIo

                              #15
                              I see that this issue has basically been resolved, but thought I would add a bit for others that might read it.

                              Originally posted by Mith
                              I've partly disassembled one of the forks on my 1981 GS550L. I need to make the T-handled tool with the 19mm nut. Is the nut 19mm across the flats (as measured with a digital caliper)? ...
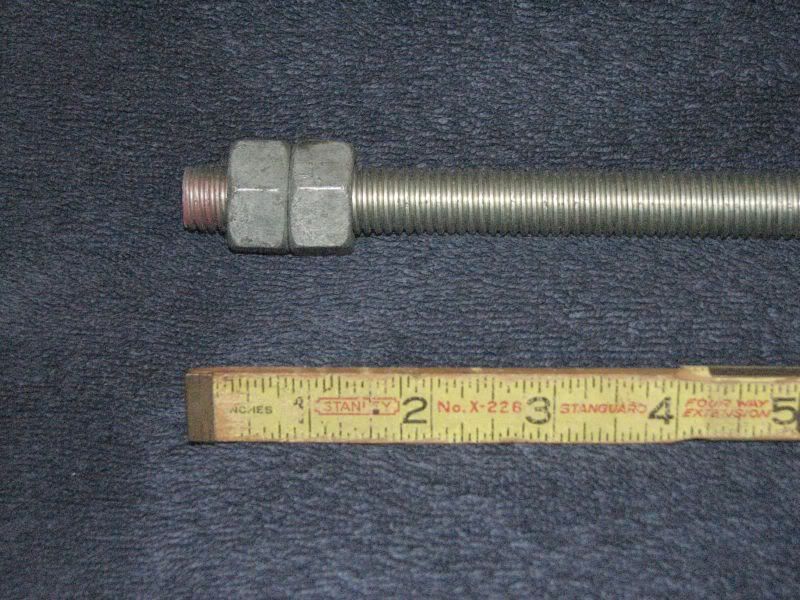
                              Yes, it's 19 mm across the flats. You can make a tool using about $5 of parts from your hardware store and no welder.
                              Get a 2-foot length of 1/2" all-thread rod and four nuts. Put two nuts on each end, leave about an inch of rod sticking out, jamb the nuts together.
                              Put the 'tool' into the fork leg, the rod that is sticking out will help locate it in the damping rod. Use a wrench on the inner nut on the upper stack to remove the damper rod.


                              Originally posted by chef1366
                              If you have an impact wrench put the fork caps back on and hit the bottom allen with that. Heat it a little first to loosen the old loctite.
                              If you don't have one do a search. I know basscliff's site has a picture tutorial.
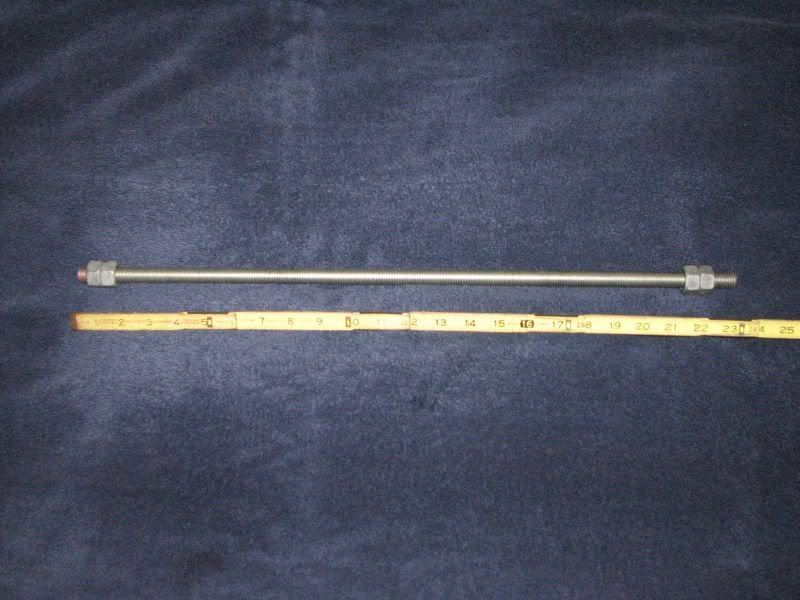
                              When re-assembling, remember it's the speed of the impact that will be doing the work. Be careful to not over-torque it.


                              Originally posted by Mith
                              After reading through BassCliff's instructions and comparing my forks to the GS1000G that the instructions are for, I'm thinking that my reassembly will have to deviate. Specifically, I'm thinking that installing the new seal will come AFTER the inner-tube and piston are installed in the outer tube. I'm saying this because the inner tube can't very well be inserted through the new seal since it has the brass collar and steel collar on the end of it.

                              I think that I can drive the new seal in after the inner tube is installed using a piece of PVC with a cap on it. That way I won't scratch the inner tube.
                              I have not read BassCliff's directions, but can't imagine installing the seal first. The best way I have found is to assemble the inner and outer fork legs, lube the seal so it slides nicely, slide the seal into place. I use a piece of PVC tubing as you suggest. The fork tubes on my 850s will just barely fit into the PVC, but not slide easily, so I cut a slit down the length so the PVC can expand just a bit. Make sure that the end of the PVC is cut squarely and that it's longer than the inner fork tube. Tap on the end of the PVC (yeah, a cap on the end might help), the seal gets driven into place very nicely.


                              Originally posted by Mith
                              The tubes are clean and rust-free. I don't see how the inner tube can be installed if the seal is installed before the tube goes in. The inner tube has a collar on it that is larger in outer diameter than the tube itself. The 550L forks are not like the forks on the 1000.
                              I have not worked on 550 forks for comparison, but I agree, the seal is almost the last thing to into the assembly.
                              sigpic
                              mine: 2000 Honda GoldWing GL1500SE and 1980 GS850G'K' "Junior"
                              hers: 1982 GS850GL - "Angel" and 1969 Suzuki T250 Scrambler
                              #1 son: 1986 Yamaha Venture Royale 1300 and 1982 GS650GL "Rat Bagger"
                              #2 son: 1980 GS1000G
                              Family Portrait
                              Siblings and Spouses
                              Mom's first ride
                              Want a copy of my valve adjust spreadsheet for your 2-valve per cylinder engine? Send me an e-mail request (not a PM)
                              (Click on my username in the upper-left corner for e-mail info.)

                              Comment

                              Working...