Announcement

Collapse
No announcement yet.

1980 Suz GS450E Project

Collapse
X
 
  • Filter
  • Time
  • Show
Clear All
new posts

    #16
    Larger than what's on the bike is fine, it's when it's smaller that you need to worry.
    1982 GS450E - The Wee Beastie
    1984 GSX750S Katana 7/11 - Kit Kat - BOTM May 2020

    sigpic

    450 Refresh thread: https://www.thegsresources.com/_foru...-GS450-Refresh

    Katana 7/11 thread: http://www.thegsresources.com/_forum...84-Katana-7-11

    Comment


      #17
      Originally posted by pete View Post
      Larger than what's on the bike is fine, it's when it's smaller that you need to worry.
      Exactly. I also have a 12 gauge blade fuse wire spliced in. I think stock was 16 gauge. Bigger wire, no problems.

      Comment


        #18
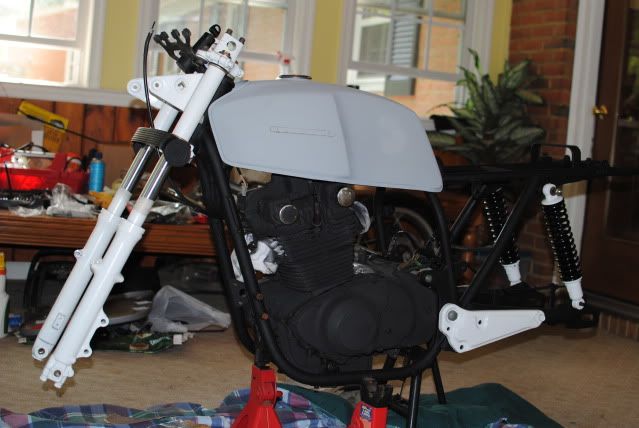
        Okay, so I've been busy as of late... I have pics that I will get up soon. So far I've:
        1) Stripped the bike down to the frame
        2) Checked and re-wrapped the wiring harness
        3) Painted the lower fork legs
        4) Painted the headlight mount and housing
        5) Painted the yoke and triple trees
        6) Painted the frame

        I finally got the bug and started tearing into it all. Now let's just hope it all goes back together! hehe


        Last edited by Guest; 06-23-2011, 10:02 AM.

        Comment


          #19
          Progress is always a good thing
          1982 GS450E - The Wee Beastie
          1984 GSX750S Katana 7/11 - Kit Kat - BOTM May 2020

          sigpic

          450 Refresh thread: https://www.thegsresources.com/_foru...-GS450-Refresh

          Katana 7/11 thread: http://www.thegsresources.com/_forum...84-Katana-7-11

          Comment


            #20
            Question.. I have the ignition switch off the bike and it is in the locked position (steering locked) .. is there a way to disengage this without it being installed on the bike? I'm having a hell of a time getting the deadbolt to retract back into the mechanism. The top with key in still pushes down, and it will retract about 1/8" or so, but won't completely disengage... any trick to this?

            EDIT: Disengaged! Literally after writing this and still fooling with it at the computer... it popped back in.. I think I will leave this unlocked from the posts I've read as I'd rather not have to replace the whole switch.. all keys (helmet lock, tank and ignition) are one key... I've started to reassemble now, so more pics soon for you all.

            Painted the engine flat black too... nice and stealthy.
            Last edited by Guest; 07-04-2011, 01:09 PM.

            Comment


              #21
              Glad you got it sorted, I was going to say they're notorious for it.

              I had my bike parked out the front of my work in about '99 when it happened, and I had to take the mechanism off so a mate could take it away and get it lubed with some graphite, seems to still work ok now but I'm not sure I'd risk it again.
              1982 GS450E - The Wee Beastie
              1984 GSX750S Katana 7/11 - Kit Kat - BOTM May 2020

              sigpic

              450 Refresh thread: https://www.thegsresources.com/_foru...-GS450-Refresh

              Katana 7/11 thread: http://www.thegsresources.com/_forum...84-Katana-7-11

              Comment


                #22
                Ok so I've been cleaning the carbs today and want to install my o-ring kit from the Cycle O-Rings and I can't figure out which one is the needle jet. even looking through all the tutorials and all. Also, the adjustment screws.. are those under the brass cap in the fuel bowl area? If so how important is it to get that out to install a new o-ring? Becoming frustrated. That and after cleaning the carbs with Super Clean, I have white residue on the parts.. ugh..

                Any help appreciated..

                Comment


                  #23
                  Originally posted by Strycker View Post
                  Ok so I've been cleaning the carbs today and want to install my o-ring kit from the Cycle O-Rings and I can't figure out which one is the needle jet. even looking through all the tutorials and all. Also, the adjustment screws.. are those under the brass cap in the fuel bowl area? If so how important is it to get that out to install a new o-ring? Becoming frustrated. That and after cleaning the carbs with Super Clean, I have white residue on the parts.. ugh..

                  Any help appreciated..
                  Ok, first things first... the mixture screws should've been out for the dip so the cleaner can get in those passages.

                  If you're having trouble locating them, FC's 450 carb rebuild guide should show you how to get them out.

                  On my Aussie model they're exposed so I didn't have to do anything to get to them.

                  They're not near the float bowls, they're on the carb body near the throttle shaft.

                  This is the best pic I have and you can just see it there (brass coloured flat head recessed in) right in front of my index finger like I'm pointing to it:


                  As to which jet/screw is which, left to right below is mixture screw, main jet, pilot jet, needle jet:


                  Not sure on what the deal is with the residue from the Super Clean (not sure what that is actually), but I used Yamaha's Yamalube carb cleaner and they were perfect afterwards, no residue or anything. Gave everything a really good rinse with the hose followed by compressed air through every passage followed by carb cleaner sprayed through every passage and then compressed air again to finish.
                  1982 GS450E - The Wee Beastie
                  1984 GSX750S Katana 7/11 - Kit Kat - BOTM May 2020

                  sigpic

                  450 Refresh thread: https://www.thegsresources.com/_foru...-GS450-Refresh

                  Katana 7/11 thread: http://www.thegsresources.com/_forum...84-Katana-7-11

                  Comment


                    #24
                    Thanks for the images.. I have 3 of the 4 identified.. the one by your finger is the one i didn't remove. Wasn't sure what it was at the time. The carb guide i was looking at on Basscliff's site looked a little different and was throwing me off.

                    As for the residue I thing I left the parts in the cleaner too long.. oh well. I'll just try to clean it up as best I can. Should I have used a petroleum based cleaner and not a water based? Almost identical ingredients between the two I saw, but I went with the cheaper one. Live and learn. Figure it'll still work. SuperClean brands is what its called.

                    EDIT: and upon trying to get the screws out, they won't back out completely. They stop inside the tube and won't come out. Is there a trick to getting them out of there?
                    Last edited by Guest; 08-28-2011, 11:06 AM.

                    Comment


                      #25
                      Originally posted by Strycker View Post
                      Thanks for the images.. I have 3 of the 4 identified.. the one by your finger is the one i didn't remove. Wasn't sure what it was at the time. The carb guide i was looking at on Basscliff's site looked a little different and was throwing me off.
                      I get ya', you were probably going off the 4 cylinder carb clean rather than Flaming Chainsaws 450 one.

                      While the 4 cyl. one is great and is the original (and has been recently updated I believe), FC's 450 one is specific to our carb's and should clarify these things for you.

                      As for the residue I thing I left the parts in the cleaner too long.. oh well. I'll just try to clean it up as best I can. Should I have used a petroleum based cleaner and not a water based? Almost identical ingredients between the two I saw, but I went with the cheaper one. Live and learn. Figure it'll still work. SuperClean brands is what its called.
                      I'm sure I've heard of some other cleaner or process doing the same thing, and I think it may be a minor reaction with the alloy but I won't swear to it, so probably do some more searching. I don't think it will do any harm though.

                      For the moment, maybe an extra rinse and blow through might help?

                      EDIT: and upon trying to get the screws out, they won't back out completely. They stop inside the tube and won't come out. Is there a trick to getting them out of there?
                      The O rings will stop them coming out completely as the thread stops before they come out of the hole.

                      I used a pair of flat blade jewellers screwdrivers to gently "walk" it out with one on each side, if that makes sense.
                      1982 GS450E - The Wee Beastie
                      1984 GSX750S Katana 7/11 - Kit Kat - BOTM May 2020

                      sigpic

                      450 Refresh thread: https://www.thegsresources.com/_foru...-GS450-Refresh

                      Katana 7/11 thread: http://www.thegsresources.com/_forum...84-Katana-7-11

                      Comment


                        #26
                        Surely do appreciate all your tips. Found the guide by Flaming Chainsaw and that's exactly what I needed. I also decided to do things right and grabbed a can of Berryman's at the local autoparts store. Going to re-dip the parts to get rid of the residue. First set already in the dip and looks better already. Chalk that up to lessons learned. Get the right stuff the first time! I'll try to get some pics up of the progress soon. Been a while since I did much to the moto.

                        Comment


                          #27
                          Originally posted by Strycker View Post
                          Surely do appreciate all your tips. Found the guide by Flaming Chainsaw and that's exactly what I needed. I also decided to do things right and grabbed a can of Berryman's at the local autoparts store. Going to re-dip the parts to get rid of the residue. First set already in the dip and looks better already. Chalk that up to lessons learned. Get the right stuff the first time! I'll try to get some pics up of the progress soon. Been a while since I did much to the moto.
                          Glad you found my guide useful. I went back and reread my guide and it's kinda vague in some places. I have another set of GS450 carbs so I think I'll redo the whole guide with detailed pics, info, and the process.

                          Good luck on the rebuild!

                          Comment


                            #28
                            I reckon your guide's good as is FC, certainly helped me out! So thanks again
                            1982 GS450E - The Wee Beastie
                            1984 GSX750S Katana 7/11 - Kit Kat - BOTM May 2020

                            sigpic

                            450 Refresh thread: https://www.thegsresources.com/_foru...-GS450-Refresh

                            Katana 7/11 thread: http://www.thegsresources.com/_forum...84-Katana-7-11

                            Comment


                              #29
                              Originally posted by Strycker View Post
                              Surely do appreciate all your tips. Found the guide by Flaming Chainsaw and that's exactly what I needed. I also decided to do things right and grabbed a can of Berryman's at the local autoparts store. Going to re-dip the parts to get rid of the residue. First set already in the dip and looks better already. Chalk that up to lessons learned. Get the right stuff the first time! I'll try to get some pics up of the progress soon. Been a while since I did much to the moto.
                              Good stuff, hopefully that'll get 'em cleaned right up and you'll be all set again.
                              1982 GS450E - The Wee Beastie
                              1984 GSX750S Katana 7/11 - Kit Kat - BOTM May 2020

                              sigpic

                              450 Refresh thread: https://www.thegsresources.com/_foru...-GS450-Refresh

                              Katana 7/11 thread: http://www.thegsresources.com/_forum...84-Katana-7-11

                              Comment


                                #30
                                Okay, finally a few pics of the bike progress... slow and steady. Kind of get an idea of the paint scheme I'm going for in this. Still deciding what to do with the speedo and tach. They're all painted up but I hate the bulkiness of the housing. Their surrounds are damaged a little, so using them without really won't work. But anyways, here she is so far...


                                Comment

                                Working...
                                X