Thanks! I can't wait to try it correctly.
The clip and needle shown are actually from my jet kit - I just matched the spacer/washer positions that were on my original needles.
The original needles on these carbs (in the US anyway) did not have adjustable clip positions. One of the ways to combat the lean setting from the factory was to put the spacer below, thereby raising the needle and enrichening the mixture.
-
 Guest replied
 -
Guest repliedYou're onto it! Plastic "washer" indeed comes on top as per factory setup...
Whay would some PO put it below the e-clip on an otherwise adjustable needle is beyond me... why not just lover the e-clip??Leave a comment:
-
Guest repliedAha!
Quick update: I think might have come closer to solving the rich mix issue with the bike.
To recap, it seems to idle fine, but under partial throttle it's definitely running way too rich - fouling plugs really fast and bogging down as the bike warms up.
I originally set my needles to the 4th e-clip position down. The jet kit suggests 3rd position, which would be a little less rich (since the needle would be higher under partial throttle, letting more fuel through). Honestly, it was so rich that I doubted that one e-clip position would make that much difference. I pulled the carbs and opened them up anyway. Here's what each needle looked like:
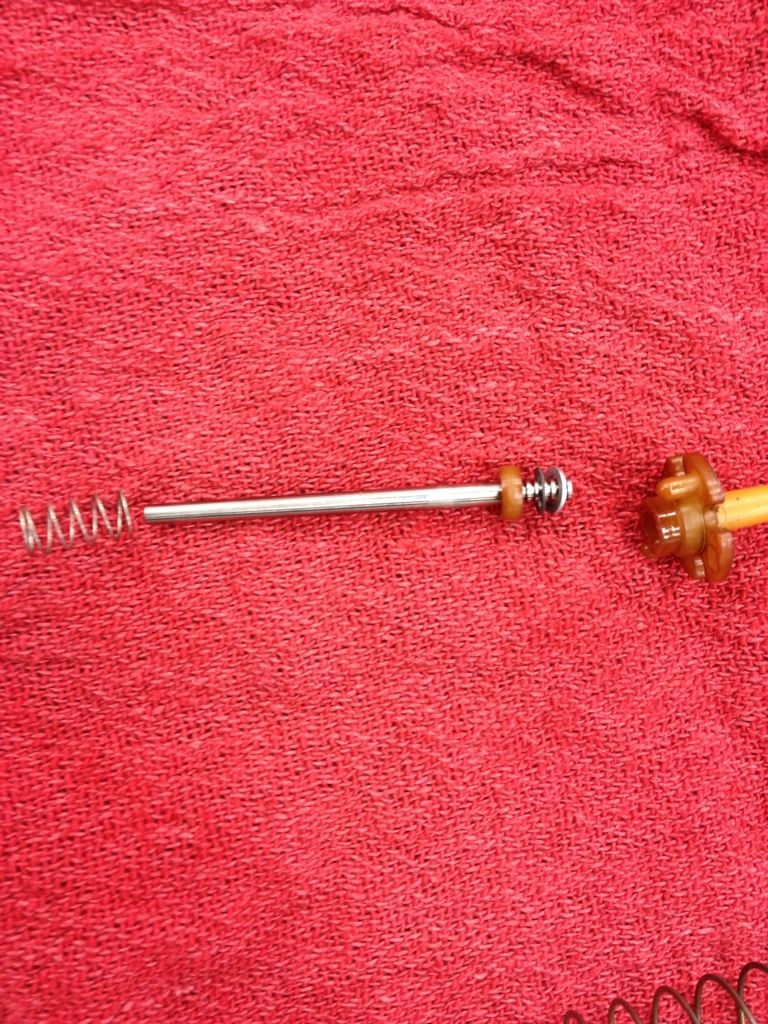
Hmmm.....on looking at the current setup of the needles, two things came to mind.
(1) There were no detailed directions for my jet kit other than recommended settings, but it did say "keep stock washers in their positions" so I did that when I rebuilt them. HOWEVER....
(2) I remember reading something somewhere about owners swapping the fat spacer and the washer around because Suzuki jetted these carbs too lean from the factory. I wondered if that had happened to this bike before I got it. If you look at the pic above, just imagine the fat orange spacer being moved to ABOVE the black e-clip, and the small silver washer being moved below the clip. That would essentially lower the needle by nearly the diameter of the fat spacer (minus the diameter of the thin washer) and make it MUCH less rich relative to the original position I had.
So I swaped the spacer and washer back - to what I now think was stock. Like this:

A quick web search seems to confirm that the fat spacer is supposed to be on top when the GS550s with CV carbs are bone stock. Since I'm rejetting, I'm thinking that I needed to move the spacer/washer back to stock, and I hadn't done that. I also lowered the needle one clip position, and reassembled the carbs.
Unfortunately, I had no time today to put the carbs back in and actually test my thinking. Tomorrow I hope......Last edited by Guest; 01-14-2013, 04:33 PM.Leave a comment:
-
Guest repliedI ran the bike for a few minutes today. My goal was to get the engine warm and re-check compression properly. I also wanted to check for proper charging. My aux tank shipped today, so I?ll wait until it arrives before doing a sync and starting to tune.
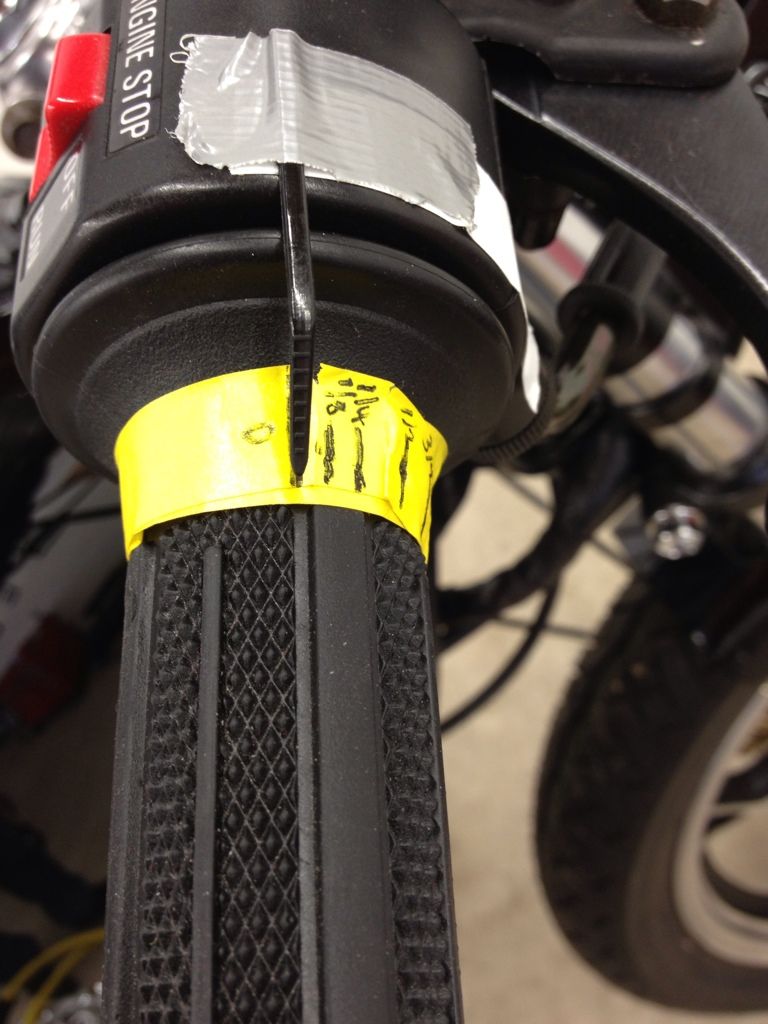
I did mark off various throttle positions for tuning purposes (I?m stretching things to get a pic of SOMETHING today).
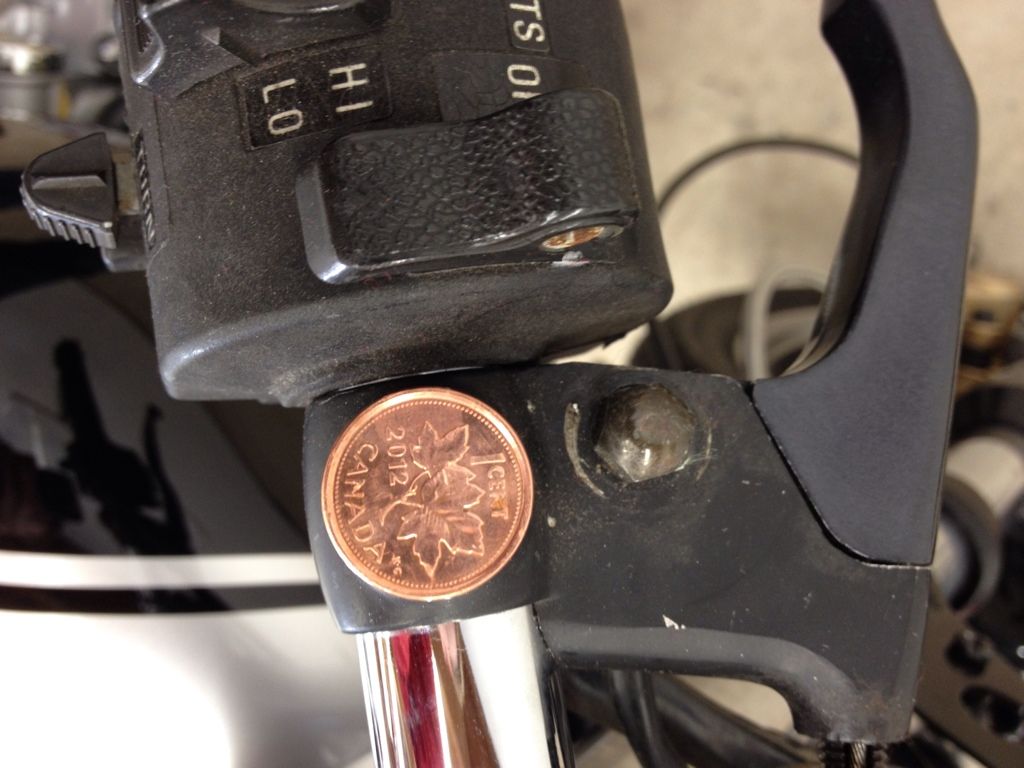
I also added a 2012 Canadian penny to cover up the left side OEM mirror mount. I figure since I?m still Canadian and finished it in 2012 that it was appropriate (I already stuck a 1981 US penny on the right side mount since it?s an ?81 bike and I don?t have a Japanese coin from 1981 lying around).
First, here?s ?proof of life? - a video of it running. Bad audio quality from my phone (and I forgot to turn it sideways to capture ?landscape?):
It idles great. The throttle response was good when cold, but got worse and worse as the engine warmed up (which is when the video was shot) - to the point where it wanted to die under throttle. Classic over-richness. You can hear it bog a bit and see it when I rev it a little. It needed very little choke to warm up (also classic richness, especially since it was really cold in the shop today).
Here?s a plug shot. Yup. Rich. I had already cleaned off the top and bottom plugs before running the bike today. Plug #3 looks the most sooty in this pic, but they?re all pretty similar.

I'm much happier with the compression numbers versus when I checked them before running the bike. When warm (as specified in the manual) the cylinders that were higher before are a little higher (two were in the mid 140s and are approaching 150 now), and the two that were a little low have already improved a lot (from 100 and 115 to 120 and 130 now). So it looks like everything is beginning to even out nicely. As the rings continue to seat, which will take a bit more than a couple of starts in the garage, I expect further improvements.
I verified that it is charging properly. Sweet.
Tomorrow I?m taking the seat to the upholstery place.
My wife nixed the idea of a better garage heater, so it looks like it?s back to saving money for a while.Leave a comment:
-
Guest replied -
Guest repliedWhat handlebar control switches did you use?Leave a comment:
-
Guest repliedI battled the carb setup on my 850 (4-1 + pods) for a long time before getting an advice to go DOWN on Air Jets. I think i went 6 sizes down to get good results. This was in addition to using what came with the Dynojet kit.
I also realised that other than the idle setup all the other carb setup needs to be done under load, i.e. while riding. You can have "perfectly" tuned carbs with no load and then as you get out on the road it runs like a poo. I learned the hard way Last edited by Guest; 01-06-2013, 04:52 PM.
Leave a comment:
-
Guest repliedI had a minute to visit the bike yesterday. Damn it's cold in my shop. I might break down and order a real heating system....as in calling the local heating place on Monday if the wife approves. My kerosene heater works ok, but I can't keep things warm unless I give it a few hours and plan to stay out there for a while.
Anyway, I checked the plugs. As I had suspected, they look rich. That's what I was aiming for when I put in the jet kit. Based on some reading on here and the fact that my kit was made for an '82 Katana (same carbs), I installed the richer of the two mains from the kit (even though they mentioned starting out with the leaner ones), and I raised the needle clip one spot higher (richer) than the kit said to start with. Again, better too rich than too lean.
The plan:
My spare fuel cell is enormous, so I bought a cheap auxiliary setup off e-bay. It should be here in a few days. That way I can remove the tank and tune things better.
I will probably idle the bike longer for a good run-in and then get the idle set and do a carb sync to start. Then I'll adjust the pilot fuel screws (although the idle is pretty good already, they likely need a little tweaking anyway).
After that, I'll probably pull the carbs and lower the needle one notch. It's hard to get it to full throttle now, so I don't think I'll swap main jets just yet (it's hard to do a proper plug chop on that anyway). When I was at full throttle briefly, it seemed to be ok - at least better than at 1/8-1/2 throttle, when the needle is far more involved in metering. For now, I'm trying to get it the point where (1) I'm satisfied enough to leave it until Spring, when I can actually ride it and get the last bit dialed in, or (2) unhappy enough with prelim tuning that I get a friend and a truck and haul it to a dyno.
The best news is that it's not leaking gas or oil anywhere.
I quickly checked voltage at the battery after I first fired it up, and it looks like it might be charging now too (not enough hands or alligator clips handy to try and rev it the engine and actually check for proper charging, but a good sign based on voltage). I plan to test the stator as well.Leave a comment:
-
Guest repliedwhat an amazing build!! well done friend!Leave a comment:
-
Congrats! I'm sure you'll have it running as good as it looks in no time.Leave a comment:
-
Guest repliedJust the facts folks.....
-installed a crankcase vent tube
-moved the bike out to the shop
-Installed a new petcock and fuel/vac lines
-put 2 gallons of fresh gas in the tank (pre-treated with Stabil just in case).
-heated the shop to 60 degrees
-primed the carbs
-no leaks!
So then I pressed "Run", pulled the choke, pulled in the clutch, and pressed the starter button.
crank
crank
crank........
WAIT
FOR
IT

AND IT RUNS!!!! Idles well. I'll try and shoot a video at some point when I get an extra set of hands to hold the camera.
Downside? It doesn't want to rev too well. First time I tried it, it bogged and died frequently. I figured I was just rushing things a bit (choke off too soon). Then, a few minutes later, I tried it again when warmer and it would rev "ok" and seemed ok at full throttle too. Showed some subtle "hanging" at idle though and the bogging was still evident at lower throttle positions.
With the jet kit, new pipes, and K&N filter, it's gonna be "fun" to tune this thing. I'll start by adjusting the fuel-mix screws, idle, and doing a carb sync. Then I'll probably check compression again. After that, I'll probably end up taking it to the dyno to tune it better and sort out the off idle issues (as well as any other issues). There is likely a class of students at Wastenaw Community College starting next week who can help tune it as part of their "carb tuning" course. The beauty of a dyno tune is that you can analyze the fuel/air mix at any throttle position and make sure it's optimal. I suspect that I'll need to adjust the needles and perhaps swap pilots/mains a few times to sort it out. My jet kit came with an adjustable needle and some spare jets, so that should help, although getting four carbs right won't be the easiest thing in the world. All of the boots, o-rings, and other bits are brand new though, and at least I'm starting with clean carbs. Best of all, I still have a few months to get it all sorted out before the riding season starts.
Very excited to get this thing so close.
Oh yeah. I want a new muffler. This one is too quiet and doesn't fit the style of the bike. I'm gonna start shopping around.....Leave a comment:
-
Guest repliedYour bike and the work you have put in it is very inspiring.
Every shiny bit shows the dedication and attention in your work.
Congratulations on a job done so well!Leave a comment:
-
Guest repliedwow what a transformation from the redneck rocket... and the photos are equally artistic... you sir have talents!Leave a comment:
-
An amazing transformation from where you started. Hard to believe it's the same bike. Very nicely done. You should be very proud.
I was faced with the same dilemma on a sub-fender for my Honda 550. I used a plastic front fender from a Yamaha RD400, and fabbed a reverse mount for it that attached to the swing arm. This, after cutting it in half down the center with a band saw and then widening it an inch with a piece of aluminum. It was riveted back together and then fiberglassed to smooth it all out. What a pain. It looked really cool and worked..for the most part..but it also hit the bottom of the seat pan under heavy compression. I took it off, bought a small sheet of black plastic 1/8" thick, cut it to fit the frame opening behind the airbox, drilled a couple of holes on each side and used black zip ties to mount it to the frame tubes. Works great. I must've spent three days on the first mod, only to find out the sheet of plastic was the easiest and simplest way to do it, and it looks good, too. Sometimes we have a tendency to over-think things... It's one of the things I like best about your bike. It has a very clean and uncluttered look to it. Again, nicely done.
Leave a comment:

")

Leave a comment: