Announcement

Collapse
No announcement yet.

Gs550ln

Collapse
X
 
  • Filter
  • Time
  • Show
Clear All
new posts

    Gs550ln

    So over the past few days I've been doing a bunch of stuff to my new bike.


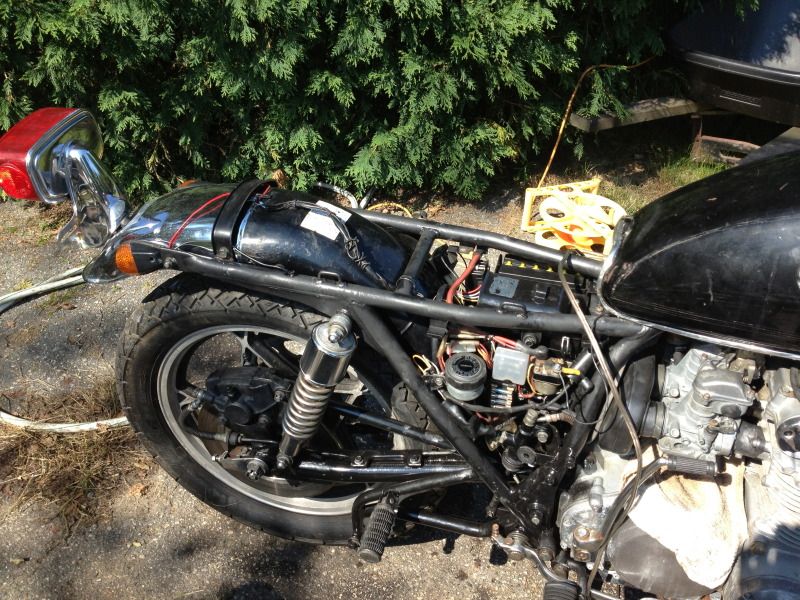
    I took the swingarm and all associated parts. Checked em out, cleaned em, greased em, painted with black spray paint and reassembled. Looks much better now.

    I took the exhaust pipes off and cleaned them. Originally I used some Turtle Wax chrome polish. Then I remembered watching a bunch of youtube vids from an old timer from Florida I think it was? He said hit it with Marvel Mystery Oil. Let it soak a bit, then wipe off. I did that, and added a wire brush to the mix. I really wasnt expecting it to work that well. It really amazed me. Anyway so I got the exhaust pretty rust free and shiny. I got some new grade 10.9 hex header bolts and nice looking allen bolts for the little brackets on the side. Sweet.

    I then took down apart the brakes. The rear wheel wouldnt turn. Front seemed ok but the lever was super squishy. The fluid was a wonderful maple syrup mixed with a bit of hot cocoa looking ordeal. Stripped the calipers down and dunked em in carb cleaner for a bit. Came out mint. Took apart the master cylinders and brushed, scrubbed and rinsed them all out. Came out pretty good. Brakes work awesome now. Pumped!

    Changed the oil and filter. Used Rotella T 10w-40 and a Napa/Wix filter. New oring too. I used a TINY bit of RTV to hold the oring in the groove before tightening the acorn nuts.

    Checked my points gaps. Were a bit small if I remember correctly. Set em to spec.

    Checked my valves. Big thanks to Steve for the spreadsheet! From left to right I ended up with: .05, .09, .07, .07 on the exhaust and .05, .04, .07, .09 on the intake side. Some questions: I popped the cover off and each "cup" had a bunch of oil still in it (it sat all day). I checked clearances anyway. I'm somewhat confident I got good readings. It seemed the outside edge of each lobe was lower than the rest of the ground flat part. Almost like there was a burr on it but I didnt feel any. Thoughts on this? Also a few lobes had marks from the valve rod. Nothing you could feel just differences in the surface finish. If I cant even feel any grooving or scratching its all set right? The PO said the bike sat for quite some time. I figure I'll put a few miles, 10? 25?, on it, change the filter, ride some more, change oil and filter, clean the screen in the belly pan, and see if the valves "settle in" at all before I start thinking about changing those two .09mm. Seem like a plan? Also will putting MMO in with the oil affect the wet clutch? How bout Sea Foam?

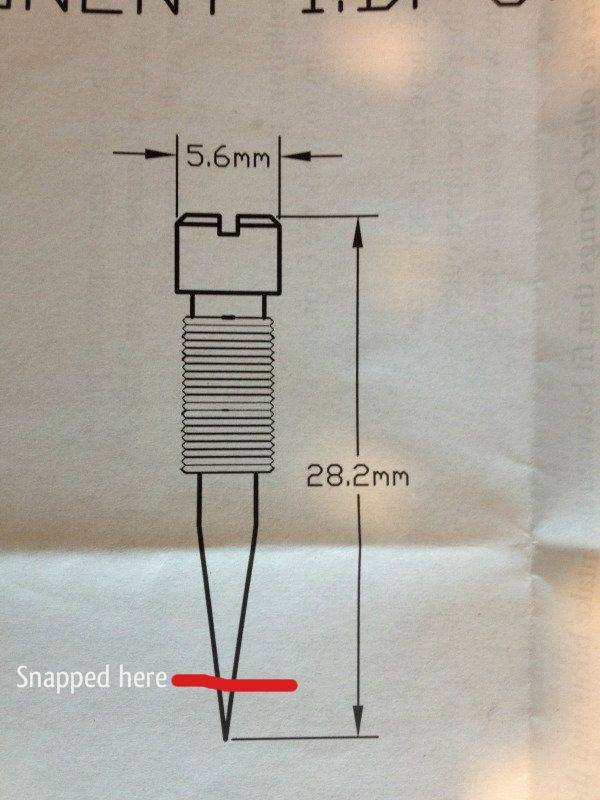
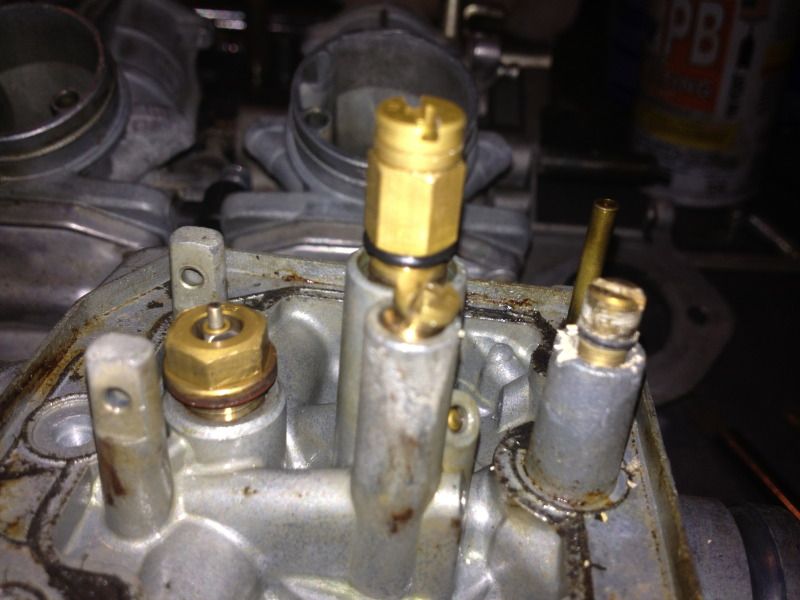
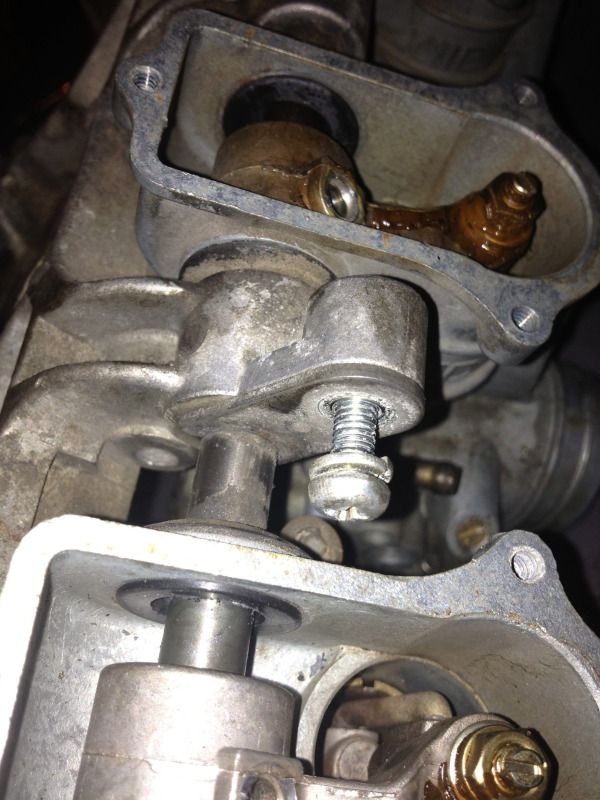
    Popped the carb rack off and got the oring kit and stainless allens from cycleorings. Strepped the carbs down and set em in carb cleaner. Came out sparkling. Siiiick. Brushed all the gunk off the jets and needles. New orings, light film of oil on em, put em together. Scored the intake boot orings at a local store for 70 cents apiece. Thanks to Robert at cycleorings for the specs, and seal kits! 1 issue! Carb #3 someone bottomed out the fuel pilot screw and snapped the tip off. Its wedged in there pretty good. I tried bending a needle and sticking it in the tiny hole in the throat to shove the needle tip out. Didnt happen. Seems like its in there pretty good. I went to a motorcycle junkyard to try and get a new carb #3 but they were all CV carbs. (I rock the VMs) I called a parts warehouse and they said they only sell complete racks and wont just sell me #3. $250 for a rack. Not happening. I got a #60 drill bit and thought about drilling the bottom of the tip out a bit. Then I grew a brain and put the power tools away. So I just put the needle back in but left it loose in hopes that itll rattle loose or somehow pop outa there. Any ideas?


    I took notes of how the wiring came apart...or so I thought. Upon reviewing my notes, trying to put everything back together, it seems I spaced out and just wrote the colors coming off the harness and not which things they go to. Also my pictures...werent useful. I think I have it back together pretty good. Obviously I need to start by getting a new battery, even though the PO said its new, as well as the rectifier. Battery wont hold a charge. I jumpered my bike battery to my car. Before I took everything apart I tried turning it over a few times. Everything worked. So when I reassembled it I turned the key and get all the good lights. Everything but blinkers. Horn works, brake lights, starter, everything...but blinkers. Also if I unhook my car battery it dies instantly. I figured it would run off the stator and try to charge the battery? So I have a constant 10v on Yellow w/ Green stripe going into the blinker relay. Nothing on the Light Blue wire. I tried jumping the 2 wires together but no blinkers went off. I figured this would show if my relay went bad as I was cleaning everything? As for the not running on its own any ideas? I have a Red wire with constant 12v in the wiring harness bundle with White w/Red stripe and White w/Green stripe and I think Yellow with 2 female connectors? Then I have 2 Reds on the harness. They have no power to them. My last red is from the rectifier. So which goes where?


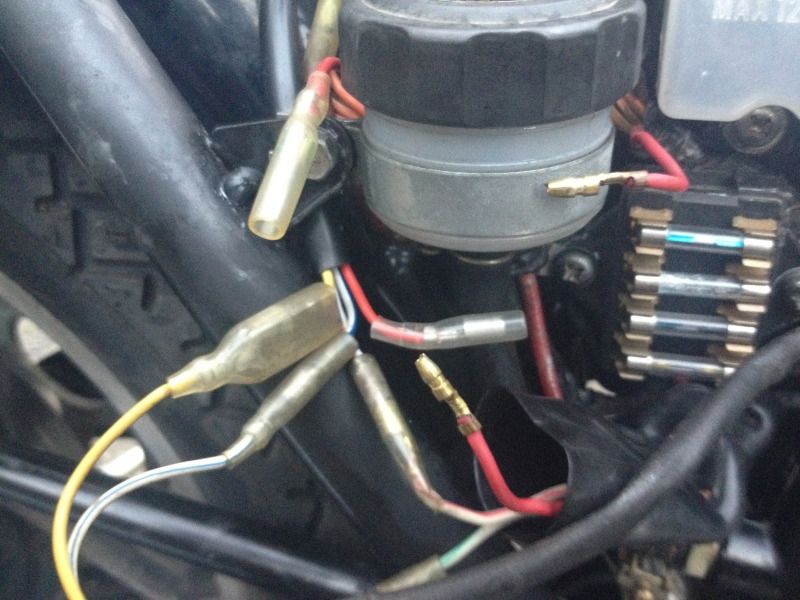
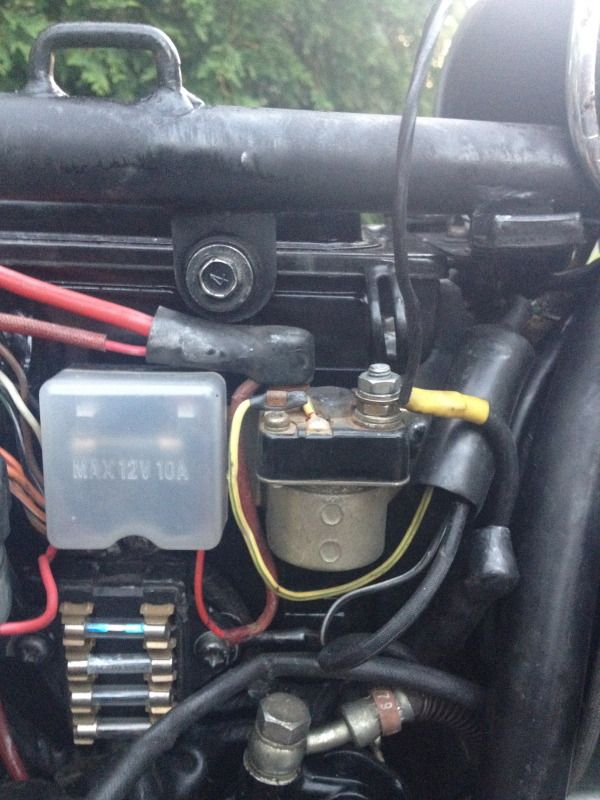
    Whats the 10A fuse under the cover for? Why does my fuse block get BURNING HOT? Cant be normal can it?


    Also this Black wire over the airbox is coming from a Black w/ White wire coming off the front side of the main connector under the fuel tank. Should it be grounded or wired to the Negative side of the starter relay? It was shoved under the Neg nut on the starter relay when I first got the bike.


    Last thing. The fuel sender has 2 ports on it. I think I had a tube running from the left top side of Carb #2 going to the bottom nipple of the sender. Is that correct? Whats the upper port on the sender for?

    Thanks for all your help

    #2
    The single fuse block is an accessory fuse block; I would highly recommend swapping your older buss style fuses for blades (read my rebuild thread as I did something similar). Your petcock will have two ports - the larger goes to the fuel inlet on the back side of your carbs while the smaller is the vacuum that runs to the number 2 carb.

    Welcome to the site.
    Cowboy Up or Quit. - Run Free Lou and Rest in Peace

    1981 GS550T - My First
    1981 GS550L - My Eldest Daughter's - Now Sold
    2007 GSF1250SA Bandit - My touring bike

    Sit tall in the saddle Hold your head up high
    Keep your eyes fixed where the trail meets the sky and live like you ain't afraid to die
    and don't be scared, just enjoy your ride - Chris Ledoux, "The Ride"

    Comment


      #3
      Ordered a new stator from Rick's. I'm going to get a fuse panel from Napa tomorrow but I'm still wondering why my old one would get super hot. Any ideas? All my bullet connectors are clean with die electric grease in them.

      Comment


        #4
        I got just about everything back together but for some reason my blinkers wont work. During the rebuilt I dropped the flasher relay so I got a new one hoping thatd fix it. Nope. If I jumper the rear lights they come on just fine. I'm wondering what I should get on the volt meter coming off the 2 wires going into the relay. Also which wires in the headlight bucket are blinkers? I want to see if I have power there. Thanks a lot for any help

        Comment


          #5
          Originally posted by BC4Lyphe View Post
          Ordered a new stator from Rick's. I'm going to get a fuse panel from Napa tomorrow but I'm still wondering why my old one would get super hot. Any ideas? All my bullet connectors are clean with die electric grease in them.
          The fuse block itself can be a major source of resistance due to corrosion. Some people use naval jelly, muriatic acid, or even sandpaper to clean it up. Whatever you have on hand works. Evaporust will not because that only deals with ferrous metals
          '83 GS650G
          '83 GS550es (didn't like the colours in the 80's, but they've grown on me)

          Comment


            #6
            Yea I've read a lot about that and went to Napa and picked up an ATC fuse panel. I also used an inline ATC fuse holder for the top fuse, which I think had constant power? Soldered and liquid electrical taped everything. Also I took apart the blinker switch and that was the problem. Once I get Ricks stator I should be good to go!

            Comment


              #7
              I went to start the bike and noticed the 2 inside carb bowls were leaking. I said DANG IT! I have to pop the carb rack off again which is a painnnnn. But on the bright side I figured it gave me a chance to try to get carb #3 back in business. While trying to get the bowls tightend up I almost stripped the screws out. Replaced them with hex headed ones. I wanted allen heads to match my carb boot, left and right side covers, and license plate bolts but I couldnt find any small enough.

              I ended up getting a dental pick that was bent so it could fit in the carb throat. Punched out the broken off tip of the pilot fuel screw but didnt have a new one so I just put the old one back in. It's getting fuel at idle which is better than before. Ill have to find a place that carries them.

              THE BIG NEWS! I got it registered today and put 60 miles on it! Couldnt be more thrilled. Got it up to 50mph which was about 4500rpm? in 6th gear. The highest I revved it was around 7k (I'm scared. Little steps ) Its my first bike and I love it. I noticed my front brake bolts and swingarm bolts loosened up after about 10 miles. I pulled over and put loctite on them and torqued em back down. Seem like theyre staying now. Also my chain has a few stiff links. I think I might need a new one.

              One question I have is my speedo seems to take awhile to update the speed. Maybe like 10 seconds? Is this normal? The cable ends are tightly secured and everything and I think once it has a chance to catch up it reads accurately.

              Another question. When I'm accelerating it sounds real smooth and throaty. When I'm cruising along I hear kind of a "barbling" or bubbling, not popping but something fainter. I have what I believe are stock pipes. 2 into 1 on each side of the bike with 7 exit holes. Anyone have this?

              Last question. Do I checked the oil window when the bike is cold/off. Warm/off. Or running?
              Last edited by Guest; 09-26-2012, 05:52 PM.

              Comment


                #8
                Originally posted by BC4Lyphe View Post
                So I have a constant 10v on Yellow w/ Green stripe going into the blinker relay.
                The diagram that I am consulting does not have a yellow/green going to the blinker relay. The only yellow/green wire that I know of on the bike is the one that goes to the starter solenoid, not the turn signal relay.


                Originally posted by BC4Lyphe View Post
                Nothing on the Light Blue wire.
                The blue wire is only 'live' when the relay is flashing. It carries the intermittent current to the left handgrip, where you decide which side to light up.


                Originally posted by BC4Lyphe View Post
                I tried jumping the 2 wires together but no blinkers went off.
                I thought the problem was that the blinkers were not working? Now you are implying that they are ON steadily, and you can't turn them OFF, even when jumping the two wires together.

                The only yellow/green wire that I know of on the bike is the one that goes to the starter solenoid, not the turn signal relay. It is a switched wire (meaning that it is not live most of the time) and you are trying to connect it to another switched wire (one that is live only when the turn signals are on) and you expect that to turn the turn signals OFF?


                Originally posted by BC4Lyphe View Post
                I have a Red wire with constant 12v in the wiring harness bundle with White w/Red stripe and White w/Green stripe and I think Yellow with 2 female connectors?
                The red with a constant 12 volts is probably the feed from the MAIN fuse to the ignition switch.

                The white/red and white green are parts of the infamous "mystery loop" for the stator, they do not need to connect to anything if your stator is wired directly to the R/R, as it should be.

                There are only two possible places for a yellow wire to exist on your bike. The one that will definitely be there is the wire from the high/low headlight selector to the high beam filament of the headlight. The other is if you have an aftermarket stator, the wires might be yellow.


                Originally posted by BC4Lyphe View Post
                Then I have 2 Reds on the harness. They have no power to them. My last red is from the rectifier. So which goes where?
                The only red wires on the bike are from the battery (or the starter solenoid) to the MAIN fuse, another from the MAIN fuse to the ignition switch and one from the R/R to a junction in the wire between the MAIN fuse and the ignition switch.


                Originally posted by BC4Lyphe View Post
                Whats the 10A fuse under the cover for?
                That is an AUX port, and is live all the time, regardless of key position.


                Originally posted by BC4Lyphe View Post
                Why does my fuse block get BURNING HOT? Cant be normal can it?
                No, it's not normal. Heat can only come from bad connections or inadequate wire. Sounds like you have a bunch of cleaning or replacing left to do.


                Originally posted by BC4Lyphe View Post
                Also this Black wire over the airbox is coming from a Black w/ White wire coming off the front side of the main connector under the fuel tank. Should it be grounded or wired to the Negative side of the starter relay? It was shoved under the Neg nut on the starter relay when I first got the bike.
                First of all, I am going to ask you to clarify "the front side of the main connector under the fuel tank". There are a BUNCH of connectors there, which one is the "main" one?

                Black wires, especially ones with white stripes are usually ground wires, but the left turn signal wire from the flasher to the lights is also a solid black. I think one of the wires from one set of points is also black, but none of them will have a ring terminal on them, nor will they be that large a wire.

                Yes, it should probably be grounded, but please be aware that THERE IS NO 'NEGATIVE SIDE' OF THE STARTER RELAY. The body of the relay is the 'negative side', so if you are wanting to ground something, do it to a mounting bolt. BOTH of the large wires on the top of the solenoid are HOT wires. One is 'hot' all the time, the other is only 'hot' when the starter is cranking.


                Originally posted by BC4Lyphe View Post
                Last thing. The fuel sender has 2 ports on it. I think I had a tube running from the left top side of Carb #2 going to the bottom nipple of the sender. Is that correct? Whats the upper port on the sender for?
                More clarification needed here. The "fuel sender" is a gizmo inside the tank that shows on a gauge how much gas is in the tank. Do you even have that gauge?

                Based on your description, I am thinking you are talking about the "petcock" or "fuel cock" as it is called in the parts diagrams. There should be two ports. The larger one is for fuel, it goes to a "T" between carbs 2&3. The smaller one is the vacuum port that turns on the petcock, it should be connected to the vacuum port on #3, not #2. The ports that are in a very similar position on carbs 2&4 are VENT ports, they should have hoses that drape over the airbox and go through that little rectangular "bridge" that is in the very bottom of your picture.

                This would also be a good time to make sure you are numbering your cylinders correctly. #1 is under your clutch hand, #4 is under your throttle hand.

                .
                sigpic
                mine: 2000 Honda GoldWing GL1500SE and 1980 GS850G'K' "Junior"
                hers: 1982 GS850GL - "Angel" and 1969 Suzuki T250 Scrambler
                #1 son: 1986 Yamaha Venture Royale 1300 and 1982 GS650GL "Rat Bagger"
                #2 son: 1980 GS1000G
                Family Portrait
                Siblings and Spouses
                Mom's first ride
                Want a copy of my valve adjust spreadsheet for your 2-valve per cylinder engine? Send me an e-mail request (not a PM)
                (Click on my username in the upper-left corner for e-mail info.)

                Comment


                  #9
                  Originally posted by BC4Lyphe View Post
                  Last question. Do I checked the oil window when the bike is cold/off. Warm/off. Or running?
                  There are a few versions of this with slight variations, but all of them agree that it is with the engine OFF and the bike on the centerstand.

                  Some people will check it COLD, as in "before the first start of the day". Some people will run the engine for a bit, then turn it off, wait a minute or two, then check the sight glass. Others will go for a ride to get the oil fully warm, then park the bike on the center stand when they stop for lunch and check it when they come out. There shouldn't be much difference in the level in any of these, I use the COLD method for consistency.

                  .
                  sigpic
                  mine: 2000 Honda GoldWing GL1500SE and 1980 GS850G'K' "Junior"
                  hers: 1982 GS850GL - "Angel" and 1969 Suzuki T250 Scrambler
                  #1 son: 1986 Yamaha Venture Royale 1300 and 1982 GS650GL "Rat Bagger"
                  #2 son: 1980 GS1000G
                  Family Portrait
                  Siblings and Spouses
                  Mom's first ride
                  Want a copy of my valve adjust spreadsheet for your 2-valve per cylinder engine? Send me an e-mail request (not a PM)
                  (Click on my username in the upper-left corner for e-mail info.)

                  Comment


                    #10
                    You can check the oil window cold off or warm off, might take a little longer to come up to window if oil is cold as it is thicker, just make sure bike is standing straight.(not on side stand)
                    If your speedo is stock it should come right up, possibility that your cable is broken in middle. Detatch at back of speedo and pull up at cable inside of cable housing (the skinny piece of metal in center) you should have ends with a noticeably different shape from cable. If cable broke you should be able to tell.

                    Comment


                      #11
                      Steve you wrote all of that in the time it took me to type?
                      I am impressed

                      Comment


                        #12
                        Originally posted by Crankthat View Post
                        Steve you wrote all of that in the time it took me to type?
                        I am impressed
                        I took typing 45 years ago (back when it was still "typing", not "keyboarding"). Speed has diminished a bit since then, but I still do OK.

                        .
                        sigpic
                        mine: 2000 Honda GoldWing GL1500SE and 1980 GS850G'K' "Junior"
                        hers: 1982 GS850GL - "Angel" and 1969 Suzuki T250 Scrambler
                        #1 son: 1986 Yamaha Venture Royale 1300 and 1982 GS650GL "Rat Bagger"
                        #2 son: 1980 GS1000G
                        Family Portrait
                        Siblings and Spouses
                        Mom's first ride
                        Want a copy of my valve adjust spreadsheet for your 2-valve per cylinder engine? Send me an e-mail request (not a PM)
                        (Click on my username in the upper-left corner for e-mail info.)

                        Comment


                          #13
                          Steve-
                          Thank you for replying to my questions. I think I have the blinkers figured out. I went out and get a new relay thinking that was the issue. It wasnt. My new relay blinks about twice as fast as the original. I thought that was kinda cool/interesting. Turns out it was inside the switch on the handle bars. The screw holding down the left/center/right lever was loose so the lever was pushing the switch to either side, just sliding over top of it. Fixed that. Blinkers work like a charm.

                          The PO put what looks to be Rick's RK_10-202 R/R on the bike which is basically new. My old stator was toast so I put a Rick's stator on it. It has 3 black wires. I have 2 going right to the R/R, yellow and white/blue, and one going to a white/green wire in the harness. Is this the loop I've been hearing about? If so which wire off the R/R does the last wire go to?

                          I have my R/R ground going to (-) battery post. Then I have a short wire from (-) going to ground my frame on the left screw holding the airbox under my seat. I also have 3 other ground wires under that screw. Scraped the paint off the frame of course.

                          I replaced the glass fuses with an ATC fuse panel along with a separate inline ATC fuse holder.

                          As for the fuel gauge. The gauge itself is on the bottom of my tach. On the underside of my tank, clutch side, forward of the petcock, is the sender. Has 2 hose nipples and 2 wires. I have my left vent hose connected to the lower nipple. My right vent is routed between the swingarm along with the 4 carb drain hoses and battery drain. The sender itself looks similar to This. Fuel gauge works so I'll just leave it be I guess. My petcock doesnt have prime like some Ive seen. Just On and Reserve. I have an inline filter. Such a pain to get it to fit between the petcock and Fuel Tee.

                          Comment


                            #14
                            Yikes

                            One more thing. Today my bike started acting up. Sometimes when I let off the throttle the RPMs remain where they were. Example: I'm in 6th at 3000rpm going 35mph. I come off the throttle to engine brake a bit but it stays at 3000rpm. Its like cruise control, but scary. Sometimes if I grab the clutch, rev it, then drop the clutch it'll come out of it and the RPMs will drop as they should. Most of the time I end up having to leave it in gear and use my brakes to bring my RPMs down, then shift, possibly grabbing the brakes again, and then it'll usually come out of it. Since my slides seems to be closing fine I'm guessing I have a vacuum leak in my boots between the cylinder and carbs? I replaced the orings there but maybe adding some RTV will seal em up proper?

                            Comment


                              #15
                              Why are you in 6th gear at 35? I barely make it out of 2nd at that speed. Your power band for these bikes starts 6000 - 7000; your hurting the bike running at that high of a gear. 6th gear should only be used after you hit 65 and are running close to 5500 rpm
                              Cowboy Up or Quit. - Run Free Lou and Rest in Peace

                              1981 GS550T - My First
                              1981 GS550L - My Eldest Daughter's - Now Sold
                              2007 GSF1250SA Bandit - My touring bike

                              Sit tall in the saddle Hold your head up high
                              Keep your eyes fixed where the trail meets the sky and live like you ain't afraid to die
                              and don't be scared, just enjoy your ride - Chris Ledoux, "The Ride"

                              Comment

                              Working...
                              X