Announcement

Collapse
No announcement yet.

1984 Katana 7/11

Collapse
X
 
  • Filter
  • Time
  • Show
Clear All
new posts

    You've somewhat read my mind there Larry... while I was working on it last night I was trying to work out how I could lay the matting down on the outside to shape using the outside mould... then figured I could use the mould to shape some clay on the inside. I have some here still from doing the seat, and that can form the foundation of the patches.

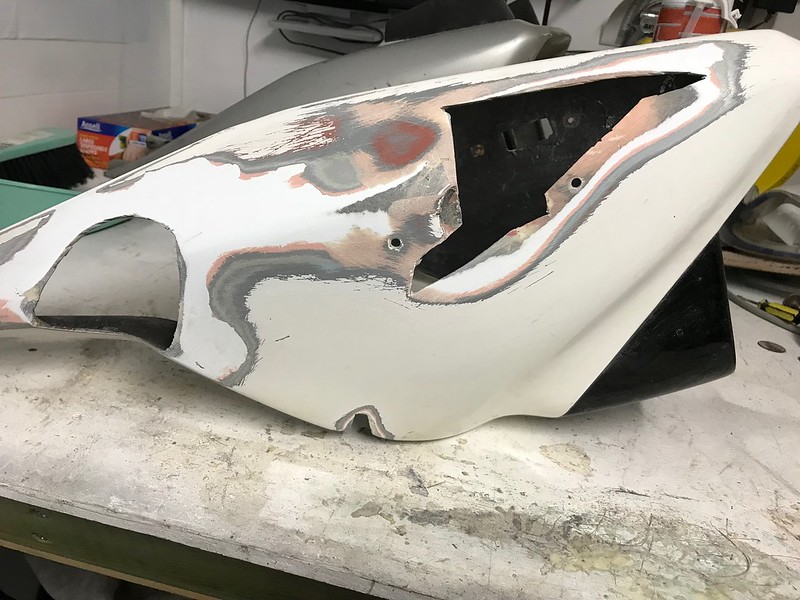
    The sanding was much better with some 40 grit paper, but I still hit my threshold last night with plenty more to go. I may end up deciding to leave the sanding until the weekend when I can break out the power tools.

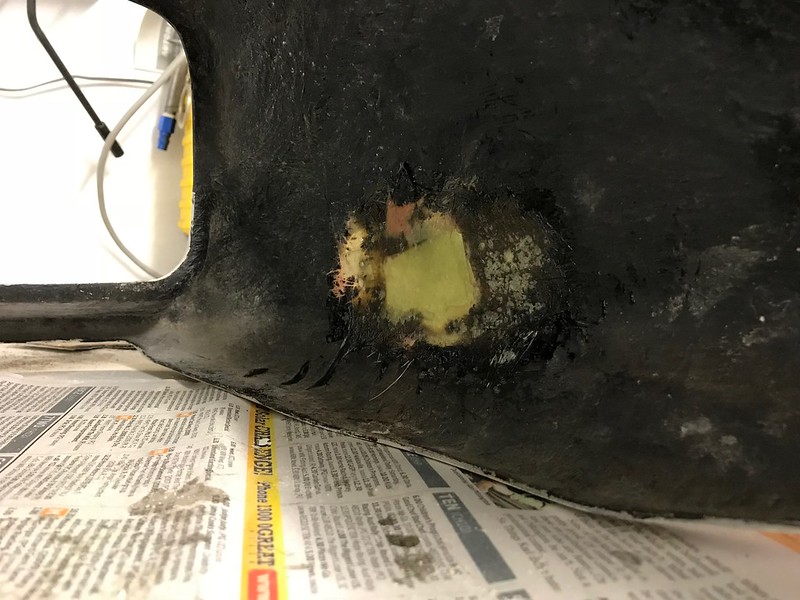
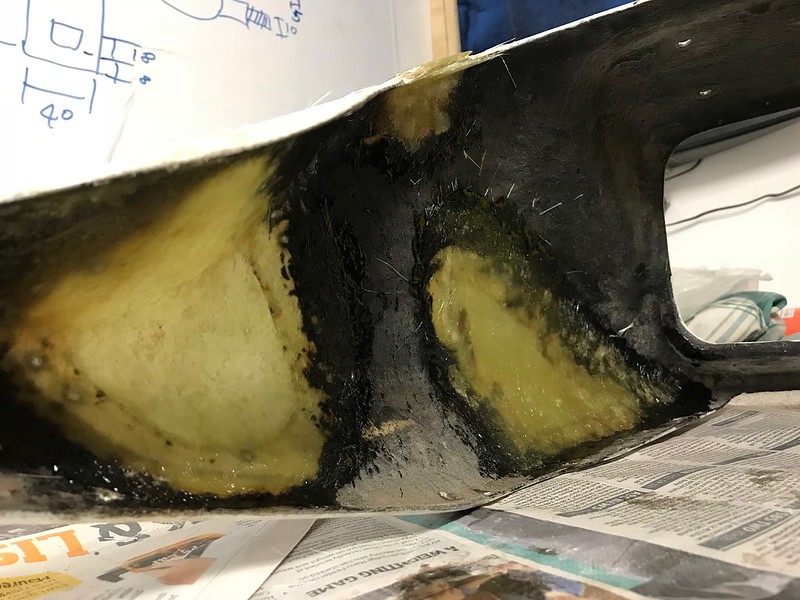
    I also figured if I'm moulding that entire side it'd probably be best to make that front section more of an open hole so I cut that middle section out as well.

    Untitled by starpoint73, on Flickr

    I also got the loaner cowl taped up ready to lay some matting down for the mould which I hope to get done tonight.

    Untitled by starpoint73, on Flickr

    The confusing bit for me is getting the gelcoat on.

    I'm thinking do the repair, sand it back, gelcoat once I'm happy with the shape and tape the mould back on to seal the gelcoat from the air and let it cure.

    I have to remember to patch the indicator hole on the right side also.
    1982 GS450E - The Wee Beastie
    1984 GSX750S Katana 7/11 - Kit Kat - BOTM May 2020

    sigpic

    450 Refresh thread: https://www.thegsresources.com/_foru...-GS450-Refresh

    Katana 7/11 thread: http://www.thegsresources.com/_forum...84-Katana-7-11

    Comment


      You can get "air dry" gelcoat.

      You would also be better off waxing the loaner cowl, multiple times, than using tape. You are creating a lot of extra work for yourself by using tape as the mold will require extensive sanding in order to produce a good part because of the rough rippled finish the tape will create.
      1978 Gs1085 compliments of Popy Yosh, Bandit 1200 wheels and front end, VM33 Smoothbores, Yosh exhaust, braced frame, ported polished head
      1983 Gs1100ESD, rebuild finished! Body paintwork happening winter 2017

      I would rather trust my bike to a technician that reads the service manual than some backyardigan that THINKS HE KNOWS how to fix things.

      Comment


        Boy, Pete..after looking at what you have..and forgive me if I'm stepping on your process..but ya know, I wouldn't even use the loaner fairing. You're creating a lot of work for yourself. If it were me, I would just put a backing on those holes, and lay the glass right in there. Make it just a bit high. Using your grinder/power tools will make short work of grinding it to shape. Before you start getting things gooey, mask the fairing for resin run-off so you don't have to sand it, let it dry overnight, grind, re-glass a bit more if necessary. I think you can do it easier w/o the aid of the other fairing. Your painter should be able to re-gel coat the entire fairing for you once all the body work is completed, but even that's (arguably) not needed anymore. Modern urethane primers are so good, that they take away the need for that step with the hardeners/catalysts they have in them.
        1979 GS1000S,

        1982 Honda CX500 Turbo, 1982 Honda MB5 w/CR80 motor, 1977 Honda "nekid" Goldwing, 1976 Honda CB550F cafe', 1972 Honda XL250 cafe'

        Comment


          Here is another way also. Wax up the loaner and just lay up 2 layers of glass and resin in the area that yours is broken. Do not do the whole thing.

          Peel it off after cure then lay it on yours and bond in place. Fillet edges on the inside then build up layers on the inside for strength. The 2 layers outside could very easily be blended/feathered to be unnoticeable. Couple layers of high build primer instead of gelcoat and you are pretty much done.

          I have done multiple repairs to aircraft fiberglass components this way and it always works and is very fast in repair time.

          HTH's,
          Daryl

          Once again, awesome job and I look every day to see how this project is coming along.
          1978 Gs1085 compliments of Popy Yosh, Bandit 1200 wheels and front end, VM33 Smoothbores, Yosh exhaust, braced frame, ported polished head
          1983 Gs1100ESD, rebuild finished! Body paintwork happening winter 2017

          I would rather trust my bike to a technician that reads the service manual than some backyardigan that THINKS HE KNOWS how to fix things.

          Comment


            Cheers for the input Daryl and Larry!

            I agree the tape isn't a great base... I did that with the seat but it didn't matter squat how that came out as it's never seen, the side of the fairing is a whole different story.

            I saw both your posts here yesterday and went and removed the tape last night, that's definitely out.

            Initially I thought I'll just use the clay as a support behind, build it up like Larry has suggested then sand it back.

            However... now I'm starting to like your second suggestion there Daryl, that could be a more certain way of getting a correctly shaped finish. I have plenty of wax here already and I can mask off the rest of the loaner cowl easily to ensure any resin drips/splash is kept away from it.

            Food for thought but I'm leaning towards this method for sure.

            I'll probably get some sanding discs for the drill attachment for the weekend too, found the backing pad yesterday and it's good to go, just need some more 36 grit discs.

            Oh, and Larry... my painter?

            I'll tell him not to bother with the gelcoat...

            I'm thinking just some blade putty to finish it up and get a nice smooth surface on top of those glass patches should do the trick nicely.
            1982 GS450E - The Wee Beastie
            1984 GSX750S Katana 7/11 - Kit Kat - BOTM May 2020

            sigpic

            450 Refresh thread: https://www.thegsresources.com/_foru...-GS450-Refresh

            Katana 7/11 thread: http://www.thegsresources.com/_forum...84-Katana-7-11

            Comment


              I masked the loaner cowl last night, left the areas to make the patches reasonably large.

              Untitled by starpoint73, on Flickr

              I went a bit overboard with the wax, 4 coats plus some PVA release agent as I really don't want any chance of anything sticking to the cowl or damaging it.

              Then two layers went on for the patches. The resin seemed to be going off nicely when I left them last night.

              I should be able to remove them tonight and make the patch for the indicator hole on the right side.

              Untitled by starpoint73, on Flickr
              1982 GS450E - The Wee Beastie
              1984 GSX750S Katana 7/11 - Kit Kat - BOTM May 2020

              sigpic

              450 Refresh thread: https://www.thegsresources.com/_foru...-GS450-Refresh

              Katana 7/11 thread: http://www.thegsresources.com/_forum...84-Katana-7-11

              Comment


                Hey, Pete..is the plan now to hold those patch panels up to the inside of your fairing, trace a line following the shape of the holes and then cut and insert the new pieces into the openings? If so, I can see "the method in your madness" now.
                1979 GS1000S,

                1982 Honda CX500 Turbo, 1982 Honda MB5 w/CR80 motor, 1977 Honda "nekid" Goldwing, 1976 Honda CB550F cafe', 1972 Honda XL250 cafe'

                Comment


                  Hi Pete, personally I would have used cloth instead of the mat you used for the technique I described.

                  I find mat to be thick and rough for the technique, it will work but creates more work to smooth and usually ends up being twice or more the thickness of bi-directional cloth.
                  1978 Gs1085 compliments of Popy Yosh, Bandit 1200 wheels and front end, VM33 Smoothbores, Yosh exhaust, braced frame, ported polished head
                  1983 Gs1100ESD, rebuild finished! Body paintwork happening winter 2017

                  I would rather trust my bike to a technician that reads the service manual than some backyardigan that THINKS HE KNOWS how to fix things.

                  Comment


                    Sort of Larry... they're translucent enough that I should be able to trace from the outside so they overlap the holes enough to be laminated further out than the edge of the hole, say half an inch or an inch... if that makes sense.

                    Daryl, I didn't realise there was an alternative to the matting? That's all I have and have used so far, getting anywhere to buy materials gets tricky for me as there's nowhere near where I work or live that sells materials, so I have to go by what I can find on the interwebs and get them posted or couriered to me. The matting worked ok in the end but I get what you're saying. I can cope with a bit more work

                    I got the patch for the indicator hole sorted last night. That area's quite flat but I'd still rather start with something the right shape to help me keep it that way.

                    Untitled by starpoint73, on Flickr

                    Before that I took the other patches off and they came off nice and easy with no damage whatsoever so the wax and PVA worked as it should.

                    The front section worked well and will sit nicely once trimmed down to suit.

                    Untitled by starpoint73, on Flickr

                    However, the left side is a different story and the patch just wouldn't sit right even though the shape all looks spot on. When taping it to the side there was a gap on top, and vice versa.

                    Untitled by starpoint73, on Flickr

                    On closer inspection, that side definitely has an issue. Where the side comes in, it's lower down than the right side. Hard to see in the photo.

                    Untitled by starpoint73, on Flickr

                    If I hold the left side up about where the right side is, the patch sits neatly.

                    Untitled by starpoint73, on Flickr


                    The issue at the front is even harder to see. On the bottom where the shark fins mount the left side has bent upwards compared to the right side.

                    Untitled by starpoint73, on Flickr

                    To sort the left side out all I can think to do is to wedge some timber both sides of where I need to patch so that once everything is laminated from the outside and inside to give it strength it maintains that shape. I'm not sure if that's a viable method or not, any thoughts on that? I need to do it in a way that it pushes the top up only, not the bottom down if that makes sense.

                    As for where the shark fins mount, I can just build up underneath with a few layers then sand it back nice and flat to match the right side.

                    The good thing is that I know when the cowl sits on the subframe it all sits correctly, so layering up the shark fin area won't affect that.
                    1982 GS450E - The Wee Beastie
                    1984 GSX750S Katana 7/11 - Kit Kat - BOTM May 2020

                    sigpic

                    450 Refresh thread: https://www.thegsresources.com/_foru...-GS450-Refresh

                    Katana 7/11 thread: http://www.thegsresources.com/_forum...84-Katana-7-11

                    Comment


                      Using a piece of wood/timber is an acceptable way of shimming, I have done exactly that in the past. You just need to make sure the wood has a complete coating of resin to stop it from absorbing water or moisture.

                      You should try bi-directional cloth sometime if you can get it. With 1 or 2 layers it has some flex to allow for differences. Once I get it cut to the desired shape, after the resin has cured, I would rough up the surface, make sure all wax is removed from both surfaces. Then I would use cleco's to hold it to the surface while the epoxy cured. The cleco's will pull it flush to the surface and the epoxy is a far superior bond than polyester resin.

                      http://www.fibreglast.com/product/Bi...erglass_Fabric this is cloth.

                      Rock on though, your doing a great job!
                      Last edited by Fjbj40; 11-03-2017, 06:04 PM.
                      1978 Gs1085 compliments of Popy Yosh, Bandit 1200 wheels and front end, VM33 Smoothbores, Yosh exhaust, braced frame, ported polished head
                      1983 Gs1100ESD, rebuild finished! Body paintwork happening winter 2017

                      I would rather trust my bike to a technician that reads the service manual than some backyardigan that THINKS HE KNOWS how to fix things.

                      Comment


                        Cheers Daryl, timber sounds like it'll do the trick. The timber I have is treated already so it shouldn't absorb anything but I know what you mean.

                        So that cloth is almost along the lines of carbon fibre type stuff? At least that's how it looks to me. I also had to Google what a Cleco is I see now!

                        The way things are with the Kat fund at the moment I definitely have to stick with what I have on hand, I need to keep $$ aside for the tank repair and start putting some aside towards paint which won't be all that cheap. All good things to know and learn though!
                        1982 GS450E - The Wee Beastie
                        1984 GSX750S Katana 7/11 - Kit Kat - BOTM May 2020

                        sigpic

                        450 Refresh thread: https://www.thegsresources.com/_foru...-GS450-Refresh

                        Katana 7/11 thread: http://www.thegsresources.com/_forum...84-Katana-7-11

                        Comment


                          Broke out the power tools yesterday, got all the areas to be patched ready, and marked out where the patches have to sit.

                          Untitled by starpoint73, on Flickr

                          Ignore the tape in the photos, I tried to use the fibreglass backed tape as it's nice and strong, but it really doesn't press the patches down hard enough so I used wood screws instead.

                          Untitled by starpoint73, on Flickr

                          Untitled by starpoint73, on Flickr

                          You can't really see it but I did let the 36 grit get a bit out of hand and the circular patch area got a bit thin in spots which I had to work around.

                          The small piece of timber is helping to hold that side back into the correct shape as I ended up with pretty much nothing there to support the patch and there's a couple of layers of matting in that area for extra support. That's gonna be a little bit of fun to remove I think.

                          Untitled by starpoint73, on Flickr

                          I haven't put much extra on the inside of the patches yet as I had to finish up for the day by the time I'd gotten this far.

                          The timber support definitely looks like it's done the trick though and the shape of the cowl is a lot more symmetrical.

                          Untitled by starpoint73, on Flickr

                          It'll have been about 30 hours of cure time when I get out there tonight so hopefully that's enough for them to all hold their shape and I can remove the timber and add some extra layers on the inside of them all for extra strength.
                          1982 GS450E - The Wee Beastie
                          1984 GSX750S Katana 7/11 - Kit Kat - BOTM May 2020

                          sigpic

                          450 Refresh thread: https://www.thegsresources.com/_foru...-GS450-Refresh

                          Katana 7/11 thread: http://www.thegsresources.com/_forum...84-Katana-7-11

                          Comment


                            I ever so carefully removed the screws one by one last night, expecting the cowl to drop back to position and the patch to let go, but alas it stayed where it should!

                            Untitled by starpoint73, on Flickr

                            I built up behind the right side indicator hole.

                            Untitled by starpoint73, on Flickr

                            And probably went a little overboard but three layers behind the big patches for extra strength.

                            Untitled by starpoint73, on Flickr

                            Now the real fun of sanding the patches down nicely and then removing every last scrap of paint off the cowl begins.

                            I'll fill the screw holes once that's done either with a bit of resin slurry with some chopped up mat or a bit of fibreglass reinforced body filler.

                            Rather than gelcoat over the patches I'll just use some blade putty I think, as that should give a nice smooth finish. It worked for the tail piece on the 450 anyway and I was very happy with the smoothness of that.

                            On the inside I think I'll just spray the left over acrylic satin black I've got on the patched areas.
                            1982 GS450E - The Wee Beastie
                            1984 GSX750S Katana 7/11 - Kit Kat - BOTM May 2020

                            sigpic

                            450 Refresh thread: https://www.thegsresources.com/_foru...-GS450-Refresh

                            Katana 7/11 thread: http://www.thegsresources.com/_forum...84-Katana-7-11

                            Comment


                              This hand sanding's a mug's game, so I won't do any more until I can make some noise and get the power tools back out.

                              Instead I mixed up a slurry last night and patched the low spots around the patches which should take care of most of the screw holes as well.

                              Untitled by starpoint73, on Flickr

                              Untitled by starpoint73, on Flickr

                              Hopefully Sunday can be power tool day and I can get a bunch of sanding done on it.
                              1982 GS450E - The Wee Beastie
                              1984 GSX750S Katana 7/11 - Kit Kat - BOTM May 2020

                              sigpic

                              450 Refresh thread: https://www.thegsresources.com/_foru...-GS450-Refresh

                              Katana 7/11 thread: http://www.thegsresources.com/_forum...84-Katana-7-11

                              Comment


                                Nice job, Pete. That fairing's coming along nicely. Looks like plenty or reinforcement on the back side, too. As you mentioned, "Dura Glass" would be a great first fill followed by a creamy body filler for a final surface. Top tip: Wear a shirt with no buttons along with long sleeves and rubber gloves when you grind and sand it..even taping your gloves where they meet your cuffs. That will keep out so much of the fiberglass dust and help keep from driving you into an itchy-scratching frenzy.
                                1979 GS1000S,

                                1982 Honda CX500 Turbo, 1982 Honda MB5 w/CR80 motor, 1977 Honda "nekid" Goldwing, 1976 Honda CB550F cafe', 1972 Honda XL250 cafe'

                                Comment

                                Working...
                                X