-
Hi Pete, I've always wondered if you'd feel any difference with porting unless you were near redline. I think sometimes you gain flow but lose airspeed so its not noticable until your up it. Once you get the big bore in you'll reap more rewards. Hey so I'm being lazy and havent read through the whole post. How/where did you fit the AFR? I'm flying blind with my tuning and dont want to go to a dyno until winter. I'd rather tune it on the road for 1%-40% throttle so its safe, then mess around at the dyno. Cheers -
Had a good Saturday morning out and the head seems fine, no noises and nothing weird going on while having fun in my favourite twisties too.
Having gotten a good lot of heat through it I re-torqued the head nuts yesterday as well as going through the valve clearances again (no changes).
On the down side it seems I'm still going through oil, and the guys did report still seeing blue smoke, so I guess my quick ring job with the stock pistons wasn't enough either. Oh well, at least I can ride now and I'll just have to start putting the pennies aside for a big bore job next year.Leave a comment:
-
Yes indeed Larry! The 450 is a bunch of fun but there's just nothing like jumping on the KatOriginally posted by nvr2old View Post
Yep Ed, that's what I noticed for sure. Only having had a 15 minute test ride I couldn't feel anything different so we'll see, but I suspect I won't ever be able to tell the difference.Originally posted by Nessism View PostLeave a comment:
-
Nice that your 450 is always there for you, Pete..but it's GOTTA feel good to ride the Kat again, eh..?Leave a comment:
-
Ok so some soft timber and a lump hammer moved the head, and I was able to finish the swap last night to a point I was able to get a successful test fire. Cam timing is all good, valve clearances set, new spark plugs in, all set!
The sun finally made an appearance today so when I got home it was off the 450 and onto the Kat for a quick 15 minute test ride. No weird noises I could detect, felt good, and no oil leaks I can see afterwards either. I'll give it a proper run on our usual Saturday morning ride and see how she goes.
I was also able to compare the exhaust ports from the loan head with the DIY porting job I inherited as well, and there's a definite difference!
 Untitled by starpoint73, on Flickr
 Untitled by starpoint73, on Flickr
 Untitled by starpoint73, on Flickr
Leave a comment:
-
Having fun trying to get the head off this week. I like how the service manual simply states "lift the head straight up". Yeah right! Tried a rubber hammer on the safe bits with no fins but still won't budge. I had a suggestion to make sure all the washers are removed in case they're binding on the threads which I did for all except the four copper washers on the four studs outside of number one and number four cylinders. I can't get in there properly around the valve springs to get them out. I shall keep persevering.Leave a comment:
-
Received a couple of parcels this week with everything to get the head swapped out at last. We have our Kristmas Katana Katch-Up today and I'll want to ride it during the week most likely, so heading in to next weekend I'll start getting set to do the swap so hopefully I can be test riding next Sunday in advance of everything shutting for Christmas in case something goes awry.
I didn't realised I'd ordered a copper gasket though so I'm just waiting on some gasket sealer and I'll also be putting a fresh set of plugs in.
 Untitled by starpoint73, on Flickr
Leave a comment:
-
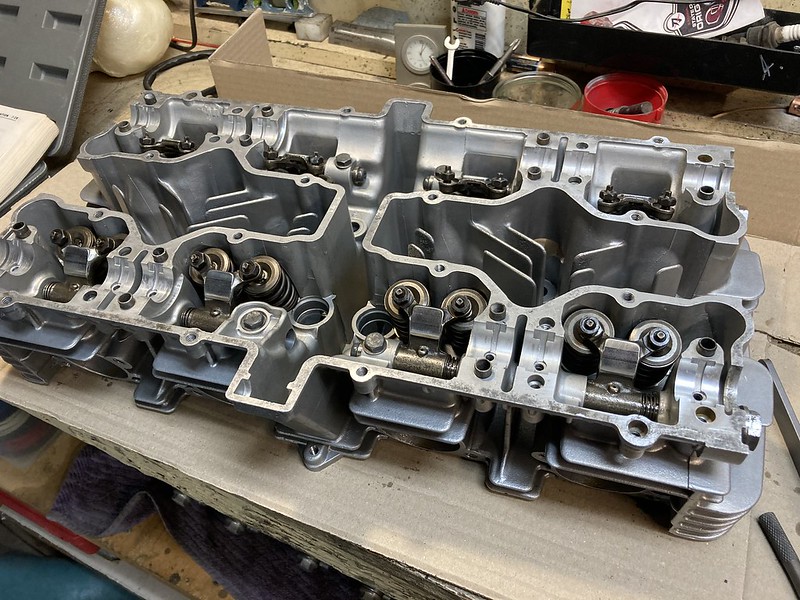
Today was a little progress on the head finishing up as much assembly as I can for the moment. I spent the morning checking out all the threaded holes and had to run the tap through some of the exhaust bolt holes and cam cap bolt holes. Nothing needs thread inserts which is great and I was able to torque up all the cam cap bolts correctly with no issues.
The only concern really is that when I dismantled the head, I put the rockers and rocker shafts in bags labelled with where they came from, but unfortunately for some reason the shop that rebuilt the head for me took them out of the bags but didn't reassemble them. Hopefully it doesn't matter too much that they're probably not in the same place they started.
I'll get my order in for most things this week, although I'll go Cometic head and valve cover gaskets again which will have to wait for next pay.
 Untitled by starpoint73, on Flickr
Leave a comment:
-
I'll be sticking with the VM33 Smoothbores I'm running now, I'll just revisit the jetting with an AFR gauge once I swap it out.
The swap will still be a couple of months away yet as the bill ended up a bit more than I was anticipating due to the dodgy porting repairs they had to do. I don't know the history of the head but it certainly looked like it had a hard life, and I could see clearly someone had done a DIY porting job on it also.Leave a comment:
-
Head looks great! What carbs are you planning to use on this head?Leave a comment:
-
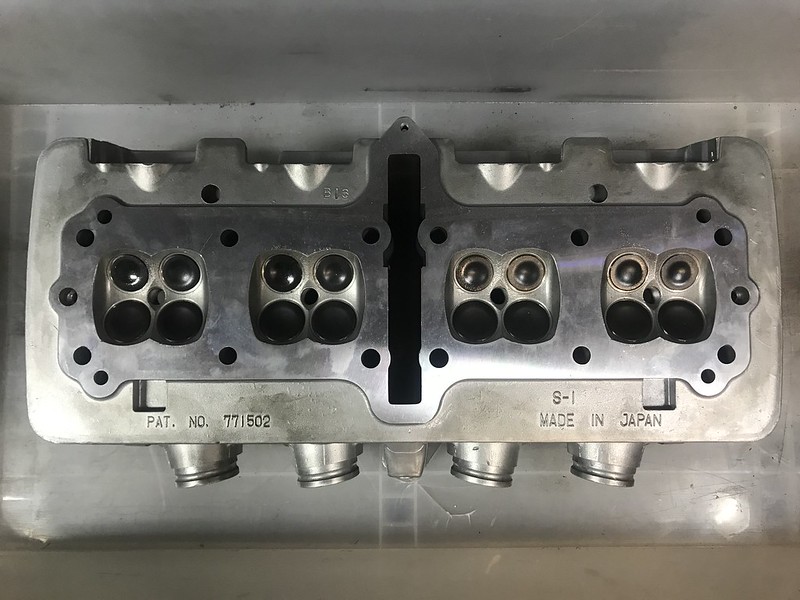
I got the head back last week, finally got around to taking some photos yesterday. Turns out the porting job was indeed dodgy and they had to replace some removed material as well as replacing a couple of valve seats.
It's certainly now very clean!
 IMG_4257 by starpoint73, on Flickr
 IMG_4258 by starpoint73, on Flickr
 IMG_4263 by starpoint73, on Flickr
 IMG_4262 by starpoint73, on Flickr
 IMG_4261 by starpoint73, on Flickr
 IMG_4260 by starpoint73, on Flickr
Leave a comment:
-
Ah thanks Greg! Someone mentioned that to me a while back but couldn't remember the correct name for them, and at the time I thought it sounded a bit dodgy so let the idea go.
Good to know Redax are good, his location's a little inconvenient but workable. There is a reputable place PLR Engineering not too far from me though so I'll give them a call first. They mention K-liners as one of the services they offer too.
Getting the head vapor blasted is most definitely on my radar. I was initially going to go satin black like the rest but after seeing a mate's with a vapor blasted head on a satin black bottom end I thought it looked great.Leave a comment:
-
Ah, yes, the old "cut the guides off at the port roof" trick.....
FWIW, the cheapest way out - which would let you use your existing valves too - is to insert K-liners in the guides.
The guides are reamed out to a larger diameter and thin wall bronze bushes - the K-liners - are pressed in.
They're then honed to size to suit the valves.
Worth ringing around reconditioners in Queensland. Maybe even Redax Engineering who are Laverda specialists in Brisbane. Red's very competent.
Do you know anyone local to you who does vaporblasting ? That head would come up much better if it's done.Leave a comment:
-
Hey Greg, I most definitely need to replace the guides, and that's actually where this all started. Every single valve has in excess of 1mm free play side to side in the guides due to (I believe) a DIY porting job.
I know to "do it right" I should go new valves as well, but the $$ are still tight so I'm hoping I can simply do the guides and reuse the existing valves. If I can get another 50 to 100K kms out of that then I reckon it's worthwhile. This motor most definitely had a hard life! I'm not sure if I need to get the seats cut yet or if I can simply lap the valves in.
Here's some older pics of what I discovered:
 Untitled by starpoint73, on Flickr
 Untitled by starpoint73, on Flickr
 Untitled by starpoint73, on Flickr
Leave a comment:
.png "Powered by vBulletin")
Required reading for all forum users!!!
Welcome!
Register to access the full functionality of the GSResources forum. Until you register and activate your account you will not have full forum access, nor will you be able to post or reply to messages.A note to new registrants...
All new forum registrations must be activated via email before you have full access to the forum.A Special Note about Email accounts!
DO NOT USE sbcglobal.net, att.net, bellsouth.net or email.com email addresses when registering for the forum! Email that our system sends out to these email servers is treated as SPAM and you will never receive your activation email, or any other email that our system may send out. Use an email address from gmail.com or some other email server.A note to old forum members...
I receive numerous requests from people who can no longer log in because their accounts were deleted. As mentioned in the forum FAQ, user accounts are deleted if you haven't logged in for the past 6 months. If you can't log in, then create a new forum account. If you don't get an error message, then check your email account for an activation message. If you get a message stating that the email address is already in use, then your account still exists so follow the instructions in the forum FAQ for resetting your password.Have you forgotten your password or have a new email address? Then read the forum FAQ for details on how to reset it.
Any email requests for "can't log in anymore" problems or "lost my password" problems will be deleted. Read the forum FAQ and follow the instructions there - that's what we have one for...
New users should be sure to read the FAQ as well as the posts in the Announcements forum. This will answer many of the questions you may have about how this forum works.
Before posting questions in the forums be sure to use the forum search function!!! Odds are your question has already been asked and answered before. And when posting, please make sure that you post to the correct forum.
Finally, be sure to check out BassCliff's website here. He has useful information that can't be found on this site. His welcome page containing useful GS information can be found here. Be sure to check it out!
If you are a returning visitor to the forum and can't log in using your old forum name and password, chances are your account is deleted. Just create a new forum account and you should be all set.
Leave a comment: