Announcement

Collapse
No announcement yet.

Weasel's 1978 GS750 cafe racer project

Collapse
X
 
  • Filter
  • Time
  • Show
Clear All
new posts

    Weasel's 1978 GS750 cafe racer project

    Hello. Just rescued a 1978 GS750 yesterday and I was thrilled to find this forum. The last bike I rescued and resuscitated from a dusty garage was about 17 years and 2 kids ago so I'm as rusty as the GS is. Looking around here, I know I'll have plenty of knowledgeable help.

    So, I'd like to turn her into a cafe racer or something similar. Anyone want to talk me out of going that direction? I have very little invested in this bike and I'll be doing all the work myself so I'm not feeling too bad about taking a cutting wheel to her. But she may be clean enough to just do a simple restoration to spruce her up and maybe I'm going the wrong direction. Look forward to hearing what you all think but I'm pretty sure you'll tell me to build what makes me happy.

    Anyway, my daughters enjoy the old pictures of me and my dad with his 70s Japanese bikes and they are interested in helping and learning. Pretty cool. So without much more yapping, here she is:


    Last edited by Guest; 01-03-2016, 08:42 PM.

    #2
    Few more details and pictures:

    1978 Suzuki GS750
    30K miles
    Currently not running, last ran about 5-6 years ago
    Good compression
    Put a charger on the battery and got gauges and lights/signals working
    Tranny shifts smoothly, clutch works fine
    Plenty of surface rust but nothing major that I can tell
    Tank is straight and clean inside & out
    Front & back brakes work and the wheels roll freely

    So, that's about it. The previous owner had a chance to gather up a parts bike years ago and I got a spare motor, wheel and swingarm thrown in. I hit a lot of the bolts with penetrating spray yesterday. Hope to find some time this weekend to inspect and clean the tank and carbs and try to get her running.


    Comment


      #3
      This is what I have pictured in my mind for the finished product. I copied & pasted this photo from the Internet and will ask forgiveness if the owner takes offense.

      Last edited by Guest; 11-25-2015, 12:07 AM.

      Comment


        #4
        very nice looking bike for practically free! I really like that tank and tail section paint scheme. If you are going for the look picture in the post below yours, I'm sure you could find someone on here that would give you good money for that tank and tail section if the paint were good.the early eighties tanks have the new dance in them like the one pictured. The rear mount on the frame is different, but many have been retrofitted to 1st generation GS's for that very reason. There was an early eighties gs450 that was a particularly popular tank, not teardrop shaped like the one in your photo, but very popular for racer looking builds.

        give me a shout if you are looking to use a different tank, as mine has a slight dent in it now after a spill on gravel. lower drag handlebars allowed the left controls to contact the tank! Might need to put Superbike bars back on it to avoid that in the future.
        '77 GS750 920cc heavily modded
        '97 Kawasaki KDX220R rugged terrain ripper!
        '99 Kawasaki KDX220R​ rebuild in progress
        '79 GS425stock
        PROJECTS:
        '77 Suzuki PE250 woods racer
        '77 GS550 740cc major mods
        '77 GS400 489cc racer build
        '76 Rickman CR1000 GS1000/1100
        '78 GS1000C/1100

        Comment


          #5
          how in depth are you looking to go on your build? If you have any questions regarding your performance brake, suspension, engine, or frame modifications, I have been in and out of many of these bikes in the past 6 years now, and am basically obsessed with them, so don't be a stranger, email or PM me!

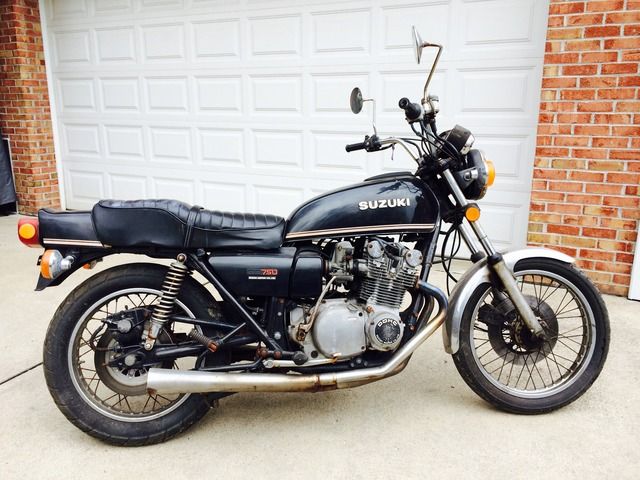
          not sure what your plans are other than the look you are going after, but the top priorities are getting the mechanicals in good order. Once rideable, don't push it until you get a good set of very grippy tires. Avon am26 road riders if you plan to put on lots of miles on straight flat roads. Otherwise Shinko 230 tour master is the best gripping tire for a low price, 100/90-19 ft & 110/90-18 rear are the absolute biggest you want to stuff onto the stock rims. it will handle worse with bigger tires than that, will be very floppy as you lean into turns and give you less straight line traction. Pirelli Sport Demons are the #1 best grippers, 90/90-19 front & 110/90-18 rear. phenomenal cornering ability. The Shinko tires are almost as good, 90% of the grip. Bridgestone battleax bt45 is a decent alternate, but for the money, go all the way with the Pirelli.

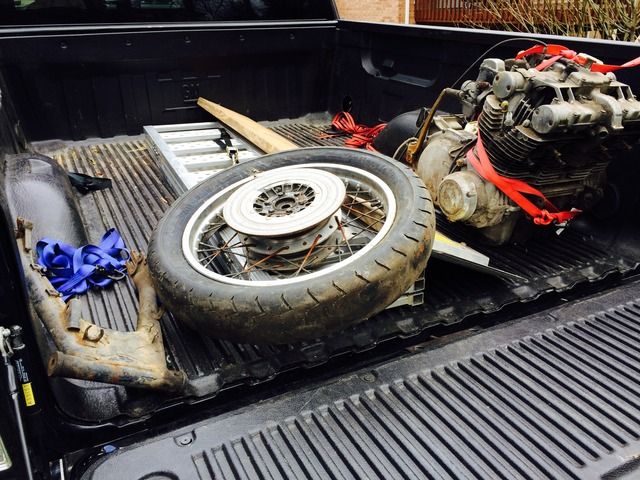
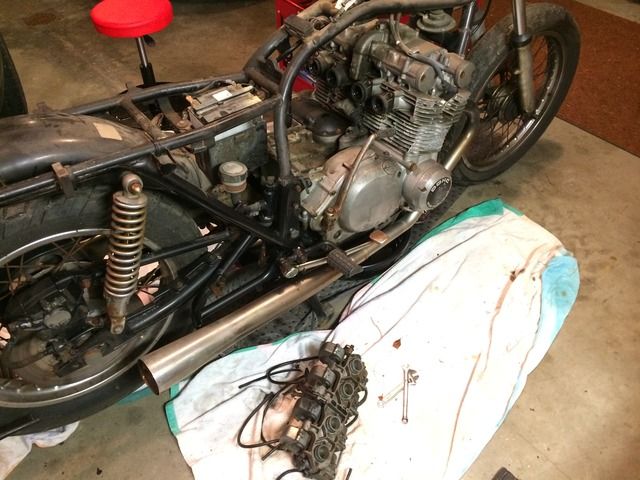
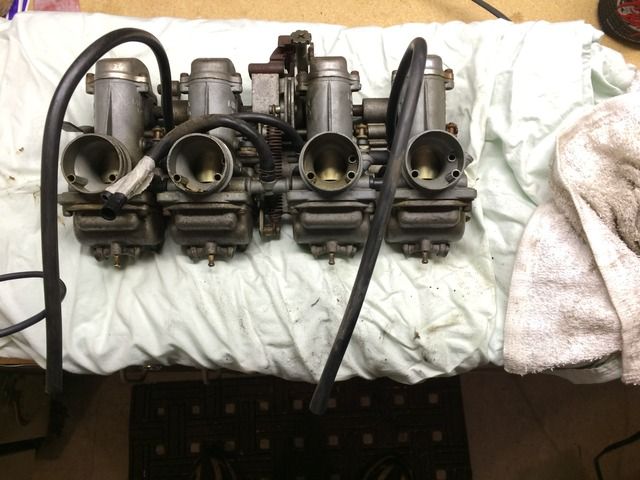
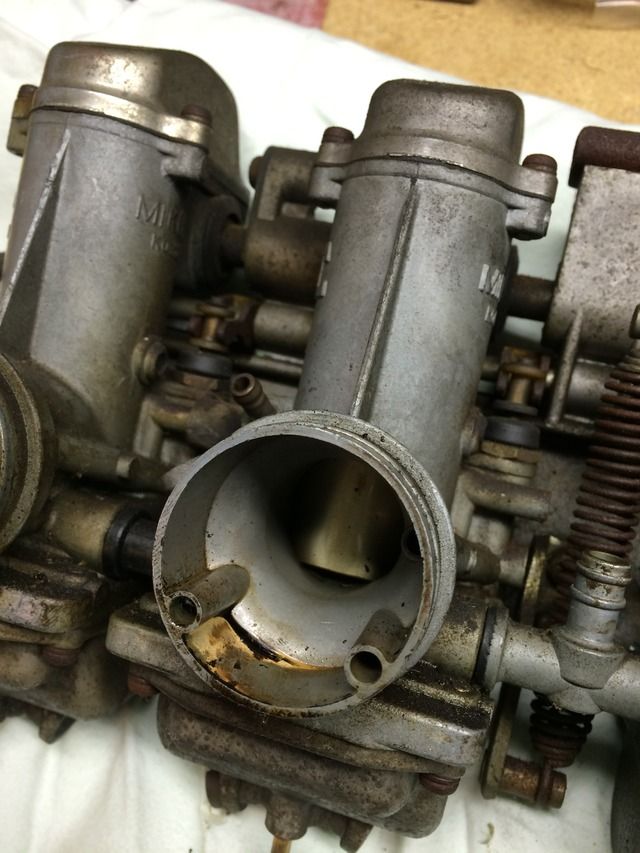
          the carbs will probably hold you up from getting it to run good. Don't buy the cheap rebuild kits that you see all over, insist on only OEM or better parts, and the rebuild kits don't come with most of the o-rings that desperately need replaced on these old carbs. basically all you will typically want for a full professional rebuild is the complete o-ring kit, top and bottom gaskets, aluminum fuel tees if you do not already have them stock, and possibly needle and seat sets. member Robert Barr on here has cycleorings.com where he sells complete kits for these carbs. You will also find a download on the main page of the GS resources for a VM carb rebuild manual, and maybe on Roberts website as well. This is way more in depth than anything you will find in a commercial repair manual. make sure to soak them at least overnight want and then chase with aerosol carb cleaner and rinse with water, then blow out all passages again with aerosol carb cleaner and compressed air at high pressure.make sure to get the float heights set properly, and replace the needle and seats as a matched set with Mikuni only oem parts, or at least with a matched set from jetsrus.com or the awesome Z1 enterprises. if your carbs have the rubber fuel tees in between them instead of the aluminum tee and couplers with replaceable o rings, just cough up the money up front and avoid fuel leaks on to your hot engine by getting the aluminum tee & couplers for use with replaceable o rings that z1 sells.
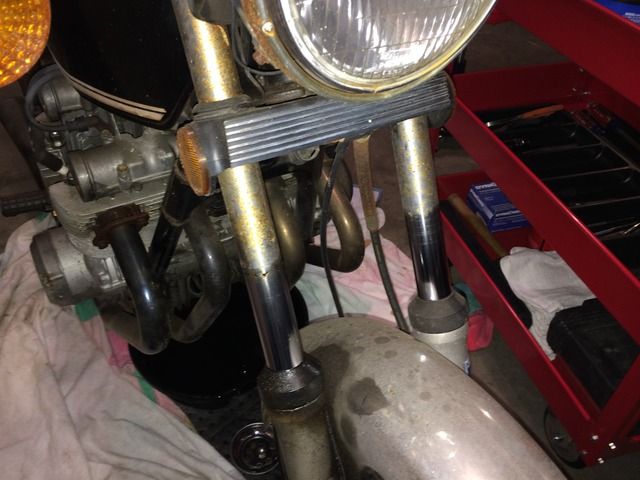
          Oh, and remove the intake boots from the cylinder head and replace the large o ring that seals them to the head. Replace the stubborn number 3 Phillips fasteners with stainless allen head bolts. Also, inspect the intake boots and very very carefully and make sure the rubber is not separating from the steel plate, and that there are no cracks in them. A vacuum leak in these will give you a whole lot of hassle and poor running. They are expensive, about $130 a set of 4, but are mandatory to have in good condition.

          the other very important thing to do is get rid of that stock Suzuki regulator/rectifier. They are absolute garbage and will fry your stator if it is not already compromised. there are a million different 3 phase regulator rectifier that you can swap on, but the latest greatest thing is the newer series style technology that just disconnects the stator when the extra voltage is not needed, where as most regulator rectifiers use front style technology, where they rapidly cycling shorts all the unused unnecessary voltage directly to ground, which lets the stator run at full load nonstop and makes it run much hotter.
          Late model Polaris RZR 800 reg-recs are the absolute hot ticket to put onto our bikes, unless you want to run heated grips or any high demand accessories. Then the Compu fire unit is the way to go. search eBay for the Polaris OEM number 4012941. you will find A couple year old unit off of a wrecked Polaris for around $50, and this is an absolute must. the manufacturer is Shindengen, model is the SH-775, but you will not find it on eBay under that number typically, so look for that Polaris OEM number. refer to numerous threads on here as to which is the ground and which is the 14 volt connection. The three terminals in a row are the stator inputs.
          also on the early models like you have, to avoid running the stator incredibly hot, but as a byproduct adding a mile of extra wire and an extra switch and see you connectors to get dirty and cause problems, Suzuki sent one leg of the stator through the headlight switch and then to the regulator rectifier. This way if you are not using the headlight, it completely disconnected 1 phase.the original setup was garbage anyway, and only regulated one phase of the three, so you were always dumping 1 full phase of unregulated power straight into the battery and charging system. when upgrading to the SH 775, or any other high quality unit, abandon this headlight switch run.

          also, make sure you go through the entire wiring harness and check every connector then, cleaning them, crimping loose connections and bullet connectors, and putting silicone dielectric grease on everything. Also a good idea to dismantle the ignition switch and spray with contact cleaner and lubricant, same with the kill switch. these will cause low voltage to your ignition coils and poor idle, not to mention additional strain everywhere. and make sure that you have great ground connections. Jim, posplayr, GS owner and aviation electronics engineer, insists on a single point ground as close to the battery negative as possible, running all grounds to this point.

          also, get the Suzuki valve shim depressor tool and a good set of feeler gauges in the smallest increments that autozone sells. .001" to .003" or .02-.08mm are your valve to cam clearances. They will get tight and cause you to burn valves if you do not do regular adjustments. Sometimes they will get loose and cause a lot of noise, but typically will get tight. join the GS shim club that Ray GhostGS1 believe his name is runs on this forum. you can trade in your shims that no longer are the proper fit and get the correct ones. or watch eBay for a complete Suzuki valve shim kit for $150 or so. always try and have a spare top cover gasket on hand for valve adjustments. not a bad idea to buy a generic gasket kit to have on hand, just don't use the head and base gaskets and internal engine orings from them. OEM only.

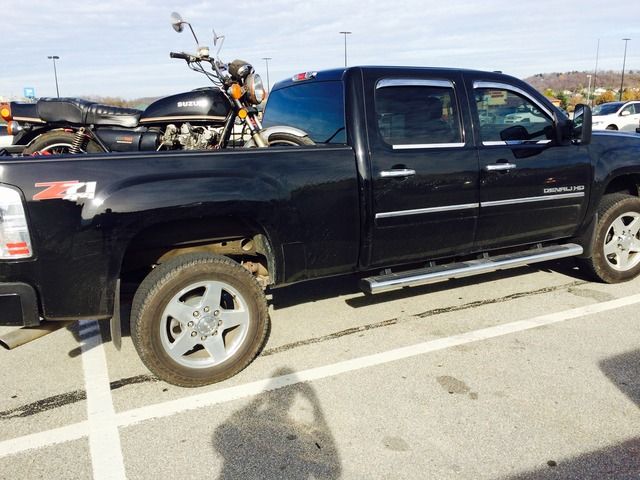
          if you are certain you will be keeping the stock swing arm (length), definitely upgrade to a 530 o ring chain kit from the one or elsewhere. it will make your bike run much smoother. The stocl longer link 630 chains are quite clunky and very heavy.

          Tapered roller bearing steering conversions from all balls will make the steering much better at high speeds and much more durable for around $40 as well (loose balls are oem, antiquated). They also sell wheel bearing kits for our bikes for good prices, nothing upgrading there, just brand new bearings if needed. Grease your swingarm needle bearings as well, there may be a grease fitting there, but if not, definitely tear them apart and clean them, blow out, and repack.

          that just about covers the first phase of mandatory work that any old GS will need. Dyna makes a nice Dyna-S ignition if you don't want to fool around with adjusting points and replacing them at regular intervals.
          Last edited by Chuck78; 11-18-2015, 08:08 PM.
          '77 GS750 920cc heavily modded
          '97 Kawasaki KDX220R rugged terrain ripper!
          '99 Kawasaki KDX220R​ rebuild in progress
          '79 GS425stock
          PROJECTS:
          '77 Suzuki PE250 woods racer
          '77 GS550 740cc major mods
          '77 GS400 489cc racer build
          '76 Rickman CR1000 GS1000/1100
          '78 GS1000C/1100

          Comment


            #6
            I don't have any cosmetic advice to offer, that's all you for your individual taste, but I have tons of performance upgrades to offer advice on.

            replace your fork seals with OEM or all balls seals only. while you are in there, assuming you are using the stock forks which you can get to perform well enough, get the Race Tech gold valve emulator copies that MikesXS.com sells, as this is a gigantic upgrade in the way the front suspension operates. it replaces the stock compression damping circuit to give you more performance and less harsh bone jarring abrupt bumps transmitted to you. get some sonic or Racetech aftermarket springs, or chopped several inches out of your stock springs if on a budget. use a section of an aluminum bicycle seat post as a shim to replace the section of spring cut out. use 10 weight or 15wt fork oil to get the rebound action that you want. the compression is fully adjustable with the cartridge emulators.

            if the chrome on your forks has any pitting or damage in the fork seal area, ditch them and upgrade to some gs850/1000 forks with the straight legs. Triples are needed also, and then you will need a set of conversion bearings from all balls. this will give you much stiffer 37mm Forks. I run my bike very hard with 35 mm, stock size, forks. while it works fairly well with my lightened up bike and other fork modifications, the 37mm forks are definitely the better way to go. might as well do dual disk at this point if you care to.

            if you want a modern cartridge fork front end, you are going to either have to lose the wire spoke wheels, or become good friends with a machinist! To get the proper height fork, 93-94 gsxr1000 are the popular ones on here, or else look into a Honda VFR 750 1994 through 1997 non ABS model. most other modern forks will be too short. This gives you a much much better brake as well (2-piston sliding calipers and longer pads), and then you can run numerous dual disc 296mm Honda floating rotors that combined weigh less than one single original Suzuki GS rotor! you will need to adjust the spacing off of the hub with a machine aluminum piece, and may need to do some work with the axle size and bearings/speedo drive or make an adapter to the GS 17mm axles. I can't remember if those vtr's use 17 or 20 mm axles. the GS 1000 fork is definitely a much easier modification that gets you similar results using the Racetech cartridge emulator made for forks that size, since the other one (MikesXS copy) only works with 35mm forks.

            you can also do a 2 piston caliper upgrade using ninja calipers and the Honda rotors I mentioned. Dan aka salty monk on this forum manufactures and sells an adapter kit. Look for the thread "twin pot brake mod for 78 skunk." on page 7 I listed a very comprehensive list of donors to get the proper parts, and Dan has added a few more at the end. that brake setup looks very cool, works far better than stock, and isn't terribly expensive or difficult.
            the stock setup isn't too bad if you have dual disk, stainless braided lines, and new EBC pads. you can also get a 310mm Honda CBR floating rotor and a single ninja caliper and use the brackets that dan aka salty monk makes, but just one set instead of left and right. there is one rotor in particular that already has the 23mm offset, same as stock, I believe 98 through 99 CBR 900 RR. Then you would not even need the hub spacer, just need to enlarge the 6 millimeter bolt holes to the 8mm that the GS uses. this would give you the same set up that one member (Suzuki Don?)runs on his modified GS550-673cc, and he says it is more than enough brake for that bike. The modern GS500 runs the same caliper and same rotor diameter, and racers say the brake is more than adequate for that lighter two cylinder bike. The 750 is heavier than both, however.

            rear brake is plenty stock, although you can switch out to a lighter rotor, ask me and I will dig up the info.

            the last suggestion I have is to spend as much as you can on good rear shocks, but no less than $200. I highly recommend YSS if you are looking to spend 300 to 500 on shocks. Hagon or progressive if you are looking to only spend 200. money put into brakes and suspension is the best money spent once you get the thing running good. the GS 750 cams and engine don't put out much down low, but when you rev that thing up 5000-9500rpm or down shift to pass cars, the thing takes off like an absolute rocket! A good 4:1 (V&H or MAC are the only easily available new systems, Jardine exhausts pop up on ebay sometimes), k&n air box filter or k&n/Uni pods, and raised needle height plus a larger main jet will make the thing even faster up top. the valve timing duration on these cams is almost into race cam territory, mucho high rpm hp.
            sorry to shove a whole lot of useful information down your throat and confuse you! just wanted to get you set straight on the essential maintenance up front, and give you some highly recommended suggestions on very good mods to do. there are other forks to swap, but if using the GS wheels, the modded GS1000 forks or newer Honda forks are the best. VTR1000F (4 piston calipers and 20mm axle, im using these on my current project, clearance to spokes is TIGHT tho! 6 piston gsxr1000 01-02 calipers may be needed just to get more clearance) and VFR750 forks are the only ones so far that I know of tall enough to maintain the proper geometry for our bikes.


            best of luck, and remember, the thing is very fast already, so focus on the brakes and suspension to give it a very nice modern ride quality and more than adequate stopping power.

            WELCOME TO THE FORUM, BY THE WAY!
            Last edited by Chuck78; 11-18-2015, 08:01 PM.
            '77 GS750 920cc heavily modded
            '97 Kawasaki KDX220R rugged terrain ripper!
            '99 Kawasaki KDX220R​ rebuild in progress
            '79 GS425stock
            PROJECTS:
            '77 Suzuki PE250 woods racer
            '77 GS550 740cc major mods
            '77 GS400 489cc racer build
            '76 Rickman CR1000 GS1000/1100
            '78 GS1000C/1100

            Comment


              #7
              A few last words of advice for today, as if you didn't have enough already! Be very careful removing the exhaust bolts, they often snap and lead to headaches. do everything you can to not break them. Heat the area up with a torch using an infrared thermometer to not melt the head, Spray co2 or touch and Ice Cube to the bolt head, this chills it to contract it, then spray penetrating oil, high quality stuff, on to the thread area. you can also just do this with a hot engine and chill the bolts. research this a little more so you don't break any. Also, for all those number 3 Phillips fasteners on the engine and the intake boots, use an impact screwdriver, but make sure the Philips head is clean of any grime, dirt, debris that would lead to the head being stripped out.
              '77 GS750 920cc heavily modded
              '97 Kawasaki KDX220R rugged terrain ripper!
              '99 Kawasaki KDX220R​ rebuild in progress
              '79 GS425stock
              PROJECTS:
              '77 Suzuki PE250 woods racer
              '77 GS550 740cc major mods
              '77 GS400 489cc racer build
              '76 Rickman CR1000 GS1000/1100
              '78 GS1000C/1100

              Comment


                #8
                Wow, thanks Chuck. I appreciate you taking the time to put all that down for me. That will help me get started. Yes, getting all the mechanics correct was my first priority before any cosmetics. Everything you mentioned sounds pretty reasonable and in line with what I expected to shell out. I'm not looking to make this thing race or museum quality but I like to do things right and safe and want to end up with a pretty nice bike we can be proud of. I don't mind spending a little more for quality but I don't need top of the line stuff just for name brand sake.

                I'm sure I will be e-mailing and PMing as I get into this thing since you so graciously offered. I'm not all that far from you either. We go to the Deer & Turkey Expo almost every Spring at the State Fairgrounds in Columbus.

                Thanks again.

                Comment


                  #9
                  Ignition key was hanging up badly, could only turn on after several minutes of wiggling. Accidentally over turned the key and locked the forks and struggled with it for a half hour. A flathead and pliers later, the ignition is lined back up and turns on and off easily every time now. Battery is charged. All lights & horn working, except left gauge light and rear left turn signal, electric start is not working. Need to check the harness and clean connections.


                  I let some gas & seafoam sit in the tank since Tues. pulled the tank, shook it up and drained it. Gas was clean, no debris at all. Petcock in working order and the hoses going to the carbs in decent condition. Put tank back on, put a little clean gas in, connected hoses & turned gas on. No leaks. That's it for today. Will check the carbs & air filter next chance I get.

                  Comment


                    #10
                    Just ordered the VM o-ring kit, intake o-ring kit and stainless steel fasteners from cycleoring.com. Also, ordered the top and bottom gaskets. Hope to get those carbs broken down and soaking this weekend.

                    Comment


                      #11
                      Since the fork locks in the integrated ignition switch/fork locks don't get used frequently, that problem occurs often where it gets stuck in the counterclockwise lock position.
                      Try ordering a brand new key from a dealer or ebay (they have a number code on them for ordering a replacement), pull lock apart (drill out roll pins, drill & tap for smallest fine thread allen set screws u can but to reinstall), insert new key into lock cylinder with it removed, file all the worn "wafers" I think they're called, file them flush on both sides of outside of cylinder, degrease heavily & flush out all metal shavings, lubricate with graphite lock lube, reassemble, & you should be good.

                      Shod be good to get er running with a check of points & points gaps, and anew top cover gasket (do the half moon end plugs also while you're in there, rtv the curved halves into the head after degreasing). Get feeler gauges in .001"-.003" range, $20 motion pro valve adjust tool, and some micrometer calipers & tweezers and a little flathead yo pop the shims out of the bucket at the slot, and you're good. Read the valve adjust procedures in a few different manuals, don't check with cam lobes straight up, check with the lobes angled a but so the adjacent lobes aren't pressing hard to open adjacent valves, this will slightly throw off your clearance readings.

                      Then you should really be good to go to get it running if the electrics all check out! Don't run it much until you go through all the wiring, do tests on stator ohms and running ac volts unhooked (ignition running off battery), read the stator papors on this website to fully test. Then get that 4012941 shindengen Polaris regulator rectifier installed, and it should be ready to run!

                      Check all wheel bearings, steering bearings, & swingarm bearings, as well as brakes while you're at it.
                      Last edited by Chuck78; 11-20-2015, 04:29 PM.
                      '77 GS750 920cc heavily modded
                      '97 Kawasaki KDX220R rugged terrain ripper!
                      '99 Kawasaki KDX220R​ rebuild in progress
                      '79 GS425stock
                      PROJECTS:
                      '77 Suzuki PE250 woods racer
                      '77 GS550 740cc major mods
                      '77 GS400 489cc racer build
                      '76 Rickman CR1000 GS1000/1100
                      '78 GS1000C/1100

                      Comment


                        #12
                        What condition are the forks in? Any decisions on direction for the forks & brakes? Keeping the wire spoke wheels?
                        Stock 35mm forks are sufficient with a Tarozzi fork brace & MikesXS.com cartridge emulator valves (& I ride it pretty hard), but without a doubt 37mm GS850G & GS1000 (non-L models, straight legs) are much more rigid & superior.
                        If you run it hard, & ride in the hills, mountain tains, and very twisty road regions, dual discs up front are a huge bonus.
                        Using Dan aka salty monk's twinpot brake mod brackets, you can run a single 310mm cbr900rr rotor & ninja caliper that will weigh half of stock & give you better single disc braking power, however. Good budget move, if your single disc forks have good chrome on the tubes. If any pittung, they'll be leaks & tear up new fork seals, so forget it.

                        If chrome is good on the 35mm forks (single disc, right?) I may have a spare set of dual disc lowers but not sure. The 37mm forks with racetech gold valve emulators, Tarozzi brace, chopped/shimmer springs or $80 sonic or Racetech springs are all the front end you need, unless you must have full on cartridge forks & bigger brake pads, then.the vtr 750 94-97 forks are the ticket, but will require some machining, or custom bearings and gsxr speedo drive modded to fit your wheel.

                        Japan.webike.net has some 18" 2.50x18 & 2.15x18 alloy rims & spoke sets for gs400's for around $500, and you might be able to get the same sizes from MikesXS.com and order Buchanans spokes for about the same price if you're looking for slightly wider polished aluminum rims to run 1 size bigger tire than stock. Wire wheels, huge plus in my opinion!
                        Last edited by Chuck78; 11-20-2015, 04:03 PM.
                        '77 GS750 920cc heavily modded
                        '97 Kawasaki KDX220R rugged terrain ripper!
                        '99 Kawasaki KDX220R​ rebuild in progress
                        '79 GS425stock
                        PROJECTS:
                        '77 Suzuki PE250 woods racer
                        '77 GS550 740cc major mods
                        '77 GS400 489cc racer build
                        '76 Rickman CR1000 GS1000/1100
                        '78 GS1000C/1100

                        Comment


                          #13
                          FYI plan on attending AMA Vintage Motorcycle Days in Lexington, OH @ MidOhio Sports Car Course, EVERY SUMMER around the 1st weekend of July, Friday swap meet is always fantastic, 20 acres of largest vintage bike swap around, weekend of road races and dirt biking/trials, new bike demos, vintage bike club shows, wall of death motorcycle circus thrill shows... camp there for the full experience. $35 ish a day in advance or get a weekend pass, flat rate for a campsite for the weekend. A bit spendy but nothing like it elsewhere, its AWESOME! Barber Vintage Festival is the more formal version of it in Alabama in Sept/Oct.


                          Here's the road race course, nice layout & some good hills, world class track. This is only about % of the land it's on.


                          Big Rich is in your neck of PA, & Beatnic (mostly on dotheton.com, seldom here) usually has a crew of people who ride from the Pittsburg area to AMA Vintage Days every year, fyi.
                          Last edited by Chuck78; 11-20-2015, 04:12 PM.
                          '77 GS750 920cc heavily modded
                          '97 Kawasaki KDX220R rugged terrain ripper!
                          '99 Kawasaki KDX220R​ rebuild in progress
                          '79 GS425stock
                          PROJECTS:
                          '77 Suzuki PE250 woods racer
                          '77 GS550 740cc major mods
                          '77 GS400 489cc racer build
                          '76 Rickman CR1000 GS1000/1100
                          '78 GS1000C/1100

                          Comment


                            #14
                            Thanks again for all the info Chuck. Looks like you're my only source of help and feedback here and I appreciate it.

                            Spent a good few hours organizing and cleaning the garage. My wife and I have always garaged our vehicles and as excited as I am about this project, my Sierra Denali HD is not sleeping outside.


                            I pulled the air box covers and the air filter. Pretty much toast as expected. With the fuel tank & petcock sorted, I checked the plugs and was getting spark. Sprayed some starting fluid in the carbs and gave her a kick. She fired up but didn't run long. Trying to figure out how to get a video loaded so you can see & hear. Anyway, the engine run/stop button works just fine so the whole control isn't bad, just the start button. Need to go through the wiring and check/clean connections.

                            The fork tubes may need replaced. I'll have to see how they clean up. Yes, single disc on the front.


                            Yes, I'm planning on keeping the wire wheels. I'd like to keep as much of this stock to start until I get all the mechanics in top order. Once it's a reliable driver I'll start adding the custom changes. I have a powder coating shop not far from home that's reasonable. Just need to figure out color scheme before I start degreasing parts and dropping them off.

                            Comment


                              #15
                              If fork tubes are toast, any rust at all on fork seal area, just shop for straight leg (non-leading axle) gs850/1000 37mm forks & GS1100E aluminum triples - the models for straight leg forks, they have much more offset in the triples, leading axle models have very little offset and look like a big rectangular block (the lower triple). Cant go wrong with that setup, fresh oem or Allballs seals, racetech gold valve emulators, and racetech straight rate springs with 10wt or 15wt oil to tune the rebound. Tarozzi fork brace down the road for stiffer cornering &reduction in stiction.

                              Oh, & of course AllBalls conversion needle roller bearings will be needed, so it's a mandatory upgrade from loose bslls, better by far. & GS1000/850 axle & spacers may be needed. Pretty easy swap, really. Dual rotors will bolt up to your hub, just a plastic cover over the unused side currently, hides the unused rotor holes from the elements.

                              A single disc gs1000 fork will work also, but you'll want to do the salty monk brackets for a 310mm cbr rotor for sure, as the stock single 295mm old style big single piston setup is barely enough to stop it if ridden aggressively. 310mm with 2 piston tokico sliding calipers with 3x longer pads will make it sufficient. Dual 296mm cbr rotors and tokico ninja calipers will have far less fade and work much better on twisty hilly roads where you are braking hard and frequently, & on long downhills, the duals really shine.
                              Last edited by Chuck78; 11-21-2015, 07:42 PM.
                              '77 GS750 920cc heavily modded
                              '97 Kawasaki KDX220R rugged terrain ripper!
                              '99 Kawasaki KDX220R​ rebuild in progress
                              '79 GS425stock
                              PROJECTS:
                              '77 Suzuki PE250 woods racer
                              '77 GS550 740cc major mods
                              '77 GS400 489cc racer build
                              '76 Rickman CR1000 GS1000/1100
                              '78 GS1000C/1100

                              Comment

                              Working...
                              X