Announcement

Collapse
No announcement yet.

'85 GS550 Bobber Rescue

Collapse
X
 
  • Filter
  • Time
  • Show
Clear All
new posts

    #16
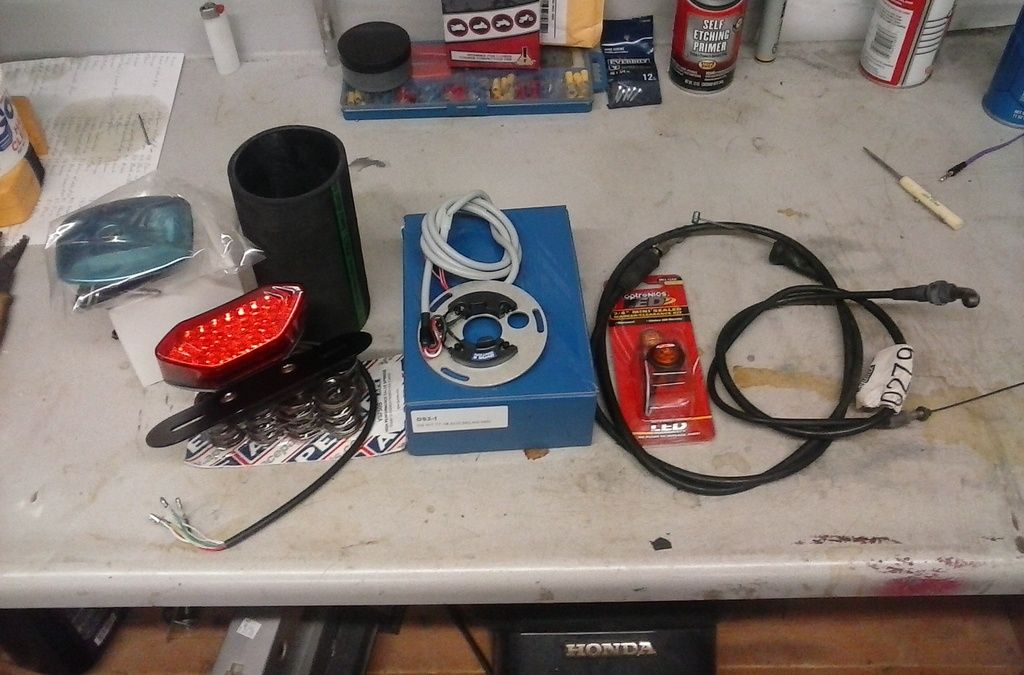
    Only a day later and I got a bunch more toys in the mail! Behold!


    That's a new fuel tank cap, tail/brake/turn combo light, 3" radiator hose to fab up some pod boots, valve springs, Dyna S ignition, clutch cable, blinker indicator, and throttle cable.

    Yes, I ordered the valve springs and then discovered it was probably a pointless gesture. Oh well.

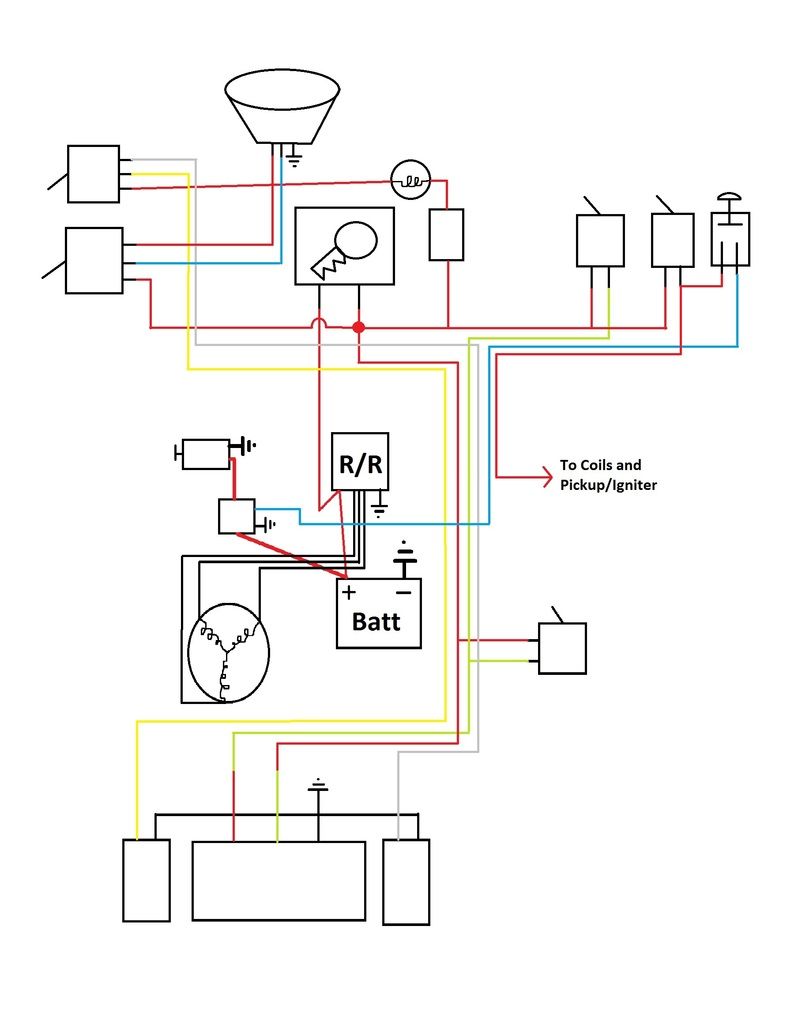
    I didn't get a chance to re-do the harness in an image program, but wanted to share anyways. If anybody spots a problem or has a suggestion, please don't be shy about letting me know.


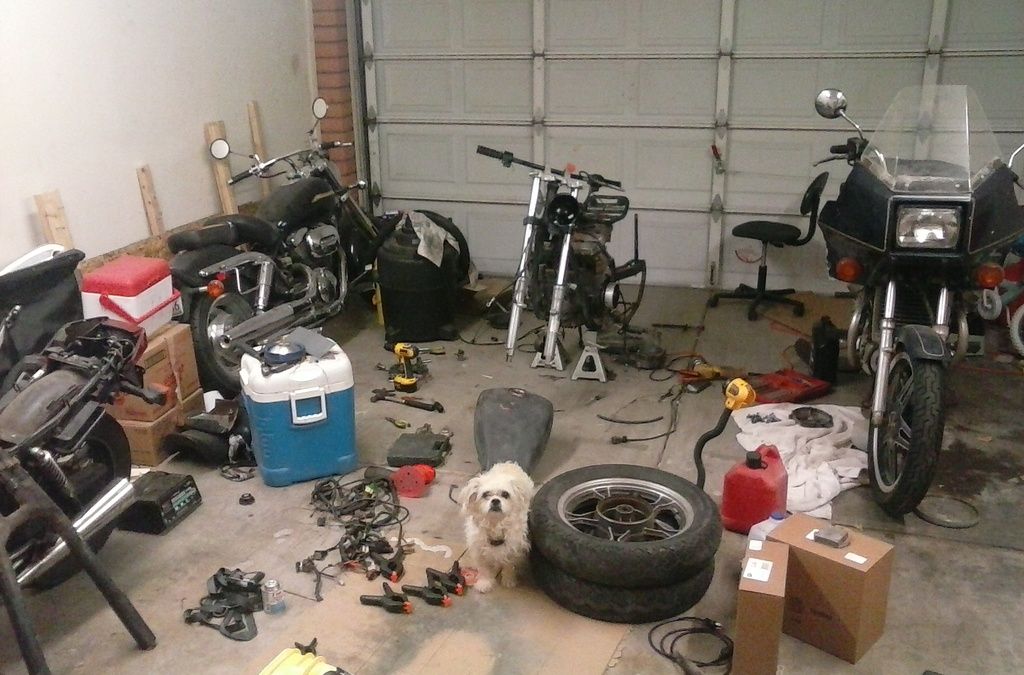
    And just for kicks, here's my garage at the moment.


    No, none of them are road worthy... *sadface*
    From left to right:
    Honda Nighthawk 250 (crashed it a couple weeks ago and bent the forks)
    Suzuki Marauder 750 (carb issues, sitting while my roommate buys it from a mutual friend)
    Suzuki GS550L (the bike this thread is about)
    Honda GL500 Silverwing (frozen clutch)

    Comment


      #17
      Another thing about valve springs, for your edification, not to stick your nose in the dirt...

      The ideal springs to use will be those with the lowest possible tension to keep the valves from floating at high rpms. OEM companies like Suzuki design the springs to do just that, with a little margin to avoid float in the case of an over rev situation.

      Springs like those APE jobbies you bought have a HIGHER than stock spring tension because they are designed for use with high lift cams. Using them on a stock bike will accelerate valve train system wear, the exact opposite of what you should be striving for.
      Ed

      To measure is to know.

      Mikuni O-ring Kits For Sale...https://www.thegsresources.com/_foru...ts#post1703182

      Top Newbie Mistakes thread...http://www.thegsresources.com/_forum...d.php?t=171846

      Carb rebuild tutorial...https://gsarchive.bwringer.com/mtsac...d_Tutorial.pdf

      KZ750E Rebuild Thread...http://www.thegsresources.com/_forum...0-Resurrection

      Comment


        #18
        All the last bits that were in the mail have arrived!


        Bondo (fill a couple dings in the tank. Bought locally, but included because reasons)
        Rubber pads, grommets, and inserts for mounting the gas tank
        Mirror
        Foot pegs
        Float bowl gaskets (the last bit I needed before re-doing the carbs)
        Ignition switch

        Not pictured, but in my hands: mechanical advance. This weekend is going to be busy.

        Nessism, no dirt rubbing was felt. I appreciate the info. I'm going to hold off on installing them until after I've finished up the carbs and eliminated them as a potential cause. If it turns out I didn't need them, I won't be using them.

        Lastly, I finally re-drew the wiring diagram. I was going to do it in GIMP, but forgot it's not installed on my laptop, so I threw it together in MSPaint instead...


        The red and green wires switch at the tail/brake light because the assembly has those as the colors in the pigtail which is opposite what I had been running for the rest of the bike.

        I also probably could have made it a little less confusing with a couple more wire colors, but six colors is what I had, so six colors is what I drew.

        Comment


          #19
          Progress has been annoyingly slow, but that's largely due to being a weekend-only project and occasionally having my weekends taken up with family things (like my daughter's birthday).

          Anyways, I finally got the bulk of the wiring harness done. I've hit a light impasse in that I ran out of heat shrink tubing and can't do the battery/starter solenoid until the batter box is sorted a bit better. What I don't have finished yet...
          -Temporary wiring to test the stock (but likely broken) electronic advance.
          -Tail/turn light assembly connectors.
          -R/R connectors (includes stater to R/R wires)
          -Blinker relay (just need to buy one)
          -Battery wires
          -Starter solenoid (needs ground and battery/starter motor wires)

          Here's the battery box area. The heavy wires for the battery/starter motor will all need trimmed/routed. You can also see where the harness ends behind the battery box. This is where the tail assembly will connect.

          And here is the front end. You can see the ignition switch, plate to hang the blinker relay, and blinker indicator. The mass of wires below/behind the ignition switch is where the controls half and frame half of the wiring harness come together (but aren't currently connected).

          So for the moment I broke into the carbs. A couple of the screws holding the CV boot covers were, nicely put, stuck. I managed to twist an impact bit trying to get them out and was sincerely worried I might crack one of the carb bodies. I didn't want to use heat/penetrating solvents for worry of harming the CV boots. Fortunately they all came loose in the end. However, I've hit another slight impasse. The Dynojet kit is missing a slide weight and they sent me only half the instructions. I'll have to contact them on Monday to get it straightened out.

          Carb with impact driver. Because reasons.

          On the plus side, I got the new tires mounted. Just that has helped the bike look more like a bike. Once the carbs and wiring harness are completely sorted, I'm going to see what kind of magic I can work on that rusty old tank. I was going to do that last, but have decided to get the bike running before pulling the motor out to clean up the frame. I also want to see if the ignition box is functional before putting in the Dynatech.
          Last edited by Guest; 04-25-2016, 12:25 AM.

          Comment


            #20
            A quick attendem to the last post: Getting the fuel needle pistons apart was a bit of a head-scratcher but I finally got it sorted. The service manual says to use long nosed pliers, but the forces I was using (and the pliers teeth) were starting to mar the (30 year old!) plastic. After a bit of thinking I came up with this solution:


            I pulled the holder plate off the CV boot and slipped the piston back into its slot. Then, carefully wedging two flat-head screw drivers between the piston and the plate, I twisted in opposite directions. Worked SO much better than trying to use pliers. And didn't mar the plastic either.

            Here's a couple reference pictures I took before I figured this thing out:


            Comment


              #21
              I applaud your determination. The 550 has its issues, but sort the ignitor out and build on
              1984 GS550ES
              Rebuild in progress....

              1983 GS750ES
              4700 miles

              1978 GS1000E...Resto-mod to come

              Comment


                #22
                While I don't necessarily understand your decision to start with this bike, since there isn't much bike left, I do admire your determination and desire. Ive turned away free bikes that looked much nicer, you must be atleast a little crazy. I will be watching eagerly.

                Comment


                  #23
                  wouldn't have been my choice for a project but I love a good rebuild story so I'll be following this one...

                  we don't do it because it's profitable, we do it because we love bringing dead toys back to life.
                  1979 CBX, AW440 Maico, GS1150EF

                  Comment


                    #24
                    Hey guys! Thanks for the words of encouragement. I hope you enjoy the journey! Sorry about the long silence, life's been busy. Between only having the weekends to do things and having more things than just this bike to do, it's taken me a while to get to some things.

                    First off, a clean and uncluttered work space will help any project beyond words.
                    Something almost exactly NOT like this is ideal.

                    But as you can see in that photo, I finally got around to fixing up the carbs. Full dip and scrub, new o-rings and a Stage 3 jet kit.
                    Made the darn things look practically brand new.

                    I also did some more work on the wiring harness. The R/R is connected. The tail assembly is sorted out. And a couple grounding leads I hadn't done yet are now finished. I haven't whipped up a temp-harness for the old ignitor box, yet and still need to finish cleaning up and mounting the battery box before doing the heavy battery/starter wiring. The battery box has had all the extra tabs and brackets cut off and just needs some dings filled in before painting. With a little luck, it'll be something I can do this week. And then this weekend I can get it actually mounted under the seat.

                    In other news, I did get a "new" work bench almost finished. The particle-board-and-counter-top one I've got is functional, but I wanted something I could pound on without breaking. I just need to put the top together (it's only set there at the moment) and add a lower shelf to help support the legs.
                    Recycled swing/play set wood is good stuff!
                    Last edited by Guest; 05-23-2016, 03:19 AM. Reason: Added some details of completed bits.

                    Comment


                      #25
                      If you like, you can embed images right in your posts by copying and pasting the IMG links in Imageshack. I have a 550es, and it's a fun ride. Best of luck getting it going. It'll be one hell of a redemption story if you can.

                      Like this:


                      and this:

                      Last edited by BigD_83; 05-23-2016, 11:55 AM. Reason: added image
                      '83 GS650G
                      '83 GS550es (didn't like the colours in the 80's, but they've grown on me)

                      Comment


                        #26
                        Yeah, I'm familiar with the IMG tags, but have been making links instead in case there are people on dial-up (still a thing!) reading this. If you guys want me to just post the pics so you don't have to click through to them, I'll start doing that.

                        Anyways, I didn't get to painting the battery box, but did decide to just mount the darn thing. Keep in mind, I haven't welded in almost 20 years (freshman in high school) so I'm quite pleased that I didn't totally screw it up!

                        First I tacked on the starter solenoid mount.

                        After some fiddling with a hammer and my "new" bench vice, the box fit where i wanted it.

                        So I tacked it in place.

                        And trimmed off the extra.

                        A bead along the new edge, some work with a flap wheel and then a shot of primer finished it off.

                        Repeat for the other side, and the battery box is mounted!

                        I then ran and trimmed the battery wires. Right now the battery is in the bike and hooked up, but I have yet to add electrolyte to it. It's just there to make sure I have everything measured at least half right. Tomorrow I'll do the temp wiring for the old ignition box and then see if it will be willing to crank when I push the magic button. Hooray for three day weekends!

                        Oh, and next weekend I'll be worthless on this project because I'm taking my ladyfriend and younger daughter to Comicon. Because we're nerds and that's how we roll.
                        Last edited by Guest; 05-30-2016, 05:05 AM.

                        Comment


                          #27
                          Ok, this thread is too interesting to not follow. Subbed.

                          Originally posted by Latrans View Post
                          (...) If you guys want me to just post the pics so you don't have to click through to them, I'll start doing that.(...)
                          Just embed small clickable thumbnails, so we can decide which pictures to view in full ("view" as in wait for crappy photobucket to serve).

                          What are you going to do about the frame btw? Clean up and leave it in this bobber style? (I do assume so, otherwise you wouldn't have gotten it).
                          #1: 1979 GS 550 EC "Red" – Very first Bike / Overhaul thread        New here? ☛ Read the Top 10 Newbie mistakes thread
                          #2: 1978 GS 550 EC "Blue" – Can't make it a donor / "Rebuild" thread     Manuals (and much more): See Cliff's homepage here
                          #3: 2014 Moto Guzzi V7 II Racer – One needs a runner while wrenching
                          #4: 1980 Moto Guzzi V65C – Something to chill

                          Comment

                          Working...
                          X