Announcement

Collapse
No announcement yet.

Repairing broken aluminium, a brief how-to.

Collapse
X
 
  • Filter
  • Time
  • Show
Clear All
new posts

    Repairing broken aluminium, a brief how-to.

    Now this isn't a perfect write-up as i've had a few speedbumps on the learning curve that i have taken but have gotten this mostly sorted and thought i would post a mini how-to for the benefit of others.

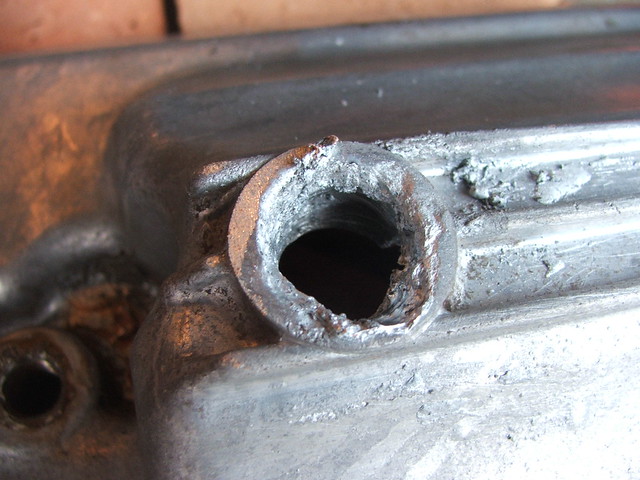
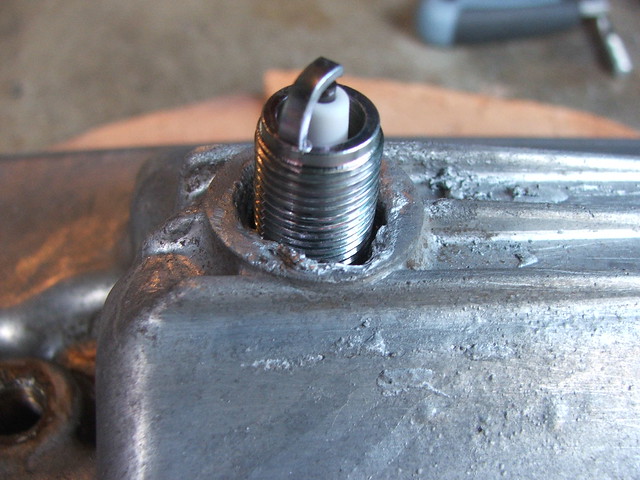
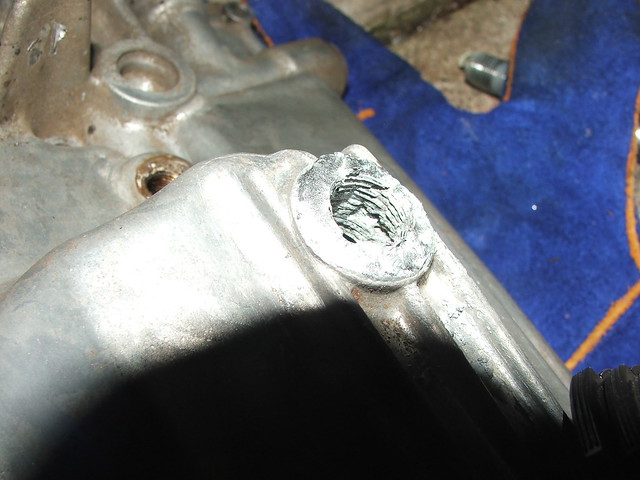
    Basically due to a series of unfortunate events as well as my carelessness i managed to strip the sump plug on my RF900, for the record the part is identical to that in gsx-1100's from 81 though 86 or so.

    After much cocking about, false starts and many headaches i think i have got a relatively conclusive answer to the question of "htf do i fix broken aluminium". I tried helicoils by recoil, unfortunately i wasn't able to tap the required thread and just made more of a mess of things by chewing out what aluminium was left.

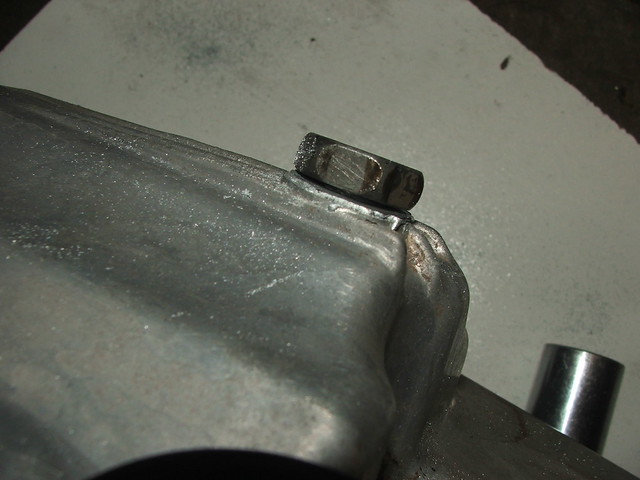
    Left with two options of buying an overpriced replacement part or taking this as an opportunity to do something that isn't commonly done and try and make a propper repair of the mess i had gotten myself into, i elected to have a go at the latter.

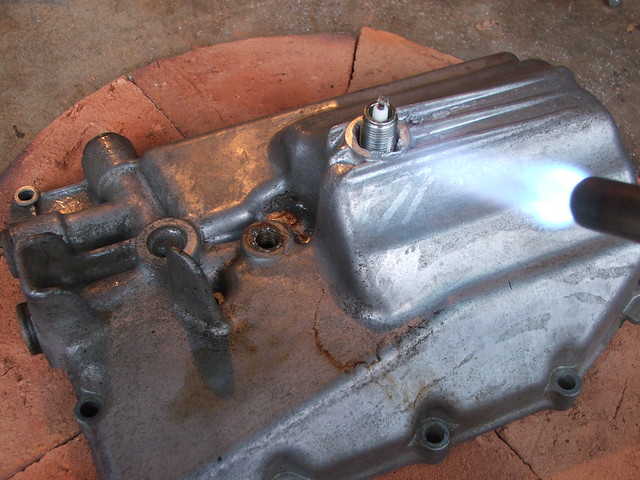
    Here are most of the bits you need, rods, gloves, safety glasses, stainless steel brush (mild steel brushes are no good as the aluminium will steal carbon atoms frmo the mild steel and cause surface purity issues!)

    Substitute a MAPP torch for the propane torch and you have everything you need to kick start this adventure.

    #2
    Yeah, Ive used the HTS 2000 rods to repair everything from stripped threads in a blind hole to holes in a Jon Boat. Stuff works very nice.

    Comment


      #3
      Here are the rods i used, they are called techni-2000 and distributed by a local guy, however there are plenty of other rods out there, HTS-2000, Durafix, ultrabond & alumaloy.

      They are all based on similar base alloys of copper, aluminium and zinc, with zinc being the crucial metal here in that it will bond tightly with both aluminium and a lot of other non ferrite metals. Some like HTS-2000 use up to 9 different metals in their mixture in the search for the perfect compound.

      If you want to find a common manufacturer, then you can go look for bernz-o-matic's AL3 rods, which i have found listed on dozens of websites worldwide. I found this out AFTER making a purchase through a specialist repair company, but the $/value was much higher on the specialist company rather than buying at bunnings (semi equivalent of a walmart's outdoor/diy department)

      Comment


        #4
        Here is the damaged portion of the sump, the camera i used for this photo sucked, so i couldn't get much in the way of a zoom happening.

        Comment


          #5
          The big thing about using these rods is that you need to keep lots of heat in the project being repaired. Standard propane doesn't get hot enough. Mapp gas will work but the heat has to be kept to a constant. The solution I found was to set the project up on "fire" brick. Once the piece is heated the fire brick doesn't allow the heat to leech away but bounces it back into the project.

          I think oxy/acet. would be a much better heat source but it definitely is doable with Mapp.

          Definitely a good method for aluminum repair or project welds.

          Thanks for sharing your experiences.

          cheers,
          Spyug

          Comment


            #6
            The first test run was to put a thread in a spare bike part i had no need for. Preparation consisted of cleaning it to remove any petrolium products left on it.

            Then using a stainless steel brush to clean the area and remove any ozidization prior to performing the repair. It cannot be a mild steel brush as mild steel has a high-ish carbon content, and the aluminium will steal carbon atoms from the mild steel and cause significant quality issues with the joint created. This issue doesn't exist with stainless though.

            Comment


              #7
              For some reason i can only attach one picture per post, hence my adding a lot of posts instead of dropping it into one or two posts in one go.

              Here is the other side of the test run, not quite as pretty, but a quick run with a file would smooth it right out.

              Comment


                #8
                As to propane Vs mapp. It was chalk and cheese with the level of heat i was able to sink into the project.

                I didn't have any heat bricks available so just put it on the most durable surface i could and went at it. As it was a peice that was about a kilo of aluminium i was repairing, it took a fair while to sink enough heat into it to minimise/prevent warping before i went and focussed on the actual repair.

                I didn't rest the job on cement as i was pretty sure i'd cause some sort of damage to it due to residual moisture within the concrete.

                As you can see in this picture i was able to thread the sump plug in on the inside and provide an accurate starting point for the thread to be re-worked.

                Comment


                  #9
                  Here is the finished product.

                  Comment


                    #10
                    From the other side

                    Comment


                      #11
                      Originally posted by mike-s View Post
                      For some reason i can only attach one picture per post, hence my adding a lot of posts instead of dropping it into one or two posts in one go.
                      If you have your pictures hosted on a public site like PhotoBucket or Image Shack, you can copy the IMG link from that site and paste up to TEN of them in one message. Please add a blank line (hit the ENTER key twice) between pictures to give a little border around them.

                      .
                      sigpic
                      mine: 2000 Honda GoldWing GL1500SE and 1980 GS850G'K' "Junior"
                      hers: 1982 GS850GL - "Angel" and 1969 Suzuki T250 Scrambler
                      #1 son: 1986 Yamaha Venture Royale 1300 and 1982 GS650GL "Rat Bagger"
                      #2 son: 1980 GS1000G
                      Family Portrait
                      Siblings and Spouses
                      Mom's first ride
                      Want a copy of my valve adjust spreadsheet for your 2-valve per cylinder engine? Send me an e-mail request (not a PM)
                      (Click on my username in the upper-left corner for e-mail info.)

                      Comment


                        #12
                        Congratulations, but as previously stated I'm real surprised you could get enough heat into the pan cover even with MAPP.

                        Comment


                          #13
                          Now remember this was done with a thread that doesn't fully penetrate the filled part, and also there is the above shown gap in the underside of the part that caused the liquid metal to not be able to pool sufficiently and fully form the thread. I got carrued away with the repair then later realised i had left a couple of inch+ sized blobs of dropped alloy on the drainplate i did the work on top of.

                          This hole will be blocked with a looped bit of brass or cut to suit piece of steel/aluminium when i redo it this weekend and hopefully enough alloy will be able to pool to fully create the thread.

                          As to getting enough thread to go all the way through, as suzuki in their infinite wisdom decided to use a thread size NOONE else uses (the 6 bolt/fastener shops i spoke to can attest to this) for bolts. I have found a sollution. Spark plugs, yes that right, if you put a suzuki sump plug next to a 14mm wide spark plug, you will find that the thread pitch is exactly the same and consequently I will be able to use a brand new spark plug for a Hilux/Tacoma with it's rediculously long length to fully form a thread the entire way through when i redo it on Sunday.

                          The job is do-able, i just haven't quite been able to complete it as i got the spark plug and realised about the leak after i had my first attempt at the repair.

                          Comment


                            #14
                            As to the hosting, to be honest i've posted this in a few places and never bothered with putting the pics on my photobucket account as i did a lot of the initial submission late at night last night. It was just plain easier to do it this way.... for now.

                            For the curious i've also got a couple of videos of the process.

                            The test run with the unused rear-set. (link)

                            The actual repair (link)

                            As to getting sufficient heat into it? i think the fact i used the extremely powerful torch (bernz-o-matic ts8000) along with MAPP gas were both factors. MAPP burns 400'C hotter than propane and the "swirl flame" outlet of the ts8000 allows the entire flame to get to a high temperature as opposed to just having parts of the flame at sufficient heat levels, and others that aren't as with standard & pencil torch heads.

                            Comment


                              #15
                              Ok, here's the latest and hopefully last update in this "adventure". Sorry about the delay, have been working as well as waiting for all the rain to go away as doing this kind of thing inside near two partly fuelled bikes and a collection of random aerosol cans is not the smartest thing i could be doing.

                              Video:


                              I removed the majority of the allow as a test run showed that even with the unthreaded part filed out, the remaining thread was flattening out the fresh thread of the new spark plug. Not exactly ideal, so it was removed.


                              By fitting a deep spark plug I was able to make 100% sure that i was going to have enough thread there to be able to have a thread the entire way through. At least that was the plan. Also as a side note, a spark plug seems to be the only 14mm threaded object i could find with the correct pitch for this (1.25 for the curious).


                              Just showing the underside of the spark plug fitment to the oil pan in preparation for the repair


                              Hopefully this does enough of a good enough job to stop a leak springing up.


                              Thanks for the suggestions of heat bricks, made a hell of a huge difference to how quickly the job heated up.


                              Unfortunately the thread job was more crap and less spectacular, but the top 3-4mm of thread at each end is pretty solid, meaning it should hold provided i smoothed the face off sufficiently well.


                              I'll be checking in the morning, but I am hoping that this will do a good enough job for what i am after.
                              It was a long learning process even just to get this as far as it has come.


                              more pics can be seen here

                              Comment

                              Working...
                              X