.png "Powered by vBulletin")
6 gallons of white vinegar into my gas tank to hopefully loose the small amount of surface rust in there. When/if this works I'll install the new petcock and gas gauge seal....still looking for a new seal for the oem gas cap that I just polished the top out.{had a few minor scrapes and dings from the PO...looks like it was dropped a few times}
-
-
Played with handebar adjustment - aftermarket clip on type- I hated the factory set. For years, they have hit the beat up, dented tank at full lock, which I wasn't very concerned about due to the tank's condition. They were in a position I liked, so it was good enough. The end game is to eventually put on the new gas tank I've had for around 10 years now.
I've dragged my feet for a couple of reasons.
With the mismatched panels, putting it on would have been like putting a brand new hood on an old sunbaked and faded car. I now have a full set of decent 1985 blue parts....
To place the handlebars in a position that didn't hit the tank would require either a remote reservoir master cylinder (acceptable, but requires $), or put them in a position I didn't like- not acceptable. Hopefully and happily I may have disproved this.
The Telefilx clip on are highly adjustable so I spent some time fiddling with them and I think I found a spot that clears the tank, feels good, and allows the brake and clutch levers to be in a likeable position.
Of course I need to ride it before I claim the win, but I think it will be good.
of course there is a, catch.... at the end I realized that the choke assembly on the handlebar control cluster was removed ( the lever broke years ago) so if I replace the lever and reinstall the mechanism it may hit the tank after all.. or I can just leave it off. At this point I'm not even sure where the parts are.
2017-02-26 22.38.57.jpgsigpic
When consulting the magic 8 ball for advice, one must first ask it "will your answers be accurate?"
Glen
-85 1150 es - Plus size supermodel.
-Rusty old scooter.
Other things I like to photograph.....instagram.com/gs_junkie
https://www.instagram.com/glen_brenner/
https://www.flickr.com/photos/152267...7713345317771/Comment
-
Although not completely mounted yet, the forks are now back on the bike:
 Cowboy Up or Quit. - Run Free Lou and Rest in Peace
1981 GS550T - My First
1981 GS550L - My Eldest Daughter's - Now Sold
2007 GSF1250SA Bandit - My touring bike
Sit tall in the saddle Hold your head up high
Keep your eyes fixed where the trail meets the sky and live like you ain't afraid to die
and don't be scared, just enjoy your ride - Chris Ledoux, "The Ride"Comment
-
As I suspected. I found the choke mechanism, test fit it, and it hits the tank. It will be left off for now.
Truth be told the tank is on the bottom of the list. I assume I'll need gaskets, etc for the fuel sender, petcock, plus I need the rubber mounting pad and possibly the rubber mounting bushings.
Next up is wheels / tires.sigpic
When consulting the magic 8 ball for advice, one must first ask it "will your answers be accurate?"
Glen
-85 1150 es - Plus size supermodel.
-Rusty old scooter.
Other things I like to photograph.....instagram.com/gs_junkie
https://www.instagram.com/glen_brenner/
https://www.flickr.com/photos/152267...7713345317771/Comment
-
Just curious if you found the joist hanger and laser level to be useful in this project, and if you had any pointers.Originally posted by cowboyup3371 View PostRoger
Current rides
1983 GS 850G
2003 FJR 1300A
 Gone but not forgotten 1985 Rebel 250, 1991 XT225, 2004 KLR650, 1981 GS850G, 1982 GS1100GL, 2002 DL1000, 2005 KLR650, 2003 KLX400
Comment
-
Sure did but I can't remember why for now.
actually I have yet to figure out why they are there unless I started to put them away and forgot to walk the final few stepsCowboy Up or Quit. - Run Free Lou and Rest in Peace
1981 GS550T - My First
1981 GS550L - My Eldest Daughter's - Now Sold
2007 GSF1250SA Bandit - My touring bike
Sit tall in the saddle Hold your head up high
Keep your eyes fixed where the trail meets the sky and live like you ain't afraid to die
and don't be scared, just enjoy your ride - Chris Ledoux, "The Ride"Comment
-
Put a gel pad in my 81 GS450EX seat. PHENOMENAL difference. 5/8" gel pad, factory seat cover held in by the "shark teeth" under the seat, no staples, foam easy to cut and level... a little spray glue, smoothing foam and voila... a comfy seat... did not need to cut the gel pad at all, fit perfect. total work time including clean up was 1 1/2 hours... elapsed time about 14 hours.
Gel-pad - ebay $40
flex seal liquid - $15 target/walmart. - as seen on TV isle ** ill explain
Spray Glue - homedepot $12
using auto upholstery tools I already had, pried up the shark teeth and easily removed cover ( after rails were off ) drew outline of gel pad on foam, set depth of razor, cut along outline (inside line) drew a grid on area to be removed, cut grid lines, cut out grid area. At this point I knew I would go too deep on the cut and it would be uneven for the gel pad... I had planned just in case I cut too deep or couldn't get foam even. I then poured the flex-seal liquid into the foam cavity I cut out...just enough to level it out... then walked away for the night and let the flex seal dry. next day, measured depth... was spot on, spray glue on seat foam and gel pad then put gel pad in. spray glue on seat/pad and smoothing foam and then lay the foam over the area. The supplied pad pretty much covered the whole seat. I let that dry for about 30 mins then slipped on the factory cover.. went right on and using a mallet bent the shark teeth back in holding the cover. You can't tell....unless you're riding. Can't really complain, seat feels great.Comment
-
Did a compression test... definitely due for a valve adjustment. 110 - 120 - 100 - 100 from left to right when sitting on bike. I'll be measuring clearances this week and joining the Shim Club.Comment
-
Should be a keeper or go in Tips and Tricks.Originally posted by Blue Falcon View Postsigpic[Tom]
“The greatest service this country could render the rest of the world would be to put its own house in order and to make of American civilization an example of decency, humanity, and societal success from which others could derive whatever they might find useful to their own purposes.” George KennanComment
-
Wheel off, tire off. I forgot all about the fact the wheel came from a salvage yard, hence the writing inside.
definitely needs some attention, particularly at the bead.
http://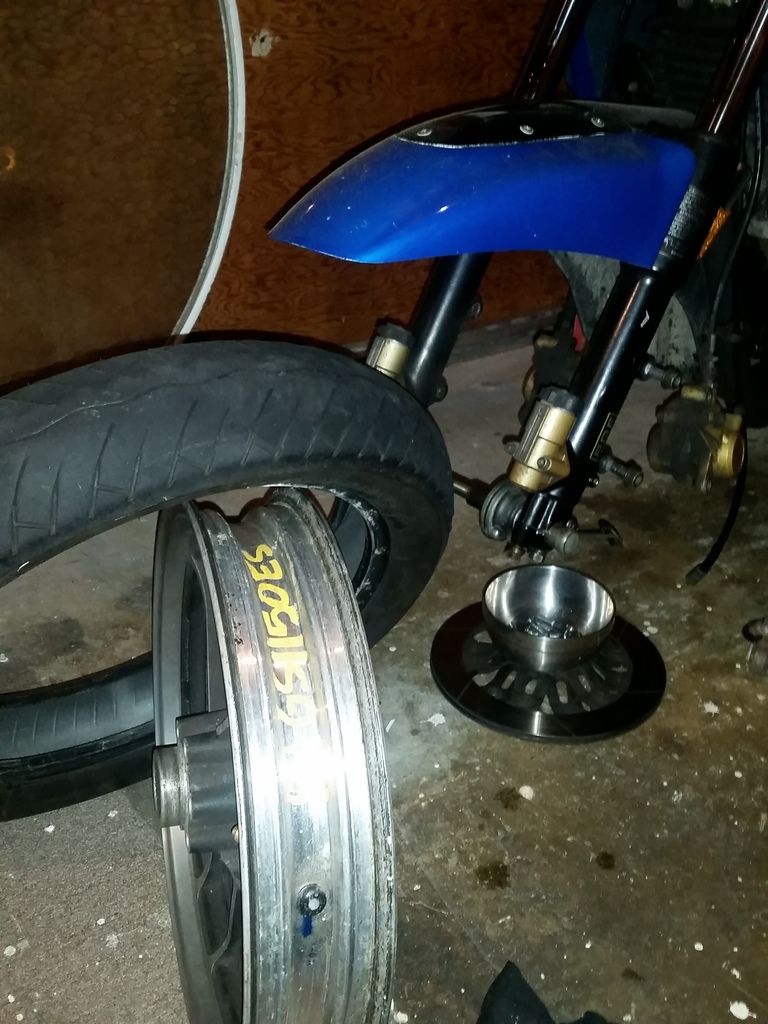 sigpic
When consulting the magic 8 ball for advice, one must first ask it "will your answers be accurate?"
Glen
-85 1150 es - Plus size supermodel.
-Rusty old scooter.
Other things I like to photograph.....instagram.com/gs_junkie
https://www.instagram.com/glen_brenner/
https://www.flickr.com/photos/152267...7713345317771/Comment
-
Salvage yard in NJ with bike parts???Comment
-
It was a long time ago, and it was from A&J Cycle Salvage near Philly. I just looked them up. It seems that they are still open.
We also used to go to Barrys Cycle Salvage in Montclair. Not sure if he is open anymore.Last edited by dorkburger; 03-01-2017, 07:42 AM.sigpic
When consulting the magic 8 ball for advice, one must first ask it "will your answers be accurate?"
Glen
-85 1150 es - Plus size supermodel.
-Rusty old scooter.
Other things I like to photograph.....instagram.com/gs_junkie
https://www.instagram.com/glen_brenner/
https://www.flickr.com/photos/152267...7713345317771/Comment
-
Wheel is cleaned up. I was hoping to take advantage of the warm weather and paint it tonight, but there wasn't enough time. Cleaning years of brown film from the little hard to reach spots, especially around the hub, took time. Im using the VHT epoxy paint that Steve recommended. I did a little test spot. It covered the black nicely, but the silver showed thru, and ran. I wiped it off before it dried.... Light coats will be the way to go, which the can states - 2 light then a medium wet coat.sigpic
When consulting the magic 8 ball for advice, one must first ask it "will your answers be accurate?"
Glen
-85 1150 es - Plus size supermodel.
-Rusty old scooter.
Other things I like to photograph.....instagram.com/gs_junkie
https://www.instagram.com/glen_brenner/
https://www.flickr.com/photos/152267...7713345317771/Comment
-
Painted the wheel last night. I'm not overjoyed with the result, but it's passable. Despite cleaning it thoroughly, my applying light coats at the start, and allowing time between coats, there are a couple of spots on the corners of the silver parts of the spokes that the paint did not stick.
It definitely looked better today after some curing time.
Picture looks good, decent in real life.
20170303_202123.jpgsigpic
When consulting the magic 8 ball for advice, one must first ask it "will your answers be accurate?"
Glen
-85 1150 es - Plus size supermodel.
-Rusty old scooter.
Other things I like to photograph.....instagram.com/gs_junkie
https://www.instagram.com/glen_brenner/
https://www.flickr.com/photos/152267...7713345317771/Comment
-
cleaned carbs again...third time in two months. getting an on/off valve and an in-line filter tomorrow. These carbs are sensitive... the float needle little screen was boogered up on both carbs and I had a couple jet ports that needed a push through... I've been using the non-ethanol gas from WaWa. Cleaned them about a month ago and everything was fine. But ya, filter and on/off valve.... tired of pumpin out gas tank and cleaning carbs.Comment


Comment