S
saltcitytattoo
Guest
so for gs1100ez bs34ss carbs ss bolts you need are 32 of m5 x 16, 8 of m5 x 12, and 8 of m6 x 16
Required reading for all forum users!!!
Welcome!
Register to access the full functionality of the GSResources forum. Until you register and activate your account you will not have full forum access, nor will you be able to post or reply to messages.
A note to new registrants...
All new forum registrations must be activated via email before you have full access to the forum.
A Special Note about Email accounts!
DO NOT SIGN UP USING hotmail, outlook, gmx, sbcglobal, att, bellsouth or email.com. They delete our forum signup emails.
A note to old forum members...
I receive numerous requests from people who can no longer log in because their accounts were deleted. As mentioned in the forum FAQ, user accounts are deleted if you haven't logged in for the past 6 months. If you can't log in, then create a new forum account. If you don't get an error message, then check your email account for an activation message. If you get a message stating that the email address is already in use, then your account still exists so follow the instructions in the forum FAQ for resetting your password.
Have you forgotten your password or have a new email address? Then read the forum FAQ for details on how to reset it.
Any email requests for "can't log in anymore" problems or "lost my password" problems will be deleted. Read the forum FAQ and follow the instructions there - that's what we have one for...
If you are a returning visitor who never received your confirmation email, then odds are your email provider is blockinig emails from our server. The only thing that can be done to get around this is you will have to try creating another forum account using an email address from another domain.
If you are a returning visitor to the forum and can't log in using your old forum name and password but used to be able to then chances are your account is deleted. Purges of the databases are done regularly. You will have to create a new forum account and you should be all set.
so for gs1100ez bs34ss carbs ss bolts you need are 32 of m5 x 16, 8 of m5 x 12, and 8 of m6 x 16

My comments:
Page 2: BS 30 SS (30MM) carbs are used by GS 250 & 400 twin bikes.
Page 4: Maybe take a macro shot of the JIS screwdriver/screw inset on the page showing how close the fit should be.
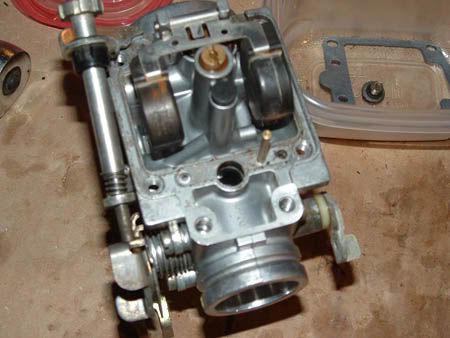
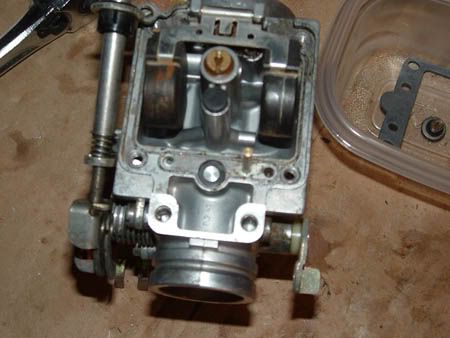
Page 40: Maybe mention that the cross drilled holes need to be free and clear of crud as they are important for aeration of fuel.
Also perhaps consider looking into showing where each pathway goes. When fuel goes in the pilot jet, it comes out at the pilot needle taper. Same goes for the pilot air and the main emulsion air jet as they are pretty important too.
Other than that, I can't think of anything. It looks pretty thorough to me.
Regarding all the various passages...guess that could be added but where do I stop?
Have a new version with (most of) the suggested improvements. Compressed it a little too.
Will post the new link as soon as the new file is uploaded.
EDIT: deleted the old file and uploaded the new one... (see above)
Please keep the suggestions coming.
Slide 6 Vise-Grips not Vice grips. I think the latter may be handcuffs.

Excellent work, nothing less than I would expect from you, truly spectacular.
A couple minor notes;
1. The old tutorial showed the use of a special tool, a pick made from a wooden stick and a piece of wire used to probe the small holes in carb body as well as the needle jet emulsion tubes and pilot jets. I still find this invaluable when cleaning carbs to ensure that these passages are spotless.
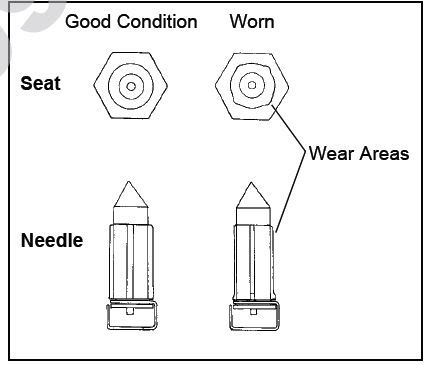
2. A little discussion of the fuel valve operation, at least checking the spring rebound of the plunger and the seat for wear may be warranted. I know these are small details, but most users are only going to use one guide for reference so they may not check this out.
3. It may be important to note which jets are fully seated and which are adjustable. One would hope they paid attention to this detail when disassembling carbs but sometimes carbs were a previous owners problem.
Thanks for updating this. I predict it will downloaded worldwide.


")