Announcement

Collapse
No announcement yet.

Pulled the carbs off the 81 850G today.

Collapse
X
 
  • Filter
  • Time
  • Show
Clear All
new posts

    #16
    got the carbs apart. I'm going to have trouble with left two carbs. They are nasty and the pilot jets are stuck. I'm soaking them with PB Blaster right now. I'll let them soak then try again using my heat gun as well. Got all of the other jets soaking in white vinegar and they are cleaning up nicely after only a couple of hours.

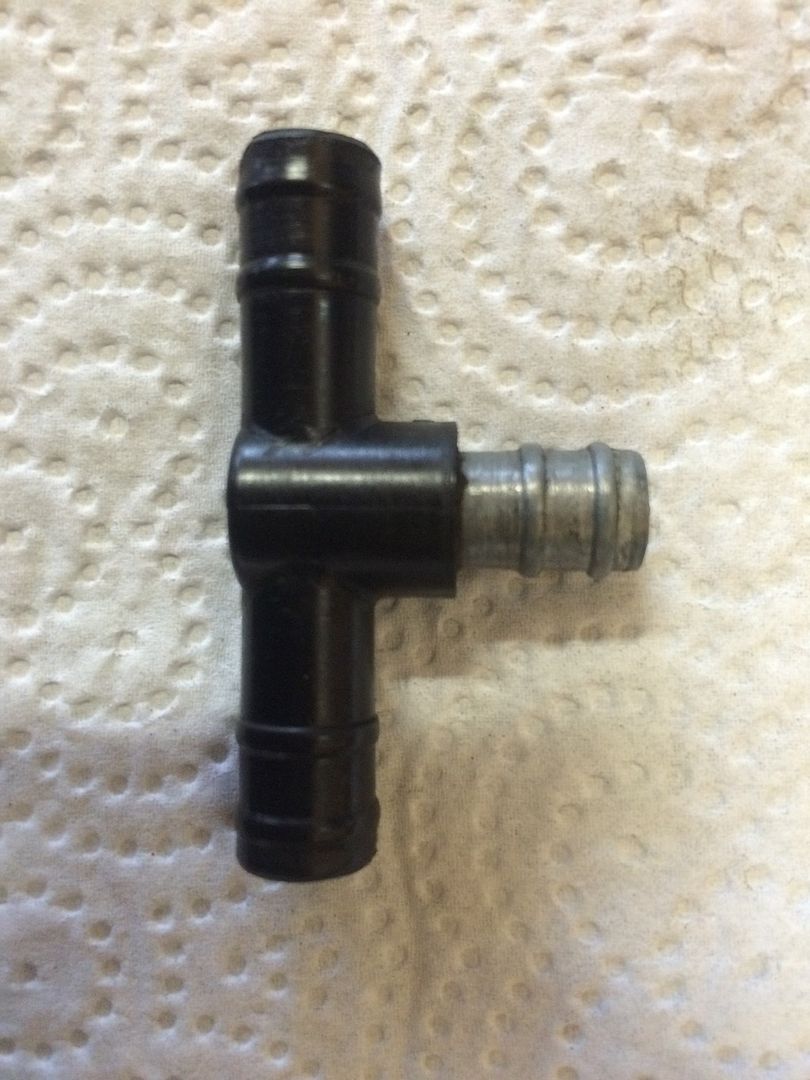
    I have one more question about the fuel inlet. It doesn't look to me like there are replaceable O-rings. Looks like rubber coated metal Tee fitting. Is that correct?
    Comment


      #17
      Humm, yes, you got the rubber coated Tee fitting. No O-rings. It looks to be in good condition anyway. Soak it in gasoline for a few hours before you go to put it back in. The gas will swell the rubber and form a good fit inside the carb bodies.
      Ed

      To measure is to know.

      Mikuni O-ring Kits For Sale...https://www.thegsresources.com/_foru...ts#post1703182

      Top Newbie Mistakes thread...http://www.thegsresources.com/_forum...d.php?t=171846

      Carb rebuild tutorial...https://gsarchive.bwringer.com/mtsac...d_Tutorial.pdf

      KZ750E Rebuild Thread...http://www.thegsresources.com/_forum...0-Resurrection

      Comment


        #18
        Teflon tape for gas application is your friend here. One wrap, no leakage.
        Larry

        '79 GS 1000E
        '93 Honda ST 1100 SOLD-- now residing in Arizona.
        '18 Triumph Tiger 800 (gone too soon)
        '19 Triumph Tiger 800 Christmas 2018 to me from me.
        '01 BMW R1100RL project purchased from a friend, now for sale.

        Comment


          #19
          Originally posted by jdvorchak View Post
          ...the pilot jets are stuck.
          Propane torch or the heat gun will help here, don't be afraid to get it really hot around that post they are seated in. Make sure you have the correct sized screwdriver, or modify one to fit since it sounds like you have 2 of them out already. The brass is really brittle and there is not much "meat" around the slots on the pilot jets, so if you strip them you'll have to get a set of left handed drill bits and work them out - don't be tempted to use EZ-outs for this. I've had several that were stripped out and the drill bits work great. I

          've had more trouble with the blasted air/fuel mix screws than the pilots, had to cut a notch out with the dremel to get 3 of the 4 out on a set of carbs that sat for 23 years recently. Patience, heat and PB Blaster works good, but my favorite is a 50/50 mix of good hardware store or lab grade acetone and ATF to break bolts and jets free. Soak, heat, soak, heat and try again. If you have trouble with the air/fuel screws, make sure you turn them in and out as you work them out - especially if the metal caps are already removed, because the fine aluminum threads will be caked with grime and you'll strip the SS screw head. When you do get them out, don't lose the tiny little washer or spring and be sure to replace the o rings. All of them - including the ones behind the intake boots.

          Also, replace all the screws with SS allen head bolts while you have them out - especially the ones on the intake boots.
          ----------------------------------------------------------------
          2014 BMW F800GSA | 1981 GS850GX | 1982 GS750T (now the son-in-laws) | 1983 GS750ES | 1983 Honda V45 Magna (needs some love) | 1980 Yamaha GT80 and LB80 "Chappy" | 1973 and 1975 Honda XL250 projects

          Comment


            #20
            thanks for the advice on heat and PB. They are soaking overnight with PB in on top of them. I'll try heat tomorrow and more soaking if needed. I know that new jets are available from places like Bikebandit and partszilla so if I tear them up I'll just buy new ones. I do have a good set of left hand drill bits and easy outs. Came in a kit. Using left hand bits or easy out would be my last resort. They are plugged solid and have to come out of there. I haven't gotten around to the mixture screws and yes they are uncapped and dirty in on top of them. Once I get the pilot jets and mixture screws out I can start to clean these carbs in earnest. These aren't the worst I've worked on but certainly not the easiest either! I'm guessing that they have been sitting with fuel in the tank and carbs for 10+ years or longer. Right side two carbs aren't in bad shape at all but #1 and #2 are really crusted up. I'm pretty sure I'll have to boil these carb bodies for a while to get the internal passages clean. I usually use boiling distilled water and some Dawn dish washing detergent for the "dip". I also hear that Pine Sol works well but has a tendency to attack the aluminum and turn it black.

            Comment


              #21
              Make sure you have a screwdriver that tightly fits the slot of the pilot jet or you will strip them out. Heat and PB Blaster is good.

              I don't understand why anyone would use anything other than carb dip to clean the parts. The formulas are created by chemists for a specific purpose, and they work well. Dish washing liquid and Pine Sol are for the kitchen, not the garage.
              Ed

              To measure is to know.

              Mikuni O-ring Kits For Sale...https://www.thegsresources.com/_foru...ts#post1703182

              Top Newbie Mistakes thread...http://www.thegsresources.com/_forum...d.php?t=171846

              Carb rebuild tutorial...https://gsarchive.bwringer.com/mtsac...d_Tutorial.pdf

              KZ750E Rebuild Thread...http://www.thegsresources.com/_forum...0-Resurrection

              Comment


                #22
                Can you suggest a good carb dip? Last time I bought one it was next to worthless. I think that was B12 from autozone but don't really remember. That was probably 20 years ago. Haven't been able to get the good stuff since the 1970's. Loved that smell and it would clean a carb in a couple of hours.

                Comment


                  #23
                  Barrymans....
                  Rob
                  1983 1100ES, 98' ST1100, 02' DR-Z400E and a few other 'bits and pieces'
                  Are you on the GSR Google Earth Map yet? http://www.thegsresources.com/_forum...d.php?t=170533

                  Comment


                    #24
                    In the gallon can with the basket
                    Cowboy Up or Quit. - Run Free Lou and Rest in Peace

                    1981 GS550T - My First
                    1981 GS550L - My Eldest Daughter's - Now Sold
                    2007 GSF1250SA Bandit - My touring bike

                    Sit tall in the saddle Hold your head up high
                    Keep your eyes fixed where the trail meets the sky and live like you ain't afraid to die
                    and don't be scared, just enjoy your ride - Chris Ledoux, "The Ride"

                    Comment


                      #25
                      And ignore the directions.

                      The directions say to dip "for 15 to 30 minutes". With the reduced-strength formula for the solvents, we have found that "15 to 30 HOURS" is more appropriate and will not damage any of the metallic parts of your carbs.
                      I ride many bikes.
                      Some are even Suzukis. :D

                      Comment


                        #26
                        Some guys dip for 24 hours but I recommend dipping the minimum time necessary to get the carbs clean, typically over night. I've seen carb bodies turn dark from extended dip times and that's something to be avoided. Berrymans dip is decent enough, although it's no where the same as it used to be. My favorite carb dip from days gone past was made by Mckays. That stuff was nasty. Worked great!
                        Ed

                        To measure is to know.

                        Mikuni O-ring Kits For Sale...https://www.thegsresources.com/_foru...ts#post1703182

                        Top Newbie Mistakes thread...http://www.thegsresources.com/_forum...d.php?t=171846

                        Carb rebuild tutorial...https://gsarchive.bwringer.com/mtsac...d_Tutorial.pdf

                        KZ750E Rebuild Thread...http://www.thegsresources.com/_forum...0-Resurrection

                        Comment


                          #27
                          Just went and bought some Berrymans chem-dip. Got some parts soaking now.

                          Comment


                            #28
                            Cool. Make sure you only go OEM Mikuni on replacements.

                            I bought the $80 Harbor Freight Ultrasonic cleaner a few years ago and I'll dip in the can/basket for ~24 hours condition depending, rinse, then hit them for 15-20 minutes in the heated ultrasonic cleaner filled with Simple Green HD (I've used Pinesol as well but prefer the HD) and 2 carb bodies barely fit at a time and I rotate them when the timer stops, I place the jets, choke components, springs, valve and seats all in a small mason jar with carb cleaner in the jar and it cleans them right up. Like I said I had a set that sat for 23 years and they were plugged solid. The berrymans softened the crud and the ultrasonic blasted them open. I still follow through with wire or a safety pin and make sure I can see light through the openings, then I reassemble squirt carb cleaner in the jets then follow up with a fins blast of compressed air.

                            Make sure you lightly oil the o-rings when you assemble them, that way they don't bind up or get pinched.
                            ----------------------------------------------------------------
                            2014 BMW F800GSA | 1981 GS850GX | 1982 GS750T (now the son-in-laws) | 1983 GS750ES | 1983 Honda V45 Magna (needs some love) | 1980 Yamaha GT80 and LB80 "Chappy" | 1973 and 1975 Honda XL250 projects

                            Comment


                              #29
                              Thanks for the reminder about OEM parts. There are times to go cheap with aftermarket but inside a carb is not one of those times. I would never consider aftermarket unless there was no way to get the OEM part.

                              Comment


                                #30
                                100% agree, I'll buy aftermarket parts for a lot of things but this is one area I wouldn't.

                                Keep us posts on your progress - and post more pics if you can. We love pics!
                                ----------------------------------------------------------------
                                2014 BMW F800GSA | 1981 GS850GX | 1982 GS750T (now the son-in-laws) | 1983 GS750ES | 1983 Honda V45 Magna (needs some love) | 1980 Yamaha GT80 and LB80 "Chappy" | 1973 and 1975 Honda XL250 projects

                                Comment

                                Working...
                                X