Announcement

Collapse
No announcement yet.

1979 GS550L Return To The Road

Collapse
X
 
  • Filter
  • Time
  • Show
Clear All
new posts

    1979 GS550L Return To The Road

    Hi All!

    You can read about me/the bike here.

    Here is what I have accomplished so far:
    New battery installed.
    Changed the oil and filter. (*1)
    Replaced all the turn signals with some aftermarket ones. (One was broken. Not sure how. So I replaced all of them.)
    ALL THE LIGHTS WORK! Blink as they should. Turn on. Switch from low to hi and vice versa. YAY!!!

    Onto getting the bike started....

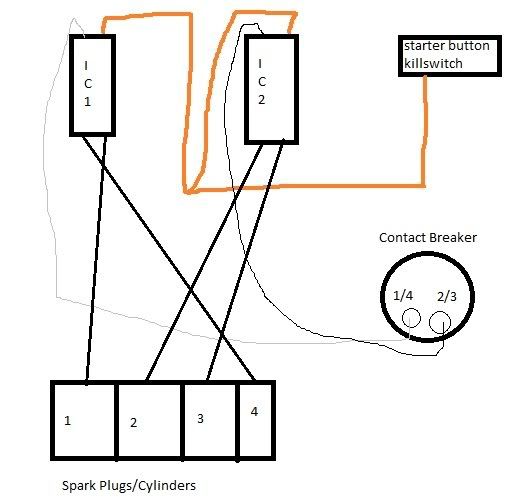
    I know the starter button and motor works because I can hear it crank and the engine spin with the oil cap removed. I'll take this as a good sign. Now its time to check the 3 things you need for an engine to run:
    • Fuel
    • Spark
    • Air

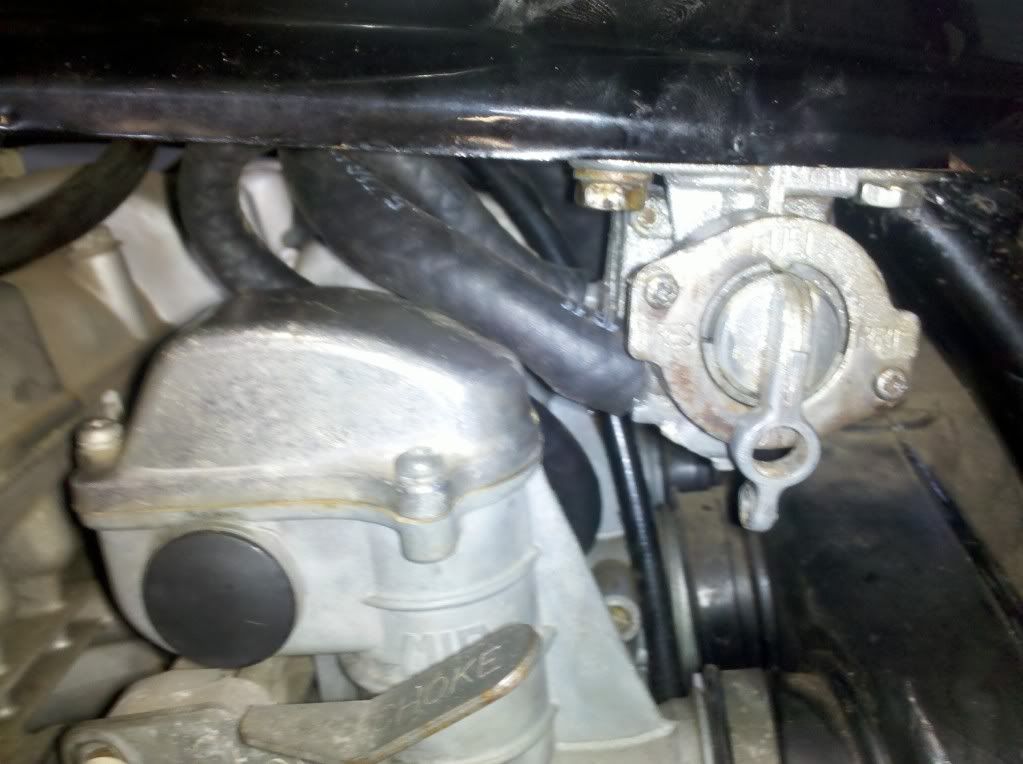
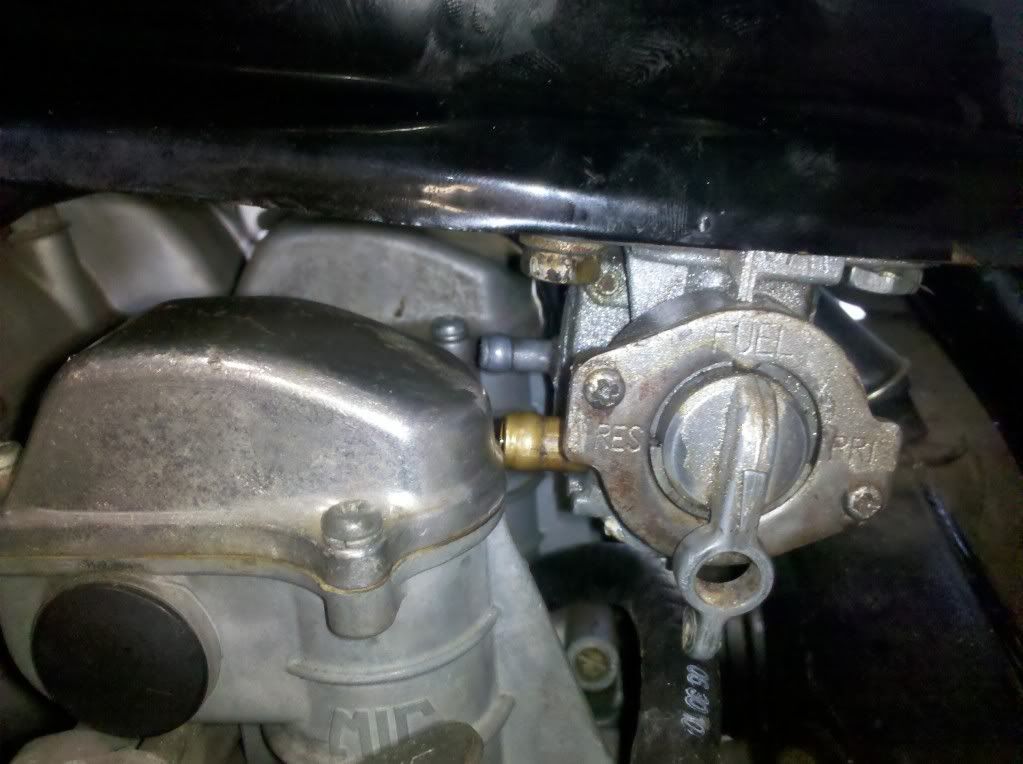
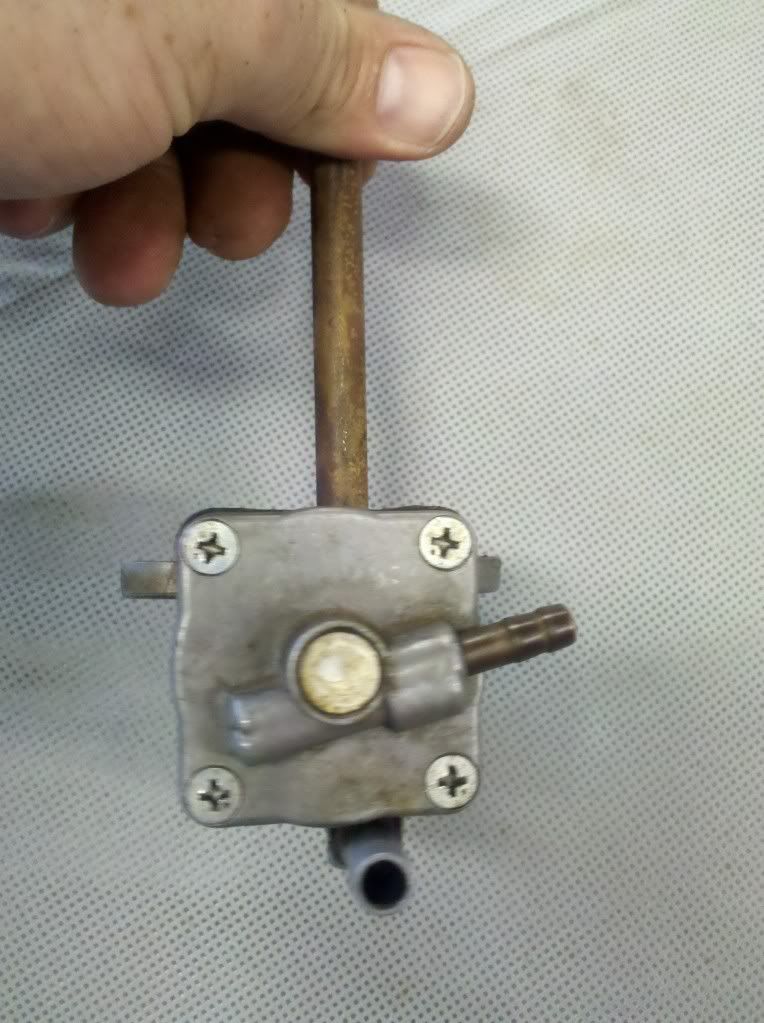
    FUEL .... I removed the old gas that was in the tank. The inside of the tank is clean. I was very pleasantly surprised. So I've added some new gas back in. When I get home I'll get to see if the petcock/fuel tap will give up the precious cargo behind its filtered wall. My way of testing this is to turn the petcock to PRIME and some fuel should come out. If not, petcock is bad I would assume. QUESTION 1 - Would you recommend a rebuild kit for the petcock or just replace?
    Once I know fuel is flowing to the carbs or able to flow, I will clean the bejesus out of the carbs; maybe even rebuild them; per the instructions providing from this site. QUESTION 2 - I have Mikuni VM22SS carbs, correct? My manual isn't 100% clear to me. (EDIT - Nevermind. I found the answer in another thread on the site.)


    SPARK .... I have no spark coming out of #1. I know this because I could not see a spark when I pulled the plug, laid it on the engine and hit the started button. (Did not test the rest, yet. but will tonight.) NOW I do have power going to both coils but nothing nothing coming out of the cable, (per using a test light). I have not checked the points gap. It's been forever since I've messed with points, but will do this when I get home.(*2) HOPEFULLY, the wife won't have a million little honey-do's for me.


    AIR .... I have no idea how dirty the air intake is. Once I know there is spark and the carbs are receiving fuel, I'll look at the air intake because I'll have to remove it in order to clean the bejesus out of the carbs.


    So you know this thread will be updated by me as I have time and $$ you throw at the bike. So be patient. Also, thank you in advance for you input, words of encouragement and/or insults.

    CHEERS!
    Scrumdown


    *1 - After changing the oil, I was putting the the nuts back on to hold the filter cover on. I still had the old oil catcher underneath, when one of the nuts slipped out of my hands landed in the old catcher and rolled into the tank compartment. UGH! I went got my telescopic magnetic pick up tool and rotated around until I felt it hit the nut. Now I don't have to use a filter funnel to drain the catcher basin. YAY ME!

    BTW - 2 of the 3 had 10mm fine threaded nuts and the 3rd was a 11mm course thread which I didn't realize at the time of removal and luckily enough I had a spare 10mm nut in my jar or spare screws, nuts and bolts. YAY ME!

    *2 Purchasing new feeler gauges today. Cannot find my other set, which was old as dirt, and I could barely read the measurements. So its a good thing.
    Last edited by Guest; 08-08-2011, 03:56 PM.

    #2
    According to many replacing the petcock is the only 100% sure way to have it work right. Some folks have no problem with the rebuild kits, but some do. Z-1 Enterprises has a great overview of your options in their reference guide: http://www.z1enterprises.com/reference/petcock.aspx

    Also, did you take the petcock off and look at the screen? Things can be dirty down there and still look clean on the top by the fuel filler. If it flows fuel on Prime then at least you can test the bike, but that doesn't guarantee that it flows fuel on the other two settings as it's vacuum activated, you have to apply vacuum to the hose to test those.
    "Men will never be free until Mark learns to do The Twist."

    -Denis D'shaker

    79 GS750N

    Comment


      #3
      Generally it's recommended to just replace the petcock. There's been limited reports of success with rebuilds, but less than the failures.

      I only saw mention of no spark on #1 - did you test the others? #1 and #4 actually run on the same coil and should spark together (likewise with #2 and #3 - verify correct plug wire routing). If #4 is sparking but not #1 it could be as simple as a bad plug cap.

      Comment


        #4
        Hi,

        Congratulations on your good start. These are the critical maintenance items from your "mega-welcome":

        ***********Quoted from Mr. bwringer************
        Every GS850 [and most other models] has (or had) a set of well-known issues that MUST be addressed before you have a solid baseline for further troubleshooting. It's a vintage bike, and it's quite common (as in, every single GS850 I have had contact with) that there are multiple problems that have crept up and slowly gotten worse over the years. It's not like a newer vehicle, where there's generally one problem at a time.

        These common issues are:

        1. Intake O-rings (install NEW OEM or Viton only - common nitrile O-rings will quickly deteriorate from heat)
        2. Intake Boots (install NEW -- these cannot be repaired)
        3. Valve clearances (more important than most people think)
        4. Carb/airbox boots
        5. Airbox sealing
        6. Air filter sealing
        7. Petcock (install a NEW one)
        8. On '79 models, install new points or Dyna electronic ignition (or at least verify that the old points are working correctly)
        9. On all models, it's fairly common to have problems with the spark plug caps. These are $3 or $4 each, and often worth replacing if you're keeping the stock coils/wires.
        10. Stock exhaust with NO leaks or holes -- good seals at the head and at the junctions underneath.


        What I have noticed at the rallies is that very, very few 850Gs are actually running right. Make VERY sure it's actually running the way it's supposed to before busting out the modifications.


        Brian's E-Z and fun plan for GS850 happiness:

        1) Seal the airbox and air filter with weatherstripping.

        2) Ensure no intake leaks. Spraying WD-40 or water doesn't tell you much, since very small air leaks can cause problems even though they won't suck in enough WD-40 to make a difference. Replace your intake boot o-rings and boots if needed, and seriously consider spending the lousy $28 for new airbox/carb boots.

        3) Ensure clean carbs with correct settings, new o-rings, and original OEM jets. No, not just squirted with something. I mean completely disassembled.

        4) Check/adjust valve clearances (Manual calls for every 4,000 miles. This is not optional.)

        5) Ensure healthy electrical system.

        6) Seriously consider upgrading coils and plug wires.

        7) Install new, stock NGK B8-ES plugs gapped to .031".

        8 ) Fine-tune float height and idle mixture screw to ensure best off-idle transition.

        9) Clean air filter and reinstall with only the lightest oil mist -- over-oiling and/or letting the filter get dirty is a common and critical mistake, and will make the bike run funny at low speeds and run rich. This may take a few tries.

        10) Make sure the exhaust seals are sealing.

        11) Ooh, much better now, huh? You're gonna need upgraded suspension - Progressive or better fork springs and shocks. Set suspension sag appropriately.

        12) Upgrade brakes with new pads and stainless lines to deal with all that extra speed.

        13) Install new petcock, since I'm going to head to the roof with a rifle if I have to read about yet another #2 plug fouling and failed hillbilly attempts to rebuild the petcock and/or deny there's a problem.

        14) Oh yeah -- check compression somewhere in there to ensure the valves and rings are reasonably healthy.

        15) You'll probably need new OEM clutch springs -- the clutches last forever, but the springs get tired after 20 years or so under pressure. E-Z and cheap.
        ************************************************** ********

        You'll find lots of "how to" guides (carb cleaning, valve adjustment, etc) and other information on my little website to help you. Keep us informed.


        Thank you for your indulgence,

        BassCliff

        Comment


          #5
          Originally posted by mike_of_bbg View Post
          I only saw mention of no spark on #1 - did you test the others? #1 and #4 actually run on the same coil and should spark together (likewise with #2 and #3 - verify correct plug wire routing). If #4 is sparking but not #1 it could be as simple as a bad plug cap.
          I did not check the other plugs because I could not find my gauges nor my cap tool and am getting new ones on my way home.


          BassCliff ... Read through that and got lots of info from it when I joined and posted in the GS Owners thread. I appreciate that post, again.


          Basically, I created this thread because 1) I know others like seeing a GS return to the road. 2) Kinda help to keep track of what I have done, need to do and should have done. 3) Maybe this will spark someone else to revive an older GS.

          Comment


            #6
            All I was able to do yesterday was purchase the feeler gauges and a multimeter. Been needing one of those for a while.

            Hopefully, tonight I can get some work accomplished.

            Comment


              #7
              OK ... I NEED SOME HELP!!

              1) I need a replacement petcock. Any leads/ideas on ones where its not going to cost me $60 plus for one.

              2) I have no spark on 1 & 4 ignition coils wires. DID NOT check 2 & 3, yet.
              I think I checked/set the points per the Haynes service manual I own correctly. QUESTION 1 - Do you set the gap when either point is fully open or when the T mark on the back plate is lined up for 1/4 & 2/3?
              I know the contact breaker unit is sending juice because I used a test light & it showed power on both the white (grey) and black wires from it.
              I have checked the gaps on the plugs. they are good. (.024in)
              I have have juice, (all the lights work & the starter motor cranks. Plus I saw the points "spark" when I hit the starter button.)
              I have power going to the ignition from the condenser to both ICs. QUESTION 2 - Could the condenser be old and not sending a strong enough "signal"?

              Below is a drawing of how my ignition coils/contact breaker/plugs/wires are set up. QUESTION 3 -Is it wrong? I do not think so matching it to the book. This looking from the seated position on my bike. I tried to match the colors as best as I could. QUESTION 4 - Are the plugs wires going to the correct cylinders?
              Last edited by Guest; 08-10-2011, 12:10 PM. Reason: forgot to add something

              Comment


                #8
                2/3 did not have any spark either. So .... I am 99% sure the problem is the condenser is the reason for the no start. I ordered one from e-bay. It'll arrive while I am on vacation at the beach. But, at least I'll know what I'll be doing when I get back.

                Also, any ideas on the petcock?

                Comment


                  #9
                  You may be able to find cheaper petcocks, but I think going with the OEM-style replacement from Z1 is the best idea. Many of the cheaper petcocks you could find will require an adapter plate.

                  There should be lots of threads about setting the points. Use the search term "matchbook", it's one of the preferred tools for the job

                  Comment


                    #10
                    I ordered the condenser & petcock off ebay. They'll arrive while I am on vacation. I'll let you know what happened when I get back.

                    Cheers!
                    ScrumDown

                    Comment


                      #11
                      OK ... Got back from vacation yesterday. Had a great time. This morning I checked thru my mail that I have the postal service hold and and my new (to me) petcock and condenser were delivered. YAY!

                      I installed the the condenser and re-gapped the points. And the I put the replacement petcock/fuel tap on and .... It 1) looks different and 2) I am not sure if the placement of the fuel flow opening will be an issue.

                      Picture 1 (below) is the new petcock with the hoses attached. Minus the fact that I need hose clamps. Do you see a problem with the "fuel flow pipe" being that close to a carb? (The thicker/fatter hose close to the front.)


                      Picture 2 is the petcock w/o the hoses attached.

                      Picture 3 is the "old or original" petcock back view. The 2oclcck angle pipe is the vacuum and the pig pipe is the fuel flow.

                      Comment


                        #12
                        Well the new (to me) petcock and condenser arrived while I was on vacation. Installed both and ... fuel is flowing, but still no spark.

                        I believe I have the correct resistance at both the coils and condenser.

                        WHAT AM I MISSING?

                        If you want em to recheck something I will be glad to do so. Tell me exactly what you want me to do. I am drawing blanks.

                        Comment


                          #13
                          I got her started today; (well one of my older brother's & I did); after what seemed like 10 minutes of cranking we got her to run for a few minutes. Now, I am letting her sit until later today, (after I run errands with the family), when I will get her to run smoothly.

                          YAY ME! I am a lot closer to being a regular rider.

                          Comment


                            #14
                            dude, cut back on the yays, I keep visualizing "Special Ed", from "crank yankers".

                            Comment


                              #15
                              Originally posted by snicrep5 View Post
                              dude, cut back on the yays, I keep visualizing "Special Ed", from "crank yankers".
                              Don't remember him saying "yay" a lot. I may have to go back and check.

                              Is this better?


                              Comment

                              Working...
                              X