-
 Guest repliedA quick look at the parts fiche shows that the crank seal shown above swaps easily enough and should be replaced anyway. That's a bit of good news.
 -
Guest repliedWell…..as I take about 2000 steps backward, I guess I do have SOME progress to report.
You might recall that I bought a parts engine a long time ago, and used the top-end for the rebuild. So I still have the bottom-end of that junker.
PARTS ENGINE ADVENTURE:
I hauled my parts engine back into the shop yesterday with a little help from my son. It’s still sitting in its frame in this pic. Note the WOODEN inner cover. WTF. I think this bike is even more “redneck” than the Redneck Rocket!! The frame of this thing has been haphazardly been rattle-canned a few times too.
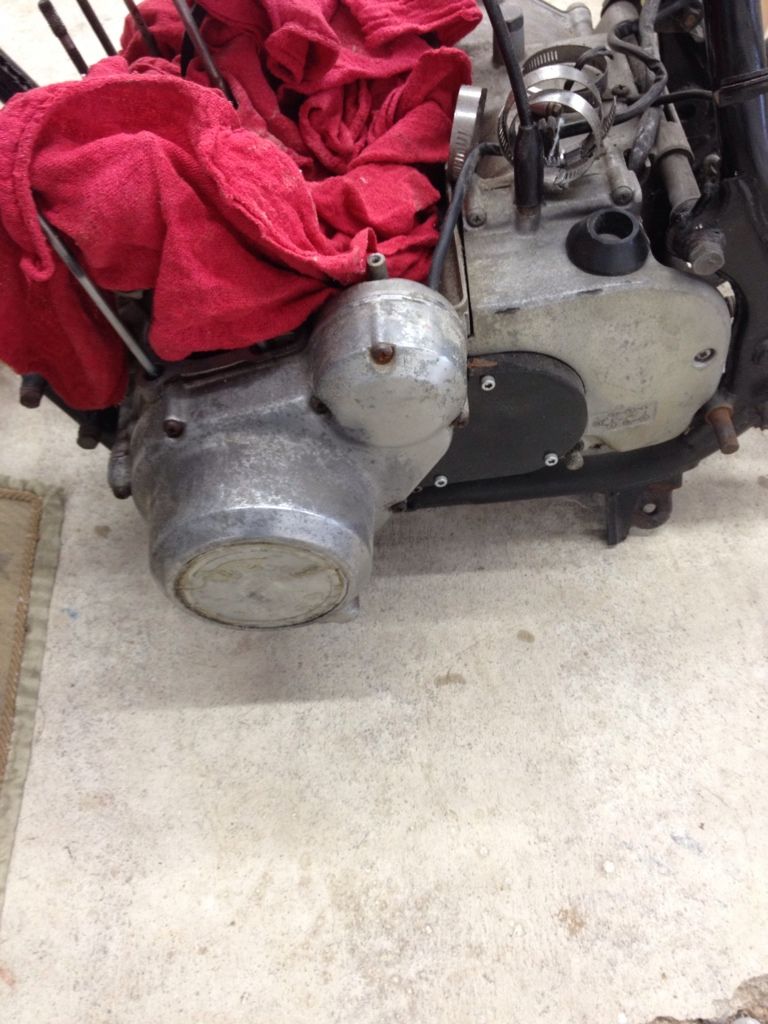
After wrestling what’s left of this engine from the frame, we managed to get it into my engine stand, drained the oil, and pulled the filter.
Then I spent a little while today removing the pre-stripped screws on the side covers. Damn I’m getting good at this. I had to Dremel slots into about 10 of them in order to get a good-enough grip with my manual impact driver to force ‘em loose. They were on TIGHT.
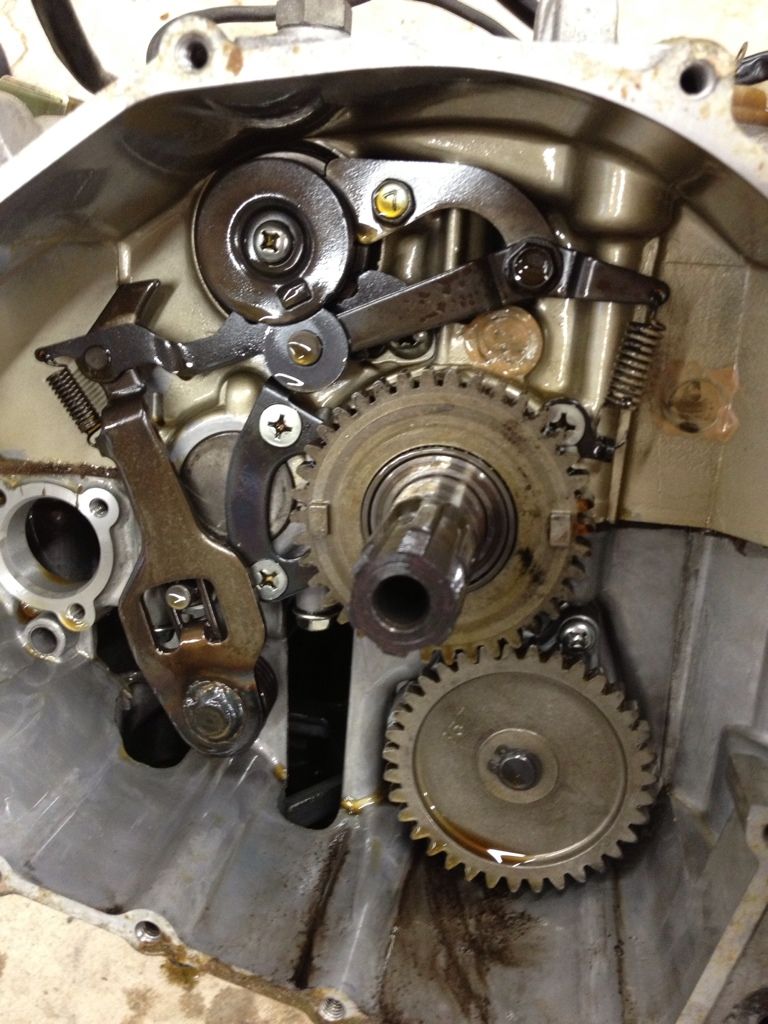
Once the covers were off, I removed the counter-sprocket (loose already – just like the one on my main engine (!)) and then I pulled the locking plate on the left side. Turning to the right-side, I tackled the clutch plates + basket. A few pics of the right-side process:
Clutch basket. I will check the plates and springs on both bikes and see what’s still good.
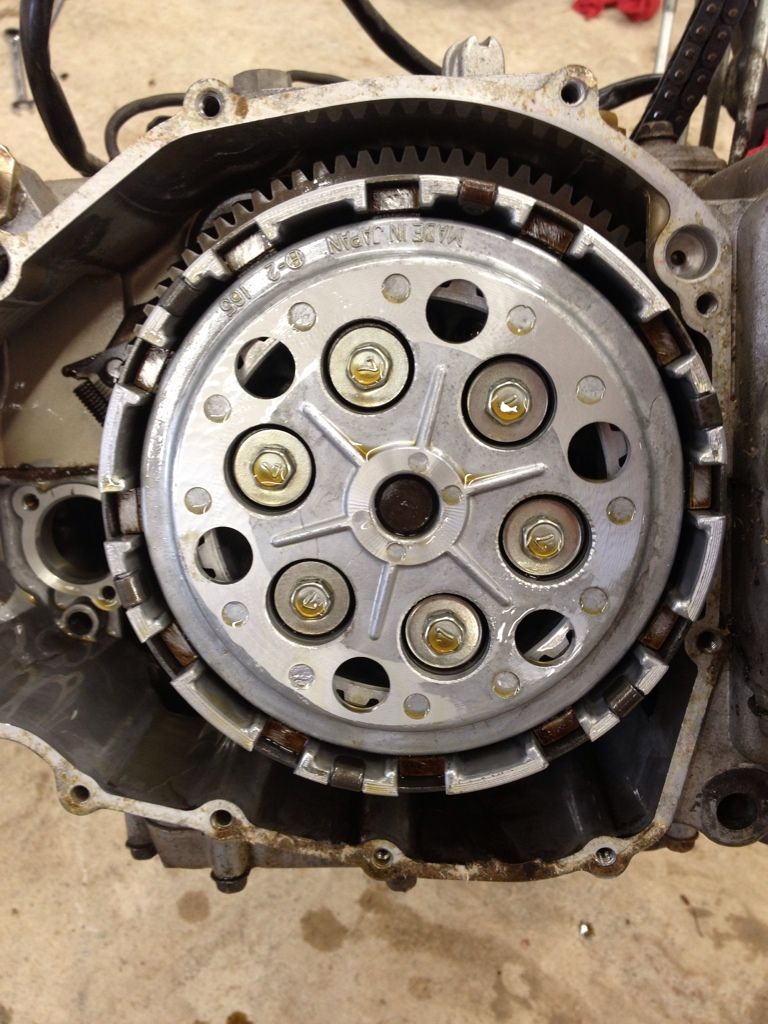
Below I’m shown pulling out the various rods that actuate the clutch. The OEM long rod can only be removed from this side, but the one in my Main bike is actually a bunch of shorter rods that don’t look stock and come out of both sides (!) I’ll likely use this assembly (stock) in the Main bike when I put it back together. You can also see the 32mm clutch hub nut in this photo.
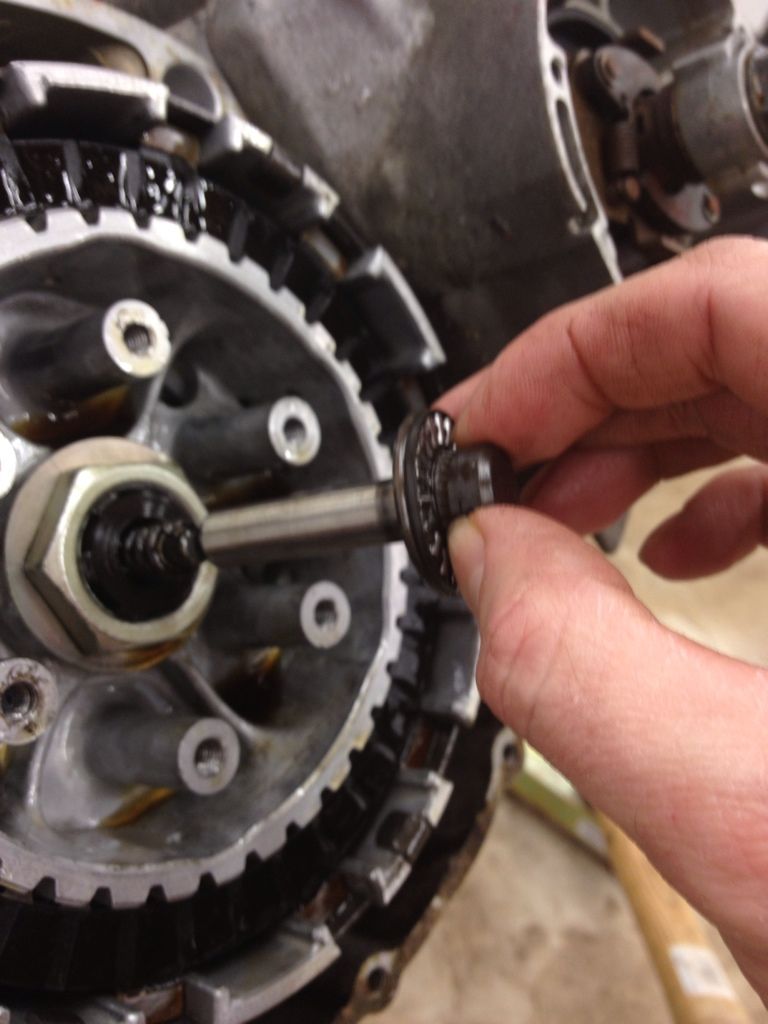
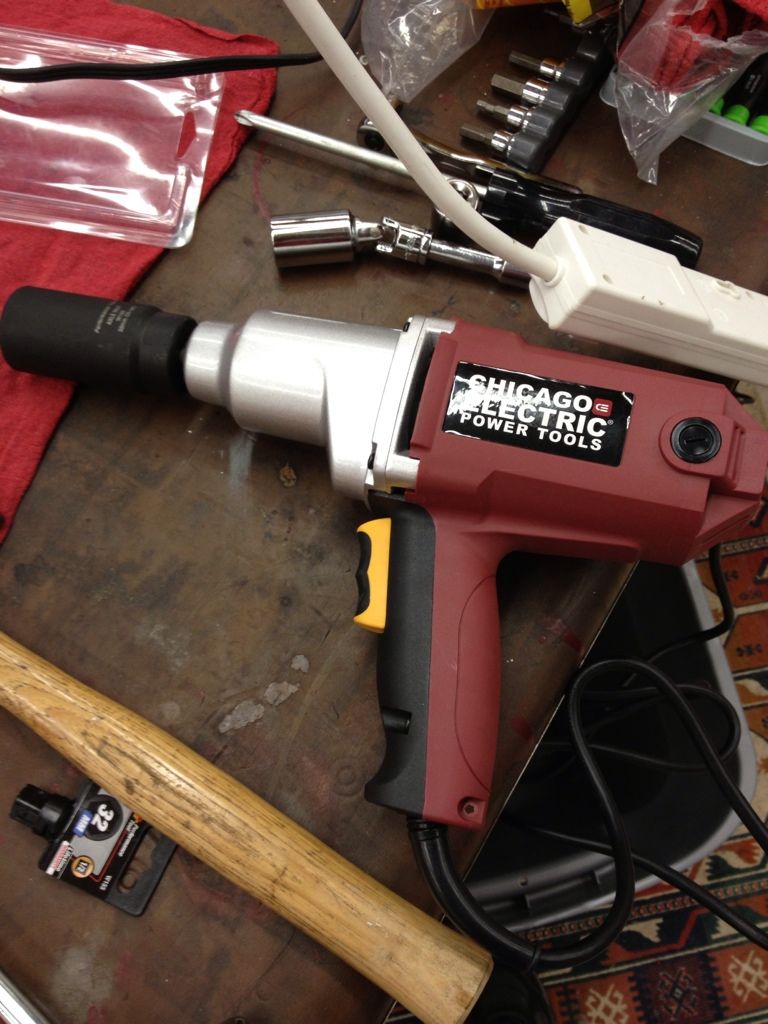
I’ve wrestled with too many clutch hub nuts in my life. While I’m a big fan of using a holder tool (homemade or otherwise) to torque them back on correctly, there’s only one way to remove them in my opinion……. So off to a parts store for a 32mm impact socket and to Harbor Freight for a cheap, but highly rated, impact driver.
The nut came off easily. Sweet. I’ll either fab or spend a few bucks on a clutch holder for reassembly when I get to that point.
After removing the basket, a bunch of washers, various needle bearings, spacers, sprockets, more bearings, etc. etc. etc. I reached this point (below). Later this week I will pull the shift mechanism and start removing the >30 bolts holding the cases together. I’m a little worried at the rusty, corroded, and cheap quality of the case fasteners. I have a feeling I might end up having to drill them out…..hopefully only on this bike. I’d like to keep both sets of cases in good shape.
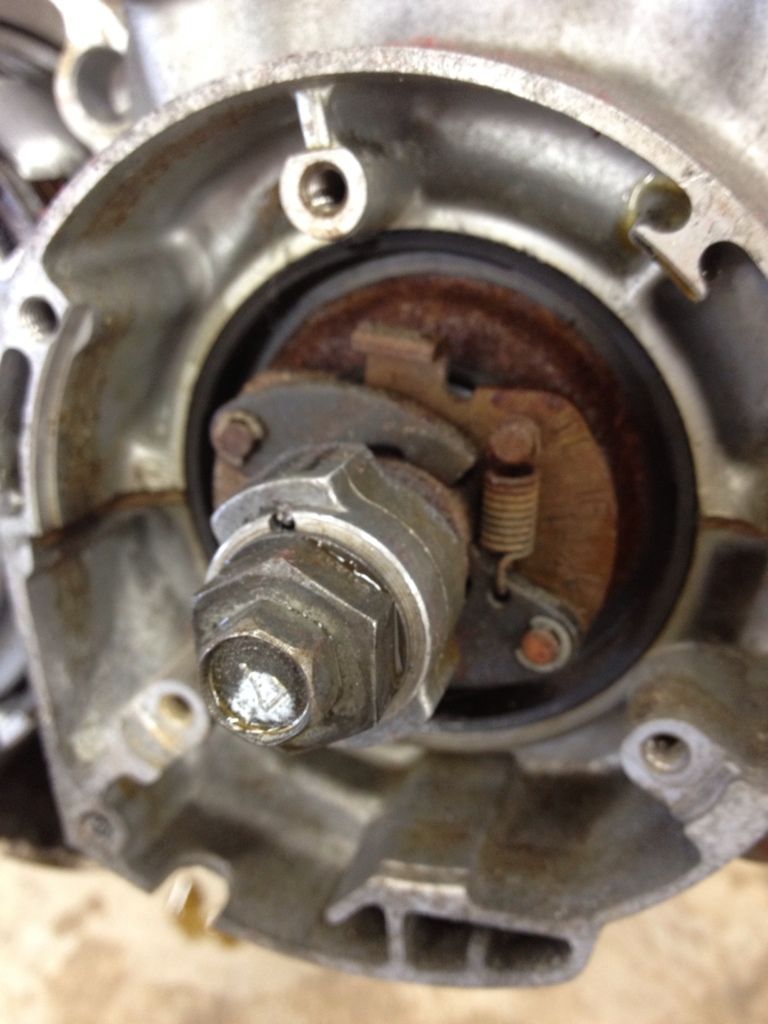
I’m not going to use the mechanical advancer on this parts bike. The one on my Main bike is much cleaner. Note all the rust in the background on what looks to be the metal part of a crank seal…..I wonder how hard that one is to replace because it looks awful.
A friend just got back from Haiti and brought me this. Perfect timing! I need a drink…..

Leave a comment:
-
Guest repliedVery impressive build D-MAC, I have just started a very similar build on a 1982 GS550e. Just got it iin November and been tinkering a bit.. I must say that You have amazing tenacity, and have produced an amazing result. A real inspiration.Leave a comment:
-
sorry to hear about your bad news but i think the good news is that you should be able to proceed with the crank swap as you intend (your points 1) to 3) in your post above)
i would however at the same time want to make sure that the crank casing is internally all as it should be so when you drop the new crank shaft in it works as it shouldLeave a comment:
-
That's a real bummer d-mac. Great job on the deduction. Good part is that you will have a fresh engine that runs strong and lasts forever.Leave a comment:
-
Guest repliedI will check. I have the ratios and part numbers written down at home (I found them through a search on here).Originally posted by mash35231 View PostLeave a comment:
-
Guest repliedtkent02 is correct.
Bearings and rods will be swapped with the crank.Leave a comment:
-
This is not true.Originally posted by eil View Post
It can only happen when there is time for the cylinder to fill with liquid. Hit the starter, something bends or breaks.
No way an entire cylinder can fill with any liquid when the engine is running, not even close.Leave a comment:
-
It's a really good thing we all know you're talking about a motorcycle engine here.Originally posted by D-Mac View Post
Ouch!I woke up today thinking that maybe the ignition timing appears to be "off" because the pistons aren't hitting TDC at the same time. I used a dial indicator to check the piston position in cylinder #4 compared with the TDC mark. It was perfect. But when I checked cylinder #1 (which should hit TDC at the same point as #4) it was off - way off. The piston actually reaches it's highest point about 15 degrees early. Yikes!
From what I understand, hydrolocking will generally only damage an engine at speed (e.g., by suddenly sucking in a large amount of water). The starter motor doesn't have enough power to damage an engine with a cylinder full of gas. It just won't turn over. But at this point, it really doesn't matter how it happened as much as how to fix it...Diagnosis? Twisted crankshaft. I'm thinking it might have resulted from hydrolock (recall that the original petcock on the bike was faulty and drained freely at all times). I caught the overflowing carbs before I started the bike, but anyone want to bet a previous owner didn't?
I'm a newbie to this stuff, but I would think that if there was enough force to twist the crankshaft, then the connecting rods and bearings should be suspect too. You'll want to measure everything against the repair manual specs as you put it back together.Anything else to consider?Leave a comment:
-
Guest repliedHere's The good news (LOL). This re-rebuild thread is NOWHERE NEAR OVER. That's right folks, I'm about to take you into new and exotic places......into the only place we haven't been on this build yet.......
Into the bottom end.
Yup. And this leads me to the bad news.....the really, really bad news.
Let's back-up a bit.
I've been thinking a lot about the problems I've been having. I kept coming back to carbs and ignition timing because both were logical. But then I started wondering what else could cause the timing to be off badly.....cam timing....maybe an electrical fault. Maybe. Then I remembered that the bike seemed to have the same problem (popping through carbs) when I first bought it, which narrows things down a lot if the cause now is the same. What HASN'T changed since then? Hmmm....
I woke up today thinking that maybe the ignition timing appears to be "off" because the pistons aren't hitting TDC at the same time. I used a dial indicator to check the piston position in cylinder #4 compared with the TDC mark. It was perfect. But when I checked cylinder #1 (which should hit TDC at the same point as #4) it was off - way off. The piston actually reaches it's highest point about 15 degrees early. Yikes!
Diagnosis? Twisted crankshaft. I'm thinking it might have resulted from hydrolock (recall that the original petcock on the bike was faulty and drained freely at all times). I caught the overflowing carbs before I started the bike, but anyone want to bet a previous owner didn't?
Soooo....now my plan of action is:
-Verify my results.
-Remove the crankshaft from my spare parts engine (with all of the work that will entail.....just getting the side covers off of that bike will be "fun")
-Main bike: Drain oil, disconnect plugs from the engine, unbolt and pull the engine from the bike, and split the cases to pull the crankshaft. Obviously, I'll swap out the various seals and check over the transmission and clutch plates/springs at the same time. Everything will get a good cleaning too. I might even end up having to re-paint the bottom end again.
Questions:
(1) I should be able to just keep the rotor on the crank and swap rotors at the same time I swap cranks, right? (maybe a good idea anyway since the one currently on my bike is chipped a little).
(2) I'll have to pull the valve cover+tensioner+at least the exhaust camshaft to get enough slack to free the crank from the cam chain on the bottom end, right?
(3) I can avoid having to pull the top end completely off my bike, right? I don't recall anything on the top-end (other than needing to free up the cam chain, above) that would require me to pull the head or cylinder block. Basically, I just don't want to risk needing another new head gasket! Related to this, I should be able to pull out the pistons from below to swap them onto the new crank, correct? (It's actually the crank they originally came from since the top-end of my main bike came from my parts bike).
Anything else to consider?
Redneck Rocket indeed.
Leave a comment:
-
Guest repliedD-Mac, I'm rebuilding a 82 550L and I really like the Dime City speedo and tach that you are using. Which DC speedo matches up to the factory speedo cable and what is the tach ratio?Leave a comment:
-
Guest repliedThanks guys! Even when I disagree with y'all (which isn't often), it still makes me think, which almost always leads to better ideas.
I haven't had a chance to get back to the bike in a few days, and with my 'day job' starting up tomorrow it'll be at least a few more before I do.
I agree that float level settings being off just a bit wouldn't cause this (unless they are set too high and flooding - seems unlikely though). That was a case of wishful thinking. I will adjust them a bit and keep the bike more level on next start-up, just to rule out any flooding issues. I have seen both cam and ignition timing cause these kinds of problems, so they both make sense - more than what I think could be carbs alone.
I'm setting aside cam timing for now given the fact that it idled well when first started, it always starts easily, leak-down at TDC is excellent, and I did (10? 20?) re-checks I did on cam timing during the latter part of rebuild, plus photos indicate it's fine. If I do end up checking cam timing again, I promise to do it in front of at least 20 mechanics so that they can beat me silly.
!!!New thought (also leads me to think ignition timing might be the culprit). Now that I think about it (and I can't believe I didn't before), this bike did the EXACT same thing - backfiring through carbs - when I first got it and managed to start it up (I even have a video around here somewhere of it "running" back then). I had assumed it was just clogged carbs at the time, although in retrospect it didn't show any other symptoms of being clogged, and the guy I bought it from (he's an experienced vintage motorcycle mechanic I know well) had actually cleaned them before I got it. So maybe it IS an ignition problem..... If it's the same issue as when I bought the bike, that would rule out coils (now new), ignitor box (I've swapped two in and out with no difference), spark plug wires (now new). That leaves the setting of the ignition pickup/timing plate, the ignition pickup itself, and wiring to the coils (now only triggering a relay, but still potentially important).
I think I should probably check the timing with a timing gun (maybe the previous owner moved the plate too far?) and I'll probably swap in a new pick-up unit and try that too (I have a spare from my parts bike). The ignition switch is new from my rebuild, but that still leaves the ignition/kill switches and lots of wiring. Although the coils now run straight to the battery, I am still using that old wiring from to trigger my coil relay, so an issue in that wiring could still cause a fault I suppose. I could just bypass my relay completely (run coils straight to the battery with no relay) to test that out, right?
What's killing me is the fact that I don't know for certain that the carbs are OK, so I keep leaning in that direction. Your assessments are helping me see other possibilities.
Stay tuned. I might have more info by Sunday.Leave a comment:
-
Guest repliedAdjustable needles came with the DynoJet kit I bought.Originally posted by mash35231 View Post
I got the plugs through Z1enterprises I think (or they might be OEM).Leave a comment:
-
Guest repliedJet needle
The reason I asked about the jet needle is the stock GS550LZ needle has no adjustment...only 1 c-clip groove...but the needle D.Mac had pictured is a adjustable needle with multiple c-clip grooves. I have a K&N air filter with stock exhaust and I may need to adjust the needle a little bit.Leave a comment:
.png "Powered by vBulletin")
Required reading for all forum users!!!
Welcome!
Register to access the full functionality of the GSResources forum. Until you register and activate your account you will not have full forum access, nor will you be able to post or reply to messages.A note to new registrants...
All new forum registrations must be activated via email before you have full access to the forum.A Special Note about Email accounts!
DO NOT USE sbcglobal.net, att.net, bellsouth.net or email.com email addresses when registering for the forum! Email that our system sends out to these email servers is treated as SPAM and you will never receive your activation email, or any other email that our system may send out. Use an email address from gmail.com or some other email server.A note to old forum members...
I receive numerous requests from people who can no longer log in because their accounts were deleted. As mentioned in the forum FAQ, user accounts are deleted if you haven't logged in for the past 6 months. If you can't log in, then create a new forum account. If you don't get an error message, then check your email account for an activation message. If you get a message stating that the email address is already in use, then your account still exists so follow the instructions in the forum FAQ for resetting your password.Have you forgotten your password or have a new email address? Then read the forum FAQ for details on how to reset it.
Any email requests for "can't log in anymore" problems or "lost my password" problems will be deleted. Read the forum FAQ and follow the instructions there - that's what we have one for...
New users should be sure to read the FAQ as well as the posts in the Announcements forum. This will answer many of the questions you may have about how this forum works.
Before posting questions in the forums be sure to use the forum search function!!! Odds are your question has already been asked and answered before. And when posting, please make sure that you post to the correct forum.
Finally, be sure to check out BassCliff's website here. He has useful information that can't be found on this site. His welcome page containing useful GS information can be found here. Be sure to check it out!
If you are a returning visitor to the forum and can't log in using your old forum name and password, chances are your account is deleted. Just create a new forum account and you should be all set.
Leave a comment: