-
As the Covid situation drags out, and I'm busy working overtime at the hospital, I made the decision to buy the Cognitomoto front wheel. This wheel costs more than I paid for the whole bike, but there's no way I'm gonna have time to do all the nessesary modifications to my old front front wheel. This will be my xmas gift to myself, a reward for working all the long hours:
 photo_2020-11-27_23-48-38 by Lars Krogh-Stea, on Flickr
Last edited by LarsKroghStea; 11-28-2020, 12:35 PM.
photo_2020-11-27_23-48-38 by Lars Krogh-Stea, on Flickr
Last edited by LarsKroghStea; 11-28-2020, 12:35 PM.Leave a comment:
-
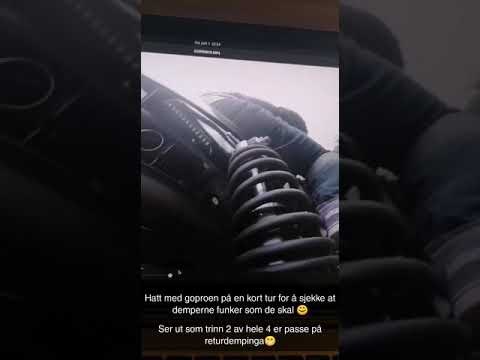
Did a test run with a GoPro mounted to the swingarm to check how the shocks work after rebuild. These are vintage Koni 7610 with the preload set to the lowest out of 3 (twist sleeve) and rebound set to 2 out of 4 (twist dial on top). They're filled with 5W fork oil. The short videoclip is from passing over a speed bump at moderate speed. You can also spot one of the hood-locks. The seat stays well in place.
Leave a comment:
-
I have mounted the hoodlatches for the "quick-release" seat:
 IMG_20200530_210232 by Lars Krogh-Stea, on Flickr
Cut the bolts to length, drilled and tapped them. Then I mounted them on flat piece of steel:
 IMG_20200530_210210 by Lars Krogh-Stea, on Flickr
 IMG_20200530_210059 by Lars Krogh-Stea, on Flickr
I will cut this plate to size and screw it on to the frame of the rear seat:
 IMG_20200530_210104 by Lars Krogh-Stea, on Flickr
This is how it looks underneath the rear fender when the seat is locked in place:
 IMG_20200530_205935 by Lars Krogh-Stea, on Flickr
Leave a comment:
-
I'm sure you're pretty tired of me posting pictures of safetywire by now, but I recieved the new nuts today. Must have been an older version as they were NOT drilled Anyhow, as they do look much nicer than the ones I that are on now, I drilled them myself and put on a couple of nuts to see the results. Pretty satisfied
 2020-05-25_11-12-34 by Lars Krogh-Stea, on Flickr
I also put together the GSXR fork to get a bether view of how it all fits together, and I must say I'm sceptic as to how I'm supposed to fit a spoked wheel between those calipers? The angle is little off on the picture where I measure. The more correct measurement is about 47mm (1.85inches). As they are radially mounted I could get some 320mm discs but that would only move them 1cm towards the narrower part of the wheel.
 2020-05-22_09-15-19 by Lars Krogh-Stea, on Flickr
 2020-05-22_09-15-57 by Lars Krogh-Stea, on Flickr
 2020-05-22_09-15-43 by Lars Krogh-Stea, on Flickr
I checked the Cognitomoto wheel and they have laced it with all spokes on the inside. Mine are the usual inside/outside. If that's how it's done I'll need another set of spokes to get all of them in the correct angle, and then I might as well get a wider front rim/tire. then it starts to get expensive.. If I have to do the front wheel all over again, I will have to wait for the winter to do the fork swap :/
 cognitomotowheel by Lars Krogh-Stea, on Flickr
Leave a comment:
-
Perseverance has turned frustration into joy once more I googled around on how to drill bolts and got some tips on drill-speed and pressure on drillbit. I've read before that small drillbits require high speed, but this guy said to use slow speed, max 1100 rpms. Geared mine to the lowest, wich is 550 rpm. He also said to oil the bit every 30 seconds :0 That told me I was way too impatient! I can now drill the bolts by listening to the sound the drillbit makes. If it makes a kind of crackling sound, the bit is either about to pack full and overheat or about to brake through the hardened surface on the other side. If the first is true, I back the bit out and clean it and reapply oil. If the bit is about to break through I'm very careful with how much pressure I apply. This was a bit tideous, but I didn't breake anymore drillbits. Took me about 1.5 hours to drill all the bolts for the front and rear discs. I also painted the center of the rear brake rotor. Pictures included as usual:
Rear rotor, painted and drilled bolts torqued down, The one odd bolt is the magnetic one. Should have drilled it last, as it made the drillbit magnetic and a pain to clean.
 IMG_20200521_222827 by Lars Krogh-Stea, on Flickr
This is how it was before:
 IMG_20200520_210733 by Lars Krogh-Stea, on Flickr
This is how the safetywiring looks now. I went with connecting two in pairs instead of three. I watched a youtube clip of an older guy wiring a propeller for a small plane, and tried to copy what he did. He had several very good tips on how to twist the wires to keep them tightly in place.
 IMG_20200521_180148 by Lars Krogh-Stea, on Flickr
Leave a comment:
-
Well.. I've been drilling some holes and the "corner"-holes on the nuts are a pain to drill. The bolts are OK, I drill them at a 90 degree angle, but the nuts.. I've given up on them. Mostly because I dont have any 2mm drill bits left :/ 3mm drill bits hold well, and I'll use 2,5mm drill bits for the rest of the perpendicular holes (it's a national holiday today in Norway, and I can't get new drillbits). I think the problem is that the bits snag on the hardened surface when you push through on the other side. I've heard that drill bits for drilling circuitboards are cheap and work great for this. Maybe I'll try them later.The bolts for the brake discs will be OK when they are drilled and wired. I'll buy titanium bolts for the brake conversion later.
For the sprocket bolts I've ordered these Pro-bolt pre-drilled aluminum nuts with steel core. They are very popular in MX competition and should hold up well. They also make them in titanium, but these were in store, and I don't want to wait.
 lspn10dbk_7 by Lars Krogh-Stea, on Flickr
Leave a comment:
-
Because I think it will be easier to fit spacers for the new brake rotors if I don't have to take the speedo assembly into consideration. And I already have the parts (the magnetic bolt)Originally posted by 93Bandit View Post
Leave a comment:
-
Sorry to hear about your speedo mishap. Glad you made it home safely, though. That's all that really matters.
Why not just buy a new/used speedo assembly?Leave a comment:
-
On the positive side I've been practicing my safety wiring skills. I don't quite know why I started drilling the corners of the bolts. They are pretty small, and hard to drill in a way that looks nice. Adding to that it looks better when drilled straight through. I redrilled the middle bolt and will drill that way on the remaining bolts. I also had to put a shim under the bolts because of the threadless part, that's why they're not positioned perfectly. I don't have the bolts for the new rotors and wil probably buy predrilled bolts for them.
 2020-05-17_08-01-03 by Lars Krogh-Stea, on Flickr
Leave a comment:
-
No, it's for a little more modern setup; a 2005 GSXR USD fork with radially mounted calipers. I have a set of original Nissin calipers, but will swap them with R1 monoblock calipers if the ratio is off with the Accossato master. It will look pretty much like this:Originally posted by bobtail84 View Post
 Cognito-Moto-Custom-Honda-CB550-Café-Racer_8 by Lars Krogh-Stea, on Flickr
But mine are almost the same rotors (mine are from a 2002 Fireblade 900 RR and have the same PCD.Leave a comment:
-
I'm not exactly proud to show you the images I'm about to post.. Normally I'm very concerned about safety. When I reassembled my last bike, I followed the manual to the letter and I had no worries with running it at 140mph+. Remember I hastily bolted the bike together to ride it home from my father? When I was almost home, some noise from the front wheel made me stop and check. I couldn't see anything and assumed it was the bearing. Drove it home and parked it. Became aware of the shocks, fixed them and today I was going to fix the front wheel. And the speedometer, as it stopped working shortly before I arrived at home.
It seems the two problems are related. The rotorbolts that became loose have grinded the speedogear to bits :/
 IMG_20200517_112631 by Lars Krogh-Stea, on Flickr
 IMG_20200517_112644 by Lars Krogh-Stea, on Flickr
 IMG_20200517_115207 by Lars Krogh-Stea, on Flickr
Pretty sure this speedogear is not going to work again..
As the new plan is to use the original front wheel with the Gixxer forks, the speedo analog/digital converter is now a forgotten, but fun, sidetrack. The new plan is to use a magnetic bolt on the rear brake rotor.Leave a comment:
.png "Powered by vBulletin")
Required reading for all forum users!!!
Welcome!
Register to access the full functionality of the GSResources forum. Until you register and activate your account you will not have full forum access, nor will you be able to post or reply to messages.A note to new registrants...
All new forum registrations must be activated via email before you have full access to the forum.A Special Note about Email accounts!
DO NOT USE sbcglobal.net, att.net, bellsouth.net or email.com email addresses when registering for the forum! Email that our system sends out to these email servers is treated as SPAM and you will never receive your activation email, or any other email that our system may send out. Use an email address from gmail.com or some other email server.A note to old forum members...
I receive numerous requests from people who can no longer log in because their accounts were deleted. As mentioned in the forum FAQ, user accounts are deleted if you haven't logged in for the past 6 months. If you can't log in, then create a new forum account. If you don't get an error message, then check your email account for an activation message. If you get a message stating that the email address is already in use, then your account still exists so follow the instructions in the forum FAQ for resetting your password.Have you forgotten your password or have a new email address? Then read the forum FAQ for details on how to reset it.
Any email requests for "can't log in anymore" problems or "lost my password" problems will be deleted. Read the forum FAQ and follow the instructions there - that's what we have one for...
New users should be sure to read the FAQ as well as the posts in the Announcements forum. This will answer many of the questions you may have about how this forum works.
Before posting questions in the forums be sure to use the forum search function!!! Odds are your question has already been asked and answered before. And when posting, please make sure that you post to the correct forum.
Finally, be sure to check out BassCliff's website here. He has useful information that can't be found on this site. His welcome page containing useful GS information can be found here. Be sure to check it out!
If you are a returning visitor to the forum and can't log in using your old forum name and password, chances are your account is deleted. Just create a new forum account and you should be all set.
Leave a comment: