.png "Powered by vBulletin")

-
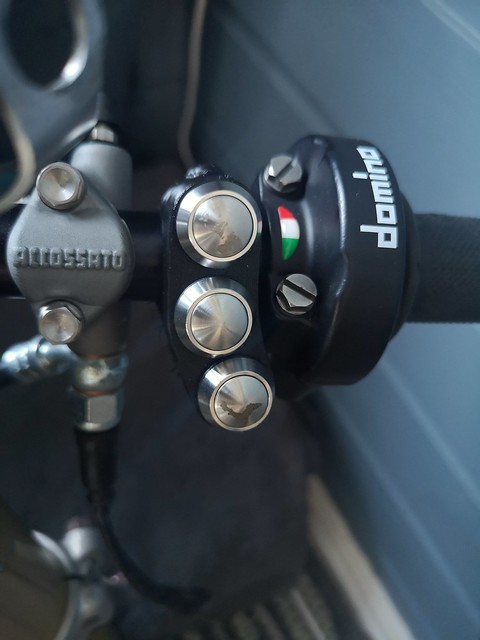
Thanks! These are "Accossato Folding Clutch Lever Assembly Part Number : 1400N" bought from "Bikers Discount Store" in the UK. These are "Non-RST/NRST" witch mean they don't have the "lightening eyelet" - a hole near the hinge (the hinge keeps them from breaking if you scrape the bike) that makes it lighter. They are quite pricey but high quality. I don't think I would spend that much on a clutch lever if i didn't care about matching the looks of the brake lever.Originally posted by roeme View Post

I paid 115Ł for the clutch-perch/lever assembly. Accossato licence their brake masters from Brembo and are similar in quality to Brembos Racing Lineup (both suppliers have a cnc-version that the teams use and that version is stupidly expensive). The reason I didn't buy Brembo is that they only have hydraulic clutchlvers in their racing lineup.
Hope this was some useful info
Leave a comment:
-
ThanksOriginally posted by Rich82GS750TZ View Post I'll use these printed controls for a couple of months, until the cnc-router is finished. I think that's a cost effective way to try it out, and make changes if someting doesn't work as intended. I have some aluminum pieces from an earlier project, and I'll mill aluminum versions to replace the plastic controls. I bought an anodizing kit some years ago that I haven't tested. I have a buddy with a laser engraver, and I want to try to engrave labels on the anodized aluminum with that. The engraved text turns white as the laser oxidizes the anodizing (or something like that..).
I'll embed a video you can see what I mean:

Knowing myself, this won't be happening soon, so I guess I'll borrow the wives labelmaker or something like that
Leave a comment:
-
Nice work! Btw, where did you get your clutch lever/perch? I'm currently looking to replace the OEM ones on a few on a bikes, to get more adjustment range.Leave a comment:
-
That is some slick fab work. Will there be labels? Or will you just have to remember what button does what on the left and right hand controls?Leave a comment:
-
Right side controls finished, I think it works well together with the throttle assembly;
Leave a comment:
-
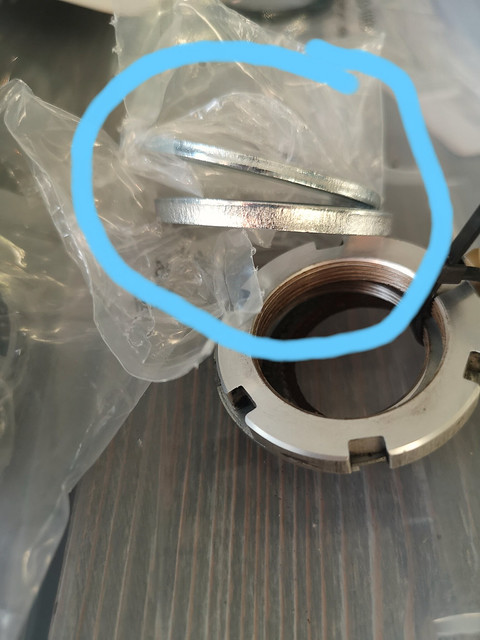
Well, I'replying to my own postOriginally posted by LarsKroghStea View Post I found this in an old post from 2006, so it's strange that my kit didn't include instructions. Maybe they're online somewhere.
"This kit is supplied with (2) spacers that are used by various applications
to make up for thickness differences between the taper bearings and the ball
stacks.
We have put instructions for the use of these spacers in kits since last
year, but if you have an earlier kit there may not be any instructions.
To determine which, if any washer is required measure the stack height of
the ball bearing assemblies (place a few ball between the races of both the
top and bottom bearing sets) and compare this measurement to the stack
height of both taper bearings. Select a washer to put the difference in
stack height to 1 mm. If the stack height is already within 1 mm then do
not use any washer.
The washer will be placed onto the stem first (before the seal and taper
bearing)
We do have some swing arm kits for street applications, but not a complete
line. If you can supply us with the dimension of the components we can
typically supply all or some of the parts.
Regards
Kevin"
I'll put the stem in the freezer until I get to measure the old bearings
Leave a comment:
-
I removed the old bearings from the stem, and was about to press the new lower bearing on. The bearings are conversion bearings from All Balls. In the package was these two spacers. They are about the same with as the stem, and I'm not sure where they go.. Anyone who knows? There a two spacers in the pack with the lower bearing (tapered bearing) and two in the pack with the upper bearing.
The spacers look like this:
Leave a comment:
-
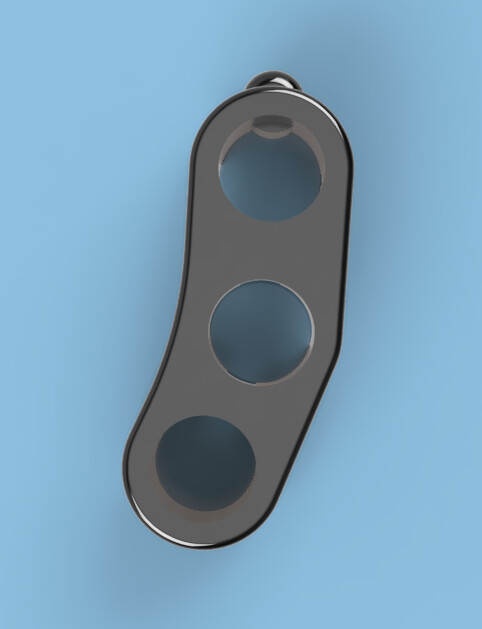
Modelled the bakside and printed both parts:

Printing the clamp lying down wasn't a good idea..

Both because of finish and strength:

The housing turned out ok, one of the threaded holes was a bit off. I'll correct it and print new ones. The clamp I'll print lying on its side.

Leave a comment:
-
I designed and rendered Version 1 of the switch housing. I'll 3D print one tomorrow to see if it seems OK.


 Last edited by LarsKroghStea; 03-31-2021, 07:45 PM.
Leave a comment:
-
Thanks, but I think this was a badly phrased question on my part :/ Some of the aluminum casting has broken off, and the threads are gone with it:Originally posted by nate665 View Post

There's too little thread left to hold the bolt properly. Usually, I would use some strong reinforced filler. But I'm afraid it wont expand at the same rate and probably work itself loose. is welding the only option?Leave a comment:


Leave a comment: