Once you compressed the spring the valve retainer came up through the hole and you could remove it then. You might be able to come up with a version for the bike head. Just remember, the longer the handle on the pry bar, the better the leverage.
Hillbilly Valve Spring Compressor
Collapse
X
-
Guest
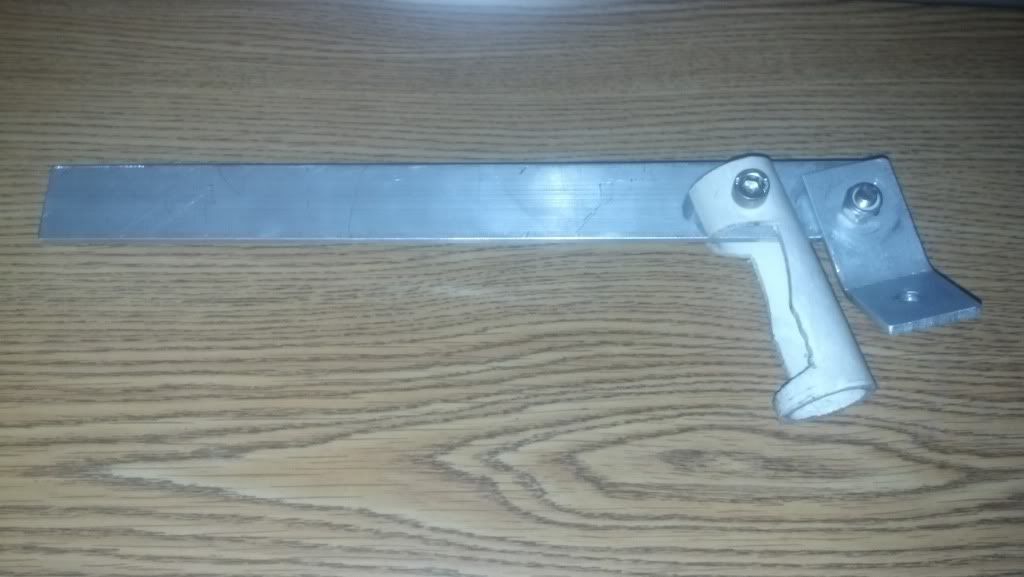
They way we used to do on car heads was bring the piston to the top. that way if the valve dropped the piston would stop it and you can still grab it to pull it back. As for depressing the valve spring we had a special pry bar for that. The pry bar locked on using the rocker arm stud using just a washer and nut. It then had a large flat type of washer welded to the pry bar that went over the spring cover/bucket with a decent hole in the middle.
Once you compressed the spring the valve retainer came up through the hole and you could remove it then. You might be able to come up with a version for the bike head. Just remember, the longer the handle on the pry bar, the better the leverage. -
something that would bolt on to the head maybe? using the valve cover bolt holes....
a bit of rummaging through a scrap pile i bet you could find something.2002 bmw r1150gs 1978 gs1000E skunk les pew 1982 GS1100
1980 gs1000G the ugly RLAMComment
-
There is an overhead spring compressor. I have one from ebay.
Comment
-
GelandeStrasse
I've read that it can be done by pressuring up the cylinder with an airline. Guess you'd need a fairly high pressure. Sounds feasible, I'll try it next time I need new seals.Last edited by Guest; 03-01-2013, 03:47 PM.Comment
-
almarconi
The compressed air will hold the valve in place but you still need something to compress the spring so you can get the keeper installed. This is not a job I would look forward to doing with the head on the bike.I've read that it can be done by pressuring up the cylinder with an airline.Comment
-
GelandeStrasse
No more complicated than making an ordinary redneck spring compressor?Comment
-
I removed and replaced the valve stem seals on my KLR650 (same shim-over-bucket setup as a GS) with an air hold and this home made compressor device.
I used 40 psi to hold the valve up once I had the keepers off, and increased it to 60 psi while I was actually working on the valve. No scientific reason -- this just felt right. YMMV -- GS valves are a bit smaller, so you may want to use a bit more pressure.
I also put the piston at TDC so the valve wouldn't drop all the way out if I lost air pressure. I made sure to secure the crank VERY well so the engine couldn't rotate with the air pressure. You'd want to do the same with a GS; set it to TDC, do those cylinders (1 and 4), then rotate 180 degrees and do the others. Fortunately, a GS is easy to re-time when you rotate the engine with the camshafts out.
The angled bit with the hole bolts to one of the cam cap holes. To move from the intakes to the exhausts, I reversed the fittings on the lever.
I thought I would just use the PVC to get the shape right then re-create it with metal tubing, but as it turned out the PVC held up just fine.
I'm pretty sure something similar would work with a GS. It was a tight fit on the KLR, but it worked. Pulling the old valve stem seals was the hard part, since there was so little vertical clearance to get my puller (a modified pair of large needlenose pliers) in there.
1983 GS850G, Cosmos Blue.
2005 KLR685, Aztec Pink - Turd II.3, the ReReReTurdening
2015 Yamaha FJ-09, Magma Red Power Corrupts...
Eat more venison.
Please provide details. The GSR Hive Mind is nearly omniscient, but not yet clairvoyant.
Celeriter equita, converteque saepe.
SUPPORT THIS SITE! DONATE TODAY!
Co-host of "The Riding Obsession" sport-touring motorcycling podcast at tro.bike!Comment
-
GelandeStrasse
Thanks for sharing, super useful info! I will definitely try thatI removed and replaced the valve stem seals on my KLR650 (same shim-over-bucket setup as a GS) with an air hold and this home made compressor device.
I used 40 psi to hold the valve up once I had the keepers off, and increased it to 60 psi while I was actually working on the valve. No scientific reason -- this just felt right. YMMV -- GS valves are a bit smaller, so you may want to use a bit more pressure.
I also put the piston at TDC so the valve wouldn't drop all the way out if I lost air pressure. I made sure to secure the crank VERY well so the engine couldn't rotate with the air pressure. You'd want to do the same with a GS; set it to TDC, do those cylinders (1 and 4), then rotate 180 degrees and do the others. Fortunately, a GS is easy to re-time when you rotate the engine with the camshafts out.
The angled bit with the hole bolts to one of the cam cap holes. To move from the intakes to the exhausts, I reversed the fittings on the lever.
I thought I would just use the PVC to get the shape right then re-create it with metal tubing, but as it turned out the PVC held up just fine.
I'm pretty sure something similar would work with a GS. It was a tight fit on the KLR, but it worked. Pulling the old valve stem seals was the hard part, since there was so little vertical clearance to get my puller (a modified pair of large needlenose pliers) in there.

Comment
-
Guest
This is a Hillbilly method that works...
You don't need a window in the socket to remove the keepers.(collet)
If you hold the unmodified socket on the valve spring a diplomatic smack with a hammer on the socket will bump the keepers out.
Pre-compress the springs and zip tie them for installation.Last edited by Guest; 03-02-2013, 09:50 PM.Comment
-
Call Me Ahab -
Guest
Yeah you can do that, though still need the piston at the top just in case the air pressure is some how released. It can happen and I've seen it happen, doesn't take much either.Comment
-
sigpic
mine: 2000 Honda GoldWing GL1500SE and 1980 GS850G'K' "Junior"
hers: 1982 GS850GL - "Angel" and 1969 Suzuki T250 Scrambler
#1 son: 1986 Yamaha Venture Royale 1300 and 1982 GS650GL "Rat Bagger"
#2 son: 1980 GS1000G
Family Portrait
Siblings and Spouses
Mom's first ride
Want a copy of my valve adjust spreadsheet for your 2-valve per cylinder engine? Send me an e-mail request (not a PM)
(Click on my username in the upper-left corner for e-mail info.)Comment
-
oldgsfan
I don't have the equipment to cut up a socket, so I went to Harbor Freight and wandered around until I spotted a $5 oxygen sensor socket.
I've never changed an oxygen sensor, but for some reason it gets a special socket with a panel missing. So it's pretty much the same idea, except the cutting is already done for you.

This gave me the access I needed to get those little keys out.

Worked great, especially for someone like me who doesn't plan on doing this job again!Comment
-
I have heard of a rope in the cylinder to remove the springs for refreshing stem seals before with the head on the bike.
So how do you get the rope in so you can jam it with the piston? Thru the intake port or something?
I admittedly haven't done a search for such tricks...sorry.MY BIKES..1977 GS 750 B, 1978 GS 1000 C (X2)
1978 GS 1000 E, 1979 GS 1000 S, 1973 Yamaha TX 750, 1977 Kawasaki KZ 650B1, 1975 Honda GL1000 Goldwing, 1983 CB 650SC Nighthawk, 1972 Honda CB 350K4, 74 Honda CB550
NEVER SNEAK UP ON A SLEEPING DOG..NOT EVEN YOUR OWN.
I would rather trust my bike to a "QUACK" that KNOWS how to fix it rather than a book worm that THINKS HE KNOWS how to fix it.Comment
-
Ed
To measure is to know.
Mikuni O-ring Kits For Sale...https://www.thegsresources.com/_foru...ts#post1703182
Top Newbie Mistakes thread...http://www.thegsresources.com/_forum...d.php?t=171846
Carb rebuild tutorial...https://gsarchive.bwringer.com/mtsac...d_Tutorial.pdf
KZ750E Rebuild Thread...http://www.thegsresources.com/_forum...0-ResurrectionComment


Comment