Announcement

Collapse
No announcement yet.

GS450 Surreptitious Engine Reassembly

Collapse
X
 
  • Filter
  • Time
  • Show
Clear All
new posts

    GS450 Surreptitious Engine Reassembly

    Hey Guys (and Gals?),
    Hope everyone's having a great week.

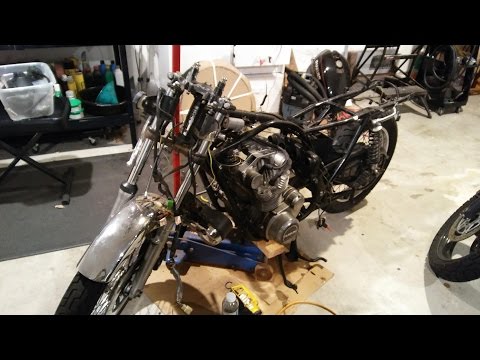
    I lost all my oil a month or so back and managed to seize the engine. In spite of advice saying to "just buy a new engine" and other expensive options, I've decided to try my hand at repairing my old gal, if nothing else than to learn more about these engines, and engines in general.

    I've never taken an engine apart, so I'm a wee bit out of my comfort zone. A couple of pointers and advice would help a lot in getting me back out of the forest.

    Questions:
    1. How do I ensure that the counter-balance is correctly oriented when I reassemble the crank assembly into the case?
    2. Is there anything I should pay attention to that isn't so obvious now that I have the case split?
    3. Do I need to add any RTV to the case halves when reassembling, as it looks like there was a little bit already in place
    4. Is it a bad idea to blue loctite every bolt as I reassemble?


    Some remarks: Those two hex nuts up above where the oil filter goes are literally the toughest bolts I've ever had to crack in my life. Also, don't, don't, don't buy a polymer movers dolly from Horror freight to rest your engine on, 1000lb capacity be damned. The surreptitious part of the title is because I'm doing this engine work against my complex's rules right in my carport.

    Pics next post.
    1982 GS 450L aka Lil' Red
    1980 GS 1000G aka Big Red (Resto-mod WIP)

    #3
    Do you have a copy of the factory manual?
    Ed

    To measure is to know.

    Mikuni O-ring Kits For Sale...https://www.thegsresources.com/_foru...ts#post1703182

    Top Newbie Mistakes thread...http://www.thegsresources.com/_forum...d.php?t=171846

    Carb rebuild tutorial...https://gsarchive.bwringer.com/mtsac...d_Tutorial.pdf

    KZ750E Rebuild Thread...http://www.thegsresources.com/_forum...0-Resurrection

    Comment


      #4
      This guy’s whole YouTube series on a GS 550 rebuild (4 cylinder, not a twin) is excellent and enjoyable to watch. He was very thorough in his documentation of every step. I watched them all. Will give you a good idea what you’re up against. I personally am not into café racers, but think his bike is very tastefully done.

      Urban Monk TV
      Rich
      1982 GS 750TZ
      2015 Triumph Tiger 1200

      BikeCliff's / Charging System Sorted / Posting Pics
      Destroy-Rebuild 750T/ Destroy-Rebuild part deux

      Comment


        #5
        Good on you for diving into the engine tear down. Like Ed said, the manual is out there, do you have it?
        The bottom end, from what what I can tell so far doesn't look like a motor that had locked up. If you do not have these things yet, I would get them soon, even the Harbor Freight stuff is ok, a torque wrench, some Vernier Calipers and some metric taps to chase some threads.
        As for what to add thread locker to, see Ed's mention above, the manual will state what bolts and nuts to add thread locker.
        How do the cylinders look? All motors I have seized needed oversized pistons and a rebore.
        1981 Suzuki GS250T
        1982 Yamaha Seca Turbo
        1985 Suzuki GS550E
        2004 Suzuki GSF1200S

        Comment


          #6
          Many thanks for your advice so far fellas.

          Ed, I have the engine portion of the factory service manual as well as torque specs printed out.

          fbody_mike, I've got both a digital vernier and a digital micrometer, metric taps, a digital torque wrench and a moderately young back to handle all this hunching over a carefully shaped assembly of metal.

          HAven't looked at the cylinders yet, I oiled them with Marvel Mystery via the spark plugs first thing once I was towed home. They slide as I struggle to remove the con-rod caps (is that the correct term?) but I expect at the least a honing is in order, I rented a compression-check kit too. I'll handle the jugs/upper portion later, if that's sensible to you folks.

          Rich, thanks for those videos, I'll be watching the rest of the dude's videos tomorrow.

          It's a lot of work, but it's nice to learn something new. I expect a few years from now I'll be wondering why I thought hunching over an engine was a good idea, but it sure beats drinking myself to sleep

          I found the point about the counter-balancer, specifically matching the punch marks. I really admire the Japanese for their attention to detail beyond factory floor assembly. And their foresight to listen to W. Edwards Deming, for helping to foster their culture of quality which the US industries ignored, and are still playing catch-up on.
          1982 GS 450L aka Lil' Red
          1980 GS 1000G aka Big Red (Resto-mod WIP)

          Comment


            #7
            This is all very doable without experience, my first foray into the Suzuki mechanical world beyond just oil and filter changes is exactly what you're doing now, although my engine rebuild was triggered by my own mis-diagnose of a gearbox issue rather than having it seize up.

            Sounds like you've got all the right advice to start with (and I'm no guru either) but will keep an eye out in case I can add anything useful.

            Good on you for tackling this also!

            I'll potentially be revisiting the top end of my own 450 some time next year as the compression is down a bit. When I rebuilt it, it had something like 96K kms on it, and it was so clean inside I simply installed new rings, cleaned everything up, and put it back together. I've since done around 90K kms on it so I have no doubt it's time to consider a big bore kit and possibly some valve seat TLC to get it humming along nicely again.
            1982 GS450E - The Wee Beastie
            1984 GSX750S Katana 7/11 - Kit Kat - BOTM May 2020

            sigpic

            450 Refresh thread: https://www.thegsresources.com/_foru...-GS450-Refresh

            Katana 7/11 thread: http://www.thegsresources.com/_forum...84-Katana-7-11

            Comment


              #8
              Hey Pete, appreciate the kudos.

              So a quick question: What is that part with the little nub & spring? I'm not sure where it came from in spite of my best efforts to stay organized.


              Took the big ends off the connecting rods. Ooooof. The babbit from the inserts actually dug its way into the oil holes on the crank.


              Luckily I was able to push it out in mostly contiguous pieces with the flat end of a 2.5mm hex driver


              Crank's looking pretty bad, man. Forgot to take a pic once I'd cleared the oil holes.


              WD-40 Oiled 250 grit and light but fast sanding with a doubled shoelace..


              Then dry 1000 grit, followed by WD-40'd 1000...


              Last pass with a piece of cloth and Noxon metal polish (I think they got the idea for the name from how noxious it smells), then a dry cloth. Do the polishing again, if the finish isn't quite up to par.

              After cleaning all oil holes with carb cleaner from top to bottom, then air blasting and careful inspection, the surface looks almost mirrored and there is no obvious debris in the oil holes.

              The finish wound up better than the pic shows. Added some oil from the top oil hole to prevent any flash rust, inside & out. I'll keep you all posted.
              1982 GS 450L aka Lil' Red
              1980 GS 1000G aka Big Red (Resto-mod WIP)

              Comment


                #9
                The crankpin diameter is 34mm. The clearance is .001" - .002". The good news is that it appears the babbit got hot and smeared on the crankpin before the crank journal had time to get hot. Typical rod bearing failures are 'end of crank' damage. You'll need to very accurately measure the journals. The crankpin pretty much has to measure within a thou of that 34mm.

                The crank is a centrifuge, spinning oil off at a huge G load. If it's leaving faster than the feed can supply, the bearing fails. There isn't any room for error at 9,000 rpm. If you can get within the .002 limit for clearance you should be fine. More than that and you're better off searching for a crank.
                '82 GS450T

                Comment


                  #10
                  I understand what you're saying John. I don't really have a way to measure ovality of the part, just a harbor frieght digital caliper. I'll do my best with an non-professional tool. I wonder if there's any part within the engine I can use as an accurate measurement to compare what the calipers read?

                  I'm taking a leap by ordering crank pin inserts at the -020 thickness, so I can at least do the plastigage measurements. If the measurements go beyond what the thickest inserts Suzuki sells can handle, new crank time for sure.

                  A question: I was under the impression that people remachine their crank surfaces on occasion when things like this happen, and in fact that'd be why Suzuki sells inserts of varying thicknesses, besides accounting for their internal machining variances. Isn't that true, or am I drawing strange conclusions?
                  1982 GS 450L aka Lil' Red
                  1980 GS 1000G aka Big Red (Resto-mod WIP)

                  Comment


                    #11
                    Originally posted by free99 View Post
                    Hey Pete, appreciate the kudos.

                    So a quick question: What is that part with the little nub & spring? I'm not sure where it came from in spite of my best efforts to stay organized.


                    Your crank questions are a little out of my league unfortunately, the only crank issue I've had to deal with was the Katana crank needing truing up which I got a professional to do for me.

                    However, I can answer your spring question, and that's the bit that indicates the gear position in combination with the gear indicator switch. The gearbox shifting shaft has a hole in the end that sits under the sprocket cover and those get inserted in there, and the gear position indicator switch mounts over it. You'll see some contact pads on the underside of the gear position indicator switch, and that little nib rotates with the shifting shaft to ground those contact pads when in each gear or in neutral.

                    Here's the parts fiche link from the dealer I use here, you're looking at parts 41 and 42: http://www.mickhone.com.au/partFinde...ifting#content
                    1982 GS450E - The Wee Beastie
                    1984 GSX750S Katana 7/11 - Kit Kat - BOTM May 2020

                    sigpic

                    450 Refresh thread: https://www.thegsresources.com/_foru...-GS450-Refresh

                    Katana 7/11 thread: http://www.thegsresources.com/_forum...84-Katana-7-11

                    Comment


                      #12
                      This just so happened to be my entry in the pic of the week game this week.

                      Rich
                      1982 GS 750TZ
                      2015 Triumph Tiger 1200

                      BikeCliff's / Charging System Sorted / Posting Pics
                      Destroy-Rebuild 750T/ Destroy-Rebuild part deux

                      Comment


                        #13
                        Originally posted by free99 View Post
                        I understand what you're saying John. I don't really have a way to measure ovality of the part, just a harbor frieght digital caliper. I'll do my best with an non-professional tool. I wonder if there's any part within the engine I can use as an accurate measurement to compare what the calipers read?

                        I'm taking a leap by ordering crank pin inserts at the -020 thickness, so I can at least do the plastigage measurements. If the measurements go beyond what the thickest inserts Suzuki sells can handle, new crank time for sure.

                        A question: I was under the impression that people remachine their crank surfaces on occasion when things like this happen, and in fact that'd be why Suzuki sells inserts of varying thicknesses, besides accounting for their internal machining variances. Isn't that true, or am I drawing strange conclusions?
                        There are four, colour coded , sizes of standard bearing shells. They cover a range of about a thou. There are two undersizes for crank regrinds at 1.625mm and 1.750mm which correspond to .010" and .020" under regrind.

                        As you can see, the tolerances are pretty precise. I'd take the crank to a machine shop and have them measure the journals you have. If the number comes up at 1.3376" [33.976mm] or larger you can use the crank. If less, you're probably best off looking for a used crank. I'm not sure if a GS500 crank is the same. ??

                        I'm not sure what you mean by crank pin inserts. Connecting rod bearings of .020 undersize are thicker and will not go over the standard crank; you'd need the standard bearings to do it that way.
                        '82 GS450T

                        Comment


                          #14
                          Originally posted by John Park View Post
                          There are four, colour coded , sizes of standard bearing shells. They cover a range of about a thou. There are two undersizes for crank regrinds at 1.625mm and 1.750mm which correspond to .010" and .020" under regrind.

                          As you can see, the tolerances are pretty precise. I'd take the crank to a machine shop and have them measure the journals you have. If the number comes up at 1.3376" [33.976mm] or larger you can use the crank. If less, you're probably best off looking for a used crank. I'm not sure if a GS500 crank is the same. ??

                          I'm not sure what you mean by crank pin inserts. Connecting rod bearings of .020 undersize are thicker and will not go over the standard crank; you'd need the standard bearings to do it that way.
                          Ah ok, replace "pin insert" with "bearing shell". That said, I'm certain I've reduced the diameter of the crank's journals for the connecting rods, at the least because of mild grinding with sandpaper. Because of the reduction of journal diameter, I'd need thicker shells to try to keep the gap between journal and shell surface within spec... right?
                          I must be misunderstanding what you're saying in that last sentence.
                          1982 GS 450L aka Lil' Red
                          1980 GS 1000G aka Big Red (Resto-mod WIP)

                          Comment


                            #15
                            FWIW, you can get a very serviceable digital micrometer from Harbor Freight that reads in MM or inches.
                            Amazing deals on this Digital Micrometer at Harbor Freight. Quality tools & low prices.


                            It's plenty accurate and precise for piffling money. The only real downside to the thing is that the cheap electronics drain the battery. Take the battery out between uses and keep a spare around, and you'll be fine.

                            All that said, without the measurements a machine shop could do, it's impossible to tell how much you've removed from the crank pin, and it's certainly not round any more, or flat side-to-side.

                            John Park's advice to employ a machine shop is the best way forward if you want to end up with a reliable engine using this crank. Could you get it to run in your carport with shoestrings and sandpaper? Sure. Would the result be something you can trust on a long trip? Probably not.

                            Anything can be fixed with enough money, but it's also nearly certain that the best financial decision would be to find another crank that's not damaged. You might have to buy the surrounding engine or bike along with it and scrap the parts you don't need, but you also don't need to care about cosmetics, title, etc.
                            1983 GS850G, Cosmos Blue.
                            2005 KLR685, Aztec Pink - Turd II.3, the ReReReTurdening
                            2015 Yamaha FJ-09, Magma Red Power Corrupts...
                            Eat more venison.

                            Please provide details. The GSR Hive Mind is nearly omniscient, but not yet clairvoyant.

                            Celeriter equita, converteque saepe.

                            SUPPORT THIS SITE! DONATE TODAY!

                            Get "The Riding Obsession" sport-touring motorcycling podcast at https://tro.bike/podcast/ or wherever you listen to podcasts!

                            Comment

                            Working...
                            X