• Required reading for all forum users!!!

    Welcome!
    Register to access the full functionality of the GSResources forum. Until you register and activate your account you will not have full forum access, nor will you be able to post or reply to messages.

    A note to new registrants...
    All new forum registrations must be activated via email before you have full access to the forum.

    A Special Note about Email accounts!
    DO NOT SIGN UP USING hotmail, outlook, gmx, sbcglobal, att, bellsouth or email.com. They delete our forum signup emails.

    A note to old forum members...
    I receive numerous requests from people who can no longer log in because their accounts were deleted. As mentioned in the forum FAQ, user accounts are deleted if you haven't logged in for the past 6 months. If you can't log in, then create a new forum account. If you don't get an error message, then check your email account for an activation message. If you get a message stating that the email address is already in use, then your account still exists so follow the instructions in the forum FAQ for resetting your password.

    Have you forgotten your password or have a new email address? Then read the forum FAQ for details on how to reset it.

    Any email requests for "can't log in anymore" problems or "lost my password" problems will be deleted. Read the forum FAQ and follow the instructions there - that's what we have one for...

  • Returning Visitors

    If you are a returning visitor who never received your confirmation email, then odds are your email provider is blockinig emails from our server. The only thing that can be done to get around this is you will have to try creating another forum account using an email address from another domain.

    If you are a returning visitor to the forum and can't log in using your old forum name and password but used to be able to then chances are your account is deleted. Purges of the databases are done regularly. You will have to create a new forum account and you should be all set.

1982 1100E 530 Chain Conversion Thread

  • Thread starter Thread starter Turtleface
  • Start date Start date
T

Turtleface

Guest
Slowly working at getting broken/inadequate bits replaced on the GS as swiftly as funds allow. Man, when you're drooling over parts, those two weeks between paydays seem like years. This thread's going to be about a few specific parts, mostly the chain, and both front and rear sprockets.

I attempted to locate a 630 chain when I discovered a few FUBAR o-rings in my OE chain. I gave up after my twenty-third negative response, and decided to just go ahead and complete the 530 conversion. So, parts were ordered, shipped, and they arrived yesterday. I'll probably wait until the weekend to commence the conversion, since I'll have Saturday and Sunday off, and I'd much rather take my time and be as particular as possible while turning wrenches.

So, my parts list is currently:

1 - 48 tooth rear sprocket
1 - 16 tooth front sprocket
1 - 6mm spacer
1 - 114 link Rk XO-ring Chain
1 - Chain masterlink

Here's the plan, in a step by step fashion, let me know if I've missed anything:

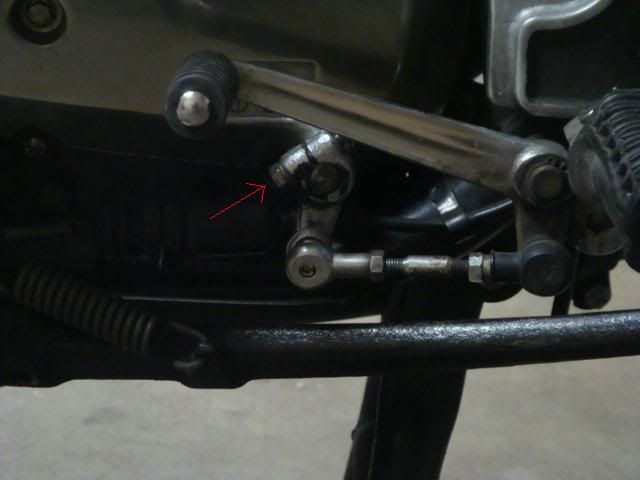
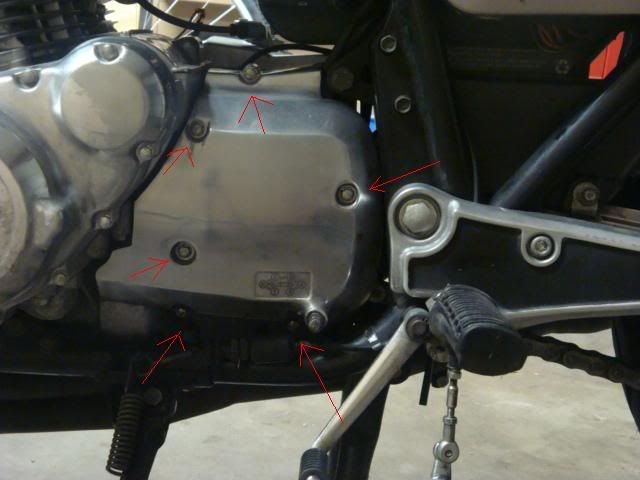
1. Remove chainguard
2. Remove front sprocket cover
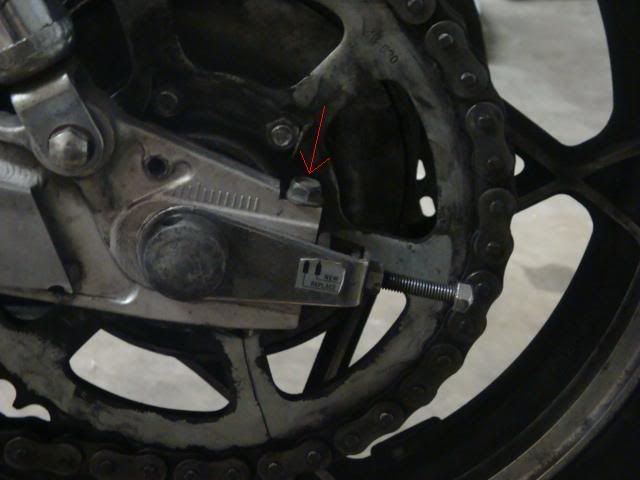
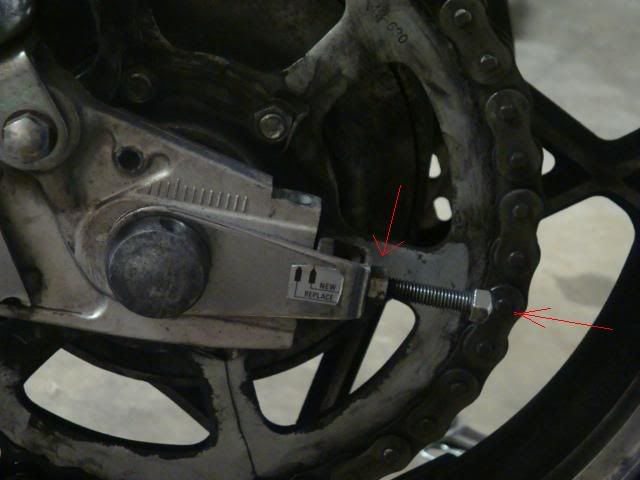
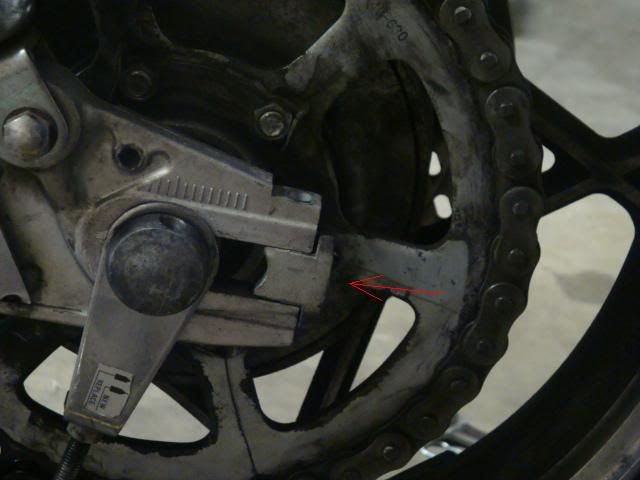
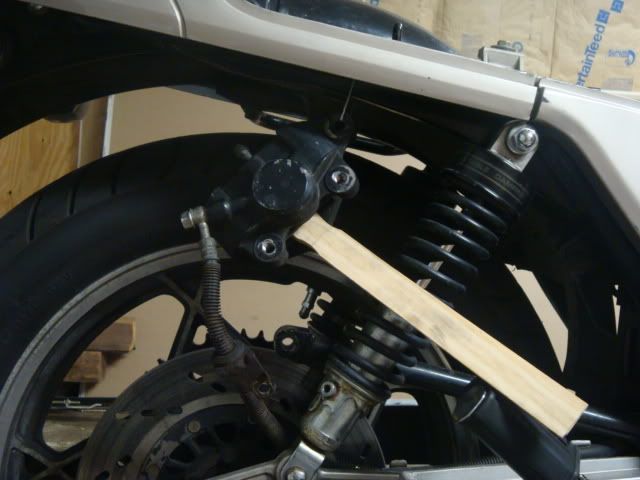
3. Untorque front sprocket bolts, using a block of wood and the bike's brakes to stop the sprocket from moving
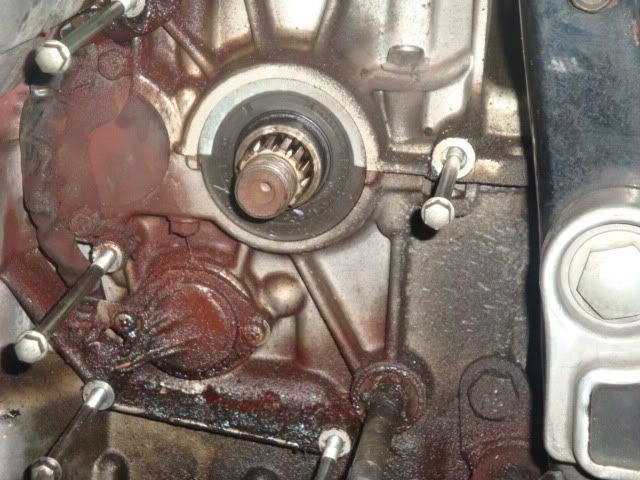
4. Break and remove chain
5. Remove front sprocket
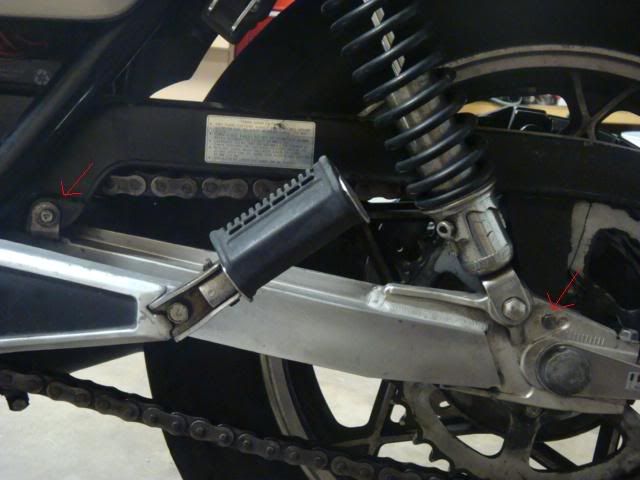
6. Remove rear wheel
7. Remove rear sprocket
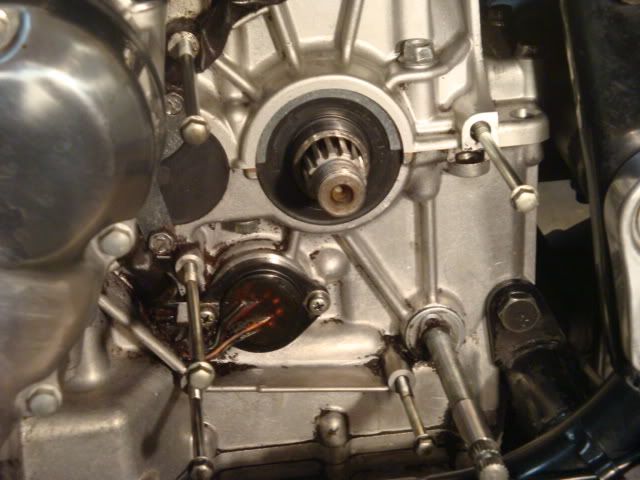
8. Install front sprocket on front sprocket shaft
9. Install 6mm spacer on front sprocket shaft
10. Install rear sprocket on rear wheel
11. Install rear wheel
12. Install chain onto both sprockets, test for length
13. Size chain to fit, if needed
14. Install masterlink, closed end towards the direction of travel, with a glob of silicone to ensure it stays put
15. Re-adjust rear wheel for straightness
16. Re-adjust chain for optimum slack
17. Clean factory preservative off chain
18. Lube chain
19. Double check everything
20. Double check everything - again

How's it sound? I miss anything? When the weekend rolls around and I actually start this mini-project, I'll populate this thread with as many pictures as I can. I went with the 16 tooth front for a touch more pep around town. I usually only do one 200-300 mile rides a month, the rest of my time is spent commuting at around 45-60 MPH, and I think the 16 toother should be just about perfect for my style of driving.
 
Last edited:
have not done 530 conversion even though everyone says i should but if the 630 is that hard to find might have to?so I will be looking at this thread to see how it goes
 
Yep, this is in my future for sure. Not sure how my potential rear end mods effect it.
 
Yep, this is in my future for sure. Not sure how my potential rear end mods effect it.

You were planning on a different rear wheel, right? Probably just have to locate the correct rear sprocket, and make sure both sprockets line up correctly. If you have to replace the chain, might as well do the conversion. Price is cheaper than doing a 630 chain and sprockets, and you get a wider selection of parts. Front and rear sprocket, chain plus the spacer and a masterlink, ran me just shy of $170, shipped, from Z1. Same setup for a 630 is nearly $200, before shipping, even without the added expense of the spacer. :eek:
 
List, nice, wish I was better at making them!

Yes, gonna run the 3 spoke 5.5" bandit wheel. The same exact wheel is on the non-titled RF900 I got for $200 and have been parting out. I have to get a chance (maybe this weekend) to pull the rear wheel on the E and see if it will fit with a 170 tire, or if I'm going to have to do a swingarm conversion (probably), but I also have the RF900 swinger (heavy parts are harder to sell because of shipping cost), and odds are it can be made to work. It already has the mount for the torque arm mounted on the bottom to covert to the RF900 brakes, but it's a monshock, so have to fab the shock mounts..
 
What I like is the 8 lbs of rotating mass you lose when you go to a 530. YOur engine will thank you.
 
In my former life (before retirement) I worked for a few years as a MFG ENG .... nice process sheet! BTW what is the spacer for? Chain alignment?

Thanks
Dom
1 - 48 tooth rear sprocket
1 - 16 tooth front sprocket
1 - 6mm spacer
1 - 114 link Rk XO-ring Chain
1 - Chain masterlink
 
spacer is for the outside of the front sprocket. the stock 630 coutnershaft sprocket has a dampener of sorts and the 530 does not. if you don't use the spacer then the nut won't tighten down on the sprocket.

he has gone with a 16/48 ratio to livin up the bottom end and midrange. the diff from stock ratio is about 9 mph less top end and almost 300 rpm higher @ 60 mph on the highway
 
Last edited:
What ratio would you use to keep rpm @60 m.p.h. the same as stock 630 chain or is that as close as you can get,I would like to keep r.p.m the same or lower at highway speed, just fine on low and mid range??
 
What ratio would you use to keep rpm @60 m.p.h. the same as stock 630 chain or is that as close as you can get,I would like to keep r.p.m the same or lower at highway speed, just fine on low and mid range??

17/48 will put you within 32rpm @ 60mph on the good side. In other words you will be 32rpm higher @ 60 all things being equal.

16/45 will get you to 17rpm higher but they are quite a bit smaller in diameter than the 15/42 630. Even the 17/48 sprockets are smaller than the stock ones. You just have to watch pivot clearance for the chain if you get soo small with the sprockets.
 
spacer is for the outside of the front sprocket. the stock 630 coutnershaft sprocket has a dampener of sorts and the 530 does not. if you don't use the spacer then the nut won't tighten down on the sprocket.

Z1's website says the spacer is to replicate a boss on the 630 sprocket that provides clearance for the chain and cases. It says the boss is on the inside. When I mocked up the spacer/sprocket combo, the spacer on the inside put the sprocket in the exact same position on the shaft as the old one, determined by measuring the remainder of the splines that protrude from the center of the sprocket. Is the rear sprocket of a different offset than the stock on? Without measuring, it looks pretty much the same. This is the wording from their website:

Sprocket spacing is important too - on the two front sprockets above, you will see the 630 version has a slight boss (raised area) to the inside - to be able to switch to the 530 equivalent sprocket, spacers must be added to give enough clearance between the chain and the engine cases.

Wrong answer,

As seen below, the stock sprocket has the 6mm damper sandwiching the sprocket. What it does not show is the id of the hole on the other side is larger for the bushing to slide into. The bushing rests against the sprocket itself. The sprocket on the 82/83 750 and 1100 katanas are flat. no boss. The sprockets I have removed from other 1100 motors have been the same.

undo the three screws on your stock sprocket ( will need an impact driver) and see for yourself and report back. Spacer goes to the outside as you can see in the picture. The nut tightens up against spacer.

In the second picture of an actual stock 630 you will see there is about a 0.040" recess in each side of the sprocket were the damper lives (Not a 6mm). This is just cut into the side of the sprocket and the outer edges are flush with the teeth of the sprocket.

630.jpg
6302.jpg
 
Last edited:
Katman, you're not talking about the number 48 piece in that fiche are you? The spacer I'm talking about isn't listed in either of the pictures you posted.

Here's a picture of the stock pieces I took off:
DSC00637.jpg


Here's a picture of the new sprocket
DSC00638.jpg


Here's a picture of the spacer I'm confused about
DSC00639.jpg


Here's one way I could put these pieces on
DSC00641.jpg
 
Here's the other way
DSC00640.jpg

that's the correct way dude. Make sure you put the locking washer between the spacer and the nut.

If you take the shaft bushing off you will see it fits inside the indide of the stock sprocket outer damper. the hole is larger on the inside.
 
Last edited:
that's the correct way dude. Make sure you put the locking washer between the spacer and the nut.

If you take the shaft bushing off you will see it fits inside the indide of the stock sprocket outer damper. the hole is larger on the inside.

Ok, I see how that works now. Thanks a ton. I'm glad I planned on this being a few days project, instead of trying to knock it out in a few hours. Gives me time to consult the Resources. Once I've got everything cleaned, re-lubed, and re-torqued, I'll post pics of the entire process, probably sometime tomorrow night. We'll have ourselves a nice pictorial tutorial for everyone else to follow.
 
Progress So Far

Progress So Far

Well, it's been a full day, that's for sure. Now that I've figured out how everything works, this seems like a pretty simple task, all in all. I've gotten everything apart and clean. Ready for it all to go back together tomorrow. I recently received a free center stand for my bike, from the PO, and recommend one to anyone who doesn't have one. It sure makes this procedure a breeze. The biggest problem I ran into was finding the motivation to scrub, scrub, scrub, scrub and scrub some more. Cleaning was the biggest time consumer today. Here's how I progressed:

Step01.jpg


Started by removing this bolt, and pulling the shift linkage off the shaft.

Step02.jpg


Next, these six bolts come out. They're all different lengths, so I just kept them in the sprocket cover, or threaded into their holes, to remember where each one went.

DirtyFrontSprocketArea.jpg


Here's what my front sprocket area looked like when I pulled the cover. Gross! The red stuff seems like a mixture of dirt and chain-lube. Looks like a rusty mess, but it's all just gunk. You can see the build up right above the bottom bolts. That stuff had to be chiseled out with a screwdriver.

Step03.jpg


Remove these two bolts and get the chain guard out of the way. Now's a great time to clean it up, while you have it off. At this point in time, I ran a piece of 1x2 pine through the rear wheel, and situated it so that it braced the wheel against the swing arm so I could remove the front sprocket nut. After that, I cut the dead chain off with an angle grinder.
 
Step04.jpg


Next, I unbolted the bolt on the top of the swingarm, the one holding the adjuster blocks in place.

Step05.jpg


Back off the lock nut, and remove the adjuster bolt far enough to swing the adjuster down out of the way.

Step06.jpg


Remove the adjuster block. Repeat for the other side. At this point in time, I chased all the threads in the both of the adjuster assemblies. There was surface rust on mine, and this cleaned them up nicely. Action is now nice and smooth, everything turns well without any sort of binding.

Step07.jpg


Remove the cotter pin on the castle nut, the castle nut, and the two bolts holding on the caliper. I slide the caliper onto a pair of Home Depot paint sticks at were approximately the same thickness as the rotor. Hopefully this keep the pistons pushed in, eliminating the need for brake bleeding later.
 
Here are the paint sticks in holding the pistons apart.

BrakePadSeperator.jpg


I tied the caliper to the frame with picture hanging wire, I wrapped the wire with black electrical tape where it contacted the frame, to prevent damage.

After the caliper's off, remove the cotter pin holding the rear axle. Remove the nut on the end of the axle, a screwdriver through the hole in the axle on the opposite side will help, and then the whole axle and wheel assembly should pull out from the swingarm. I took the opportunity to clean the swingarm, and the axle spacers and axle. I cleaned up the sprocket carrier as well, and all the hardware.

Here's the rear axle assembly, with spacers!

DirtyAxleSpacers.jpg


And here's what the same parts look after a quick bath, and reinstalled on the cleaned swingarm.

CleanRearAxleSpacers.jpg


Just throwing everything back together so I don't lose anything. Here's a shot of the front sprocket cover area after a good cleaning.

CleanFrontSprocketArea.jpg


Got the vast majority of gunk off, there's still some in the harder to get to crevices. The rest will have to wait until I pull the engine next year for paint. I'm probably going to have everything soda blasted during prep.
 
Back
Top