• Required reading for all forum users!!!

    Welcome!
    Register to access the full functionality of the GSResources forum. Until you register and activate your account you will not have full forum access, nor will you be able to post or reply to messages.

    A note to new registrants...
    All new forum registrations must be activated via email before you have full access to the forum.

    A Special Note about Email accounts!
    DO NOT SIGN UP USING hotmail, outlook, gmx, sbcglobal, att, bellsouth or email.com. They delete our forum signup emails.

    A note to old forum members...
    I receive numerous requests from people who can no longer log in because their accounts were deleted. As mentioned in the forum FAQ, user accounts are deleted if you haven't logged in for the past 6 months. If you can't log in, then create a new forum account. If you don't get an error message, then check your email account for an activation message. If you get a message stating that the email address is already in use, then your account still exists so follow the instructions in the forum FAQ for resetting your password.

    Have you forgotten your password or have a new email address? Then read the forum FAQ for details on how to reset it.

    Any email requests for "can't log in anymore" problems or "lost my password" problems will be deleted. Read the forum FAQ and follow the instructions there - that's what we have one for...

  • Returning Visitors

    If you are a returning visitor who never received your confirmation email, then odds are your email provider is blockinig emails from our server. The only thing that can be done to get around this is you will have to try creating another forum account using an email address from another domain.

    If you are a returning visitor to the forum and can't log in using your old forum name and password but used to be able to then chances are your account is deleted. Purges of the databases are done regularly. You will have to create a new forum account and you should be all set.

1982 GS550LZ part numbers help / carb rebuild?

  • Thread starter Thread starter scurvy
  • Start date Start date
S

scurvy

Guest
Well, I'm down to the point of needing part numbers for my rebuild project - a 1982 GS550LZ and I need some help getting the following part numbers:

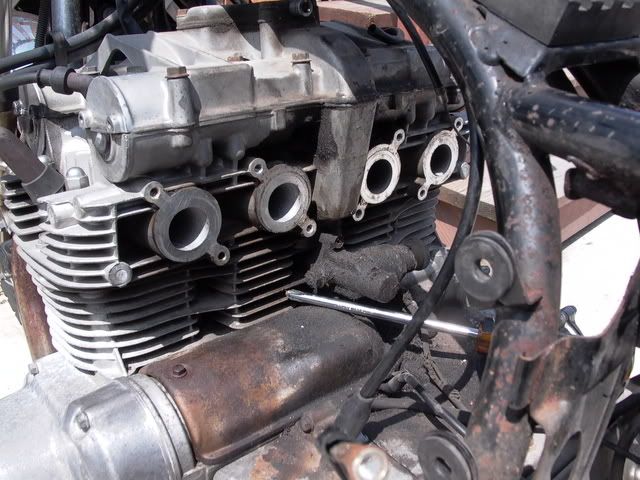
Carb-to-intake boots - 2 right, 2 left.
Carb-to-intake boot o-rings - 4
Carb-to-intake boot clamps - 4
Airbox plenum boot clamps - 4

From my experience with VW TDIs, the easiest way to get parts is to look them up in the electronic parts catalog (ETKA) and search for them directly. With GS motorcycles, does one typically just tell Cycle Recycle II or Z1 or bikebandit (or etc...) what you need, or is it easier to get the actual part number and shop around?

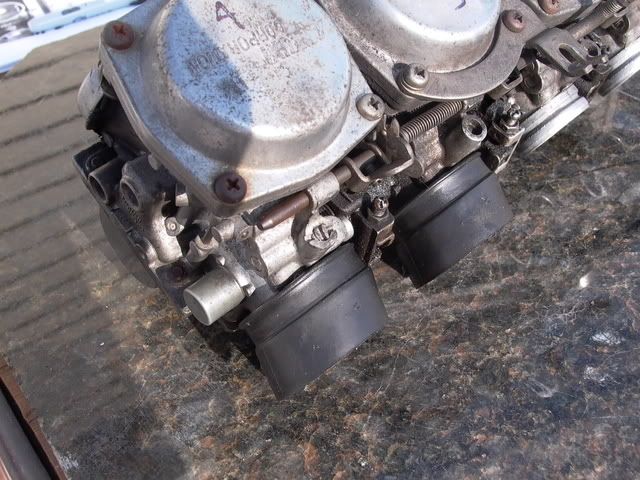
My other quandry is related to the carbs - to rebuild or not to rebuild? I'd actually like to be able to ride sometime this summer, and my intake boots have been ripped for so long, there's no telling how it would run once it's back together. Right now I'm leaning toward not rebuilding them (waiting until winter) and seeing how it acts once it's back together with new boots, o-rings, clamps & fasteners. Opinions?

Thanks!

scurvy
 
Last edited:
Possibly answering my own question here...

This is what I've found so far:
RH intake boots: 13110-47010
LH intake boots: 13120-47010
Intake O-rings: 09280-38004

Anyone able to help confirm or deny this? I found these on Alpha Sports' site.
 
Your part numbers look right.

Do the carb rebuild now. Order new floatbowl gaskets and an O-ring kit from cycleorings.com. Don't skip this critical step at this point in the game. Also, order a valve cover gasket, shim tool, and get the valves in order. Do this work up front and you will be rewarded with a bike that runs the way it should.

Good luck.
 
Do the carb rebuild now. Order new floatbowl gaskets and an O-ring kit from cycleorings.com.
WRT carb rebuild, what kits do you and others recommend, if any? Z1 has rebuild kits from K&L that will allegedly be back in stock today for my 550LZ which appear to come with floatbowl gaskets. Or do you recommend just taking everything apart, cleaning, replacing the o-rings & floatbowl gaskets and not replacing all the jets and other components? A little guidance here would be helpful.

Don't skip this critical step at this point in the game. Also, order a valve cover gasket, shim tool, and get the valves in order.
Fortunately read here about a 550 that had its tach drive gear & cam damaged by a too-thick RealGasket. I'm going for an OEM headgasket which will get a light coating (grease? floor wax? hylomar?) and socket head cap screws to replace the head bolts.

scurvy
 
More questions but no answers

More questions but no answers

Bumping this for myself (again) with a few more questions:

1. If I decide to simply disassemble, clean & reassemble the carbs (a la thegsresources' carb rebuilding pictorials), should I go ahead and source new rubber pilot jet plugs or chance it that my old ones haven't turned into black powder?

2. Upon everything being clean, is there a specification for how tightly everything goes back in? I.e., the air jet, pilot jet, main jet, air screw, etc... I've read that while bench syncing the carbs, you set the air screws 1-1/2 turns out but other than that, nothing on how tight to put everything else back in. Is it obvious once the carbs are apart? I've looked through the GS550 manual on BikeCliff's site and it's fairly bare when it comes to carb rebuilding. I reckon I should check my Clymer manual at home for this info and other, especially float heights, etc...

3. Well I already put a third number here but I can't recall what I was going to state, so this one's a freebie.

Thanks again,

scurvy
 
Re-bumping my own thread yet again... le sigh.

OK: I've got Z1 working on getting me prices for new parts and I'm ordering the carb o-rings, intake o-rings & various other bits & bobs from http://cycleorings.com but I remembered something strange. One of the airbox plenum to carb boots is loose on my bike. IIRC it seemed fairly flexible and pliable still, but I seem to recall reading a thread here about needing to replace those if they are loose. Can anyone confirm or deny this, or are those repairable with RTV/JB Weld/Library Paste/Brylcreem?

Thanks.
 
1. New o-rings, and floatbowl gaskets are typically all you are likely to need. Reuse the old jets, they don?t wear, and are exact matches to the carbs ? something that can NOT always be said of rebuild kits. Two possible exceptions to this are the float needle and seat and the rubber plugs. Inspect these parts carefully, particularly the needle, and replace accordingly. If the needle is worn, you might want to go the carb kit route since these parts are killer expensive to purchase from Suzuki.

2. The carb rebuild series on the GSR homepage covers the 550 carbs. Set the float height per the instructions. The pilot screws should be set to 3 turns from lightly seated. The various jets should be snugged down, but not too hard or you will strip the heads. The floatbowl screws should be FIRMLY snugged down to get a little gasket compression.

3. There is a metal ring that fits inside the airbox boots and holds them in place. This is a pretty weak design; sometimes the rings fall out (look on the bottom of your airbox). A little weatherstrip adhesive might be a good idea to try to hold them in place better (clean the parts really well with brake cleaner or similar to give the glue a chance to stick).
 
Nessim, you are the man! Thank you.

1. New o-rings, and floatbowl gaskets are typically all you are likely to need... Two possible exceptions to this are the float needle and seat and the rubber plugs.
Duly noted. I might get to pull the carbs apart today and take a look. Already ordered o-rings and such from Mr. Barr today. I'm waiting on Z1 to get back to me on the intake parts I need, but they (so far) have the best price on the floatbowl gaskets as well as some other bits & bobs.

T3. There is a metal ring that fits inside the airbox boots and holds them in place. This is a pretty weak design; sometimes the rings fall out (look on the bottom of your airbox).
Aha! That's what those two metal rings I found were. Well, jolly good, I should be fine, then.

Thanks again. This project is really starting to come together. twr1776 has been nice enough to lend his hand (and carbtune/colortune) to help balance & synchronize the carbs after I have it back together. Hopefully I'll be back on the road soon.

scurvy
 
One tip:

Getting the carb boots off can be a challenge because the screws don’t like to come out. The outer most screws can be turned using vise grips. Once this screw is removed, try rotating the entire boot counter-clockwise to crack loose the inner screw. Worked for me on my 550.

Good luck.
 
One tip:

Getting the carb boots off can be a challenge because the screws don?t like to come out. The outer most screws can be turned using vise grips. Once this screw is removed, try rotating the entire boot counter-clockwise to crack loose the inner screw. Worked for me on my 550.

Good luck.

Already done. \\:D/

My intake boots came loose with a large #3 Philips screwdriver and an adjustable wrench. The Harbor Fart impact driver I have doesn't seem to work worth two craps in a biscuit, so I gave them each a slight twist to tighten then they all came loose without much trouble.

P1060041.jpg


P1060043.jpg


P1060045.jpg
 
Just remember to use new stainless allen heads on the new carb boots to the cylinder head with antisieze, I have heard they do not let you into Indiana without them :-D Is your air pilot screw on # 4 movable? It looks like the top has been broken off in the picture. The airbox to carb rings you found in the airbox I think are tempered but you might be able to open them up slightly to get a better fit when you get to that point of re-assembly.
 
Just remember to use new stainless allen heads on the new carb boots to the cylinder head with antisieze, I have heard they do not let you into Indiana without them
Already ordered them today along with the carb o-ring and intake o-ring kits from cycleorings.com. They don't let you back into Illinois unless you can sing more than two (consecutive) verses of the Superbowl Shuffle.

Is your air pilot screw on # 4 movable? It looks like the top has been broken off in the picture
Good question. I'll pull it out of the car hole tonight and take a closer look.

The airbox to carb rings you found in the airbox I think are tempered but you might be able to open them up slightly to get a better fit when you get to that point of re-assembly.
I'll also have to check those this evening to see how they look. One of them was sitting in the bottom of the airbox, another was in the air plenum. They're both safely stored in Ziploc bags right now, along with all the other parts I stripped off the bike.
 
Last edited:
Is your air pilot screw on # 4 movable? It looks like the top has been broken off in the picture.
Yes, it's movable. Here's closeups from the disassembly pictures.

P1060048.jpg


P1060052.jpg


More pictures of the progress in my repair thread, link in my sig.

scurvy
 
Stupid me dropped the #3 float bowl drain screw and was unable to retrieve it from the nether regions under my deck :oops:
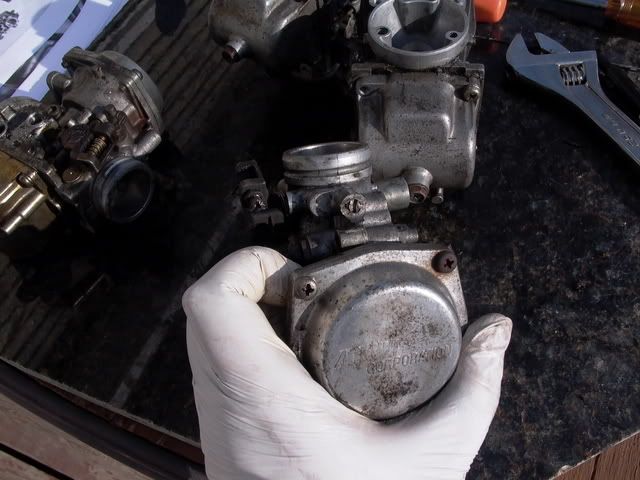
. Mikuni saw fit to make these insidious little buggers an odd size (M6x7x0.75mm, standard thread pitch for M6 is 1mm) and I can't find replacements at McMaster, so they must not exist. Aside from crawling under my deck with a magnet or trying my hand with a lathe, anybody got a good source for these that doesn't involve buying a $25 rebuild kit?
 
OK, another stupid question. Got two of the carbs cleaned and reassembled. When perusing the carb cleanout series, it doesn't specify a float height, but the manual does: 22.4 mm +/- 1mm. Gotcha. Now, what part of the float do I use to set this height - the step or the constant radius? The manual seems to indicate the radiused part of the float, per the following:

gs550_carb_float_height.png


But I have heard tell of some that say use the top of the step - or maybe I'm misunderstanding. So, interweb motorcyclists, do I use the top of the step, where the step meets the radius, or the radius to set my float height? I understand to use the gasket surface without a gasket.

Thanks again.

scurvy
 
Progress! Two carbs back together with stainless steel socket head cap screws in lieu of the original fasteners for the float bowls & top caps.

P1060061.jpg


I'm just waiting on Z1 to get me my new floatbowl gaskets and for clarification on where to check the float height, and I'll finish up the other two carbs and begin reassembly.

As an aside, I bought packs of 100 fasteners & lock washers for the individual carbs and the gang rails. It's way more than I need, but would anyone else be interested in these fasteners as well? I don't want to step on any toes here, and I've dispatched an email to Mr. Barr asking his opinion on such matters.

scurvy
 
Re-re-re-bumping my own thread. More progress!

Progress #1: Retrieved the #3 float bowl drain screw from under my deck. It's ferromagnetic, so it's theoretically possible to crawl around under your deck in your underwear with a magnetic pick-up tool wearing a LED headlamp to find it. Theoretically. :wink:

Progress #2: New floatbowl gaskets & rubber plugs arrived from Z1. Reset the float heights based on the manual picture above - they're set at 22.4 mm from the gasket surface to the radiused surface on the float on both sides.

scurvy
 
I'm getting pretty good at this.

I had the #3 carb from working condition to stripped apart and resting in the dip basket of the noxious Berryman's cleaner in about five minutes flat. Half an hour later and it was back together. #4 should be tonight, then I can work on reassembling and bench synch. This one didn't require any float height changes but the previous two were set too low. All the fuel screws are set for 3 turns out from lightly seated.
 
Great job man, sounds like you are doing the job right. Regarding the float height, make sure the weight of the float itself is not causing the spring in the needle to depress. If so, hold the float up slightly and measure when the float just starts to depress the spring loaded needle. Most likely you are good to go on this but just saying...
 
Regarding the float height, make sure the weight of the float itself is not causing the spring in the needle to depress. If so, hold the float up slightly and measure when the float just starts to depress the spring loaded needle.
Interesting. I'll have to check that when I do #4 tonight. From what I recall, the weight of the floats wasn't nearly enough to cause the needle spring/plunger to drop - I manually pushed the floats down and let them spring back up and come to rest before measuring the float heights.

Also, man alive that Berryman's Chem-Dip is some noxious stuff. WHEW, CRACK A WINDOW!

As soon as the bench synch is done, I can start reassembling everything and possibly maybe have a running bike this weekend! \\:D/

scurvy
 
Back
Top