• Required reading for all forum users!!!

    Welcome!
    Register to access the full functionality of the GSResources forum. Until you register and activate your account you will not have full forum access, nor will you be able to post or reply to messages.

    A note to new registrants...
    All new forum registrations must be activated via email before you have full access to the forum.

    A Special Note about Email accounts!
    DO NOT SIGN UP USING hotmail, outlook, gmx, sbcglobal, att, bellsouth or email.com. They delete our forum signup emails.

    A note to old forum members...
    I receive numerous requests from people who can no longer log in because their accounts were deleted. As mentioned in the forum FAQ, user accounts are deleted if you haven't logged in for the past 6 months. If you can't log in, then create a new forum account. If you don't get an error message, then check your email account for an activation message. If you get a message stating that the email address is already in use, then your account still exists so follow the instructions in the forum FAQ for resetting your password.

    Have you forgotten your password or have a new email address? Then read the forum FAQ for details on how to reset it.

    Any email requests for "can't log in anymore" problems or "lost my password" problems will be deleted. Read the forum FAQ and follow the instructions there - that's what we have one for...

  • Returning Visitors

    If you are a returning visitor who never received your confirmation email, then odds are your email provider is blockinig emails from our server. The only thing that can be done to get around this is you will have to try creating another forum account using an email address from another domain.

    If you are a returning visitor to the forum and can't log in using your old forum name and password but used to be able to then chances are your account is deleted. Purges of the databases are done regularly. You will have to create a new forum account and you should be all set.

79 GS550E project just arrived

  • Thread starter Thread starter standswithabeer
  • Start date Start date
S

standswithabeer

Guest
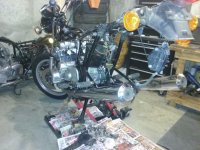
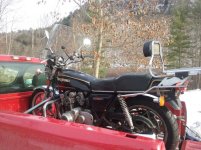
my 79GS750L project is nearly done, just need to sort out what i want for intake filters and chose a seat. so to keep me occupied i checked vtcraigslist and grabbed this one over the weekend, pretty happy w/condition. $350, and he wouldn't budge on price. :)

nice shiny tank w/no dents and a very nice interior, solid exhaust w/no rust, nice fork tubes and the seat has just one 1/2inch tear. hooked up a battery from the 750 and all electrics work, with spark on all four - happy 'bout that. brand new shinkos installed in 2009 are still pliable, am on the edge about tossing them. bike last inspected in 2012.

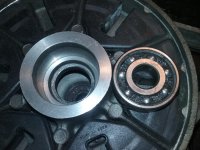
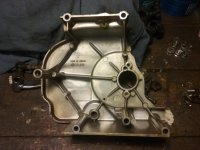
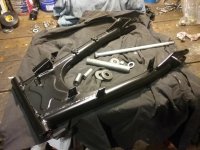
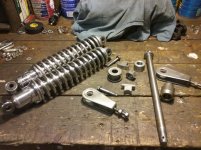
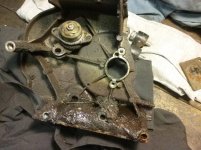
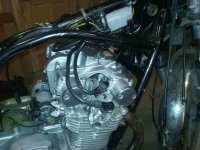
i'll strip the forks, swingarm, wheels and brakes for a full refresh and bearings as needed, then clean the carbs and see what i run into. does need steering head bearings, has stuck calipers and an oil leak at either the valve cover or tach seal. those will both be replaced when valve clearances are checked. also, the rear tire needs a re-mount, as it's off-center.

i've already downloaded the service manual from cliffs's site, and think i'll dive into the head bearings first, then brakes, then wheel bearings. oh, needs carb-to-airbox rubbers too, they're pretty much hard plastic.

think i'll be getting rid of the accessories but not sure. chrome on the windscreen, luggage rack/backrest and crashbar all needs a little buff with fine steel wool and they'll look great.

bob p
 

Attachments

  • 79.GS550E.jpg
    79.GS550E.jpg
    98.6 KB · Views: 0
Looks like a good one. Unmolested, just a few additions. Nice buy.
 
thx, just checked compression after sitting: 150/135/130/145 so no bad news yet. am hoping the probs usually see during project disass aren't too bad. center bolt at the fork leg lowers, carb internals, caliper bleed screws and pistons, etc.
 
a little progress. checked and found just two valve clearances that needed shims, and found the shims i needed in my stash of four. tried the "cable tie trick" and that worked really well. located the source of the oil leak at the engine front. complete engine, wiring harness, horn, frame and carbs covered in oily goo. over a few days i spent hours cleaning the old hard gasket/glue off the cyl and cover, then assembled w/a new gasket. wiped everything down, serviced the cct then polished that cover and the cover for the oil pressure switch. cleaned the starter and wiring, sanded and painted the starter cover, new plugs and NGK plug caps.

new o-rings for the carb insulators, cleaned the carbs w/all new o-rings there too. except the fuel tee and connectors, didn't want to fully diass them off the rack. this may bite me next summer, we'll see. as soon as the carbs are on, i'll dive into the front end. i plan on a head bearing upgrade, full disass of the forks and brake, wheel bearings checked.

and searching for a fender.
 

Attachments

  • gs550engine.resize.jpg
    gs550engine.resize.jpg
    91.3 KB · Views: 0
Bike looks like a creampuff. You did well!

The fuel Tee and interconnect tube O-rings are the ones that deteriorate the most because they get ozone exposure. VM's are easy to work on so you may as well do the job right ONE time instead of dealing with leaks later.

New brake lines are advised and be sure to check all the connections through the charging system. I think the system grounds though the battery box which is never good.
 
Hey Stands,

"new o-rings for the carb insulators, cleaned the carbs w/all new o-rings there too. except the fuel tee and connectors, didn't want to fully diass them off the rack."

I'm doing the same thing on my '78 GS750, and I also have the plastic fuel rail links that I'd rather not disturb so I left the four carbs mounted together on the backplate. But I now face an issue that maybe you found a work around:

Because the backplate has additional casting metal to support the throttle linkage hardware, there's very little clearance around Carb No. 2's starter/choke plunger retaining nut ( a common 14mm 1/4" socket will clear the other three plungers but not on Carb 2). Have you found a way to remove plunger 2 without dismantling the entire rack?

I'd hate to let this one plunger go as-is & find it poses a problem once all is put back into service. Any advise greatly appreciated. Meanwhile, I move on to Carb No. 3 ;)

Great thread BTW - I'm tuned in!!

 
there's adequate clearance on my 79 550 for either a thin-walled socket or an open-end wrench, but i do see the issue on my 79 750. i'd try to grind back the tips of a box wrench that you don't like much. you may be able to profile the tips to just grab the flats of the nut. make the wrench tips both thinner and narrower, it'll be a smidge weaker i s'pose but the nut shouldn't be gorilla tight anyhow. worth a slight gamble imho.

i have a few tools that i had to modify to work, not uncommon.
 
Last edited:
Hmmm... Yeah, that's where I was aiming too. Have to sift through my wrench bag for a candidate. Was hoping to find a thin 'cheapo zinc' bicycle wrench or somthing...not that I searched that hard!

Thanks for the suggest, and keep up the great work :D
 
finished the stem bearing tapered roller upgrade, serviced the wheel bearings, forks, front caliper, speedo drive, polished everything i removed, then torqued w/loctite all critical fasteners. checked all electrics, then moved to the rear. wheel and swingarm off for service. spent a lot of time cleaning/polishing underneath where no-one will likely see. swingarm needle bearings are fine and clean, must have been serviced i s'pose. will clean/re-lube everything then back together.
 

Attachments

  • swingarm.off.gs550.jpg
    swingarm.off.gs550.jpg
    95.8 KB · Views: 0
Last edited:
Be sure to replace the brake lines. The old ones are sure to be full of scale on the inside. I've got photos of that too (if you don't believe me);)
 
as the bike is so original, think im going to leave the choice of better feel vs originality to the new owner. either OEM two-piece (front and rear) or single braided lines.
 
whoops! someone in the last 40 years installed a shielded (rather than sealed) bearing in the sprocket carrier, and also didn't press it in all the way. this resulted in the inner spacer knocking around a bit. bearing install looks very recent. some little aluminum bits got past the shield and ruined the cage. an SKF 6303-2RS is on the way, and a little shelf in the bore prevented any contamination in the opposite bearing. the wheel refurb is on hold for a 5 days.

the swingarm, brake rod and caliper mount were sanded/painted w/three coats, and now curing over the boiler for awhile.

unbelievable! both the front and rear caliper pistons are free, this is too easy. : )

while i'm waiting for the bearing, maybe i'll disass/clean and relube the clutch throughout assy. or maybe i'll just have a some beers.
 
The stock bearing in the sprocket carrier had shields, not seals.
 
EDIT / CORRECTION !

the shielded bearing in question is the wheel bearing, on the sprocket carrier side. sprocket carrier bearing and seal are fine, but this wheel bearing is toast. the inner spacer was a little loose, allowing some aluminum bits to enter the open side.
 

Attachments

  • gs550.hub.jpg
    gs550.hub.jpg
    97 KB · Views: 0
Last edited:
cleaned cover
 

Attachments

  • side.cover.cleaned.gs550.jpg
    side.cover.cleaned.gs550.jpg
    89.8 KB · Views: 0
original sprocket ( i think ) 25,600 miles.
 

Attachments

  • sprocket.gs550 005.jpg
    sprocket.gs550 005.jpg
    94.4 KB · Views: 0
can't seem to add multiple pics.
 

Attachments

  • gs550.swingarm.jpg
    gs550.swingarm.jpg
    93 KB · Views: 0
shocks, etc.
 

Attachments

  • shocks.etc.gs550.jpg
    shocks.etc.gs550.jpg
    97.4 KB · Views: 0
r.sprocket
 

Attachments

  • r.sprocket.gs550.jpg
    r.sprocket.gs550.jpg
    94.5 KB · Views: 0
swingarm/wheel/shocks all cleaned and reassembled, and moved onto the caliper/master cylinder refresh. needed pads and a quick sand/paint of the caliper body. polished the little pins and clips, mounting bolts, etc then remounted w/Loctite. all ok. disassembled the master cyl and rinsed everything in brake fluid. everything was clean, bore nice and the seals still very pliable so i just reassembled. either well taken care of or maybe rebuilt, but a nice surprise. bled without drama, cleaned/polished the brake lever and pivot point, new M/C rod cotter pin, adjusted the brake and checked the switch adjustment - all ok.


with the complete rear end refresh buttoned up, i moved onto the clutch throw-out assy. the side cover screws were unmarked and with the amount of wear and accumulate goo, i think the sprocket was original. with everything else on the bike pretty nice, condition of the sprocket was a surprise. maybe a case of out-of-sight, out-of-mind?


dis-ass'd, cleaned and re-lubed the throw-out assembly, making sure to line up the greasing circuit hole on reassembly. cleaned the side cover, polished the small cover and screws. picking up the new JT sprocket on sat, then onto checking the point/advancer business.
 

Attachments

  • side.cover.gs550.jpg
    side.cover.gs550.jpg
    97.5 KB · Views: 0
Last edited:
Back
Top