• Required reading for all forum users!!!

    Welcome!
    Register to access the full functionality of the GSResources forum. Until you register and activate your account you will not have full forum access, nor will you be able to post or reply to messages.

    A note to new registrants...
    All new forum registrations must be activated via email before you have full access to the forum.

    A Special Note about Email accounts!
    DO NOT SIGN UP USING hotmail, outlook, gmx, sbcglobal, att, bellsouth or email.com. They delete our forum signup emails.

    A note to old forum members...
    I receive numerous requests from people who can no longer log in because their accounts were deleted. As mentioned in the forum FAQ, user accounts are deleted if you haven't logged in for the past 6 months. If you can't log in, then create a new forum account. If you don't get an error message, then check your email account for an activation message. If you get a message stating that the email address is already in use, then your account still exists so follow the instructions in the forum FAQ for resetting your password.

    Have you forgotten your password or have a new email address? Then read the forum FAQ for details on how to reset it.

    Any email requests for "can't log in anymore" problems or "lost my password" problems will be deleted. Read the forum FAQ and follow the instructions there - that's what we have one for...

  • Returning Visitors

    If you are a returning visitor who never received your confirmation email, then odds are your email provider is blockinig emails from our server. The only thing that can be done to get around this is you will have to try creating another forum account using an email address from another domain.

    If you are a returning visitor to the forum and can't log in using your old forum name and password but used to be able to then chances are your account is deleted. Purges of the databases are done regularly. You will have to create a new forum account and you should be all set.

'80 GS1100E rebuild

  • Thread starter Thread starter cavehamster
  • Start date Start date
It was a good day at the strip today. Got the bike tuned up and gently broke in the rings over about a half dozen runs before really getting on it. Best time for me was 11.60

Nice bike and very respectable 1/4 mile time! What was your 60' time and trap speed?
 
Nice bike and very respectable 1/4 mile time! What was your 60' time and trap speed?

Wish I knew. The track that I have been going to does not announce the 60 foot time, and my speedo is broken ;) I'm waiting for the local track to open so I can get some actual slips for a change, plus put some new clocks on the bike here soon.
 
Work has had me way too busy lately. But last night I stayed late and machined up the shock mount tabs for the bandit swingarm:

IMG_4645.jpg


I made a bushing out of stainless steel (actually invar, as we had some pieces laying around in the scrap bucket, haha). I turned the bushing down on the lathe and pressed it into the aluminum, and then machined it off to give me the right stickout for the shock bolt, with a 10mm hole for the bolt.

Now, I just need to mock up the swingarm one more time and mark up where I want them welded. I don't have a TIG big enough to weld this heavy of aluminum, but I found a local machine shop that will do it.

Next up I just need to resolve the sprocket offset issue and I have everything else to mount up a 170 or 180 on the back of the bike, hurray!
 
Wow, dropped the swingarm off to the welding shop this morning and they already have it done, for $20. I'll post pictures tonight.

Dug up a new front tire for it too. It might actually look like a decent bike by the end of the day at this rate!
 
That's pretty! I love the look of a nice weld, it's got such a nice industrial feel to it. Any plans to polish, or possibly powdercoat?

I'm debating what I want to do with this. The frame is black, the engine is now black, and I am debating going black with the swing arm. I like the look of the mechanical part of the bike being somewhat muted, allowing the body color to pop a bit, with some colored wheels of some sort. But... I gotta think about it a bit.

For now, I plan on bolting it on and riding it for a while ;)
 
Been busy again. I put the swingarm back on to mock it up:

IMG_4791-2010-04-25-at-18-41-10.jpg


I have one side's spacer machined, still need to do the other side tomorrow and a few other spacers, and this wheel will be on.

Started looking at the front end today a bit. I think the USD forks I got will work, but obviously I still need brakes and a tire/wheel to even start to mock that up. I may need to make a custom top triple clamp to make everything happy, so we'll see.

In the meantime, i got a new front tire for it, but not a tube, since I didn't realize the original front rim was not tubeless. With luck, it will be back on the road this weekend, so maybe with new rubber I can manage to get it registered so I can ride it around town and not just on the 1/4 mile ;)
 
All spacers are machined up, and I have the whole rear end on. Despite having hell bleeding the brake (I haven't managed it yet, grrr), and the chain still needing an offset on the counter sprocket, it rolls well, and felt really good going around the block on. The handling so far feels just right.

Here's some crappy photos of the spacers (grrr need more light on my desk):

IMG_4890+-+2010-04-28+at+22-12-08.jpg


That's the right and left spacers, along with the chain tensioners. I thought I didn't get the tensioners with the swing arm, but after I machined them it turns out I have a set. Ah well, I did put a logo on these, so I'll probably keep them.

IMG_4898+-+2010-04-28+at+22-15-55.jpg


I milled off the flat edges of the stock axle to fit.

The fitment on the bike looks really good, but I have not had time to give it a laser/string method double check. With a 170 tire on it now, the chain just barely clears the tire with a mm or two to spare without an offset counter sprocket, so that will be needed for sure.

Getting closer!
 
Oh, I forgot I made this into a jpg, here's the solid model for the chain tensioner.

If anyone is interested in anything I have machined to date, I have the models in Solidworks format. I'll probably upload them to a project website someday ;)

Chain+Tensioner.JPG
 
Damn it all. :mad: All these pretty pictures of Bandit swingarms with Ohlins shocks is only increasing my desire to own such a set-up. Thanks a lot guys, looks like I'm going to be broke well into next years with all the mods I'm starting to plan. ;) Also, what size rear tire are you looking to run with that set-up?
 
Last edited:
Nice work Sir. Your shock mounting tab location appears to be about an inch forward of where I mounted mine on my Bandit arm. That should give you a little more ride height in the rear which is good for ground clearance if you go with a shorter front end. The center of my bushing is about in line with the vertical weld on the Bandit arm.

Its been a while since I did mine and I did quite a few side by side comparisons with the stock unit. I'm pretty sure the stock 1100 swingarm bushing location is where I have mine but I wished I had moved mine forward a bit. Pic below has it laying on it's side for a dry fit. I have 7K miles on the shocks at that location. It may work out well in the end for me as I'm looking at mounting some new inch longer Ohlins from a CB1100F. I would think a more forward location will raise the rear and give sharper faster handling a more rearward location should provide more stability.

Interesting. I put the bike up on my 'jack stand', ie, a plastic box with a piece of plywood on it, and removed the rear wheel and etc. I measured out the location of the stock by tying off a wire to a tab on the frame at the top and measuring down to the axle location on the stock swinger. I repeated this for the new swinger, moving it until they lined up and looked at where the shock tab landed. I then moved it back about an inch from there, so I was expecting it might be a tad lower. I have a friend who was wanting me to go really low with it, but I want to be able to ride around town and not just on the drag strip with it ;) So, interesting that yours ended up an inch further back.

Thanks for the info and the compliment. I wish I had more time/money to put into this project, it seems like I have one good build weekend a month and the rest of the time is lustfully staring at the goods on ebay and etc, haha.
 
Damn it all. :mad: All these pretty pictures of Bandit swingarms with Ohlins shocks is only increasing my desire to own such a set-up. Thanks a lot guys, looks like I'm going to be broke well into next years with all the mods I'm starting to plan. ;) Also, what size rear tire are you looking to run with that set-up?

Tell me about it!

The wheel I bought, off a RF900 (same part number as the bandit rear, and hub compatible with the GS original hub, $35 plus $30 shipping off ebay), came with a kinda used 170 on it. I'm aiming to build such that I can stuff a 180 on it later.
 
Last night, I sat down with the calipers and the front forks I bought off some random guy on the local classifieds for $150. I forgot what he said they came off of, so I did the research and measuring and determined they are ones off a '03 GSXR-1000.

Right now, I have the bottom triple tree clamp, the steering post, and the forks. So, I started to piece things together. First, I went to figure out what axle goes in it. As always, searching for anything with 'gsxr' in the title on ebay is pricey. Like... $50 for the axle pricey. Thankfully, the parts finche and a reverse lookup at Babbitt's came to the rescue, and I bought a $8 axle with the same part number off a SV1000.

I still need to dig up a wheel and tire, and some brakes. I found a deal on some 4 pot brakes, but I'm holding out for 6 pot right now. I figure I will probably end up machining the top triple clamp myself, as I am a bit concerned about the right height with the slightly shorter GSXR-1000 forks.

I think the next thing I will tackle is to rip the foam off the seat pan, get it blasted and painted, build up some new foam and have it upholstered. EVERYONE asks me about that damn seat... are you going to fix it? when are you going to fix it? it looks ugly... Alright already, I'll fix the seat ;)
 
Damn it all. :mad: All these pretty pictures of Bandit swingarms with Ohlins shocks is only increasing my desire to own such a set-up. Thanks a lot guys, looks like I'm going to be broke well into next years with all the mods I'm starting to plan. ;) Also, what size rear tire are you looking to run with that set-up?

Here would be another...:D

1100chasis5.jpg


1100chasis1.jpg
 
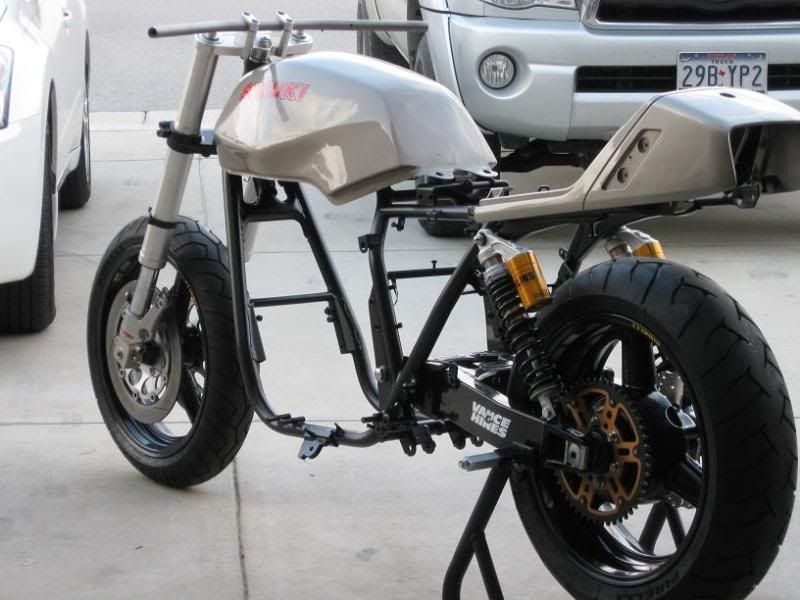
That is a sweet looking machine you have there! What rear sets are you using? I need to come up with something in that regard soon myself.

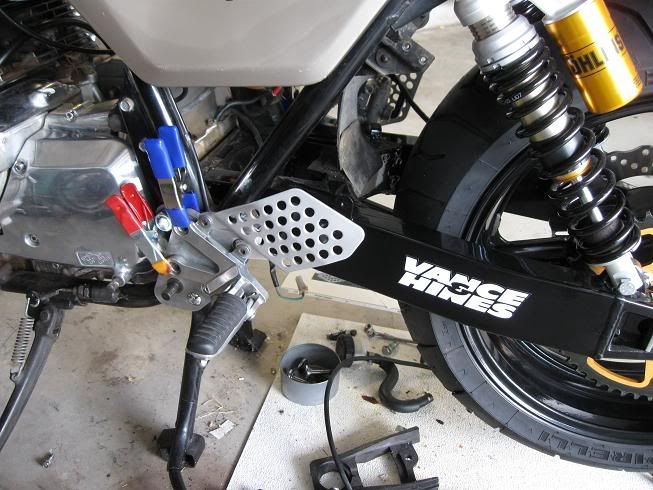
As for getting the engine in and out, I am using a generic free standing cherry picker. I put a strap over the motor, hooking it into the two tabs on the front and back of the motor that I assume are there for lifting the motor in and out (they look like a tab with a bolt hole, right at the parting line of the top and bottom engine halves). Adjust the strap such that it gives a couple of inches of clearance over the motor, and hook it with the hoist chain. I then lift it up, and push it into the frame. Make sure you remove the engine mount tabs from the frame, otherwise the top of the valve cover won't fit in there. I usually have to tilt it a bit to get the top of the valve cover to go into the frame, so... angle in the bottom of the engine first into the frame, lower the engine a bit, push it in and concentrate on getting the top under the frame. Then I sometimes need to lift it a bit more and push the bottom end until i get it roughly in position, let it down a little and get the motor mounts lined up. Usually I get the back end lined up first, and shove a bolt in, and then get the front one in and shove the bolt in. Verify that the other mounts are lining up and nothing is getting crushed that shouldn't be, get the last through bolt mount in the back with the spacer, and take the hoist away. Then I can add in the bottom front mount (although I have mounted up this mount first in the past, that works as well), and... done! I haven't tried to hard to avoid messing up the frame paint as that is something I will probably do for the winter anyway, but... have not hurt it either.

A cherry picker is almost required equipment to be able to easily work on a bike by yourself. I really want to get a bike jack and/or a lift table, but that's not in the budget for a while ;)

Does that make sense? Oh, look, I did take photos of me installing it, here we go:

Put on the strap and get it in the air:

IMG_4317.jpg


About to go into the frame. Note that the engine had rotated on me, I moved it around by hand to be in roughly in the right orientation before I tucked it into the frame
IMG_4319.jpg


It's sat in there now. Note that the horns and coils are not on the frame, and it doesn't matter if the valve cover is in or not, you should have enough room with the lower frame mount tabs gone and the coils and horns gone.
IMG_4321.jpg


Ick, soft focus in this photo, but, now it's bolted down and I've started re-connecting it.
IMG_4328.jpg


All from this album

I've probably had the engine out 3 times so far, but that first time was quite the challenge! It can be hard to move the hoist around, I just have a small one car garage and too much crap in it ;)
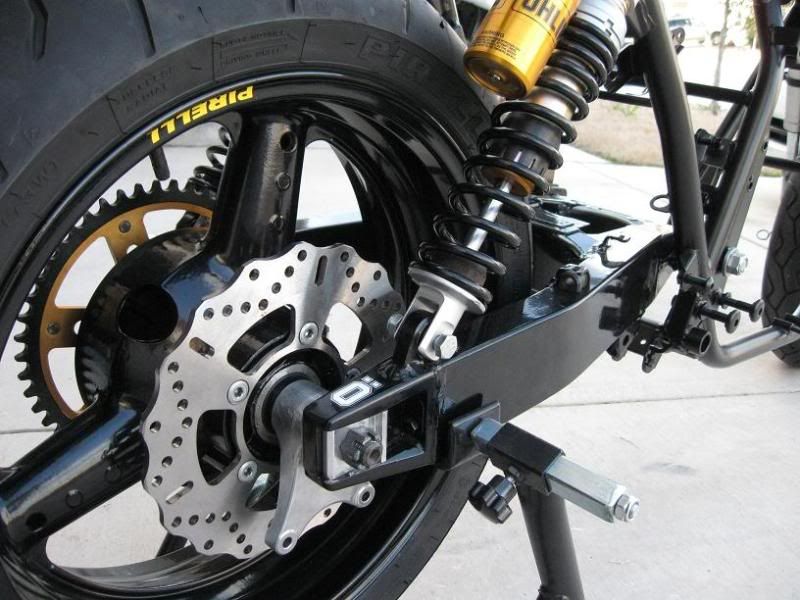
 
Here would be another...:D

1100chasis5.jpg


1100chasis1.jpg

That swingarm looks great in black. I'm going to have to paint mine up. I have a gallon of some Polane or however it's spelled at work that's an industrial coating that goes on like paint that is gloss black that I think will be just the trick for this too.

Also, looks like yours is right on that weld line too. Hmm... I tried looking for photos before I had mine welded but didn't find anything, so I just went off and did it. Hopefully that will not backfire on me, haha.

I thought about making something adjustable, but... got lazy. I could probably put on a second set of tabs if I really wanted to further back, though. We'll see how it turns out riding.
 
I like the idea of the cherry picker, would be nice to have access to one. As far as the rear sets I am going with Isleoman's set up that he was kind enough to share. They are from a ZX12R, here is a pic...

1100rearseton2.jpg
 
Cave
I followed your steps and got my engine in today. Took about 2.5 hours by myself but I was going very slow to make sure I didn't scratch the newly powder coated frame.

The one thing I did slightly different was I got the engine 90% into where it belonged with it still sitting on the lower frame rails. Holding the right side of the engine with one hand, I disconnected the ratchet hook from the engine lift point behind the tranny and moved the hook and webbing up and over the upper center frame rail and re-connected it to where it was originally behind the tranny. I then just ratcheted it back up to being taught.

I was finding that the rear strap was striking the center frame rail as I brought it in initially and was not allowing me to center the engine. If you can follow all that.

I'm getting closer to being done. Hope to have it on the road and all sorted by Memorial Day. Which will be the one year anniversary of getting rear ended. Thanks

Well, best of luck. I didn't know you got rear ended; that sucks. I'm super paranoid at lights watching for cars that don't see me.

Went out to the Test and Tune at the local strip today, but didn't have the bike ready. I need to put a dish in the face of the counter sprocket to get the chain lined up, and I'm waiting on a harder endmill to arrive from MSC so I can make it happen. So, hoping to take it out to the Midnight Drags on Friday, with any luck.
 
Back
Top