• Required reading for all forum users!!!

    Welcome!
    Register to access the full functionality of the GSResources forum. Until you register and activate your account you will not have full forum access, nor will you be able to post or reply to messages.

    A note to new registrants...
    All new forum registrations must be activated via email before you have full access to the forum.

    A Special Note about Email accounts!
    DO NOT SIGN UP USING hotmail, outlook, gmx, sbcglobal, att, bellsouth or email.com. They delete our forum signup emails.

    A note to old forum members...
    I receive numerous requests from people who can no longer log in because their accounts were deleted. As mentioned in the forum FAQ, user accounts are deleted if you haven't logged in for the past 6 months. If you can't log in, then create a new forum account. If you don't get an error message, then check your email account for an activation message. If you get a message stating that the email address is already in use, then your account still exists so follow the instructions in the forum FAQ for resetting your password.

    Have you forgotten your password or have a new email address? Then read the forum FAQ for details on how to reset it.

    Any email requests for "can't log in anymore" problems or "lost my password" problems will be deleted. Read the forum FAQ and follow the instructions there - that's what we have one for...

  • Returning Visitors

    If you are a returning visitor who never received your confirmation email, then odds are your email provider is blockinig emails from our server. The only thing that can be done to get around this is you will have to try creating another forum account using an email address from another domain.

    If you are a returning visitor to the forum and can't log in using your old forum name and password but used to be able to then chances are your account is deleted. Purges of the databases are done regularly. You will have to create a new forum account and you should be all set.

82 Kat resto-mod aka Project Bucket Case

  • Thread starter Thread starter ukilme
  • Start date Start date
Well, I have not posted in this rebuild for a little bit but I am still working away at the bike. I had to take a mandatory break in March in Tampa :D. And then get my Triumph going for the summer.

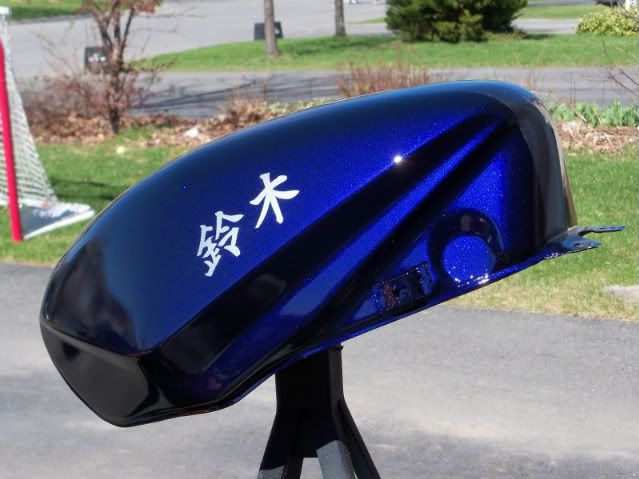
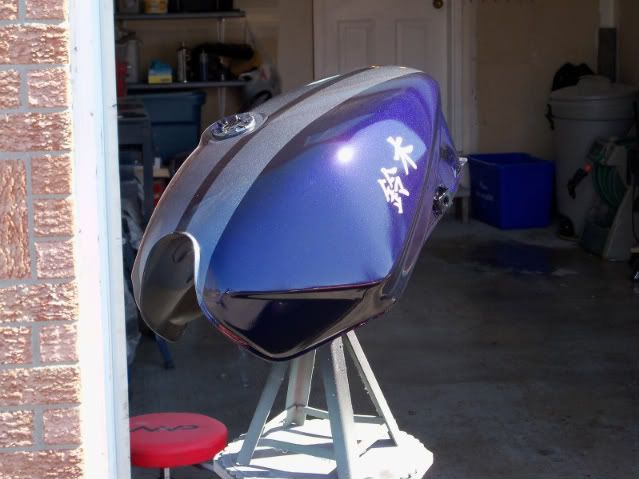
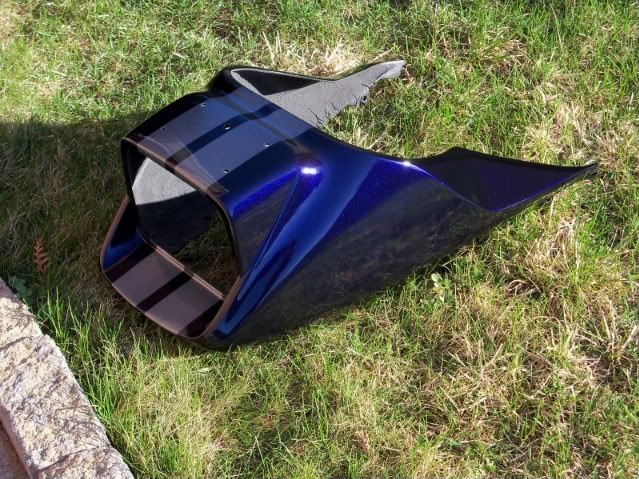
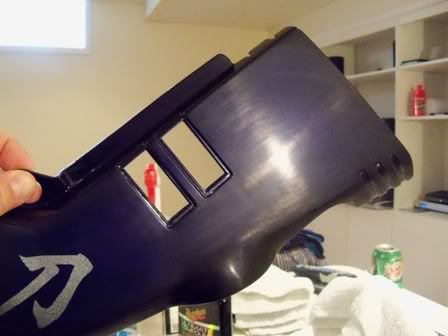
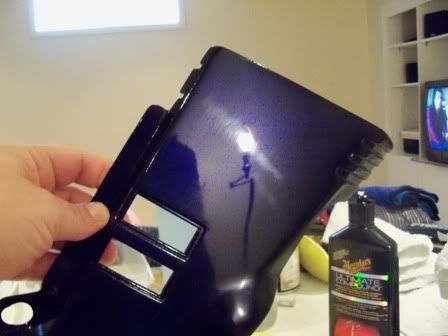
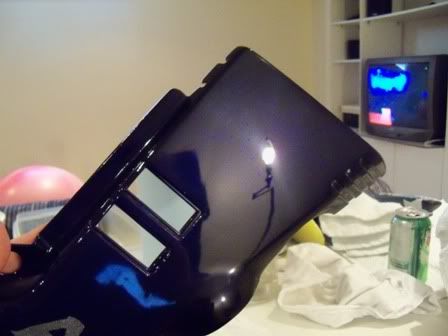
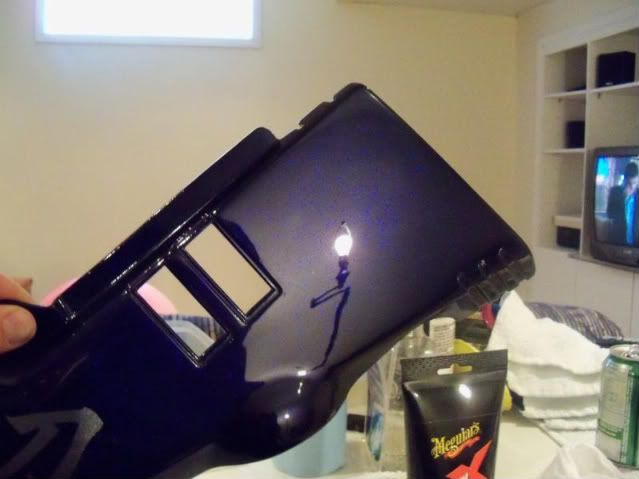
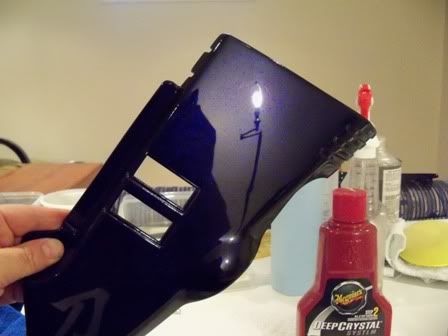
Anyways, here is the tank as it sits right now. I just cleared today. I still need to cut it as I have some orange peel going on.

I used auto air colors which is a water base automotive paint. The base coat is black. Then spray with Gem Sapphire which is a pearl paint that shifts color from black to blue but it also shift to purple.

It is a little tricky to shoot and time consuming when compare to euro's because of drying time but there is no re-coat window which is nice. And it is fairly safe to shoot in your basement. Still wear a mask but you won't die if you forget nor will your pets.

The clear is Nason 496 and shot with a home depot 'special' gun with a 1.4 tip.


101_0282.jpg


101_0280.jpg

101_0283.jpg


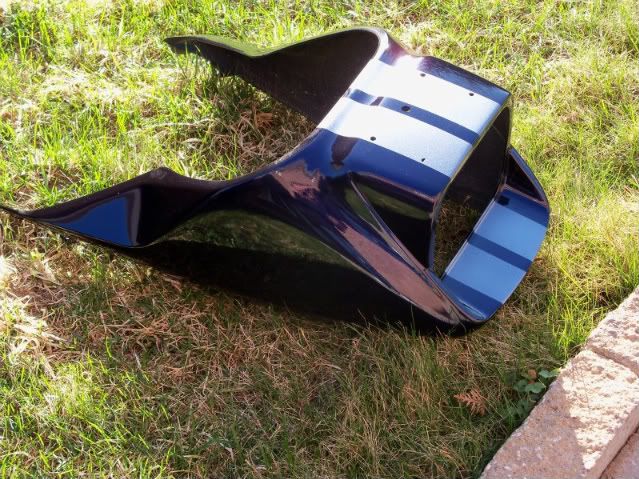
I will post the rest of the body work when they are dry.
 
Very nice paint. My favourite colour combo. You did a really nice job with it.

I cleared mine today and lets just say it didn't come out anywhere near that nice. I took it really slow and built up the coats ( maybe 6 over 2 hours). It came out kind of pebbly in spots and not really smooth. I will try and compound it tomorrow but I'm not at all happy with it.

I don't know why this has been so difficult. I've painted and cleared 4 previous bikes and never ran into this much difficulty. I'm kind of at a loss to understand what the problem really is. Perhaps its the gun. Maybe the wrong needle?

Sorry to hijack your post.

Good work sir and thanks for sharing.

Spyug
 
I had hope it went well with you. Sorry it did not. What size of gun are you using and what clear?

Thanks for the compliments.
 
Just updating the thread. I have not been sitting on my butt. I cut and polished my body by hand and here are some shots.

This was wet sanded down starting with 2000 then 2500 because the clear was pretty good.
101_0323.jpg


This is the first hand buffing with Meguiars Ultimate compound (UC). It similiar to Meguairs M105 pro stuff but easier to get. I did try my 3M and I did tried Presta Ultra cutting creme but they did not seem to work as good as the Meguiars stuff.
101_0325.jpg


This the forth buffing with UC
101_0329.jpg


Now, I used Meguiars scratch X (#1). They do not make it any more but you can still fine if you keep your eye open. They now have ScratchX2 which is actually more agressive but as not aggressive as UC.

This is twice with ScratchX
101_0331.jpg

After scratchX, I actually hit it with Meguairs No.09 which is in their pro-line. It a swirl remover and polish. I then hit it a Meguiars Polish (yes, this is overkill with the polish but what the hey)
101_0332.jpg


I did this with every piece to get it really smooth. After all this, this found out Meguiars makes 4 inch pads to do this...... The tank alone took almost 9 hours.
 
Here is another update in the same night. I know to much.

Anyways, I got some ZRX1200 shocks for the project off of Ebay. The problem with them it the top mount for the shock is 14mm while the mount on the Kat is 12mm. After trying to make some spacers, I found that the bottom bushing has the same size rubber with the center being 10mm but with enough material to drill out. So, I popped out the larger diameter bushing and got some new bottom bushing to drill out. It worked great.
101_0541.jpg


The next major issue I had was shock mounts for the B12 swing arm. So, I found a drawing for shock mounts on oldskoolsuzuki.com and used that as the bases for the drawings.


I took this shot after I made my first cut.
101_0542.jpg


Before I cut anymore, I drilled out the holes using a drill press. Started with a small drill bit and then would step it up until I got what I wanted.

I used a hand mitre saw to make the angled cuts. It worked great but was slow and my hand was dead afterward.
101_0544.jpg


To get the rounded look. I used a circle template to draw a circle. Then used a belt hand to shape it.

Here is a quick look with it on the swing arm and shock.
101_0545.jpg
 
Looks great! That paint is stunning! Will be watching with interest....
 
Thanks, I am still plugging away at it slowly.

The swing arm is welded up and I just doubled checked the spacers and they are about 2-3 mm out which is not bad. And had the steering stop welded to the CBR trees.

I'll try to post more pictures later today or tomorrow.
 
Some more work done on the Kat:

The shock mounts were welded on but I need to get new upper shock mounts made and welded as the shocks were pigeon toed. And now the upper part of the shock is half on the threads. Hence, the levels in the photo:
101_0556.jpg

If I had not offset the bottom mounts by 5mm, it would have be okay. Oh well, I am learning... The piece of metal on the left side mount is for the chain guard to attach to.

Also, I got the brake stop welded onto the swing arm as I am using a 93 gsxr brake setup which does not use the B12 brake arm.
101_0557.jpg


Also, got the steering stops on the tree done.
101_0558.jpg
 
Last edited:
I then decide to check the wheel spacers to make sure it will be fine. I tried a straight edge method but had problems as my straight edge bent some how from the store to home.

There is a good read here about the wheel alignments.

http://www.thegsresources.com/_forum/showthread.php?t=147705&highlight=rim+alignment

So, I decided to try the string method. I was able to go through the frame as I had no engine. And I measured the string at all four points on the rear rim to make sure it was the same height.
101_0562.jpg

101_0564.jpg


After, making sure the string was hardly touching the rim and cleared the swing arm and frame cross member, I was able to take some measurements. The left side of the bike was 26mm from the string and the right side was 23mm which should be fine overall. I also measured several spots along the frame and made sure the measurements were the same for both sides and they were...frame is good...just had to double check.
 
Last edited:
After this was done, I decided to install some Race Tech 1 kg springs in the gsxr forks as the bike will be heavier. They were the last ones here in Canada. I tried to order them from Bike Bandit but the order kept getting canceled.


I have done a few forks over time but the Suzuki one was a pain. I tried to make my spring compressor with 2" pipe and threaded rods.

Looks like the one down the page in this thread.http://www.gixxer.com/forums/showthread.php?t=128150&highlight=fork+compressor

However, the race tech spring was so strong that the pipe would give out. Finally, I went this way...
[
101_0597.jpg


It is not the safest way but it work great. And I kept it pointed away from me. The c-clamp was there to keep the angle iron from twisting near the top as the pressure grew. It was a bit of over kill.

101_0598.jpg

Got the cap on. Once it was on, I released the pressure by holding the tie down straps to the fork tub with one hand and released the straps. Then loosened the bolts and moved the angle iron out the way. And it was done.
 
keep up the great work.I cant wait to start on my kat this winter.It will be a blast to ride and you will sure get the looks

Steve
 
Ya, it is going slower then I thought but it is moving at a snail's pace. I bought a new bike over the summer and have been riding that.

The frame is at a machine shop to get new shock mounts done to it. That will be done in a month or so as they do it on their spare time and have four or five bikes ahead of me. It saves me money.

I got the GS1100 motor mounted into my other frame. The valves clearance were all good. I got the o-rings ready for the carbs and they are cleaned. I was getting ready to trying to fire it up but my wife and I just bought a house this week. And now we are focused on selling ours.

Good news is I got a larger heated garage to play in:D

Sometimes life just gets in the way:rolleyes:
 
Oh, don't talk about garages...mine is a few wires away from "my turn" at working on it...but still: that's a few wires I ain't touchin'!!! Wish I was done with my garage. :(

Glad it's going good; keep posting!
 
Slow-go is better than no-go. Keep up the good work. We need more killer kats here in Canada.
Cheers.
 
Sometimes life just keeps on getting in the way.

I emailed the machining company that was doing my shocks mount and we had decided to use sleeves as the zrx shocks bushing are 14mm. Anyways, I was told that the work would start within the week and ahead of schedule.

A month later, I have heard nothing from them. I ended up calling them and found out that the guy doing my mounts was basically pushed out of his business by a new majority owner and small jobs like mine are no longer welcomed. He tried to get in the shop to do it during the evening but was locked out. He tried to get another machinist to do it but nope.

So, I have the frame now after almost four months and still at square one. This is ****ing me off.

Good news, the move went well and I am off during the Christmas to work on the garage and then I can get going on the bike again.

Katman, thanks for the encouragement.
 
not very good customer service from the new ownership... should have at the very least cleaned up the backed up jobs.

I'm planning a similar build so I'm all subscribed up!!

Very nice work so far, has me feeling good about diving into it :)
 
Well, I finally can move on now. I found another machinist by chance. He bought a front wheel racing stand from me a while back and contacted me about a gsxr part that I had.

I knew he restored a Porsche as he drove to my house. I told him about the what happened with the machinist. We got together for coffee and came up with a quick drawing for some sleeves. Again, the studs on the frame are 12mm while the zrx upper brushing are 14mm.
sleeve-1.jpg


I had replaced the 14mm bushing with custom one to fit the frame but switched back.

I went home to measure (more then 3x) and make a drawing
shockmeasurements.jpg


There was a problem with the drawing as I did not label the 13.91 on the 'shock' as ID or OD.

Anyways, I ended up dropping of the frame and he got back to me two days later which was last night. Less then 4 months...lol

Here are the sleeves. The inside is stepped to mate with the shock stud perfectly.

100_1097.jpg


It is a 12 point 24mm head which looks nice but you have to be careful not to round off the head. There is a piece of duct on one sleeve because the threads are not the same. The right side was stripped and I used a 3/8 die instead of a M8. I got the idea from this thread:http://www.thegsresources.com/_forum/showthread.php?t=149454&referrerid=19107

100_1098.jpg


I had a custom spacer made as well that is stepped to mate perfectly with the stud part that is welded to the frame. This way washer can sit flat against it.
100_1100.jpg


Finally, I can have my shock mounted and square. We left room for washers as did not have the swing arm.
100_1105.jpg

100_1107.jpg


Now, to dry fit everything and figure out everything else. I just got some GS1150 cams for the GS1100 motor. I realized one the cams was crap when Nicholaschase29 posted pictures of his cams. My harden surface is not as bad and on the side but why take a chance.

A side note: I got to see the head and chassis of a 1937 Royal Enfield 500cc as the machinist is restoring the bike. Pretty cool as it had 4 valves and dual spark plugs.
 
Last edited:
Back
Top