• Required reading for all forum users!!!

    Welcome!
    Register to access the full functionality of the GSResources forum. Until you register and activate your account you will not have full forum access, nor will you be able to post or reply to messages.

    A note to new registrants...
    All new forum registrations must be activated via email before you have full access to the forum.

    A Special Note about Email accounts!
    DO NOT SIGN UP USING hotmail, outlook, gmx, sbcglobal, att, bellsouth or email.com. They delete our forum signup emails.

    A note to old forum members...
    I receive numerous requests from people who can no longer log in because their accounts were deleted. As mentioned in the forum FAQ, user accounts are deleted if you haven't logged in for the past 6 months. If you can't log in, then create a new forum account. If you don't get an error message, then check your email account for an activation message. If you get a message stating that the email address is already in use, then your account still exists so follow the instructions in the forum FAQ for resetting your password.

    Have you forgotten your password or have a new email address? Then read the forum FAQ for details on how to reset it.

    Any email requests for "can't log in anymore" problems or "lost my password" problems will be deleted. Read the forum FAQ and follow the instructions there - that's what we have one for...

  • Returning Visitors

    If you are a returning visitor who never received your confirmation email, then odds are your email provider is blockinig emails from our server. The only thing that can be done to get around this is you will have to try creating another forum account using an email address from another domain.

    If you are a returning visitor to the forum and can't log in using your old forum name and password but used to be able to then chances are your account is deleted. Purges of the databases are done regularly. You will have to create a new forum account and you should be all set.

Adjusting points gap

hannibal

Forum Mentor
This contact breaker is a new concept to me. I've read the factory manual and Earl's write up. I've been staring at it for awhile and I just can't understand how it works. I get that when the points are "connected", a circuit is completed and the coil fires. Is this all there is to it?

If this is correct, then I'm guessing the point of setting the points gap is so the coil fires at the right time. Too tight and it would fire early, too loose and it may not fire at all?

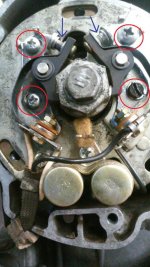
When I rotate the crank, I feel like the points barely move. In the picture, it looks like both points (blue arrows) are closed at the same time, which shouldn't happen if I'm understanding how this is supposed to work.

I have new points but I don't want to replace something that's working right. I plan to adjust the points gap as Earl described and see how it runs. So my rookie question is how do you adjust the gap? Do you adjust the gap by loosen the pair of screws (red circles) holding down the point and rotate it slightly so the crank bolt (or whatever is behind it) pushes on the bottom of the lever and makes the 0.014" gap?
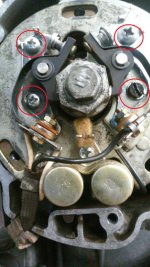
contact breaker small.jpg
 
Last edited:
Opening is what fires the coil. The field in the primary collapses inducing a big voltage in the secondary. The coil is a transformer. A big change in one side produces a bigger change in the other.
The gap has to be right to allow the field to build back up again in the closed or dwell time.
One way to adjust the gap is rotate the crank till the high point of the cam is on the heel of the points, check the gap and if needed loosen the screws just enough to move the points a little. Tighten up and recheck.
On some well behaved machines with a good set of points it's even possible to put a feeler of the right size into a loose points, push it till it's touching the high point of the cam tighten up and the timing is generally very close.
Generally when adjusting the gap loosen the top red circled screw and use a screwdriver to pry against the tabs sticking up by the top screw, pivoting around the lower screw. These things can do your head in until you get the hang of them as each tightening will change the gap a bit so you end up aiming to miss if that makes sense.
That felt pad needs a bit of light machine oil to keep the point heel from wearing too fast and even then they go stale after a thousand miles or so. The main reason for upgrading to magnetic pickups is to escape all that fiddling.
 
Last edited:
Another ghetto way that works well to set timing is to close the points on a piece of cellophane, the thinner the better. Pull lightly on the cellophane, turn the crankshaft forward very slowly, the point where the cellophane comes out is the point where the contact breaker is open.
 
Thanks guys! Makes sense to me now. I always thought worn points referred to the contact point, but now I see that the heel gets worn and keeps the point from opening fully.

Since I have the new points, it probably makes sense to install them. The new points came with a little packet of oil. I had no idea what it was for, but now I see it's probably to oil to felt you mentioned. You can see in the pic I removed the 3 screws at 12, 4, and 8 o'clock. I had no idea what I was doing so I obviously need to reset and time everything. Thanks again.
 
Last edited:
Thanks guys! Makes sense to me now. I always thought worn points referred to the contact point, but now I see that the heel gets worn and keeps the point from opening fully..

Can refer to both. The heel wears and the point faces erode from sparking. They need to be sanded flat every so often. The job of the two capacitors at the bottom is to dampen down the severity of the spark when the points open. When operating properly there will be little blue/yellow sparks as the points open. A bright prolonged spark indicates a failed condensor. ( look at me calling the same thing two different names) The point faces will erode quickly and you may even see a pit burned clean through one face and a small pip on the other.
 
Make darn sure that the two flat point surfaces close flush together, otherwise you will have a small contact area and burn them up. You can actually twist the moving contact arm to make them contact flush. Then set the gap.
 
Got the points swapped out and gaps set at .014". It was definitely an aim to miss situation but I figured out how far ahead to aim.

I tried to time it by hooking up a light and rotating the plate til the light went out. The plate was tough to rotate smoothly and I had to pull the plate away from the motor to continue rotating it. Regardless I couldn't get the light to go out, which I means the terminal on the point is grounding to the plate. I did get a nice spark at the points as I turned the crank. I read that condensers/capacitors seldom go bad. The contact points looks good (no pitting) so I think I should be OK. The old points sat flush and the new ones do too.
 
Points are usually pretty square right out of the box these days. Back in the 50's and 60's it was not the case. I still check, always, because old habits die hard, and I'm paranoid about such stuff. I still break the glaze with some fine emery, too. And clean them by dragging a dollar bill thru them. Never seem to have a five:(
 
Basicly do this..

Look thru the timing hole and youll see the line at the top on the timing plate. Now take a 19 MM wrench and turn the crank to the left ( counter clockwise) and watch the advance governor. Youll see that there is a "F" line with 1 4 next to it..line that line up with the line on the timing plate. Next look to see that the set of points for 1 / 4 are open.... set the gap.

Turn the crank again and look for the "F" line that has 2 3 next to it and line that up..check that points for 2 /3 are open and set gap. I then hit the starter button to roll the crank over a few times and go back and double check the gaps to see they havent moved.

If good then you move on to the dynamic timing with the strobe light.
 
hi;
If there's no noise at all around you, you can hear the spark if you are close to the bike. I could listenning for the spark to adjust the plate before strobe light.
Try it, with a multimeter to see the voltage
 
... Youll see that there is a "F" line with 1 4 next to it..line that line up with the line on the timing plate. Next look to see that the set of points for 1 / 4 are open.... set the gap.
...
Actually, the "F" mark is where the points start to open. They will continue to open farther as the crank turns a bit more. If you set the gap at the "F" mark, the points will actually start to open before that, and will continue to open farther as the crank continues toward the "T" mark.

Ideally, you could use a dwell meter to determine how long the points are open/closed, but I have never seen a specification for dwell on these bikes. :-k

.
 
Actually, the "F" mark is where the points start to open. They will continue to open farther as the crank turns a bit more. If you set the gap at the "F" mark, the points will actually start to open before that, and will continue to open farther as the crank continues toward the "T" mark.

Ideally, you could use a dwell meter to determine how long the points are open/closed, but I have never seen a specification for dwell on these bikes. :-k

.

Now that you mention it , neither have I. I do recall dwell being talked about for my Z650. This link will shed some light on the matter http://forums.kz650.info/index.php?topic=10546.0

I spent a lot of time messing with dwell meters and tbh never found them that useful, at least not making a difference I could see.
If OP is considering gearing up a strobe would be the first thing to get because as Steve is hinting at there is mechanical open and electrical open and static open and 1000 rpm open. A strobe will nail it for most. That said I have seen vastly more experienced guys than me do the whole thing entirely by ear and throttle twist.
 
F stands for when the coils fire...which is supposedly the points start to open..not at the T mark.... What i described is called static timing and it is absolutely correct. Next , with the light , you do DYNAMIC timing and adjust the timing plates accordingly. Static timing gets them real close though..close enough form it to run and be able to do the dynamic timing and get it perfect.
Ive done it this way for ever and NO i DONT have a dwell meter..its not actually necessary. I cant do points and timing in minutes. Yeah start bashing me...i could give schits less.

EDIT...I went and actually found the page in the 77 750 8 valve manual on Bikecliffs. If you go to the engine section and then go to page 77 youll see the pictures of where the timing mark is supposed to hit . Looks like the F mark to me..which is the same as the 1000s are incidentally. Seems oddly familiar since i just went thru 4 GSs this weekend and did everything from timing to carb syncing etc etc.

If you want to find the "highest point" of the lobe on the governor you can remove it and measure the highest point with calipers and make a mark on it for reference and lining up the points to that exact spot so you can set the gaps at the most open point on the lobe.

Lots of ways to skin the cat but thats the way i learned to do points way back when and even on our cars with points ignitions. Some of you are old enough to remember the local back road racetrack days and your tricks of the trade for adjusting with your flashlight gripped in your teeth at midnight..LOL

http://www.mtsac.edu/~cliff/storage/gs/GS750_Service_Manual_early8valve.pdf
 
Last edited:
Back
Top