• Required reading for all forum users!!!

    Welcome!
    Register to access the full functionality of the GSResources forum. Until you register and activate your account you will not have full forum access, nor will you be able to post or reply to messages.

    A note to new registrants...
    All new forum registrations must be activated via email before you have full access to the forum.

    A Special Note about Email accounts!
    DO NOT SIGN UP USING hotmail, outlook, gmx, sbcglobal, att, bellsouth or email.com. They delete our forum signup emails.

    A note to old forum members...
    I receive numerous requests from people who can no longer log in because their accounts were deleted. As mentioned in the forum FAQ, user accounts are deleted if you haven't logged in for the past 6 months. If you can't log in, then create a new forum account. If you don't get an error message, then check your email account for an activation message. If you get a message stating that the email address is already in use, then your account still exists so follow the instructions in the forum FAQ for resetting your password.

    Have you forgotten your password or have a new email address? Then read the forum FAQ for details on how to reset it.

    Any email requests for "can't log in anymore" problems or "lost my password" problems will be deleted. Read the forum FAQ and follow the instructions there - that's what we have one for...

  • Returning Visitors

    If you are a returning visitor who never received your confirmation email, then odds are your email provider is blockinig emails from our server. The only thing that can be done to get around this is you will have to try creating another forum account using an email address from another domain.

    If you are a returning visitor to the forum and can't log in using your old forum name and password but used to be able to then chances are your account is deleted. Purges of the databases are done regularly. You will have to create a new forum account and you should be all set.

any Ideas what's wrong with my sync?

  • Thread starter Thread starter castlekin
  • Start date Start date
C

castlekin

Guest
So I made my homeade Manometer( working well), And I get the carbs #1,#2,and #3 to almost sync up. I am noticing that #4 is doing nothing. Then When I have at least those 3 synced my IDLE is about 3000rpm. I can't adjust it any lower. As the Title says, any Ideas?

I thought of the possibility that the #4 cylinder isn't firing right and is flooded out.

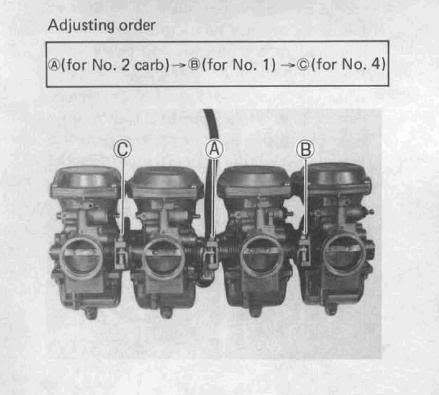
Also, I am adjusting at the screws with lock nuts on them, and I can't seem to find the idle screws for each carb, are they under the solid looking piece of metal that looks like a filled in hole on the top of the carb just on the other side of the mixture screws?
 
OK, several issues going on here, so let's just attack them as you mention them:

1. Homemade manometer. Let's see pictures or a diagram, as some of them are not worth the powder it take to blow them up. Others have managed to get theirs to work, so which one do you have?

2. What sequence are you using to sync the carbs? The factory manual specifies a certain order. Sync #2 to #3, then set #1 just a little higher. Finally, set #4 to match #1, a little higher than 2&3.

3. You should be able to turn the idle screw so low that the engine will die. You obviously have something else wrong.

4. Even if #4 is "flooded out", it's still breathing and will pull a vacuum.

5. You are apparently using the correct sync adjusters. Did you do a "bench sync" before putting the carbs back on the bike? For that matter, did you have the carbs off the bike for cleaning and o-ring replacement?

6. There are no "idle screws for each carb". What you are calling "a filled in hole" is, in fact, just that. There is NOTHING under that area that should be open. That is part of the manufacturing process to drill the passages beyond the plug. DO NOT REMOVE IT.

Hopefully, you have cleaned your carbs and replaced the o-rings AND checked your valve adjustment. Carb sync is virtually useless with them.

.
 
it has to be pulling some vacuum if not all the fluid would be sucked into the number 3
 
it has to be pulling some vacuum if not all the fluid would be sucked into the number 3
Just how would that happen? :-k

There is no connection between 3 and 4 that would allow fluid transfer, except the fuel inlet from the tank.

.
 
turns out the carbs were so out of balance that it was crazy. I got the #1 to stay constant, but #2 and #4 I can't seem to decide what they want to do. I get them real close, but they are wanting to pull to much. should I get the fluid levels close to each other, or should I get them not to move?

Any suggestions?
 
Did you change the intake boot O-rings yet? You can't sync with vacuum leaks.
 
I did not. However, as I said before, I am Real, Real close.
If you have not changed the intake boot o-rings, or at least inspected them to assure that they are in good shape, there is no point of spending another minute trying to sync the carbs.

They might be sealing right now, but wiggle the carbs just a little, there will be a leak. The leak will be an apparent change in sync to the engine.
Or, maybe they are leaking now. You make your adjustments to compensate, not knowing that you are doing so, then you hit a bump that seals them up. It's a never-ending cycle. Please do the basic maintenance, then get back with us, we will coach you willingly.

Until then, ...
noway.gif


Besides, we still don't know what your homemade apparatus looks like. It is possible that you have something very basically wrong in the concept and are simply chasing your tail.

Another thing is that you are apparently NOT following the sequence that I detailed. You just said that you could get #1 to be constant, but not 2 and 4. Got news for you ... #1 is slaved off of #2. If you change #2 (the adjuster in the very center), it will also affect #1. You HAVE to start by synching #2 to #3. Lock that in (gently), then move to #1. Last one to do is #4. Don't question the order, it's there for a reason.

.
 
Steve, thanks. I have inspected the boot o-rings earlier this year and they looked good.

So, you are telling me that the three lock nut screws are only for 1-2, then 3, then 4?
 
sorry and bout this thread guys, I want to do everything right and I am not quite sure how this multi-carb system works.

I will tell you that the carbs were so far out that all the oil was pulled into my #3 bottle the first time. after the other bottles were emptied it was so intense in the bottle from the air getting sucked into it.

Kind of funny to watch actually.
 
The three adjustments are between the carbs.
Stating this for the THIRD time:
well1.gif

- Start with the one in the center, match #2 to #3. Snug down the lock nut.

- Move to the one between #1 and #2. I hope you realize that #1 is under your clutch hand, #4 is under your throttle hand. The Suzuki manual has you set it about half a ball higher than #2. How much is "half a ball"? Nobody knows, but we usually do about 1 cm of mercury. With whatever you are using in your homemade apparatus (where are the pictures?), it will be anybody's guess how much of a difference is necessary.

- Finally, set #4 to match #1.

Just so you know I'm not blowing smoke:
Carbsyncorder-1.jpg


Have you adjusted your valves? If not, stop your sync and adjust your valves. If you have to change ANY clearances in your valves, you will have to sync the carbs again.

.
 
okay going to get a pic, but be fore warned it's dark in the shop and my phone doesn't photo well.

And I have checked the valves and cam lobes in March.
 
Last edited:
Castlekin, listen to these guys and stop everything else first. When you say you looked at the orings, what do you mean? Were they supple and in one piece or were they hard and brittle? What about the boots? Was the clearance within specs?

When you are completely ready to do the sync, read what Steve says. The number 3 cylinder will be your baseline. Loosen the locknut and adjust the screw between 2 and 3 first. Tighten that one back up and then move to number 1. Repeat. Do number 4. Make sure your temp tank has plenty of fuel and throw a fan at the front of the bike to ensure every thing stays cool.

Trying to find some other shortcut around this is going to mess you up even further. So, do what is recommended and you'll be on the road in no time.
 
My homemade Manometer is this thing. The first pic is about an Hour after I tried to sync the carbs the first time.

picture.php


And this is after I ran the bike for a few minutes after taking the first Manometer pic.

picture.php


See how number four lost some fluid? Note: the carb bottles are inline with the carbs when looking from the back of the Bike
 
Last edited:
Cowboy, the O-rings were nice and soft and the valves and cams were within specs( that's what I was checking them for).

I do want to thank you guys for answering, can't wait to hear more and update you guys on it.
 
Back
Top