• Required reading for all forum users!!!

    Welcome!
    Register to access the full functionality of the GSResources forum. Until you register and activate your account you will not have full forum access, nor will you be able to post or reply to messages.

    A note to new registrants...
    All new forum registrations must be activated via email before you have full access to the forum.

    A Special Note about Email accounts!
    DO NOT SIGN UP USING hotmail, outlook, gmx, sbcglobal, att, bellsouth or email.com. They delete our forum signup emails.

    A note to old forum members...
    I receive numerous requests from people who can no longer log in because their accounts were deleted. As mentioned in the forum FAQ, user accounts are deleted if you haven't logged in for the past 6 months. If you can't log in, then create a new forum account. If you don't get an error message, then check your email account for an activation message. If you get a message stating that the email address is already in use, then your account still exists so follow the instructions in the forum FAQ for resetting your password.

    Have you forgotten your password or have a new email address? Then read the forum FAQ for details on how to reset it.

    Any email requests for "can't log in anymore" problems or "lost my password" problems will be deleted. Read the forum FAQ and follow the instructions there - that's what we have one for...

  • Returning Visitors

    If you are a returning visitor who never received your confirmation email, then odds are your email provider is blockinig emails from our server. The only thing that can be done to get around this is you will have to try creating another forum account using an email address from another domain.

    If you are a returning visitor to the forum and can't log in using your old forum name and password but used to be able to then chances are your account is deleted. Purges of the databases are done regularly. You will have to create a new forum account and you should be all set.

Cafe bike, but 2 seater?

  • Thread starter Thread starter lilbilly
  • Start date Start date
L

lilbilly

Guest
I absolutely love the look of some of the cafe bikes some of you guys have built...

However, my wife often rides with me. We're not real long trip riders, so I'm not too concerned with comfort, but is there a way to make a cafe bike look good and have seating for 2?

Anyone have any pics how this would look?
 
Last edited:
I am in the process of doing the exact same thing. I'm using Ducati's from the 70's / 80's for inspiration. The Italians have always had a good eye for style.

ducati_900ss.jpg
 
It was also fairly common to put longer seats on Yamaha cafe racers. I've seen a few like this.

yam_sr500_bk_seat_011.jpg
 
Sorry to hog the thread but I have one more thought.

I've always thought of starting out with a GS King / Queen seat and resahipng the foam to make a cafe seat. Basically the 'Queen' part of the seat would be the 'hump' above the taillight. It would look the right shape but you could also carry a pillion.
 
buy the universal seat from this guy. You cut it to length. Depending on your size you can squeeze two people onto it, and still have a decent looking bike. My girlfriend and I squeeze onto our gs550 often. I don't know if i would recommend it for a cross country trip, but around down, or during an evening cruise it isn't bad.

www.hotwingglass.com
 
Thanks for the suggestions guys.

I really like the look of what they were doing on the website I posted. I wonder if it would be possible to shape the seat to how I like it, and then to fab some sort of cowl to go over the rear seat when not using it?
 
Thanks for the suggestions guys.

I really like the look of what they were doing on the website I posted. I wonder if it would be possible to shape the seat to how I like it, and then to fab some sort of cowl to go over the rear seat when not using it?

That's exactly what a lot of Ducatis and others had in the past (and now). Modern GSXR might give you some ideas too. Wouldn't be too hard if you are any good with fibreglass (which is easy BTW).


'Google images' is your friend. ;)
 
That's exactly what a lot of Ducatis and others had in the past (and now). Modern GSXR might give you some ideas too. Wouldn't be too hard if you are any good with fibreglass (which is easy BTW).


'Google images' is your friend. ;)

The current Triumph Thruxton uses that approach.
 
Do it yourself, safe a bunch of cash and learn something new:D

The easiest method is fiberglass over rigid foam (closed cell pink blue or green from the builder supply stores). Sheets come in different sizes and thicknesses. I like pink in 1/2" to 3/4" thick for seat bases and 2" for making the humps or tails.You need a glue that is compatable with foam and I like Gorilla brand but construction adhesive (sold in the same area as the foam) works.

Start by laying out and shaping the base. Build up the hump with a couple or three (4) pieces of the thicker stuff. Shape to your liking with rasps, files, sandpaper saws..whatever you feel comfortable with. Sand the final shape as smooth as you can with fine paper. You can fill and sand any divots with drywall mud / plaster of Paris. As the foam is cheap you can make several models to get the shape you like best.

Once you have the shape you can think about glassing. You have a couple of options but you need to know one key factor. Foam will not stand up to common fiberglass resin but is compatable to epoxy (2 part) resins. Epoxies are quite a bit more expensive but easier to work with in these projects IMHO. You can use standard resins but you will need to encapsulate the form first. No resin can be allowed to get to the form or it will eat it. One method is to paint the form with a latex based paint, several coats would be recommended. Another method is to use packing tape and wrap the form.

As far as cloth you would want the finest weave you can find. You can use a course cloth for the first layer and a finer one for the top but it is really not necessary and one fine layer is plenty strong (as the foam provides the rigidity). Cut pieces to shape. Usually one for the seat surface to wrap around the sides and be fixed to the bottom. One for the bottom and maybe a couple for the hump. You will need some push pins to hold things in place.

Now when dealing with glass and resins you need to wear gloves and masks and old clothes. Round up some dollar store brushes and a couple of plastic containers (bottom cut off pop bottles). It also helps to have some type of stand made (a couple of piesecs of scrap lumber) to affix the form to while glassing. Cut open a garbage bag and tape to cover your table. Resin get everywhere.

Start with mixing some resin as per the instructions. Just mix a couple of ounces enough to coat one piece at a time. I find a shallow tray or bowl handy to "load" the cloth. Pour the resin in and dip the cloth in. Make sure it is all wet and there are no dry areas. Pin the cloth in position. I do the whole top side one time and when hard, complete the bottom. When both sides are hard sand off any lumps and paint on another coat of resin alone.

Once the form is completed sand again to remove drips or ridges and then fill any depressions with standard Bondo or the like. Sand until smooth and primer, sand surface fill etc before paint.

As I mentioned before, I find working with the epoxy easier as you have no fear of destroying the foam. You can cut into the form after forming the shape to make holes for lights or glassing in nuts or bolts for attachment points. if you make any holes seal them with some resin painted on, cloth is not necessary.

Depending on the cost of resin ($30/40 a pint maybe) and glass ($5/10 for 5 or 6 sq feet or so)and foam ($8/20) you can make at least 2 if not 3 or more seats.

This technique is also good for making custom parts like side panels and fairings.

The first efforts may take a little time but in my opinion it a technique well worth learning and very satisfying when you get it completed.

Give it a try.

Cheers,
Spyug.

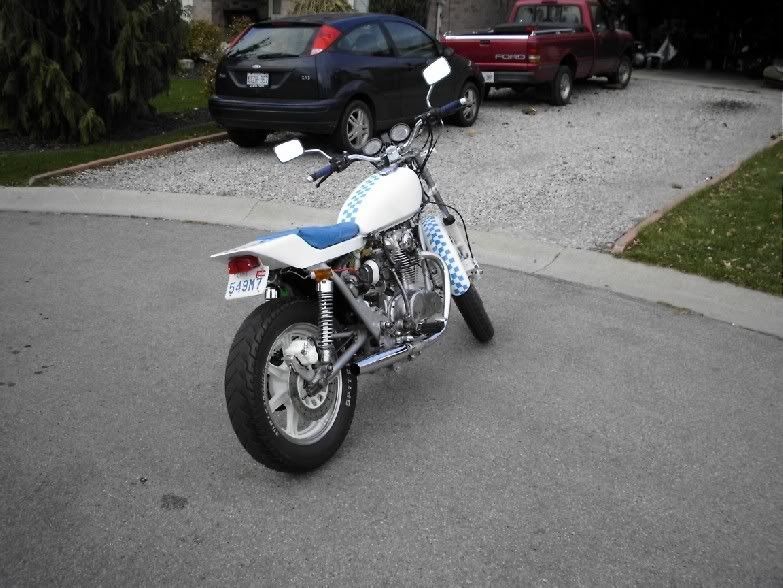
This is the fiberglass over foam seat for my XS Street Tracker. Hope it gives you an idea.
rightrear.jpg
 
Last edited:
Why not a 2 seater cafe? Just make the seat a little linger like posted above. My 400 yamaha cafe could carry an extra person if they were small. How would it look bad? Give more slide back room if you wanted to lay down on the straightaways. Here is a great link to some actual race bikes..http://www.advrider.com/forums/showthread.php?t=360180.. You can buy a seat from hotwing glass turnkey(except for mounting hard ware) for around 200 shipped..
 
Those Beemer sidecar rigs are SO FOOKIN' COOL!
+1 for the cafe'd Guzzis. I bet that was one fun afternoon.
 
Triumph Thruxton has some ideas.

Triumph Thruxton has some ideas.

Thanks for the suggestions guys.

I really like the look of what they were doing on the website I posted. I wonder if it would be possible to shape the seat to how I like it, and then to fab some sort of cowl to go over the rear seat when not using it?
Go to Triumph and have a look at the Thruxton. http://www.triumph.co.uk/usa/2009 Triumph_Thruxton_9831.aspx
Look at these pics of the Triumph Thruxton, I'm using these as a guide for my own project:
picture.php
 
There is a technique for making a cowl that is quite easy. Its called drape forming and uses ABS plastic sheet available from plastics supply companies. Usually you have to buy a 4'x8' sheet but you may be able to get smaller off cuts. You want something in 3 to 5mm thickness.

Now what you need to do is make a wooden form in the shape of the cowl. Now you need to heat up the sheet so you can form it over the cowl plug. Two ways to do this. One you can soften up the plastic with a portable heat source like a paint removing heat gun or even a butane flame. Start at the center of the piece and as soon as it starts to sag place it on the form and continue to heat it so it "sags" over the form. You can gently help it into position with a piece of dowl or the like but be gentle as you can leave marks in the plastic. Let it cool and trim the edges.

A better method is a little trickier but works much better. You need to make two strap metal frames like picture frames and sandwich the plastic between them. There needs to be enough room inside the frame to fit over the form. Heat the sandwich in the oven at 200degF until the plastic visible droops. the more droop the better. Have the form close to hand and when ready pull the plastic/frame out and press over the form. Hold in place until cool.

This is the method used to form commercial products and even sportbike bodywork but in addition to heating the plastic, they draw it down over the form on a vacuum table. You can easily build a vacuum table yourself and do a real pro job but draping works for simple projects.

Give it a whirl and learn something else new.

Let us know what you do.

Cheers and good luck with it .
Spyug

This is a cowl on the back seat portion of the 500 Virago i had. My first effort at "customizing"

xv12.jpg
 
Haha! Last night I just thought of this exact idea, hopped onto google, typed in "MAke fiberglass seat" and saw a good number of sites on how to make a removable cover.
 
Go to Triumph and have a look at the Thruxton. http://www.triumph.co.uk/usa/2009 Triumph_Thruxton_9831.aspx
Look at these pics of the Triumph Thruxton, I'm using these as a guide for my own project:
picture.php

I like that look for sure. These are the one's with a seat under the rear plastic right? I would love for it to look like that.

I'm trying to gather ideas for this winter in which I'm thinking I want to mod the looks into a cafe racer style.
 
Here is an idea that one manufacturer used to put on their bikes. Your gonna build one try this
121275.jpg
121272.jpg
 
Back
Top