• Required reading for all forum users!!!

    Welcome!
    Register to access the full functionality of the GSResources forum. Until you register and activate your account you will not have full forum access, nor will you be able to post or reply to messages.

    A note to new registrants...
    All new forum registrations must be activated via email before you have full access to the forum.

    A Special Note about Email accounts!
    DO NOT SIGN UP USING hotmail, outlook, gmx, sbcglobal, att, bellsouth or email.com. They delete our forum signup emails.

    A note to old forum members...
    I receive numerous requests from people who can no longer log in because their accounts were deleted. As mentioned in the forum FAQ, user accounts are deleted if you haven't logged in for the past 6 months. If you can't log in, then create a new forum account. If you don't get an error message, then check your email account for an activation message. If you get a message stating that the email address is already in use, then your account still exists so follow the instructions in the forum FAQ for resetting your password.

    Have you forgotten your password or have a new email address? Then read the forum FAQ for details on how to reset it.

    Any email requests for "can't log in anymore" problems or "lost my password" problems will be deleted. Read the forum FAQ and follow the instructions there - that's what we have one for...

  • Returning Visitors

    If you are a returning visitor who never received your confirmation email, then odds are your email provider is blockinig emails from our server. The only thing that can be done to get around this is you will have to try creating another forum account using an email address from another domain.

    If you are a returning visitor to the forum and can't log in using your old forum name and password but used to be able to then chances are your account is deleted. Purges of the databases are done regularly. You will have to create a new forum account and you should be all set.

Carb issues on 83 GS1100E

  • Thread starter Thread starter Guest
  • Start date Start date
It did however start before you put duct tape over the hole?

If so.......take the tape off, start the machine then slowly add tape to the hole. If the bike responds....i.e., revs, etc. then I would say that you are on the right track.

I am asssuming that you cleaned all the ports and jets earlier (I think that is what you said). The top end of the carbs won't need any cleaning because it is doubtful that the port that allows the vacuum to lift your slides is rarely an issue.

Does that back of the air box (around the opening) have a 'lip' that you can directly clamp a filter to? If so, you may be able to just purchase a K&N that directly clamps to it.

But, try to start the bike without the tape and then play with restricting the hole while it is running. I can't stress enough how sensitive these machines are to the appropriate mixture. Truly they won't run if it ain't right.......but you are close to getting it right.
 
It started with the choke on before I starting playing with the duct tape over the airbox filter hole. Once I put the duct tape over the hole, it never even tried to start, not once. Poked several holes in it, never even fired again. Took the tape off, still not firing at all. So I'm thinking maybe I have flooded the carbs. I'm going to try and drain the bowls and start over again. Thanks again for your help!
 
Don't drain your bowls, they are flooded in your cylinders, you'd be better off removing your spark plugs.
 
I'm "giving up" for now, I've acquired a complete set of 34MM's, exactly like the ones on this bike, except they came off an 82' instead of an 83', and aren't black, but they are completely rebuilt and ready to bolt on and go. Should have them by Wednesday, I'll take these carbs off and go through them again for "practice", I'm sure between the two sets I'll be able to get one of them running good!!!!! I'll post back with the results next week!!!!!
 
Well, slapped my new carbs on tonight, fired up on the first try! Pretty smooth throttle response, things are definitely looking up! Waiting to get a gas tank bracket and head light in the mail (Darn Canada snail mail), once I get that stuff attached, I'll be taking my first cruise down the road! Hopefully, the tranny will be fine and I can go ahead and send off for my title! Thanks for everyone's help in getting my bike up and running, can't wait to get it all put together, cleaned up and some new pics taken! GSR rules!!!!! :-D :-D
 
Last night when I finally got the bike running, it was dark, so I just pushed it in the garage and decided I would take it on it's maiden voyage this evening. Got home, pushed her out of the garage, turned the key, now it won't start. Doesn't appear to be a carb issue, I took the plugs out and they were all a little wet, but tried to crank it with a plug in it, and I saw exactly no spark? I'll search the archives, but this really sucks. I was so siked to see what I had, I don't even know if the bike will move on it's own power, now it won't even run, again!!!! I'm about ready to give up and just buy a complete running bike and use this one for parts, I got it on the cheap without a title, but I was soooooooo close to getting it going! AAAAAARRRRRRRRGGGGGGGHHHHHHH!!!!!!!!!!!!!!!!
 
If your stock carbs, do end up needing to be rebuilt, you should really consider buying a set of Mikuni VM33 smooth bores. These are no longer manufactured but you should be able to find a used set easily. The performance the smoothbores give you on the top end is incredible. I have had a set on my bike for over 10 years. The smooth bores do require a push/pull throttle, so you would have to change out your hand throttle.
If you ever decide to part with your smoothies, you'll have a field day around here. They are not that easy to find...
 
Update

Update

Well, played around with the electrical tonight and figured out the problem, I'm back in business again! Simple fix too, just a loose wire behind the headlight, wiggled it while my buddy hit the starter, and VROOM! I'm happy again! Going to fix the wiring and try to get the maiden voyage out of the way tomorrow, I'll post back with the results, hopefully positive ones!
 
Maiden voyage a success!

Maiden voyage a success!

Woo Hoo! Maiden voyage was a success, fixed the electrical problem behind the headlight, fired her up, drove her around the block several times, all gears seem to be fine. Getting closer.........now, the battery is dead, it's not charging, but I already knew this was coming. The rectifier has been HOT since day one, but I already have a new one, so that will be my next "fix". If that doesn't work, guess I'll be looking at the stator and going from there. The only thing else the bike really needs is front fork seals, but I'm waiting to get some Progressive springs in the mail before I do them........Should have her on the road soon!!!! I can officially start cleaning her up now, I'll post some pics of the bike after I make her look more respectable..........:-D
 
Backfire through the carbs

Backfire through the carbs

I was looking for information regarding a backfire through the carbs on my 1983 GS1100E and found this string. I recently installed a big bore kit to clean up after the #4 wrist pin clip let go and the pin scored a big gouge in the bore. That part is done and the engine was put together after a cleanup of the carbs (though not to the degree I have seen here). The engine starts right up and idles well, but at part throttle it backfires on all of them. I put individual filters in place of the air box after rebuild. Would going to the larger jets avoid this problem? (I think they are 112.5 mains). It almost seems more like a timing issue, but I have checked the cam timing twice and it appears on target. Bike has about 45k miles on it. I may just but the stock airbox on and see if this clears it up first, but love the simplicity and look of the individual filters.
 
You will have to rejet with the pod filters and the bore kit. I went with a Dynojet stage 3 kit.

http://www.dynojet.com/jetkits/motorcycle/suzuki.aspx

The instructions are usually on the lean side so go two steps richer on the needle and try the jets as instructed. They don't come with pilot jets but I'd go up one step on those also.
 
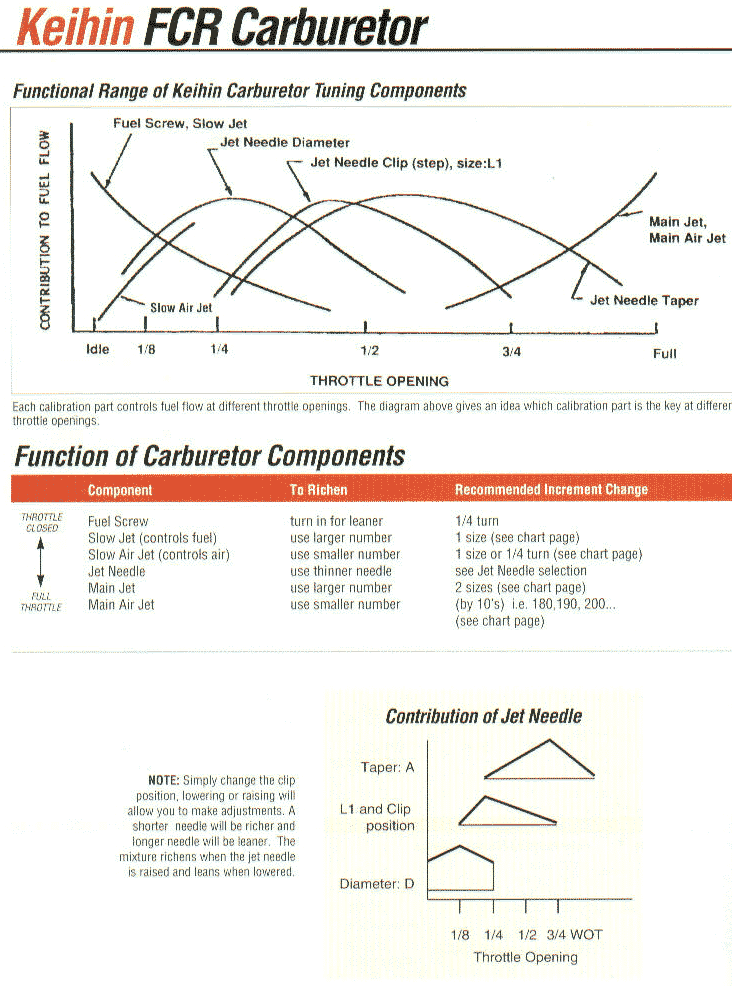
fcr_graphs.gif


Take a look at the bottom of the above page. Needle selection is critical and affects the bike throughtout the entire range. The needle is critical in three areas: taper, diameter, and clip position.

Sure you can replace jets easily, but what you pay for in a Jet Kit are the adjustable needles and a baseline setting that will prevent a lot of headaches. Place a set of aftermarket and stock needles side by side and the difference in all three areas is noticable.

You can shim stock needles with small washers, but you cannot make changes to the needles taper or diameter. Thats why most people buy jet kits. Aftermarket needles are engineered for each specific model and differ from the stock needles in all three areas.

BTW, the above chart is for Keihin FCR's but the principles are the same for CV carbs (they are just not as adjustable as the FCR's).

Good Luck, Ed.
 
Last edited:
But you can shim needles to a point. When I was taught we ran dyno and AF meters test and beleave me unless you where racing you would never know the difference. now this is all based on CV carbs. I bet if you took a bike and tuned it the way I do and then tuned it with a jet kit I bet that it would be so close with in 2 to 3 %( which usally means 1-2 hp on bikes under 100hp . Yes there are some carbs from the factory that where set up to run on the leanest side it could and I bet only a full jet kit could help.
I have even retapered needles, fun stuff but it takes time and a lot of trail and error. But once you get it it's so well worth doing it the old way, but it's not for every one. Just my 2cents worth.
Happy new year.
Kevin
 
why do you all recomend dnyo jet? When you can follow this guide.
http://www.motorcyclecarbs.com/Jetting_Rules_of_Thumb_W43C551.cfm

This has always worked well for me. Plus I don't like slide drilling, slides get spendy!!!
Just my 2cents worth
If it has worked for you, that's great. But Mr.Zanders suggestions such as "2 jet sizes for individual filters (pods)", which would equal an increase of 5 (each step = 2.5/Mikuni, so 2 x 2.5 =5), isn't even close in my experience. A STEP is 2.5, a SIZE is 5 with Mikuni. He only refers to a size, which he says equals 2.5.
In my experience, pods, even cheaper "Emgo" types, require at least 3 sizes larger (15) or more with Mikuni jets. His suggestions would have very lean results.
 
I've tried jetting per Mr. Zanders and it was really lean. I would consider that just a starting point to get the bike running and to do plug chops. That is the only real way for us home mechanics to jet is reading plugs throughout all carbs circuits.
I tried with K&N pod filters, 4-1 Kerker to jet without the Dynojet kit but I always had a stumble off the needle circuit. I did not have an adjustable needle and had to use shims. I feel I got it as close as I could. With the Dynojet I got it to run right with the first install. I did have a buddy who already had a dynojet installed and I used his jetting sequence.
So I have to agree the needle was the part of the kit that made it worth the money.
I wouldn't even begin to know how to taper my own needles.
 
Thanks for the advice. I also noticed that there are fuel stains on the outside of the carburetor now (as if they were flooded). Is this telling me anything like maybe the needle valve is not shutting the fuel off into the float bowl? Or maybe just leaky gaskets? Do the jet kits typically come with new gaskets?

I have not done much with these before.

Thanks.
 
The jet kits do not come with gaskets. I'd suggest buying K&L rebuild kits which come with gaskets, new idle mixture screws, float needle and seat with some o-rings. They also come with jets but I use the dynos. They also come with pilot jets but I'd clean and use your old ones unless you have to step up on them and then I'd only use mikuni jets.

georgefix on Ebay is where I got my rebuild kits. Also if you put new float needles and seats in you need to check and adjust your float adjustment.(very important)
 
Got the Dynojet kit and started the job. I am unimpressed with the lousy directions. In the instructions in step 1 it states: ??Using the drill bit provided (DD#32) enlarge the slide lift holes (Fig A). Do not drill the needle hole??

OK, what?s what? The needle hole I assume is the center hole the needle is in. There are 3 other holes. 1 that goes through and aligns with a small hole in the carb body when assembled. The other 2 are not through holes but are used to align the plastic needle cap. Which ones to drill? All of them? How deep? Why do these have to be drilled at all? 2 of these holes align the plastic needle cap, and on is through. Does this significantly change the slides damping?

Please advise.
 
This is not the Big Blue machine is it ? Try it with the airbox cover back on. The inlet air hole on my stock airbox is not much bigger than a quarter.
 
Back
Top