• Required reading for all forum users!!!

    Welcome!
    Register to access the full functionality of the GSResources forum. Until you register and activate your account you will not have full forum access, nor will you be able to post or reply to messages.

    A note to new registrants...
    All new forum registrations must be activated via email before you have full access to the forum.

    A Special Note about Email accounts!
    DO NOT SIGN UP USING hotmail, outlook, gmx, sbcglobal, att, bellsouth or email.com. They delete our forum signup emails.

    A note to old forum members...
    I receive numerous requests from people who can no longer log in because their accounts were deleted. As mentioned in the forum FAQ, user accounts are deleted if you haven't logged in for the past 6 months. If you can't log in, then create a new forum account. If you don't get an error message, then check your email account for an activation message. If you get a message stating that the email address is already in use, then your account still exists so follow the instructions in the forum FAQ for resetting your password.

    Have you forgotten your password or have a new email address? Then read the forum FAQ for details on how to reset it.

    Any email requests for "can't log in anymore" problems or "lost my password" problems will be deleted. Read the forum FAQ and follow the instructions there - that's what we have one for...

  • Returning Visitors

    If you are a returning visitor who never received your confirmation email, then odds are your email provider is blockinig emails from our server. The only thing that can be done to get around this is you will have to try creating another forum account using an email address from another domain.

    If you are a returning visitor to the forum and can't log in using your old forum name and password but used to be able to then chances are your account is deleted. Purges of the databases are done regularly. You will have to create a new forum account and you should be all set.

Carb Work 1978 Suzuki GS750 in Canada

  • Thread starter Thread starter WDHewson
  • Start date Start date
W

WDHewson

Guest
Gents:

I'll use this first note to introduce the GS750, so you know what I'm working on, then I'll get to the carbs in the following note.

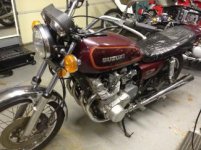
She was made in March 1978, Engine GS750-65202, and frame GS750-42578. I assume that frame and engine serials are not an exact match in old Suzuys.

The bike seems very stock with a low odometer of 19000 km, and that seems right judging by foot peg rubber and hand grip wear, etc.

It came to me running, but just barely able to rev or make power.

Front and rear hydraulic brakes were gummed, corroded, maladjusted, and ugly in every regard. But I've remedied most of that.

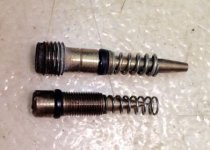
In the next post, I'll get to the carbs.
 

Attachments

  • John D (8).jpg
    John D (8).jpg
    20.7 KB · Views: 0
The GS Suzy came to me with those carb pods, but they are brand new, and I don't think the engine has run much at all with them in place. A PO was just dressing it up. I do have the airbox, but not the filter frame or the filter.

So the carbs were a cinch to get off and into the heated basement workshop. When I drained the bowls the gasoline was clear but lots of black flakes like two shakes of a pepper shaker.

And the carbs are coming apart well. They are not grossly filthy but they are far too dirty for any reliable service.

Here are the specifications of the internal bits.

Main jets 102.5
Idle jets 15
Needles 5DL36
Clip position 2
Slide 1.5
Air screw turns 2 7/8ths, 3, 3, 2 3/4ths for carbs 1 to 4 respectively
Fuel screw turns 5/8ths, 1 1/4ths, 7 1/2, 9 1/4th for carbs 1 to 4 respectively

So those fuel screw turns are not typos. Carbs 3 and 4 had their fuel screws almost falling out. So I suppose that part of the poor engine running was a grossly rich cylinders 3 and 4. Too rich for the mixture to fire I think.

The reason that the fuel screws for 3 and 4 were falling out was that a PO left out the the little friction loading springs. And in the attached image you can see that the fuel screw springs are quite different than the air screw springs. The fiche I've been using, Babbits, doesn't even show these fuel screws or their springs.

Does anyone have a source for these Mikuni fuel screw springs? I don't have a Suzy dealer nearby, and can't even search the internet based on a part number. I can find the air screw springs, but they're not the same.

At least no PO has broken off the fuel screw tips!!

Thanks All..............
 

Attachments

  • Air and Fuel Screws.jpg
    Air and Fuel Screws.jpg
    17.8 KB · Views: 0
Get your new o-rings here.
You might try Jetsrus for the missing springs.

BassCliff's site is still not fixed so the VM rebuild guide is not available. PM me your email address and I'll email it to you, it's about 0.5 mg
 
Put the airbox back in, use 1/4 inch storm door foam sealing tape to seal the covers to the body, and get a K&N filter. The filter is a complete unit..slide it in and put in the retainer screw and done.

Set the bottom screws ( PILOT SCREWS ) at 7/8 from gently seated and forget about them. Set the side screws ( MIXTURE SCREWS ) at 1 1/2 out. Touch the big idle knob end just to the throttle linkage and then go in 1 1/2 to 2 turns. This will get the carbs real close to ready.

You may have to adjust the idle once its warmed up and the RPMS start to climb..thats normal. You adjust the cylinder mixture using the side MIXTURE screws once the gauge carb sync has been done. Be sure the orings in the carb holders ( INTAKE MANIFOLDS ) are new to ensure no vacuum leaks. Replace the phillips heads screws with allen head screws as they tend to strip easily. Allen heads will last almost forever if you use the right size allen wrench.
 
Get your new o-rings here.You might try Jetsrus for the missing springs.BassCliff's site is still not fixed so the VM rebuild guide is not available. PM me your email address and I'll email it to you, it's about 0.5 mg
Thanks allojohn. I've got lots of little viton O-rings in stock, and jetRus looks very complete. I'll need to send them a note.I did a little more reading and one thread described using a ball point pen spring, but I'd like the real part.
 
Last edited:
Put the airbox back in, use 1/4 inch storm door foam sealing tape to seal the covers to the body, and get a K&N filter. The filter is a complete unit..slide it in and put in the retainer screw and done.

Set the bottom screws ( PILOT SCREWS ) at 7/8 from gently seated and forget about them. Set the side screws ( MIXTURE SCREWS ) at 1 1/2 out. Touch the big idle knob end just to the throttle linkage and then go in 1 1/2 to 2 turns. This will get the carbs real close to ready.

You may have to adjust the idle once its warmed up and the RPMS start to climb..thats normal. You adjust the cylinder mixture using the side MIXTURE screws once the gauge carb sync has been done. Be sure the orings in the carb holders ( INTAKE MANIFOLDS ) are new to ensure no vacuum leaks. Replace the phillips heads screws with allen head screws as they tend to strip easily. Allen heads will last almost forever if you use the right size allen wrench.


Many thanks Chuck. I'll follow your instructions faithfully.

Is it correct that these fuel screws are just the same function as a low speed fuel jet. But rather than a fixed jet, these fuel screws allow variation?

But why do they have fuel trim when the other air screw has air trim, all to the same effect? Seems unnecessary complication, but might offer wide tuning.
 
Idle and assisting on transitioning on and off the main jets. And there are two screw because the fuel and air arent premixed in the bowls like CV carbs do. I have taken down VM carbs before that I was pretty sure had never been taken apart before and the pilots screws on the bottom have usually been between 3/4 and 7/8..but they tended to set them lean due to the EPA regs of the day. This is why i always just got 7/8 out and leave them alone. This gives me the confidence they arent ever lean.

Since you have VM carbs, a Colortune will work great to set each carbs fuel to air ratio. Put it in the cylinder and adjust the side mixture screws and you can actually SEE the fuel to air ratios change and you will get each carb perfect. If you havent seen a Colortune go to youtube and look at some video.

Im sure others with VM carbs that have used a colortune will confirm they work great. Oh, and by the earlier comment about the 1/4 inch storm door seal..i meant 1/4 inch wide. It only needs to be about 1/8 inch thick..just so as it seals between the cover and rim of the airbox. The cost of the K&N is negligable because its gonna last the life of the bike and its the last air filter you should ever need. Little tech tip on the foam. Once its on and the cover fits smear a little film of grease on the foam. Helps to keeps it from sticking to the airbox when you have to remove the cover.
 
In your picture you have broken tips on the Pilot fuel screws. They can be replaced, Z1 Enterprises has them, their site should be up by next week for orders. The tips will also have to be removed if they are still stuck in the carburetor throats. That may change the initial settings Chuck suggested or at least make the adjustments a little more difficult depending on how damaged the needle tip seats are. You can get complete O-ring kits including the boot O-rings at (www.cycleorings.com) and the gaskets at Z1 for a very reasonable price. It is doubtful that you will need anything else for the rebuild except Pilot fuel screws.
 
You cant put new screws in with the broke tips still down the bore.......they either come out or the body gets replaced. No other way around that one. if the tips are plugging the fuel port there cant be any fuel delivery. He MAY need new float needles if they are showing signs of wear or any grooves in the beveled edges.
 
He MAY need new float needles if they are showing signs of wear or any grooves in the beveled edges.
Float needles and seats if necessary should be Suzuki Factory parts and should be available. I believe Chuck has a neat little clean up trick for the seats. I've been lucky with the needles, but they can get worn out.
 
If you don't want to wait for Z1 for the hard parts, SUDCO has everything you need.
 
And again Sirius has the float seats and needles listed since you may be ordering the pilot screws from them too.
 
Hi Spyderman. I bounce around three different spots in Toronto, London, and Sarnia, all Ontario.


Seeing as you are in the area if you do end up buying parts from Sirius, pick them up in person and save the pricey shipping costs.
They are in the north end of Kitchener.
 
Many thanks to all the very helpful contributors to this thread.

Becoming aware of the potential for broken fuel screw tips, I illuminated the interior of the slide body, and could see light through the wee hole that the fuel screw seats into. All four carbs had clear holes, and the holes seemed about equal diameters. No broken tips in there.

I took a straight length of soft copper wire of diameter 0.022 inches, and that was a slip fit with little play in all the holes.

I'll take another look at the four fuel screw tips to see if they're dull or fractured. Maybe a little marcophotography for the next note.
 
If the ports are all open youre good to go. I would suggest you get all 4 new screws and be certain they are all good as far as length and proper tapper goes.
 
Back
Top