• Required reading for all forum users!!!

    Welcome!
    Register to access the full functionality of the GSResources forum. Until you register and activate your account you will not have full forum access, nor will you be able to post or reply to messages.

    A note to new registrants...
    All new forum registrations must be activated via email before you have full access to the forum.

    A Special Note about Email accounts!
    DO NOT SIGN UP USING hotmail, outlook, gmx, sbcglobal, att, bellsouth or email.com. They delete our forum signup emails.

    A note to old forum members...
    I receive numerous requests from people who can no longer log in because their accounts were deleted. As mentioned in the forum FAQ, user accounts are deleted if you haven't logged in for the past 6 months. If you can't log in, then create a new forum account. If you don't get an error message, then check your email account for an activation message. If you get a message stating that the email address is already in use, then your account still exists so follow the instructions in the forum FAQ for resetting your password.

    Have you forgotten your password or have a new email address? Then read the forum FAQ for details on how to reset it.

    Any email requests for "can't log in anymore" problems or "lost my password" problems will be deleted. Read the forum FAQ and follow the instructions there - that's what we have one for...

  • Returning Visitors

    If you are a returning visitor who never received your confirmation email, then odds are your email provider is blockinig emails from our server. The only thing that can be done to get around this is you will have to try creating another forum account using an email address from another domain.

    If you are a returning visitor to the forum and can't log in using your old forum name and password but used to be able to then chances are your account is deleted. Purges of the databases are done regularly. You will have to create a new forum account and you should be all set.

GS1000 valve clearance problem

  • Thread starter Thread starter NitroGS
  • Start date Start date
Hi Guys,

Got the bank of VM carbs today for the Suzuki GS1000E, I have stripped them down and cleaned all parts. Noticed a scratch on one of the slides the inner bore of the carb is fine pic included click http://www.minimotos4u.com/throttleslide.htm will this be okay. I have all the parts from my old bank of carbs. Will be fitting the new O rings tomorrow
 
Can you take a slide from the other bank of carbs? If so, I'd do it and put the scratched slide with the part's carbs. Regarding the scratch itself, doesn't look too bad. My guess is that it would be okay.
 
Hi there,

I certainly can take one of the slides from the other bank of carbs, i have 4 spares. Just wondered if it was accepted practise to do so[-o<
 
I've had scratched slides before and I carefully smoothed out the scratch with some emery cloth. As long as it's not binding the slide, the scratch didn't seem to make any difference at all that I could tell. Just be certain it's not binding and fix whatever caused the scratch in the first place.
 
Quite a scratch there. Since you have spares, I'd replace it.
I'd like to see what caused the scratch. Anything you see in the carb body?
As part of any rebuild, I always check the body for any burrs. Then I polish the body.
What I do is to use some Mothers, Semi-chrome, or Blue Magic aluminum polish or silmilar. Nothing more aggressive. Using a small amount at a time, I work the polish into the cloth first. Then, with my index finger, I rub straight up and down and get about 1/2 the body polished. Add a little more paste and then finish the body. I even keep a rough count of how many times I rub each body but that's probably not necessary. You don't need to rub hard.
Get a fresh cloth and buff out the residue. Carbs inside will be like a mirror. They sure feel smoother to me.
Maybe it's overkill but it's what I like to do.
PS: remember, if you dis-assemble the carb bodies completely, you must be aware that the main fuel "T" sometimes will leak after you put them together. The other 2 fuel connectors can too but it's less common.
Hopefully, your "T" doesn't leak but do pour some fuel in and test before mounting.
There are fixes if you do see leaking.
Also, use blue thread lock on the 8 recessed Phillips screws that hold the carbs to the bracket.
 
Excellent thanks for that Keith. By the why my dynojet kit is arriving tomorrow. Can you give me some pointers of my requirements. Just to remind you:

Suzuki GS1000E fitted with 1085cc Wiseco Kit, will be running a Vance & Hines street megaphone 4 into 1 and velocity stacks. Prior to rebuilding the bike was running on 120 mains and 15 pilots with needle clip set on the second groove from the bottom
 
Question for Keith Krause

Question for Keith Krause

Hi Keith

The dynojet kit is due today my friend, what will be the best starting point please
 
Hi. Just noticed this as I'm going to bed. Very late here.
I'll suggest some jetting for your DJ kit in the morning. I find most 1000's end up with fairly similar jetting but I take my advice seriously and I try to guess it right the first try. Your stacks are a concern and also your climate. Not "the norm" for me but I can adjust for them. Usually on the damp side/high humidity, correct??
I'll suggest something in the morning when I've got a little more time to think.
 
Hi Keith

Little bit like New York, damp 8 months of the year, then warm for 4 months, humidity fairly high. Look forward to hearing back from you Keith, many thanks.
 
Hi. Didn't mean to keep you waiting but by the time I saw your post, it was late and I worked on my bike in a hot garage all day. I found time to help another member but had to get to bed. I have to finish my bike today but I've got some time.
Believe it or not, I've spent some time thinking about your situation, just like it was my own bike, and I just can't come up with a set up that I'm sure will fix you up the first try. As I said earlier, I'm no expert with stacks and I've only received only limited feedback from helping members in very different climates. I'm learning here too. That said...
I just want to say one more time that I recommend the K&N ovals. I know, I know.:lol:
The main thing is, the DJ kit, or any other stage 3 kit, isn't designed for stacks. We all know jetting can be trial and error, even with a kit. Add parts that aren't designed to match the mods and it can be more difficult.
I feel the stacks will draw in moisture to the point of corrosion issues. Maybe I'm wrong. I KNOW the unfiltered air will lead to increased wear from dirtier oil. The small HP advantage gained (about 1 HP? and at only very high rpm's) simply isn't worth it, even if I guess the jetting right the first time. I suppose if the bike doesn't accumulate a lot of miles, it will last a long time without significant problems. But if my bike, there's no way I let the cost of the filters get in the way here. Had to say it one more time.
Sorry for the long post but I have a habit of explaining my thoughts, not just saying do this or do that. Others may be interested and I take that into consideration too.
As for your jetting, the stacks create the biggest guess. What I can't decide 100% is how they might effect the overlap between the jet needle and the main. I'm concerned about roll on performance (from about 60 mph, top gear, then full roll on.) In my mind, the stacks have a dual personality. I think they don't contribute significantly more air than pods unless you really open it up. I think they contribute about the same flow at lesser throttle openings and especially at lower rpm's. So at these smaller (below 3/4) throttle openings, the typical jet needle adjustments and the 138 mains make sense. But I think the bike may now starve at full throttle/high rpm's if I choose the smaller main jet, which more often than not works well with pipe/pods. The stacks WILL want more fuel at full throttle/high rpm's. But it's a possibility that the larger 142 main may create a bog during a roll on because the stacks don't have the same effect at smaller throttle openings/lower rpm's. Kind of a catch 22. Possible good mixing at both the jet needle and main circuits but with an overlap bog, or good mixing at the jet needle with no overlap bog but the top end off a little because of the smaller main. If that were to happen, I always sacrifice a little top end because I insist on getting the jet needle right, if I must pick which one. DJ does make 140 mains and that may be a compromise that works.
The bike may want the jet needle a little richer than I have in mind and this would just aggravate the overlap problem. It's the darn stacks.
I have factored in your climate but I don't think it cancels out the stacks at every point. I do think they cancel each other out at smaller throttle openings and warmer weather, but the rest of the time I just don't know.
Sorry to ramble. The bog issue I bring up is just something I've seen with many VM bikes. Who knows, maybe I'm just wasting time worrying about it.
I can say that I believe there are only 2 jet needle positions that will work in your case...the 4th position (most common) and the 4 1/2 position. If I'm right, that means you shouldn't have to adjust the needles more than once if the first try isn't right. The needles are the most work and moving them requires the carbs to be bench and vacuum synched AGAIN.
I'd go with the 142 mains.
With some doubt, I'd try the needle e-clips at position 4 from the top. I have to say that the general rule in jetting is to go rich and work your way back. There's a good chance your e-clips may need to be in position 5 from the top with the DJ jetting spacer directly on top the clip. That is position 4 1/2. If the stacks do lean it out more than I think while on the jet needles, 4 1/2 would probably be better. But I'm guessing 4. I hope it's right. Very mixed feelings here as I've said.
The DJ kit is designed to work with the stock 15 pilot jets but not your stacks. Since I feel the stacks aren't effecting the pilot circuit enough, I'd stick with the stock pilots and leave it to the pilot fuel screws underneath to help the pilot jet enough. I think I'd start at 1 1/2 turns out from LIGHTLY seated. Your stacks may cause some significant deceleration popping because the carbs are under the leanest conditions at nearly closed/closed throttle and I can see the stacks aggravating that. Be sure you have new exhaust gaskets and don't blame all the poppng on the jetting. A little is acceptable to me. You can cause worse problems by trying to eliminate all the popping. If it seems lean, try up to 2 1/2 or even 3 turns out on the pilot screws. If poor results, you'll need the correct length 17.5 pilot jets and return the screws to close to factory, about 1 turn out.
The side air screws are always set using the highest rpm method. Initially set at 1 3/4 turn out.
REMOVE the 2 floatbowl vent lines and leave the ports open to avoid possible fuel starvation.
The carbs must be bench synched for fully closed and fully open positions.
If bench synched well, it will start up.
Warm up fully. Set idle to 1,000 rpm's. Adjust air screws. Starting at any carb, slowly turn in either direction until you hear the rpm's max. Fine tune the screw. Return the idle to 1,000 if necessary by using the idle adjuster knob. Repeat to the other 3.
Now vacuum synch with a gauge.
Test the mains at full throttle.
Test the jet needles at 1/3 throttle.
Test the pilot circuit at minimal throttle, a steady 35/40 mph in 4th/5th gear is good.
In all cases, warm up fully, run a couple miles and judge performance then chop off and read the plugs.
I really can't say how the jetting will respond (if it is right the first try) when your weather changes. I hope it will be acceptable year round.
Let us know how it goes.
 
Many thanks Keith, for the in depth reply. Received the dynojet stage 3 kit today. Polished the carb inner bores exchanged the scratched slide for a good one. Taking the carbs to work tonight to blow with compressed air, everything is lovely and clean. Fitting all new o rings tomorrow with the jet kit. Still waiting for my darn intake rubbers in the post when they arrive all systems go.
 
OK. I'll be around.
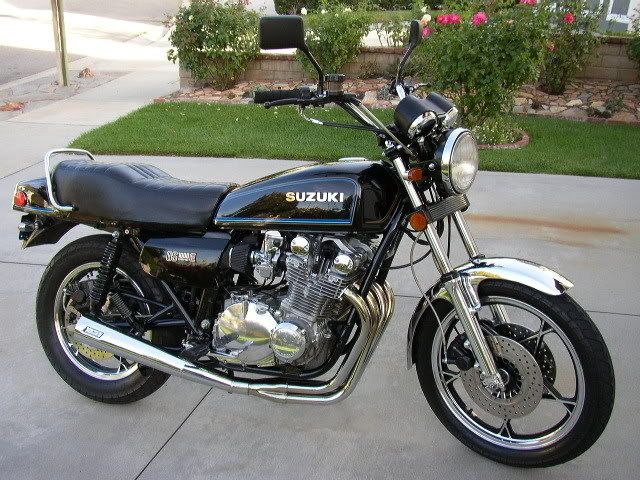
Thought I'd share a pic of my bike. '79 GS1000E. I'm the original owner.
Over 130,000 miles total. I used to have a nice website to show her off better, but my new service axed that.
She runs great. Still surprises quite a few newer bikes if I'm not in the mood to be passed. It's harder than they think. 1085/light head polish/V&H/K&N's/DJ kit/Dyna coils and S ignition/cams timed at 106/welded and polished crank/welded clutch basket/etc.
I kept the stock ergonomics because it's just so comfortable to ride. But it does help contribute to the "sleeper" look. No bike with stock bars can be quick or fast, right?
I agree the faired look and lower bars look cool though. I may someday go that way, after I semi-retire her. Right now, I ride too much to compromise comfort.

shownight029.jpg
 
Hi Keith,

Absolutely stunning bike, love it.

I was just looking at my old set of carbs and noticed on the air intake side at the base are two small apertures. My new bank of carbs have a jet in one of the apertures for each carb whereas my old set does not, odd.
My previous setup with the velocity stacks and performance exhaust was with 120 mains, 15 pilot jets and needles on 4th groove. Rollon was good, with the ability to loft the front wheel in first on the throttle. Looking forward to doing the dynojetting.
 
Hi Guys Suzuki GS1000E 1979 VM carbs

Just a quick question I have noticed when disconnecting the throttle operating arm from the throttle slides there is a small shim plate with three holes. There is a dimple on the shim plate, on two of the slides the dimple was on top and the other two the dimple was faced down. Which way should the dimple go please up or down?
 
Hi Keith,

Absolutely stunning bike, love it.

I was just looking at my old set of carbs and noticed on the air intake side at the base are two small apertures. My new bank of carbs have a jet in one of the apertures for each carb whereas my old set does not, odd.
My previous setup with the velocity stacks and performance exhaust was with 120 mains, 15 pilot jets and needles on 4th groove. Rollon was good, with the ability to loft the front wheel in first on the throttle. Looking forward to doing the dynojetting.
The jet in the filter side is the air jet. Air enters and goes to the needle jet/bleedpipe. It atomizes the mixture. Without it, that part of the carbs operation was very lean. Be glad the new carbs have the jets. I can't understand why someone would remove them but there are people out there that have no business touching carbs, among other things.
From my experience, I'm surprised if you liked the performance before from the 120 mains. 120's are small in my opinion for these mods.
 
Hi Guys Suzuki GS1000E 1979 VM carbs

Just a quick question I have noticed when disconnecting the throttle operating arm from the throttle slides there is a small shim plate with three holes. There is a dimple on the shim plate, on two of the slides the dimple was on top and the other two the dimple was faced down. Which way should the dimple go please up or down?
Dimple down.
When assembled, the dimple will contact the jet needles thicker plastic ring that sits on top the e-clip. Under the spring pressure, the dimple causes an uneven surface that forces the jet needle to be cocked to the rear. The needle must be in this condition or it will pre-maturely wear itself out from unwanted rotation and vibrations. Luckily, your new DJ needles will eliminate any care about possible jet needle damage.
I use a very small dab of grease to make the brass plate stick to the bottom of the throttle arm. I then drop in the 2 Phillips screws and lower it into the slide as an assembly. Without 3 hands, screwdriver in mouth, ready to start the screws.
Since the previous owner(s) did things like placing the plate upside down, be careful to check everything well. Make sure the two plastic spacers for the jet needles are installed in correct order. Thicker above the e-clip, thinner under the clip. Things like that. If you have a question, just ask before doing something that doesn't feel right. If needed, I have many VM carb posts about various things, so a search may help if I can't reply soon enough. I work all this week and I can only reply at night if you need my help. There is a very good VM carb rebuild section here that a member allowed me to help with and it can help you too.
PS: Be sure to bench synch for the fully opened and fully closed slide positions. This must be followed by a vacuum tool synch.
 
Hi Keith,

Thank you again. Part of the instructions for the dynojet kit that i have recieved are missing. Obviously there are not too many parts to not know where things go. The small spacers that are provided, I assume they go the top of the e clip. Are these spacers only used to half movements so if I setting to the fourth groove do I not need to fit the washer
 
Hi Keith,

Thank you again. Part of the instructions for the dynojet kit that i have recieved are missing. Obviously there are not too many parts to not know where things go. The small spacers that are provided, I assume they go the top of the e clip. Are these spacers only used to half movements so if I setting to the fourth groove do I not need to fit the washer
Correct. They are for 1/2 position changes.
If the 4th position from the top isn't rich enough, and depending on plug color/performance, the next richer position to try would be 4 1/2, which means to place the e-clip in the 5th position from the top and lay the jetting spacer directly on top the clip.
I feel one of these two positions should work for you as I said earlier. It sounds like you're trying the 4th position and I hope it will be right.
I'm off to work sir. You have a good day.
 
Thanks Keith,

Just to update you meticulously assembled al the carb components including o rings. Checked once, twice and three times that everything is as it should be. I have taken your recomendations fully. Gone with the 142 DJ mains, stock 15 pilots (I do have a set of 17.5's if need be). Pilot fuel screws out 1.5 turns from lightly seated and pilot air screws 1.75 turns from lightly seated. E clip in the fourth groove without adjuster washer fitted. Had to get ready for a night shift so called it a day for now. Looking forward to next part. Have a good day, speak soon.
 
OK. Be sure the bench synch is good. That will make the vacuum synch easier/quicker.
I assume you know how to bench synch both the fully open and fully closed positions? If needed, I have a detailed post on how to bench synch if you search at Mark Hoomgar's thread "GS1K bad fuel economy attn Keith Krause".
If the bench synch is done right, add enough turns at the idle adjuster knob and it should start right up.
After full warm up, then you can fine tune the side air screws using the highest rpm method. Don't just assume they are close enough at the initial 1 3/4 turns out point. That's a "start up" setting I suggest because they usually end up somewhere between 1 1/2 and 2 turns out after fine tuning. I understand you may use the Colortune to set the air screws and the pilot fuel screws, that's fine if it works. I have no trouble adjusting the air screws by ear but some do. As for the pilot fuel screws, I do what the plugs and performance say after minimal throttle testing.
Once the air screws are set, I'd let the bike cool down some before hooking up the vacuum gauge. But if you know how to synch quickly, then I guess over-heating isn't an issue.
If needed, I mentioned a few things about the vacuum tool synch at reply #15. If you don't have much experience with synching these carbs, it's quite easy to find yourself making adjustments that are too much and you can find yourself going back and forth with the levels. Like anything, it can take some practice to make the adjustments quickly. You'll see how little adjustments effect the levels.
Be sure the gauge is connected with no leaks or kinks.
I just use the gas tank mounted safely on a bench with extra long fuel and vacuum lines. If you prefer to use a hanging reservoir, be sure it's vented properly so fuel will flow easily.
Hope it goes well.
 
Back
Top