A
Adler
Guest
The major symptom that this tutorial will address is that of the ignition switch getting stuck in any position, usually "lock" or "park".
The first thing to remove is the clip on the top. Be careful because this is old plastic. I took 3 small nails and I slipped the first under one of the fins then the second under the next and the third under the one following that. Once the third nail is in, you can remove the second, carry on like this until the top clicks off.
On to the roll pins...
The trick to getting the pins out was to find a screw small enough to JUST barely fit into the roll pin. I didn't have such a screw, so I used one that was too big. It worked on the first pin, but sustained too much damage to work on the second. The second pin I used a drill bit to widen and when I pulled the drill bit out, the pin came with. The third pin I drilled out then used a tiny screw to get the rest out.
So now that its open, you have this...
and this...
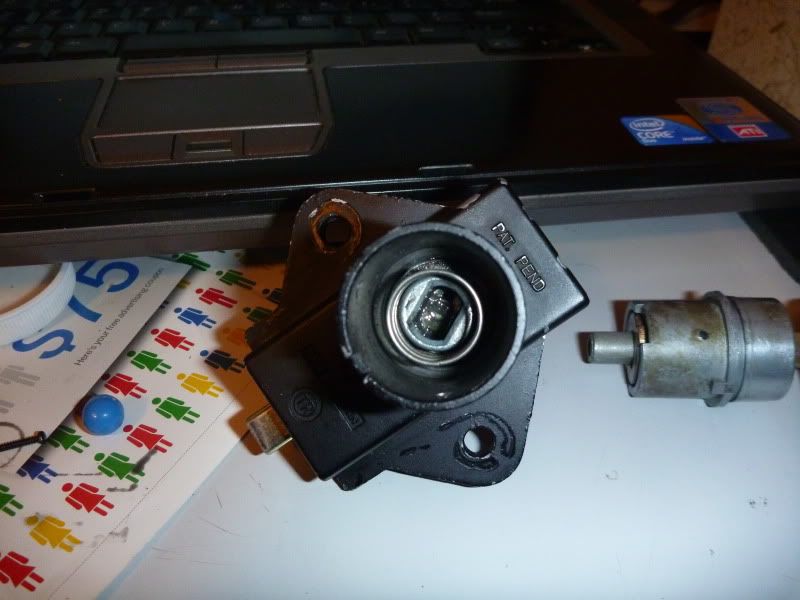
The part that contains the steering lock is quite simple and I doubt it is damaged. You can remove the piece at the bottom of the channel in the above pic and clean and re-lube it but thats about all that comes out without ALOT more work.
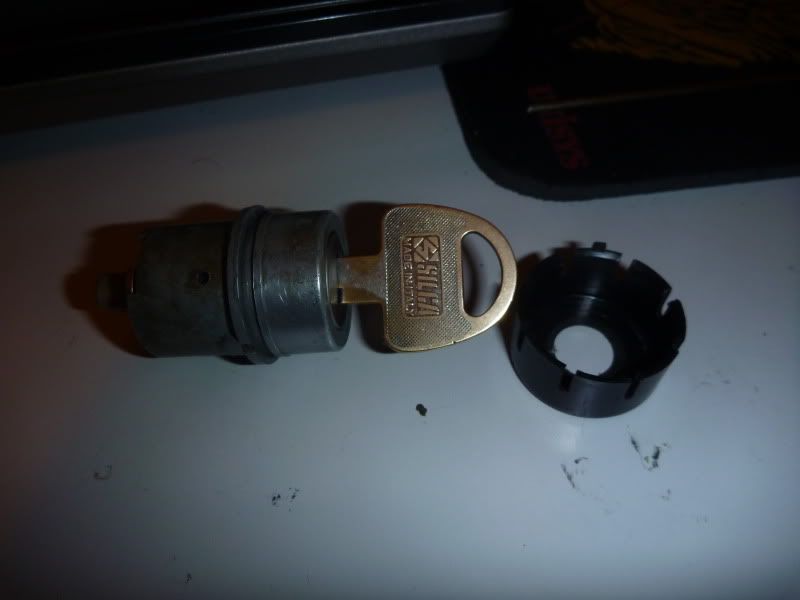
On to the important part...
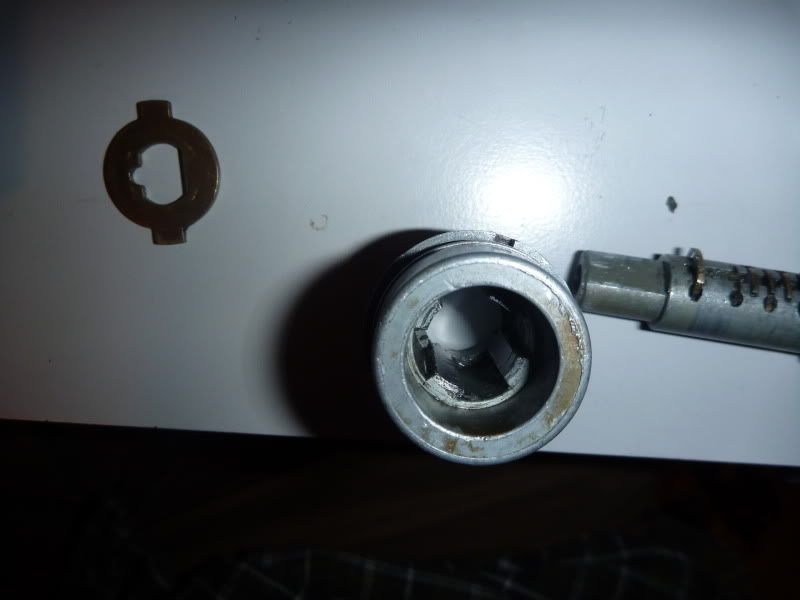
To remove the tumbler cylinder from the outer sleeve, you need to push in on the big flat tumbler on the end (on the left of the next pic). Then the whole inner piece should simply slide right out.
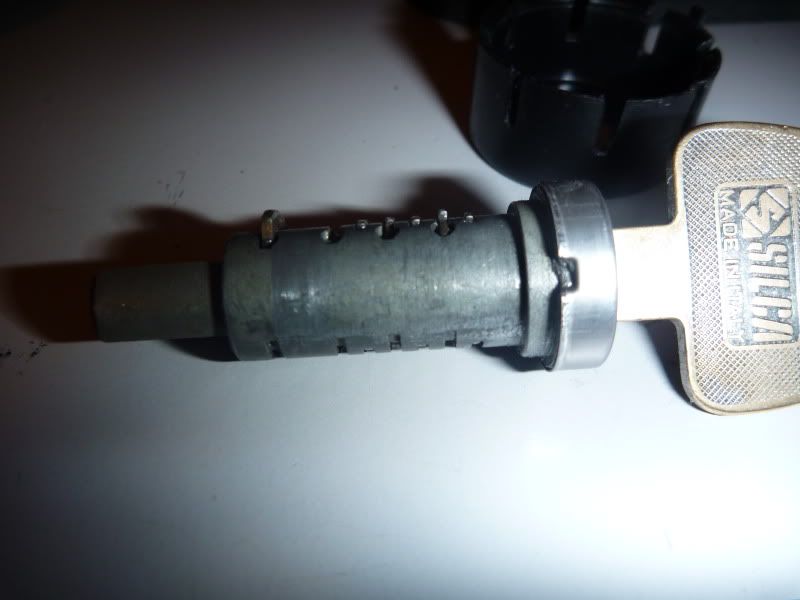
The reason this has failed is because the tumblers have worn down over the years and no longer align perfectly with the cylinder as you can see in the picture above. This is especially true of pin number 2.
Often this failure will only be evident when the lock is put in "Park" or "Lock". The reason for this is that the piece of the outer sleeve that blocks the lock from turning when the incorrect key is inserted wears down with the tumbler creating grooves in the wall of the outer sleeve.
Since the "Park" and "Lock" positions are so rarely used, they do not have the grooves and will show the condition of the lock more precisely.
In order to fix this defect I have compiled a few solutions.
1. Remove the tumblers (not simple) and replace them with new ones from a locksmith.
2. Make a new key that fits the worn out tumblers.
3. file down the offending tumblers to reduce the clearances in the lock. This will offer worse security, but honestly, who are you kidding.
I went with solution number three. I found it helpful to hold the pin up from the bottom while I file it down from the top, otherwise the spring just compresses while you try filing and it takes forever.
I then reassembled with the mangled roll pins I had removed. Ideally you should go to a hardware store and replace these.
Sorry I didn't take more picture, in the heat of the moment I was too excited to remember. (I may take some more and add then if something isn't clear)
The first thing to remove is the clip on the top. Be careful because this is old plastic. I took 3 small nails and I slipped the first under one of the fins then the second under the next and the third under the one following that. Once the third nail is in, you can remove the second, carry on like this until the top clicks off.
On to the roll pins...
The trick to getting the pins out was to find a screw small enough to JUST barely fit into the roll pin. I didn't have such a screw, so I used one that was too big. It worked on the first pin, but sustained too much damage to work on the second. The second pin I used a drill bit to widen and when I pulled the drill bit out, the pin came with. The third pin I drilled out then used a tiny screw to get the rest out.
So now that its open, you have this...
and this...
The part that contains the steering lock is quite simple and I doubt it is damaged. You can remove the piece at the bottom of the channel in the above pic and clean and re-lube it but thats about all that comes out without ALOT more work.
On to the important part...
To remove the tumbler cylinder from the outer sleeve, you need to push in on the big flat tumbler on the end (on the left of the next pic). Then the whole inner piece should simply slide right out.
The reason this has failed is because the tumblers have worn down over the years and no longer align perfectly with the cylinder as you can see in the picture above. This is especially true of pin number 2.
Often this failure will only be evident when the lock is put in "Park" or "Lock". The reason for this is that the piece of the outer sleeve that blocks the lock from turning when the incorrect key is inserted wears down with the tumbler creating grooves in the wall of the outer sleeve.
Since the "Park" and "Lock" positions are so rarely used, they do not have the grooves and will show the condition of the lock more precisely.
In order to fix this defect I have compiled a few solutions.
1. Remove the tumblers (not simple) and replace them with new ones from a locksmith.
2. Make a new key that fits the worn out tumblers.
3. file down the offending tumblers to reduce the clearances in the lock. This will offer worse security, but honestly, who are you kidding.
I went with solution number three. I found it helpful to hold the pin up from the bottom while I file it down from the top, otherwise the spring just compresses while you try filing and it takes forever.
I then reassembled with the mangled roll pins I had removed. Ideally you should go to a hardware store and replace these.
Sorry I didn't take more picture, in the heat of the moment I was too excited to remember. (I may take some more and add then if something isn't clear)
Last edited:
 .
.