• Required reading for all forum users!!!

    Welcome!
    Register to access the full functionality of the GSResources forum. Until you register and activate your account you will not have full forum access, nor will you be able to post or reply to messages.

    A note to new registrants...
    All new forum registrations must be activated via email before you have full access to the forum.

    A Special Note about Email accounts!
    DO NOT SIGN UP USING hotmail, outlook, gmx, sbcglobal, att, bellsouth or email.com. They delete our forum signup emails.

    A note to old forum members...
    I receive numerous requests from people who can no longer log in because their accounts were deleted. As mentioned in the forum FAQ, user accounts are deleted if you haven't logged in for the past 6 months. If you can't log in, then create a new forum account. If you don't get an error message, then check your email account for an activation message. If you get a message stating that the email address is already in use, then your account still exists so follow the instructions in the forum FAQ for resetting your password.

    Have you forgotten your password or have a new email address? Then read the forum FAQ for details on how to reset it.

    Any email requests for "can't log in anymore" problems or "lost my password" problems will be deleted. Read the forum FAQ and follow the instructions there - that's what we have one for...

  • Returning Visitors

    If you are a returning visitor who never received your confirmation email, then odds are your email provider is blockinig emails from our server. The only thing that can be done to get around this is you will have to try creating another forum account using an email address from another domain.

    If you are a returning visitor to the forum and can't log in using your old forum name and password but used to be able to then chances are your account is deleted. Purges of the databases are done regularly. You will have to create a new forum account and you should be all set.

My Homemade Manometer (pics!)

  • Thread starter Thread starter C.V.
  • Start date Start date
C

C.V.

Guest
So after much internet research, and less than 20 bucks, here it is, after growing another 3 feet...

DSC02032.jpg


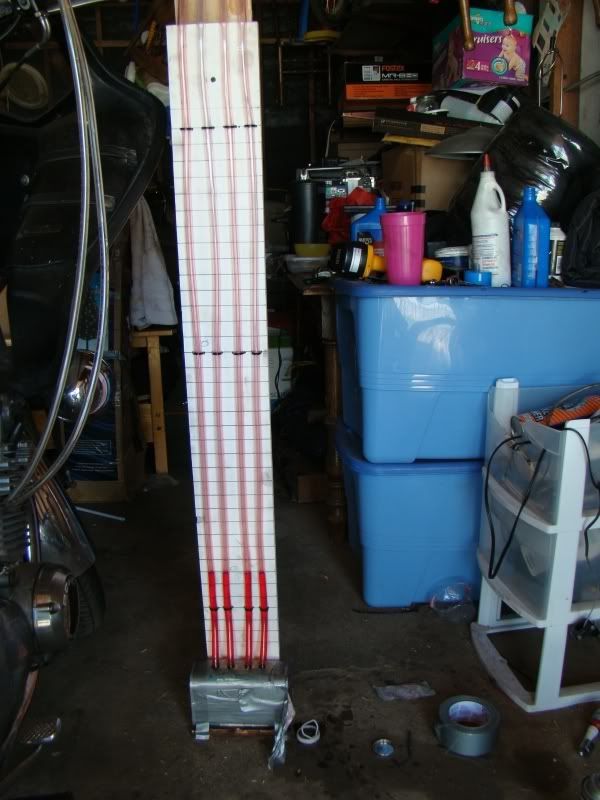
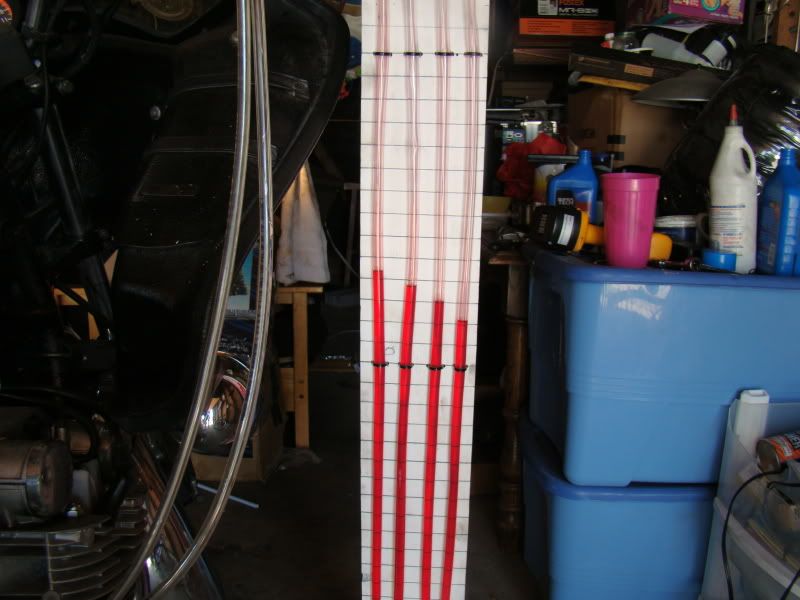
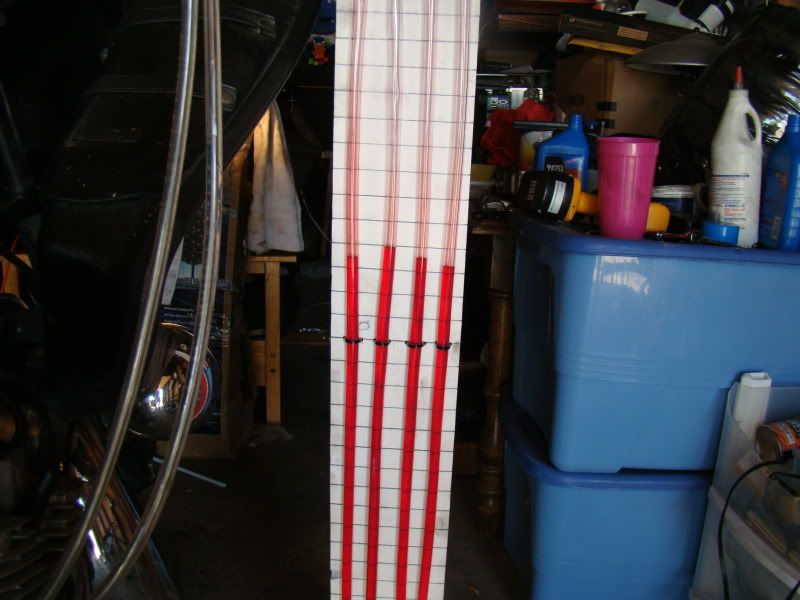
It is 4 half inch OD clear tubes, originally 4 feet, ultimately 7 feet, terminating into a common airtight reservoir, filled with ATF. I stepped the vacuum end down in size twice, once down to smaller vinyl tubing (about 5 feet worth, the "whips"), then down to the size of the vacuum line using a new female bullet connector to splice the 2 together, this also served as a good vacuum restictor! The bench sync was so far off (and i really thought it was very close!) that cyl one was drawing so much more vacuum, that i needed to extend the the tubes to compensate for the error. It didn't matter once I got them close, as you can see in the next 3 pics. These are three different adjustments (after getting them close), with the last one where i left it.

DSC02034.jpg

DSC02035.jpg


DSC02036.jpg
 
video

video

here is a quick video of it functioning...don't pay much attention to what i am saying, I thought i was finished, but I wasn't..The thing was very sensitive, a slight turn of the adjuster would make a big difference. You can see cyl one shoot up with just a litlle turn. Almost no intake pulse.
 
Congrats, how does it run now?
Much smoother through out the whole power range now, very noticeable difference. I wasn't really unhappy with the bench, it ran OK, but it was way off! Never assume that it is good enough with getting a vacuum sync on it!:D


Hey, special thanks to Bob (Baatfam) for donating the vacuum barbs!:D
 
Last edited:
Good job, I like it. It kinda reminds me of the old county fair game where you hit the base pad with a sledgehammer and try to ring the bell at the top. ;)


Yeah, I've learned myself that bench-syncing is essentially worthless. Every time I've rebuilt carbs, bench-synced them, then mounted and synced them properly, at least one, sometimes two cylinders have been WAY off of the two that were pretty close.

Home made manometer, vacuum gauges, mercury sticks, Morgan carb tune, it doesn't matter. You just need some objective method to compare intake vacuum levels, or your bike will never truly run right.
 
What type of fitting do you need to access the vacuum in the inlet rubbers and where can you get them? I got a Twinmax on Ebay but it had no adapters.
 
I second that question. The lowest price I've seen is about $8 each. That's a big step towards a Morgan Carbtune.
 
I've read about people drilling down through a socket head screw and epoxying a piece of brass tubing in the socket so a piece of tubing can be attached. Not sure what thread and pitch but the info is in the archives if you care to search.

BTW, great job CV. I love do-it-yourself projects.:)
 
Nice job. :clap:

Depending on the amount of fluid in your reservoir, you could probably lower the level to the bottom of the tubes, as long as the tubes are still immersed in fluid.
That would reduce your overall height of the manometer that much more.

Now, after it's all done (and, you say, worth it), just how much time to you figure you have invested in this project, including all the research, material acquisition and assembly?

How much do you value your time?

How do you plan to store your gauge until the next time you use it?

Do you think that overall, it was worth all the time (and its value) rather than $90 for a ready-made item (that is only about 18" long and won't leak)?

Please, expiring minds want to know. :D

.

Geeze Steve, some people don't want to spend $90 on something they can make themselves for $10, regardless of how much time they spend. And even if it costs more than $10, the satisfaction and knowledge people learn from DYI projects can not be calculated. This is the GSR, not some late model bike forum where people take their bikes in for oil changes.:D
 
Geeze Steve, some people don't want to spend $90 on something they can make themselves for $10, regardless of how much time they spend. And even if it costs more than $10, the satisfaction and knowledge people learn from DYI projects can not be calculated. This is the GSR, not some late model bike forum where people take their bikes in for oil changes.:D

:D...Either way, the end result is what matters. I've made things and had twice as much in them as I could have purchased them for, but it bought me precious time in the shop and at the end of the day, one can always say: "I did it my way". ;)

Nice job on the sync tool. A bench sync gets things close enough to get them running. The final set still needs to be done with the trans fluid...:p
 
Yeah, I've learned myself that bench-syncing is essentially worthless. Every time I've rebuilt carbs, bench-synced them, then mounted and synced them properly, at least one, sometimes two cylinders have been WAY off of the two that were pretty close.
Either you need more practice or I have been incredibly lucky. I have gotten them close, but you are right that it is not a substitute for a good vacuum sync.


I got a Twinmax on Ebay but it had no adapters.
Unless you have a twin-cylinder bike, the Twinmax is only marginally better than a single gauge and manifold. As C.V. mentioned, it's amazing to see how one small tweak of the screw affects them all.

.
 
Nice job. :clap:

Depending on the amount of fluid in your reservoir, you could probably lower the level to the bottom of the tubes, as long as the tubes are still immersed in fluid.
That would reduce your overall height of the manometer that much more.

Now, after it's all done (and, you say, worth it), just how much time to you figure you have invested in this project, including all the research, material acquisition and assembly?

How much do you value your time?

How do you plan to store your gauge until the next time you use it?

Do you think that overall, it was worth all the time (and its value) rather than $90 for a ready-made item (that is only about 18" long and won't leak)?

Please, expiring minds want to know. :D

.

From personal experience, I know that when you're between jobs, your time can be worth a lot less than than at other times, particularly when something costs the same as a week's worth of groceries.

Speaking of which, hey Victor, how's the job hunt going? Any more leads?
 
Here is the info if you want to make your own vacuum port adapters. You need the following:

Four 5mm x 0.8mm brass bolts about 30 mm long
Four 5mm x 0.8mm brass nuts
Four o-rings ID 5mm
Four 6-7mm metal pipe joiners (male both ends) also called barbs
A 5mm x .8mm tap
A 1.5mm drill bit
Thread locker

1) Cut the heads off the brass bolts so that you have four threaded pieces about 25mm long.
2) Use the 1.5 mm dril and drill a hole lengthwise through the shaft - use drill press if you have - keep this hole a small as you can, it helps with the dampening.
3)The metal couplers (barbs) are mostly brass with chrome plating. Use the tap to thread one end for about 8-10 mm deep.
4) Put a drop of threadlocker on the brass threaded part and screw into the coupler.
5) Put a drop of threadlocker on the thread (coupler side) and screw the nut in until about 8-10 mm of the thread sticks out.
6) Push a small o-ring up against the nut

You now have 4 vacuum take off connectors for your vacuum ports

You could also solder them together if you do not have a tap.
 
This is a simpler method to make your own port adapters...

1) take 5mm x .8mm screw and drill a 3/32" hole or so down center
2) using a larger bit, 13/64" or so, open up the socket head hex to match tubing
3) epoxy piece of 5mm OD tubing into hex (hobby stores sell tubing like this)
4) install O-ring onto threaded end

These photos show the screw. The tubing was not epoxied in place and there is no O-ring but I'm sure you guys can figure that part out.

IMG_1030.jpg

IMG_1032.jpg

IMG_1033.jpg
 
Last edited:
This is a simpler method to make your own port adaptors...

1) take 5mm x .8mm screw and drill hole down center
2) using a larger bit, 13/64" or so, open up the socket head hex to match tubing
3) epoxy piece of 5mm OD tubing into hex (hobby stores sell tubing like this)
4) install O-ring onto threaded end

These photos show the screw. The tubing was not epoxied in place and there is no O-ring but I'm sure you guys can figure that part out.

Hi Nessism,
Thats definitely an easier way and even allows for a finger grip if you can get the allan heads with the ridges! Have you made up the "special tool" to reach down to the screws and locknuts from the top yet.
Keep well.
 
Homemade Manometer is pretty darn cool in my book. homemade tools are always the best because you get the reward of knowing you won! would it be feasable to build another one alot smaller? if you want, i can measure everything on mine and send you these measurements and some pics. this would be a super weekend project for anyone who wants to check there sync from time to time and save some bucks and build it themselfs. it has been said," its never yours until you build it" i am pretty sure that goes for tools too. someone told me once along time ago if it wasnt for hillbillys and there contraptions nascar would have never been born. GOOD JOB! next is a static balancer and tire machine and a frame jig (all home made too) cliff
 
Hi Nessism,
Thats definitely an easier way and even allows for a finger grip if you can get the allan heads with the ridges! Have you made up the "special tool" to reach down to the screws and locknuts from the top yet.
Keep well.

You talking about on the carb linkage to sync them? If so, I bought one. Could have made one but was going though a weak moment...:o
 
Back
Top